


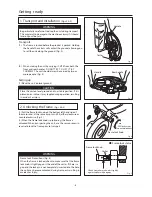


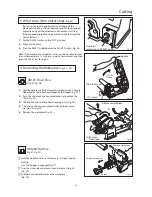


(1) Insert the plug into the outlet. (Fig 23)
A lways check to make sure that the ON/OFF switch is in the
"OFF" position before plugging in the unit. If the unit is plugged
in with the switch in the "ON" position, the unit will operate
unexpectedly, possibly resulting in accident or injury.
Do not wear gloves while operating the unit. T hey may become
caught in the moving parts, leading to accident or injury.
CAUTION
1. Cutting
(Figs. 23 - 25)
Cutting
(2) Hold the handle and lift the frame to its highest point and
release the stopper. (Fig. 23)
Immediately after being cut, the workpiece and blade will be very
hot. You may be burned if you touch them with bare hands.
CAUTION
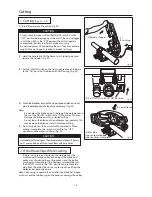
(4) When the blade has reached the proper speed of rotation, slowly
place the blade against the top of the workpiece. (Fig. 25)
Notes:
・
Do not place the blade against the top of the workpiece and
then set the ON/OFF switch to the "ON" position. This may
damage the blade or result in slanted cutting.
・
Do not lower the blade on the workpiece too suddenly. This
may damage the blade or result in slanted cutting.
(5) From this point on, the unit will cut automatically. When
cutting is complete, the switch will shift to the "OFF"
position and the motor will stop. (Fig. 25)
(3) Set the ON/OFF switch on the front right section of the base
to the "ON" position. The blade will start turning. (Fig. 24)
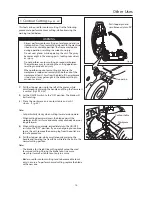
2. If the Blade Slips While Cutting
・
If there is oil, grease or similar on the workpiece or the
machine parts (blade, pulley or bearings), the blade and
pulley may slip during the cutting process and the pulley
may begin simply idling. If this happens, immediately turn
the ON/OFF switch to the "OFF" position and remove the
plug from the outlet. Then use a rag to wipe the oil from the
workpiece and machine parts.
Note: Continuing to operate the unit after the blade has slipped
may burn out the rubber ring on the pulley or damage the pulley.
(1)
Insert plug
(2) Release stopper
Fig. 23
Fig. 24
Fig. 25
(3) Set ON/OFF switch to "ON" position
(4) Lower frame
(5) Machine
stops automatically
when cutting is complete
- 12 -
Содержание MANTIS 120A
Страница 23: ...XB125 120 E4 0802R0200 S S ...