・
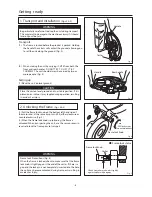
Be sure to unplug the unit from the power supply before changing the blade. If the unit is left plugged in,
it may start up unexpectedly, leading to injury.
・
Do not touch the blade directly with bare hands. This may result in injury. When changing the blade,
wear gloves and protective goggles.
WARNING
4. Changing the Blade
(Figs. 7 ~ 12)
Check to make sure the blade matches the material to be cut (see Page 5). If it does not, replace the blade.
When attaching new blades
(1) To prevent the blade from slipping, wipe away all rustproofing oil from the blade before attaching the blade.
Also wipe away any oil sticking to the pulley and bearings.
(2) New blades tend to be chipped easily or make slanted cuts, so be sure to perform trial cutting.
Trial cutting: set the load to Light (L) and make one or two cuts in a gas pipe measuring 50 A or larger.
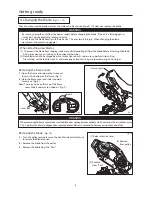
Removing the frame cover
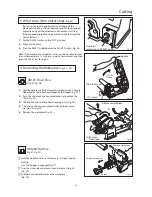
(1) Open the frame and release the two cover
locks on the bottom of the frame. (Fig. 7)
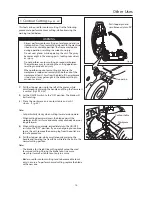
(2) Hold the frame cover and slide it upward
to remove. (Fig. 8)
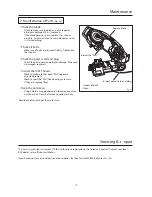
Note: There is a hook on the top of the frame
cover. Slide it upwards to unhook it. (Fig. 9)
When removing the frame cover, make sure the blade does not pop out unexpectedly which could result in accident or injury.
T his is particularly likely to happen when replacing broken blades, so remove the frame cover slowly and carefully.
WARNING
(3) Remove
from "SELI"
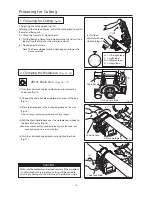
Removing the blade
(Fig. 10)
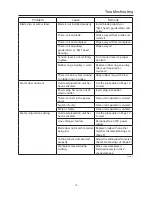
(1) Turn the pulley tension lever on the handle side anti-clockwise
to release the blade tension.
(2) Remove the blade from the pulley
.
(3) Remove the blade from the "SELI."
Getting r eady
Cover lock
Fig. 7
Fig. 9
Fig. 8
Fig. 10
Hook
Frame cover
(1) Release tension lever
(2) Remove
from pulley
- 8 -
Содержание MANTIS 120A
Страница 23: ...XB125 120 E4 0802R0200 S S ...


