background image


LabRAM I Installation and User Manual 

HMI Operation 

 Setup and Configuration 


Resodyn Acoustic Mixers 

48 

Rev. 072420 

9. 

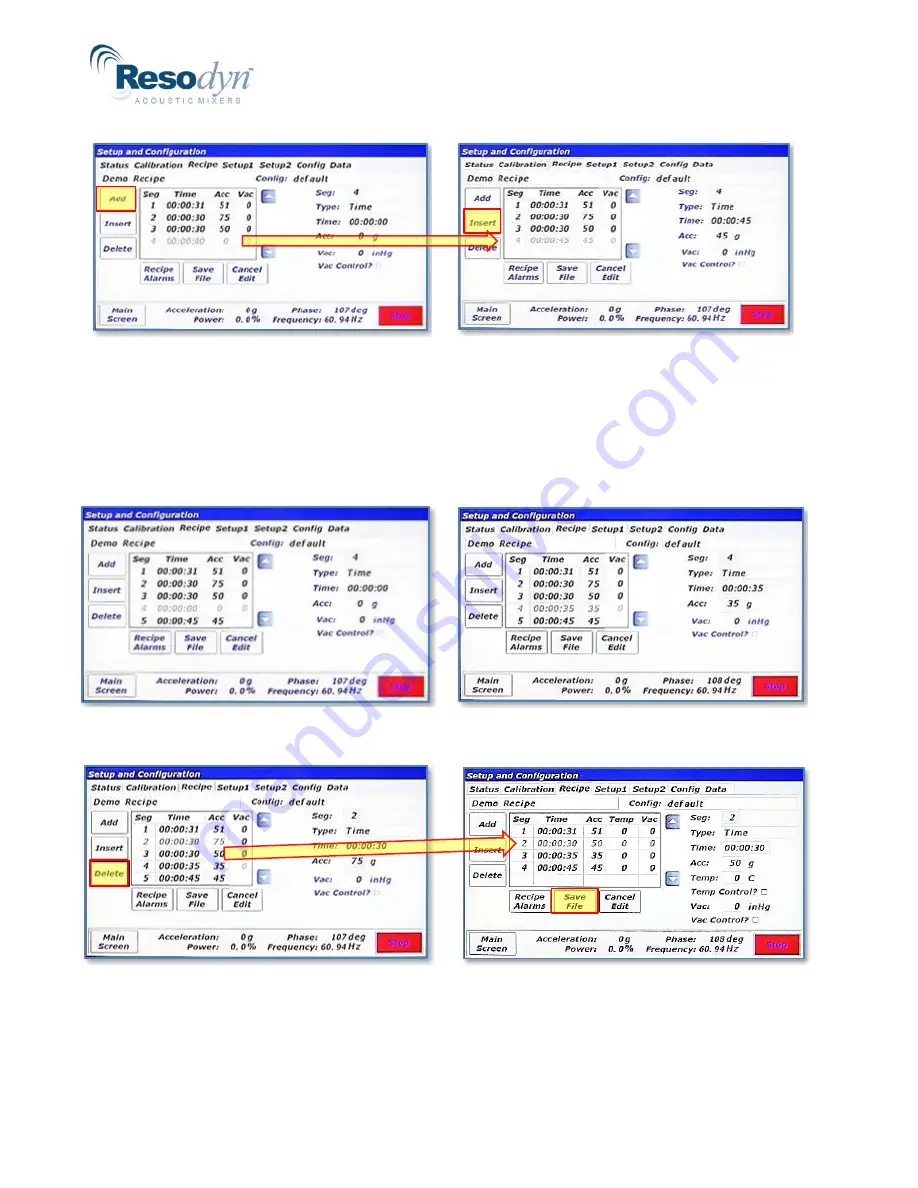
A new segment, segment 4, is now 

added to the end

 of this 

recipe. Using the methods previously described, this segment 
can be edited to have a time duration of 45 seconds and an 
acceleration setpoint of 45

g

, as shown on the following 

screen.  

10.  To add another segment between existing segments in the 

recipe, the <Insert> button will be used this time. 
  
Touch the <Insert> button to add another segment ahead of 
the selected segment. Since segment 4 is selected (light grey 
color), the new segment will become segment 4 and the old 
segment 4 will become segment 5, as shown in the next 
screen. 


NOTE:

 The selected segment is a lighter grey color than the other 

segments. To select a different segment, touch the desired 
segment in the table control. 

11.  To edit the contents of the new segment 4, use the methods 

previously described. This segment is edited to have a time 
duration of 35 seconds and an acceleration setpoint of 35

g

, as 

shown in the next screen. 

12.  The new segment 4 now has updated time and acceleration 

setpoint. Segment 2 will now be deleted. Touch the line that 
contains segment 2. 

13.  Segment 2 is now highlighted (light grey). Touch the   

<Delete> button on the left to delete segment 2. 

14.  The previous segment 2 is now deleted and the previous 

segments 3,4, and 5 are shifted up one position. To complete 
this recipe edit, touch the <Save File> button. 

Содержание LabRAM I

Страница 1: ...Resodyn Acoustic Mixers 130 N Main Street Butte MT 59701 USA 1 406 497 5333 ResodynMixers com LabRAM I Installation and User Manual...

Страница 2: ...Using the Retractable Handles 12 4 3 Mounting 12 4 4 Lid Operation 13 4 5 Remove the Shipping Lock Bar 14 4 6 Install Vessel Holder Assembly 15 4 7 Electrical Connections 17 5 Technical Support 17 6...

Страница 3: ...n Alarms 41 12 1 Screen Operations Alarms 41 13 HMI Operation Viewer 42 13 1 Screen Operations Viewer 42 14 HMI Operation Setup and Configuration 44 14 1 Status Tab 45 14 2 Calibration Tab 45 14 3 Rec...

Страница 4: ...t of Serviceable Parts 63 15 5 1 Fuse Replacement 63 15 5 2 Bellows Replacement 64 15 5 3 Accelerometer Replacement 64 16 Troubleshooting and Service 65 Revision History Periodically as required this...

Страница 5: ...ation For use in non hazardous environments as classified by the United States National Electrical Code NEC 1 2 Warnings and Cautions Throughout the manual the following symbols are used to identify w...

Страница 6: ...designed with components that are specifically rated for use with the LabRAM I machine Replace worn or damaged components only with factory replacement parts or parts approved by Resodyn Acoustic Mixe...

Страница 7: ...nd moving the LabRAM I to avoid striking other objects There is 1 38 mm clearance under the LabRAM I This space allows clearance for fingers and for the retractable handles to be securely positioned u...

Страница 8: ...uses the standard gravity symbol g defined as 9 81 meters per second squared Acceleration is generated by the vertical motion of the mixing processing vessel configured in a RAM machine This vertical...

Страница 9: ...effects on different materials that are being processed In addition to the vessel acceleration g other salient factors that affect the mixing and or processing performance include pressure inside of t...

Страница 10: ...d space above the mixing media in the vessel that is not occupied Impedance See Damping above Mix Media The material inside the mixing vessel Mixing Power The amount of power being delivered by the RA...

Страница 11: ...lide the packaging box sleeve up and over the LabRAM I The LabRAM I should be the only remaining item resting on cushioning bags in a corrugated tray on the shipping pallet Make sure to remove any loo...

Страница 12: ...is attained before using the mixer 4 Check for any blockage below the machine if the handles do not smoothly slide to their locked storage position 4 3 Mounting The LabRAM I should be installed on a...

Страница 13: ...the lid until the lower edge of the lid bracket has cleared the upper edge of the latch and then release the latch Check to confirm the latch is securely engaged NOTE The lid is equipped with a Safety...

Страница 14: ...3 16 Hex Key from its shipping bag attached to the Warning Label Use the Hex Key to remove the two 20 Socket Head Cap Screws securing the Lock Bar 2 Lift the Lock Bar off the platform and retain it a...

Страница 15: ...for installation or if reassembly or vessel holder movement is needed in the future 3 Make sure the long 20 socket head cap screws are positioned properly throughout the overall Vessel Holder assembl...

Страница 16: ...4 to mount the Vessel Holder to the LabRAM I Never use the mounting holes for mounting any other equipment to the LabRAM I Never use other screw locations on the Payload or Cancellation Plates see Fi...

Страница 17: ...appears to be malfunctioning please do not hesitate to contact Resodyn Acoustic Mixers You may contact your customer service representative directly or utilize the general contact information provided...

Страница 18: ...emperature Monitoring 1 RTD monitored and recorded optional Automatic Programmable Vacuum Yes optional Data Logging Yes Computerized Operator Interface HMI Yes Weight 180 lb 82 kg plus vessel holder f...

Страница 19: ...werful yet quiet operation Features include an adjustable Vessel Holder Safety Interlocked Lift Assisted Lid with viewing window and a Touch Screen Human Machine Interface HMI Optional features includ...

Страница 20: ...ta entry and operations are provided through software keypads and buttons on the screen The touch screen and operating system are described in detail in Section 9 HMI Human Machine Interface Overview...

Страница 21: ...nd prevents the vessel from moving laterally during mixing The Jam Nut is critical for locking the vessel in place When lightly tightened against the top of the Cross Bar the Jam Nut prevents the Hold...

Страница 22: ...ser to develop optimal processing characteristics that can be integrated with processing recipes Automatic Vacuum System Enables the user to control the pressure inside the Mixing Vessel Pressure can...

Страница 23: ...ce at 1 406 497 5333 for a replacement 2 Turn the Hold Down Knob clockwise until the Mixing Vessel is securely positioned in the center of the Resonator platform 3 Tighten the Jam Nut against the Cros...

Страница 24: ...Mode in the title bar and will be referred to as the Main Screen throughout this Manual 8 3 Login Before running the LabRAM I a user login is required For the example the lowest or most restricted le...

Страница 25: ...uch the Select Recipe button The Select Recipe screen is displayed 2 Touch the line that displays Demo Recipe Group This will expand the Demo Recipe Group and show the recipe s contained in that group...

Страница 26: ...ne to be performed e g Batch 123 or Test 1 Use the keypad to enter mix comment 3 After touching the OK button on the Enter Mix Comment screen the accelerating mixing will begin and the Main Screen wil...

Страница 27: ...Recipe Status Bar See Section 9 1 Main Screen for Status Bar location reads Status Ready the mixer s Lid can be opened and the Mixing Vessel can be removed 1 Open the Lid 2 Loosen the Jam Nut 3 Loosen...

Страница 28: ...will vary depending on operating mode Recipe or Auto and machine operation status The basic sections of the Main Screen are illustrated and described below Title Bar Displays mode and the firmware ver...

Страница 29: ...ry mode for operators while Auto Mode is used by advanced users to characterize a mixing process for eventual recipe programming Level 0 Operator Level can be locked out of Auto mode The Mode button i...

Страница 30: ...operated the mixer the system incorporates a user authentication system Users are required to enter a username and password before operating the mixer If the machine is not running and no user intera...

Страница 31: ...the textbox beneath Username 3 Using the keypad enter supervisor for the username Touch the OK button when finished 4 The Login screen will reappear and supervisor will be visible in the Username text...

Страница 32: ...ogin is unsuccessful a dialog box will be displayed notifying the user lower image above Touch OK to try again 8 To logout simply touch the Login Logout button again A confirmation dialog box will app...

Страница 33: ...as already logged in to the system See Section 10 Detailed HMI Operation Security and Login for login instructions 3 The main screen is displayed and the Start Mixer button will be visible while the R...

Страница 34: ...the currently executing segment total segments and remaining time on the current segment acceleration setpoint temperature setpoint and vacuum setpoint NOTE If not equipped with temperature or vacuum...

Страница 35: ...or stopping can be corrected The LabRAM I can then be restarted by touching the Start Mixer button 10 The Enter Mix Comment screen will appear again Enter a fitting description Touch OK when finished...

Страница 36: ...Mode 3 Touch the OK button to close the Mode Select dialog 4 The Main Screen will appear but will look differently in Auto Mode than it did in Recipe Mode The Controls Pane now has three textboxes th...

Страница 37: ...ric keypad will appear Enter the new setpoint value and touch the Enter button to close the keypad 7 The newly entered setpoint will now appear in the textbox Touch the Done button to close the Accele...

Страница 38: ...on Name 10 The Select Configuration dialog will appear and the Configuration can be selected from the list only one configuration is defined in the image Touch OK after the configuration has been sele...

Страница 39: ...a mix cycle in Auto Mode 17 The Enter Mix Comment screen will appear Enter a fitting description of the current mix The text entered in this screen is stored in a log file in the LabRAM I s memory Tou...

Страница 40: ...button If the Reset button is pressed it will reload the timer to the initial value 20 When the timer expires the LabRAM I will stop accelerating mixing If the Auto Mode timer is set to the manual op...

Страница 41: ...er Whenever an alarm is triggered acknowledged or recovered a log file in the LabRAM I s memory is updated The alarm logs can be uploaded to a computer through a USB connection See Section 13 8 Data T...

Страница 42: ...peration Viewer The LabRAM I measures several parameters important to mixing efficiency These measured parameters can be viewed in real time as time history plots To view real time plots touch the Vie...

Страница 43: ...ase Y Axis 4 The smaller power can now be examined more closely To focus on a specific parameter of interest paring down other visible parameters touch the Select Trend button 5 The Select Trend Plot...

Страница 44: ...iguration screen is laid out in a tabbed format similar to many modern web browsers Touching a tab title will switch between tabs Tabs are visible based on the user s login level The table to the righ...

Страница 45: ...andards and procedures to calibrate the accelerometer Accelerometer calibration should be performed annually Vacuum and temperature can be calibrated with any standard systems used for that purpose 14...

Страница 46: ...uching the recipe name an arrow will appear indicating that the recipe has been selected To view edit the contents of this recipe touch the Edit Recipe button NOTE The buttons on both sides are now en...

Страница 47: ...tion setpoint from 50g to 51g touch textbox next to Acc 7 The Acceleration Recipe Entry dialog will appear Use this dialog entry the same as the Auto Mode acceleration entry Touch the textbox and ente...

Страница 48: ...the old segment 4 will become segment 5 as shown in the next screen NOTE The selected segment is a lighter grey color than the other segments To select a different segment touch the desired segment in...

Страница 49: ...portion of Section 14 3 1 Screen Operations Edit an Existing Recipe The following section continues to assume Log In as a Supervisor 14 3 2 Screen Operations Create New Rename and Delete The following...

Страница 50: ...d in a later section Touch OK 6 When a new recipe is created a default name is given to the recipe Also a blank segment 1 is automatically added To change the name touch the textbox in the top lefthan...

Страница 51: ...button without editing the empty segment 1 11 The Bad Recipe Segment dialog will appear and it specifies that something is wrong with the definition of segment 1 The time for segment 1 is 00 00 00 whi...

Страница 52: ...on the Recipe Delete Confirmation dialog to delete the recipe 18 Selecting new group again will confirm that the recipe is deleted Recipe Groups are also renamed and deleted from this screen The proce...

Страница 53: ...nstallation and User Manual HMI Operation Setup and Configuration Resodyn Acoustic Mixers 53 Rev 072420 21 Confirm deletion by touching Yes in the Group Delete Confirmation dialog 22 The group has bee...

Страница 54: ...al setpoint 14 4 2 Machine Options Group Box If a LabRAM I user decides to enable features after initial purchase a keycode must first be entered to turn those features on The Machine Options Group Bo...

Страница 55: ...checkbox is checked Level 0 Operator is allowed to operate the LabRAM I in Auto Mode Clear Mix Comment By default the previous Mix Log Comment is retained between a LabRAM I shut down and re start Thi...

Страница 56: ...New User dialog appears Touch the Username textbox to enter a new username 4 Enter the new username and password using the same method as initial login and set the login level number according to the...

Страница 57: ...ystem date and time The entire date and time must be set for the update to work correctly The date is entered in YYYY MM DD format and time is entered in 24 hour format i e HH MM SS Touch Enter when c...

Страница 58: ...rature alarming would be active and the temperature would read 0 Turn on temperature 1 by touching it NOTE The default configuration cannot be deleted but it can be modified 4 Temperature 1 is now che...

Страница 59: ...If the system has more than one fixture defined the and buttons scroll through all of the fixture files Touch Done 14 7 2 Screen Operations Create a Configuration The following details the creation o...

Страница 60: ...urations are used for both Recipe and Auto Mode In Recipe Mode the Configuration is selected as soon as a new recipe is created or by touching the textbox next to Config Refer to the following illustr...

Страница 61: ...nt start stop time operational mode recipe name if in recipe mode are all written to the Mix Log files Login Logs Every successful and unsuccessful login attempt is written to a login log file It is t...

Страница 62: ...sive cloth and water with slight additives of neutral washing agents pH 5 8 Greasy or oily substances may be removed by rubbing with a cloth wetted with isopropyl alcohol IPA or white spirits that are...

Страница 63: ...Part Number Quantity Accelerometer Integrated Cable Assembly 904132 1 Bellows Replacement Kit 904131 1 Fuses 6 3 A Time Lag For 100 120 VAC 004481 2 Fuses 3A Time Lag For 200 240 VAC 003059 2 Note onl...

Страница 64: ...han 2000 hours with proper maintenance Should a replacement be required instructions are provided with the replacement parts 15 5 3 Accelerometer Replacement The LabRAM I is equipped with an accelerom...

Страница 65: ...d into the mixer and a wall outlet Ensure that the power switch located on the back of the machine above power cord socket is in the on position I Check breaker to ensure that the electrical socket is...

Страница 66: ...r accelerometer has failed Incorrect user limit Accelerometer and cable assembly must be replaced Verify user limits are correct Fixture Limit High Temp or Fixture Limit Low Temp or User Limit High Te...

Страница 67: ...LabRAM I Installation and User Manual 130 N Main St Suite 630 Butte MT 59701 USA 1 406 497 5333 ResodynMixers com Rev 1 0 072420...

Отзывы: