background image

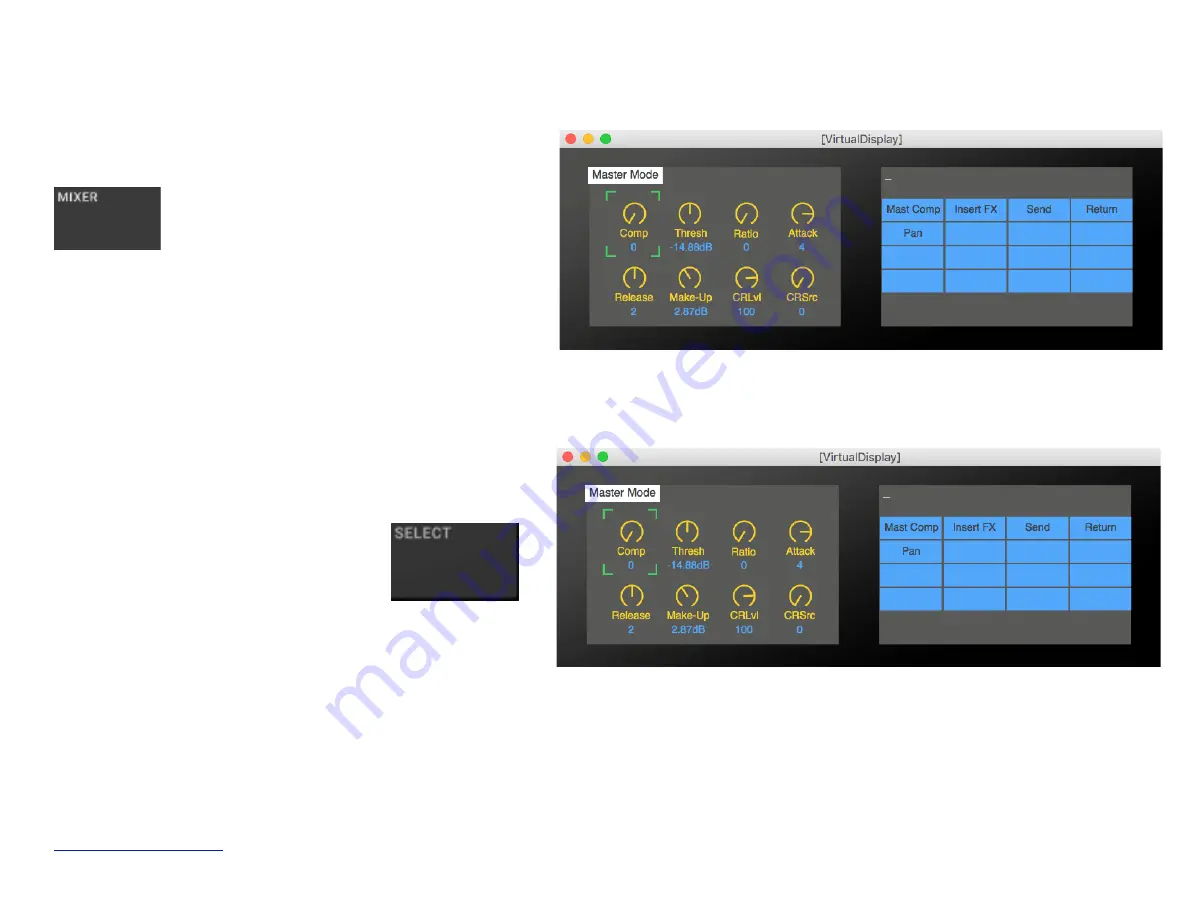
C. Controlling the Master Section 
 

www.retouchcontrol.com

                                                       Maschine

R

 - Getting Started Guide


40

Keep  pressing  the  “

Mixer

”  button  until  the 

“Master  Mode”  screen  appears  on  the  virtual 
display.  The  master  compressor  parameter 
bank is selected by default.

+

To  change  to  another  parameter  bank, 
press  the  “

Select

”  button  and  hit  pads 

9, 13, 14, 15 

or 

16

Содержание MaschineRMikroMK3

Страница 1: ...MaschineRMikroMK3 control solution for Reason Getting Started Guide version 1 0 0 www retouchcontrol com MaschineR Getting Started Guide 1 ...

Страница 2: ...ing Control Surfaces in Reason s Preferences 11 Step 6 Locking MikroMK3Mixer control surface to the Master Section 12 2 Overview 13 3 Using the data wheel with the virtual display 16 4 Controlling the Sequencer 18 A Selecting a device and changing patches 18 B Changing Playhead Loop Points and Tempo 19 C Transport Controls 20 D Sequencer key commands 22 E Events editing 24 5 Controlling Devices 25...

Страница 3: ...ling other devices Synths Samplers FXs REs and VSTs 34 6 Controlling the Mixer 37 A Controlling Mixer Volumes and Pans 37 B Controlling the Channel Strip 39 C Controlling the Master Section 40 8 Other Controls 41 A Chords 41 B Note Repeat Fixed Velocity 43 C Using the TouchStrip 44 D Browser 45 E Sampling 46 F Other Keycommands 46 9 Song navigation via Session Mode 47 Appendix A 49 www retouchcont...

Страница 4: ...Appendix B 50 www retouchcontrol com MaschineR Getting Started Guide 4 ...

Страница 5: ...chsen de software loopmidi html For video instructions please refer to this video HERE 1 Go to the LoopMIDI website download and install it 2 Launch the LoopMIDI application Follow the example below to create the MIDI ports 3 Create 2 MIDI ports from MaschineRMikroMK3 1 and to MaschineRMikroMK3 1 www retouchcontrol com MaschineR Getting Started Guide 5 1 Enter port name here 2 Click o the to creat...

Страница 6: ...ease refer to this video HERE www retouchcontrol com MaschineR Getting Started Guide 6 Step 1 On your Mac go to the Applications folders then open the Utilities folder and launch the Audio MIDI Setup application Then from the Window menu choose Show MIDI Studio Step 2 Double click on the IAC icon to open the set up screen ...

Страница 7: ...touchcontrol com MaschineR Getting Started Guide 7 Step 3 a keep the device name empty b click on the sign to create 2 ports and and give them the following names MikroMK3_IN MikroMK3_OUT c click on Apply a b ...

Страница 8: ...ing directories on your HD macOS Macintosh HD Library Application Support Propellerhead Software Remote Codecs Lua Codecs Macintosh HD Library Application Support Propellerhead Software Remote Maps Windows choose to create directory when the installer prompts you C ProgramData Propellerhead Software Remote Codecs Lua Codecs C ProgramData Propellerhead Software Remote Maps www retouchcontrol com Ma...

Страница 9: ...Go to File and select Open Template Now navigate to the download and go to the Template folder In there you will find MaschineRMikroMK3 ncmm3 Open it and it will load on your device This is the template you will be using with MaschineR www retouchcontrol com MaschineR Getting Started Guide 9 Open Template in Controller Editor ...

Страница 10: ... on the file called MaschineRMikroMK3 drag this file on the dock for easier launching If you are on Windows double click on the file named MaschineRMikroMK3 exe pin it to the desktop for easier launching After launching the application it will look like the images below www retouchcontrol com MaschineR Getting Started Guide 10 MaschineR app on Mac MaschineR app on Win with LoopMIDI ...

Страница 11: ...that you need to create These are MikroMK3Devices MikroMK3Transport and MikroMK3Mixer Add MikroMK3Transport first and make it the master keyboard When you add the second control surface Reason will issue a warning in the form of a yellow triangle Simply ignore it as it won t affect anything This is Reason telling you that more than one control surface are using the same MIDI ports www retouchcontr...

Страница 12: ...er If you now save your song as a template the locking will be remembered by Reason every time you create a new song so you won t have to repeat the last step every time you open a document That s it you are done and ready to use MaschineRMikroMK3 Read on to find out all the neat things that you can do with it www retouchcontrol com MaschineR Getting Started Guide 12 Lock MikroMK3Mixer to the Mast...

Страница 13: ...pters 3 Transport Controls general transport controls for the Reason sequencer Additional functions can be accessed with the Native button These are described in the Controlling the Sequencer chapter 4 Data Wheel Modes the data wheel has several functions from adjusting device parameters to moving the playhead selecting tracks etc These are described in the Using the Data Wheel with the virtual LC...

Страница 14: ...Overview of Navigation Controls www retouchcontrol com MaschineR Getting Started Guide 14 ...

Страница 15: ...Overview of the Note and CC mappings www retouchcontrol com MaschineR Getting Started Guide 15 ...

Страница 16: ... retouchcontrol com MaschineR Getting Started Guide 16 Press the Star button to open close the virtual display The display will stay on top of Reason so you can keep working in the program and still be able to see it Press the Native button and touch the data wheel to enable control A green highlight rectangle will appear around the parameter selected for control Now if you turn the data wheel the...

Страница 17: ...l device parameters There is Keyboard Mode to set the scale and root the playing octave range the fixed velocity and note repeat values and to program chords using the chord tool And finally there is Session Mode to move to different song sections in the sequencer www retouchcontrol com MaschineR Getting Started Guide 17 To select another parameter for control press the Select button and move the ...

Страница 18: ...ed Guide 18 Prev Track Open the virtual display then press the Swing button to open Track Mode Make sure the Track field is selected and active with the green highlight rectangle around it Now you can turn the data wheel to move to the desired device in the sequencer Similarly for the patch of the selected device Next Track Prev Patch Next Patch Press the Variation button The pads will change colo...

Страница 19: ...ta wheel www retouchcontrol com MaschineR Getting Started Guide 19 Press the Select button and turn the data wheel to move the green highlight rectangle to the desired parameter Then release the Select button and turn the data wheel to adjust the parameter You can scroll the playhead position change the Left and Right loop locators and the song Tempo in bpm ...

Страница 20: ...u are controlling the Maschine software in Reason you can control the Reason transport even when the device is not in MIDI mode There is a caveat Host Transport Control takes over the Erase and Tap buttons which no longer function in the Maschine software If you d rather have that not to happen you need to disable Host Transport Control in the MaschineR template by editing it in the Controller Edi...

Страница 21: ...o restart playback from the beginning of the song Use Native Restart to turn the Loop On and Off Use Variation Restart to start looping the current selection P key command Erase use the Erase button to execute the Cancel key command Use Native Erase to execute the Delete key command Tap use the Tap button to tap in a song tempo Use Native Tap to turn on off the metronome Follow use the Follow butt...

Страница 22: ...ason sequencer and these are illustrated below www retouchcontrol com MaschineR Getting Started Guide 22 When in Track Mode press the Select button and hit pads 1 to 16 to execute the key commands shown here When in Track Mode Device Mode and Mixer Mode press the Native button and hit pads 1 to 16 to execute the key commands shown here ...

Страница 23: ...www retouchcontrol com MaschineR Getting Started Guide 23 Horizontal ZOOM Vertical ZOOM ...

Страница 24: ...r turn the data wheel to select single midi notes in the clip Press Select then turn the wheel to select multiple contiguous midi notes in the clip 2 with midi note s selected in the sequencer press the Native button then turn the wheel to shift the notes back or forth along the timeline by ticks fine adjustment Press the Native button Events to activate editing function for the data wheel When th...

Страница 25: ... VSTs At the time of writing all native devices are mapped along with several hundreds Rack Extensions and a growing list of commonly used VSTs For a given device there are up to 24 banks of 8 controls each www retouchcontrol com MaschineR Getting Started Guide 25 With the virtual display open press the PlugIN button to open Device Mode The parameters for the selected bank are shown on the left si...

Страница 26: ...first 16 banks of controls Once a bank is selected its name is shown at the top next to Selected Bank Press the Select button followed by the Duplicate button and hit pads 9 thru 16 to access the remaining 8 banks of controls To change the volume of the selected device keep pressed the PlugIn button and rotate the wheel ...

Страница 27: ...data wheel to adjust the selected control If the control is of the On Off type like a button instead of turning the wheel click it by pressing on it and use it like a button To use the touchstrip to adjust the selected parameter first press on the Perform button and make sure it is lit You ll see the touch strip led adjust to the position of the selected parameter You can then slide your finger to...

Страница 28: ...e this mode to play the Kong pads As you hit a pad the pad s LED turns yellow to show that the pad was hit The light feedback is bidirectional so if you play a pad from the software it will be reflected on the hardware as well Step Mode 16 velocity levels use this mode to play the selected pad see below how to select a pad at 16 velocity levels Pad 1 corresponds to the lowest velocity level while ...

Страница 29: ...e LEDs turn green for pads which are soloed Mute Mode use this mode to mute pads The LEDs turn red for pads which are soloed Select Pads to select a specific pad for parameters control 16 velocity mode or group assignment mode press Select then hit the pad of interest Device Mode with Kong selected ...

Страница 30: ...pad s LED turns white to show that the pad was hit The light feedback is bidirectional so if you play a drum from the software it will be reflected on the hardware as well Step Mode use this mode to program a beat using the step sequencer The virtual display updates to show the relative parameters in Device Mode You can edit up to 16 steps at a time for the selected drum To select a drum for editi...

Страница 31: ...ru 8 while the bottom 4 pads represent the 4 available pattern banks A B C and D Solo Mode use this mode to solo pads The LEDs turn green for pads which are soloed Mute Mode use this mode to mute pads The LEDs turn red for pads which are soloed Select Pads to select a specific channel for parameters control sampling or step sequencer mode press Select then hit the pad of interest ...

Страница 32: ... the loop parameters using the data wheel and the parameter names and values are displayed on the virtual display in Device Mode www retouchcontrol com MaschineR Getting Started Guide 32 Step Mode use this mode to play the next 16 slices of the selected loop using the pads Pattern Mode use this mode to change which loop is playing You can use Pad 9 to stop the currently playing loop STOP Pad Mode ...

Страница 33: ...www retouchcontrol com MaschineR Getting Started Guide 33 Device Mode with Dr Octorex selected ...

Страница 34: ...aschineR Getting Started Guide 34 Pad Mode use this mode to play the selected device By default the pads are arranged chromatically starting from C on pad 1 The root notes are displayed in light blue while the other notes are displayed in light grey Keyboard with Pad Mode engaged use the Keyboard button to enter the keyboard settings screen From here you can change the scale and key the octave and...

Страница 35: ... is to use the Variation button as shown below www retouchcontrol com MaschineR Getting Started Guide 35 Semi Press the Variation button The pads will change color as shown on the side Use pads 13 and 14 to change semitones Use pads 15 and 16 to change octave Semi Oct Oct ...

Страница 36: ...chord Chords can be programmed on pad 1 thru pad 12 From the Keyboard Mode screen you can choose what chord to assign for each pad For more info on programming chords please refer to the Chords section in the Other Controls chapter Step Mode this mode is useful for controlling certain devices like Thor s step sequencer gates or Matrix patterns Chord programming screen ...

Страница 37: ...rolling the Master Section Each mode has a corresponding representation on the virtual display and it is accessed by pressing the Mixer button until the proper screen appears A Controlling Mixer Volumes and Pans www retouchcontrol com MaschineR Getting Started Guide 37 Mixer press the Mixer button until you access control of channel volumes You can use the data wheel or the touch strip to control ...

Страница 38: ... right by 1 channel respectively In Volume and Pans Mode you can mute or solo the 8 channels currently selected by using the pads To mute press the Mute button and hit the pad corresponding to the desired channel pad 1 corresponds to the 1st channel under control When a channel is muted the pad turns red Press the Solo button and hit the pad corresponding to the desired channel to solo it When a c...

Страница 39: ...e name of the currently selected channel is displayed in the upper left corner of the right display To change to another parameter bank press the Select button and hit pads 9 to 16 shown in green To change which channel is selected for editing press Select and hit pads 1 or 2 to advance by one channel to the left or the right respectively To advance by 8 channels hits pads 3 or 4 to move to the le...

Страница 40: ... Getting Started Guide 40 Keep pressing the Mixer button until the Master Mode screen appears on the virtual display The master compressor parameter bank is selected by default To change to another parameter bank press the Select button and hit pads 9 13 14 15 or 16 ...

Страница 41: ...hords button To program chords or load pre programmed chordsets please use the Keyboard Mode screen from the virtual display and follow the commands there more info below www retouchcontrol com MaschineR Getting Started Guide 41 Press the Keyboard button to access the controls for programming the chord tool which you can find on the right side of the screen as shown here Press the Chords button to...

Страница 42: ...t rectangle is just under the Chord Type field You can then rotate the wheel to select a specific chord type for the selected pad ChordSets once you have several chords programmed on a few pads you can save them in a chord set to be used at a later time and Press Save to save the programmed chords to a file Press Open to open an existing chord set on your computer Press Load to load the chord set ...

Страница 43: ...eat just press the button To change the repeat rates open the Keyboard Mode screen select Repeat Rate and turn the wheel to adjust to the desired value Fixed Velocity press the button to turn it on To change the fixed velocity setting press the Keyboard button then use the data wheel to first select the Fixed Velocity field and then turn the data wheel to change the fixed velocity amount ...

Страница 44: ...de the touch strip can be used to control any currently mapped parameter which has the green rectangle highlight around it This only words in Device Mode and in all Mixer Modes Volume Pans Channel Master Section Notes in this mode the touch strip can be used to change the repeat rate if Note Repeat is turned on see the next chapter for more info on Note Repeat The middle position on the strip corr...

Страница 45: ... for the data wheel In this mode rotating left will execute the up keycommand while rotating right will execute the down keycommand This is useful for navigating the browser screen when it has focus especially when selecting devices effects or patches Once you have a device an effect or a patch selected and highlighted in the browser press on the the data wheel to create the device the effect or t...

Страница 46: ...n choose the channel to sample in by pressing Select and then hitting the pad corresponding to the channel press the Variation button keep it pressed and then press the Duplicate button to access the up down left right and enter key commands via the pads Up Down Left Right Enter press the Duplicate button to duplicate the currently selected device track sequencer clip or notes basically anything t...

Страница 47: ...s assigned to that pad www retouchcontrol com MaschineR Getting Started Guide 47 Keep pressed the Native button then press the Scene button to enter Session mode The virtual LCD updates to show the Session mode view To exit Session mode keep pressed the Native button then press the Scene button again Please note you have while the sequencer is running select a pad to move the left loop locator to ...

Страница 48: ...ign a different location to a pad select it first by pressing it Make sure the Location in Bars field has the green highlight rectangle by enabling the control press the Native button and touch the data wheel Then rotate the data wheel to assign a different location ...

Страница 49: ...are loopmidi html 2 Go to the text field on the bottom right and type from MaschineRMikroMK3 1 Then press the sign on the bottom left side 3 Go again to the text field on the bottom right and type to MaschineRMikroMK3 1 Then press the sign on the bottom left side www retouchcontrol com MaschineR Getting Started Guide 49 ...

Страница 50: ...va Runtime from Oracle This is needed to execute the key commands functions Follow this link to get the download https www oracle com technetwork java javase downloads jre8 downloads 2133155 html After installing the Runtime please restart your computer www retouchcontrol com MaschineR Getting Started Guide 50 ...

Отзывы: