background image

Operator Manual

Raytheon Anschütz GmbH

Germany

R

SYNAPSIS ECDIS

8--23

4343DOC020102

Edition: November 2019

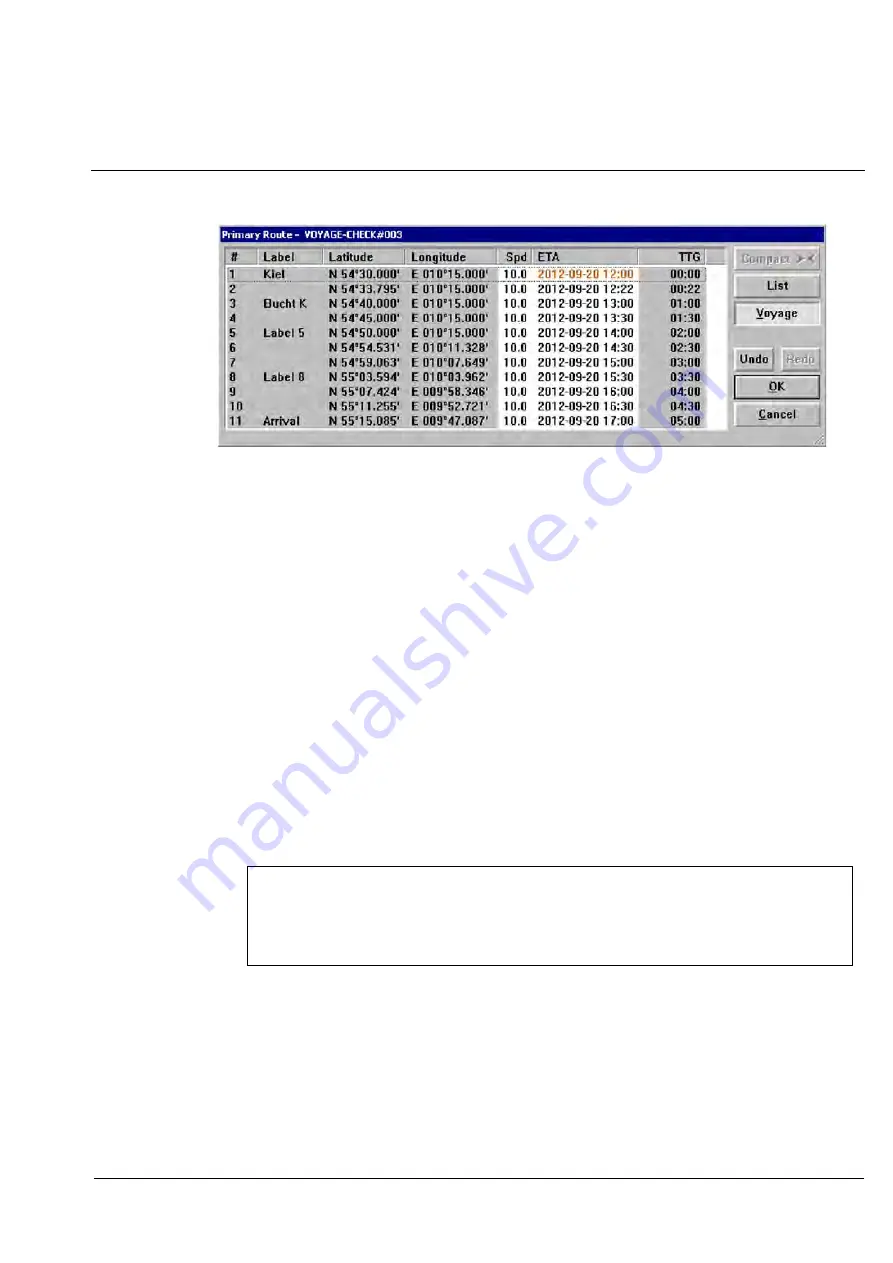
Figure: 8--13 Voyage Mode Layout

To set and fix a speed or ETA value, double--click the field in the waypoint list
and enter the desired value, other dependent speed and ETA values will be
recalculated.

To remove a speed or ETA fix, press the right button on a waypoint and
select

Remove... fix for Selected Waypoint

(see chapter 8.2.1.2

(13)

).

To

list

the current voyage click List button. The list dialog is shown

(Figure: 8--14) with applied voyage filter (all or fixed ETA’s only). Fixed speed
and ETA values are marked with an appended ’F’ character. At all time,
options are shown with TTG, Total Time and Time on Leg columns.

NOTE

Time on Leg is never shown when the filter ’fixed ETA’s only’ is
activated.

Содержание SYNAPSIS ECDIS

Страница 1: ...bH Postfach 1166 D 24100 Kiel Germany Tel 49 4 31 30 19 0 Fax 49 4 31 30 19 501 Email Service raykiel com www raytheon anschuetz de 4343 DOC012 Edition November 2019 SYNAPSIS ECDIS OPERATOR MANUAL Version E02 00 or higher ...

Страница 2: ...attet Zuwiderhandlungen verpflichten zu Schadensersatz Änderungen dieses Dokuments und dessen Inhalt bleiben vorbehalten Version 12 2013 This document and its content are copyright protected Distribution reproduction and storage as well as translation and exploitation of this document and its content in whole or in parts and regardless of what form are prohibited without prior express written perm...

Страница 3: ...attet Zuwiderhandlungen verpflichten zu Schadensersatz Änderungen dieses Dokuments und dessen Inhalt bleiben vorbehalten Version 12 2013 This document and its content are copyright protected Distribution reproduction and storage as well as translation and exploitation of this document and its content in whole or in parts and regardless of what form are prohibited without prior express written perm...

Страница 4: ...n 2 2 2 1 1 Starting the ECDIS 2 2 2 1 2 Terminating the ECDIS 2 2 2 1 3 How to Use the Cursor 2 3 2 1 4 Operator Panel 2 4 2 1 5 ASCII Keyboard Techniques Option 2 7 2 1 5 1 Shortcuts 2 7 2 2 Menu Bar 2 7 2 2 1 Menu Conventions 2 8 2 3 Using the Windows and Dialog Boxes 2 9 2 3 1 Closing a Menu 2 9 2 3 2 Using Dialog Boxes 2 9 2 3 3 Command Buttons 2 9 2 3 4 Latitude Longitude Boxes 2 10 2 3 4 1 ...

Страница 5: ...t Area 2 28 2 9 1 Chart Boundaries 2 28 2 9 1 1 ENC C MAP93 3 2 29 2 9 1 2 Track Plotter 2 30 2 10 MFC Switch Option 2 31 2 10 1 Using the MFC Switch 2 31 2 10 1 1 Changing Display Colors 2 33 3 Main Menu 3 1 3 1 Main Menu Commands 3 1 3 1 1 Print Setup 3 2 3 1 2 Print 3 2 3 1 3 Screenshot 3 3 3 1 4 Exit 3 5 4 Chart Menu 4 1 4 1 Chart Menu Commands 4 1 4 2 Goto ARCS Or Goto ENC 4 3 4 3 Info Select...

Страница 6: ...d License from File 4 26 4 4 7 Select License Order Manually 4 28 4 5 License Administration for IHO S63 License 4 30 4 5 1 User Permit 4 30 4 5 2 Licenses List 4 31 4 5 3 Add Licenses from File 4 32 4 5 4 Product List 4 33 4 5 5 Import Product List 4 34 4 5 6 Certificate SA Public Key 4 35 4 6 License Administration For ARCS License 4 37 4 7 CM93 3 or ENC Installation 4 41 4 8 ARCS Installation 4...

Страница 7: ... S52 Edition 4 0 5 6 5 2 1 2 C Map 5 6 5 2 1 3 Chart 1 selecting 5 6 5 2 2 Mariners Objects 5 9 5 2 3 Manual Updates 5 14 5 2 4 Legend 5 21 5 2 5 Display Options 5 22 5 2 5 1 Base Display 5 22 5 2 5 2 Standard Display 5 22 5 2 5 3 Other Display 5 23 5 2 5 4 User defined Display 5 23 5 2 5 5 Chart Options 5 23 5 2 6 Chart Scale 5 25 5 2 7 Display Date Auto 5 26 5 2 8 Chart Indications 5 27 5 3 Opti...

Страница 8: ...ommand 6 7 6 1 5 1 Save an Area 6 8 6 1 5 2 Open an Area 6 9 6 1 5 3 Delete an Area 6 9 6 1 6 Keeping Your Ship in the Display Area Ship Auto Center 6 10 6 1 6 1 Turning ON or OFF Auto Center 6 10 6 1 7 True Scale Icon 6 11 6 1 8 Display Colors 6 11 6 1 9 Information Panel 6 12 7 Ship Menu 7 1 7 1 Ship Menu Commands 7 1 7 1 1 Ship Info 7 2 7 1 2 Position Offset 7 3 7 1 2 1 Changing Ship s Position...

Страница 9: ...it Operations 8 14 8 2 1 3 If Track Control is active 8 30 8 2 2 Automatic Route Planning and Port Information Option 8 31 8 2 2 1 Planning a Route 8 32 8 2 2 2 Planning with certain Passages 8 34 8 2 3 Create SAR Pattern Route 8 36 8 2 4 Route Manager 8 43 8 2 4 1 Open 8 43 8 2 4 2 Delete 8 44 8 2 4 3 Export 8 45 8 2 4 4 Import 8 46 8 2 4 5 Protect Unprotect 8 47 8 2 5 Toggle Routes 8 47 8 2 6 Sa...

Страница 10: ... Pre Departure Checklist 8 71 8 2 17 Alarms 8 72 8 2 17 1 Setting the Navigational Alarms 8 74 8 2 18 Check Route 8 75 8 2 19 ECDIS used as Route Server or Route Client Option 8 76 9 NAV Tools Menu 9 1 9 1 NAV Tools Menu Commands 9 1 9 1 1 Electronic Bearing Line EBL 9 3 9 1 1 1 Range and Bearing from One Point to Another 9 3 9 1 1 2 Range and Bearing from the Ship to a Displayed Location 9 5 9 1 ...

Страница 11: ... Devices Selection 12 3 12 1 2 Target Options AIS ARPA 12 10 12 1 2 1 Calling up Target Options 12 10 12 1 2 2 AIS Messages 12 17 12 1 2 3 AIS Symbols 12 19 12 1 3 Radar Overlay Settings Option 12 33 12 1 3 1 Radar Overlay 12 33 12 1 3 2 Using the Radar Overlay Settings 12 35 12 1 4 Autopilot 12 39 12 1 5 Integrating a Depth Sounder Setting the Depth Alert 12 40 12 1 6 Changing the Wind Display 12...

Страница 12: ... Profile 12 63 12 1 13 Release USB Storage Device Option 12 63 13 Help Menu 13 1 13 1 Help Menu Commands 13 1 13 1 1 About ECDIS 13 1 14 Error Messages 14 1 14 1 Warning and Notification Messages 14 2 14 2 Permanent Indications 14 6 15 Back up Arrangement 15 1 15 1 Introduction 15 1 15 1 1 Back up ECDIS Version 15 2 15 1 2 Planning Station Version 15 3 16 Weather Overlay Option 16 1 16 1 Introduct...

Страница 13: ...anual Table of Contents X 4343DOC020102 Edition January 2016 16 4 Options Dialog 16 11 16 4 1 Info Dialog 16 16 16 5 Context Menu 16 20 16 5 1 Weather Report 16 20 16 6 Legend 16 22 Annex Bridge Alert Management ...

Страница 14: ... AND CENTER ARPA THE ABBREVIATION FOR AUTOMATIC RADAR PLOTTING AID A SYSTEM WHEREIN RADAR TARGETS ARE AUTOMATICALLY ACQUIRED AND TRACKED ARROW KEYS THE UP DOWN LEFT OR RIGHT ARROW KEYS ASCII AMERICAN STANDARD CODEFOR INFORMATION INTERCHANGE ASSA ADAPTIVE STEERING STABILIZING AUTOPILOT BA BRITSH ADMIRALITY BEARING ALL BEARINGS DISPLAYED IN PATHFINDER ST MK2 ECDIS ARE TRUE BEARINGS VS MAG NETIC OR C...

Страница 15: ...ELOCITY AND THE WATER CUR RENT SHOULD NOT BE CONFUSED WITH SHIP S HEADING CPA CLOSEST POINT OF APPROACH CROSS TRACK ERROR THE PERPENDICULAR DISTANCE BETWEEN THE SHIP S TRACK AND THE INTENDED COURSE ALSO ABBREVIATED XTE CROSSHAIRS THE CURSOR SHAPE FOR POSITIONING OBJECTS IN THE DISPLAY CURSOR THE ON SCREEN ARROW OR OTHER SYMBOL USED TO PLACE AND SELECT OBJECTS ON THE DISPLAY AND SELECT MENUS COMMAN...

Страница 16: ...DEGREES FROM NORTH HIGH RESOLUTION TRACK THE MOST PRECISE REPRESENTATION OF THE SHIP S TRACK AVAILABLE WITH PATHFIND ER ST ECDIS DISPLAYED ONLY IN REAL TIME IT CANNOT BE SAVED IN A PLOT HIGHLIGHTED INDICATES THAT AN OBJECT OR TEXT IS SELECTED THE TEXT WILL APPEAR IN A DIFFER ENT COLOR HOURGLASS THE CURSOR SHAPE THAT APPEARS WHEN THE PATHFINDER ST MK2 ECDIS PROGRAM NEEDS A FEW SECONDS TO EXECUTE A ...

Страница 17: ...H IT WAS COMPILED PLANNED TRACK THE COURSE LINE BETWEEN THE WAYPOINTS IS RED IN COLOR AND APPEARS AS A SOLID LINE BETWEEN WAYPOINTS AND A DASHED LINE BETWEEN THE SHIP AND THE ACTIVE WAYPOINT PLANNED TURNING ARC RED IN COLOR THE TURNING ARC WHICH IS ESTABLISHED AS YOU ENTER A WAYPOINT PLOT A COLLECTION OF INFORMATION THAT HAS BEEN NAMED THEN SAVED ON THE HARD DISK PLOT LAYER ONE OF THREE LAYERS OF ...

Страница 18: ...NTENDED ARTICLE IB OF SOLAS TARGET THE CURSOR SHAPE FOR SELECTING ITEMS TO BE DELETED OR MODIFIED TCPA TIME OF CLOSEST POINT OF APPROACH TEXT BOXES A BOX WITHIN A DIALOG BOX WHICH IS USED FOR ENTERING AND EDITING TEXT TID TENDER IDENTIFICATION TITLE BAR THE BAR ACROSS THE TOP OF THE WINDOW THAT CONTAINS THE NAME OF THE PRO GRAM TFT DISPLAY THIN FILM TRANSISTOR DISPLAY TOC TIME ON CHANNEL TOGGLE CO...

Страница 19: ...STEM WAS DEVELOPED BY THE USA FOR SATELLITE POSITION FIXING AND RECOMMENDED BY IHO FOR HYDRO GRAPHIC AND CARTOGRAPHIC USE WGS84 IS THE CURRENT SYSTEM IN USE 84 REFERS TO THE YEAR WINDOW THE RECTANGULAR AREA IN WHICH MICROSOFT WINDOWSTM DISPLAYS PROGRAMS AND FILES WOP WHEEL OVER POINT WPT WAYPOINT XTE CROSS TRACK ERROR THE PERPENDICULAR DISTANCE BETWEEN THE SHIP S TRACK AND THE INTENDED COURSE ...

Страница 20: ...ifferent display modes Base Standard Other User Display set the CM93 3 chart scale mechanism automatic size defined size presentation of time dependent or periodic chart objects OPTIONS MENU DNC chapter 5 3 add or delete chart symbols points lines and text add or delete chart data to or from a chart select different display modes Base Standard Full User Display change symbol type from simplified t...

Страница 21: ...t Display Scroll right Display Scroll up Zoom In Menus Dialogs Vertical bar Change the window size Cursor Symbols Operator Control Previous Next Zoom In Out Center On Ship Free EBL Fixed EBL Mark At Ship Select Chart MOB Standard Display Radar Overlay Option Menu Bar Radar Cursor A B C A Select Info panel The pictures can differ from the deliveries Free Zoom Manual 24hour Log Entries Toggle ARCS E...

Страница 22: ...quirements as defined by International Maritime Organization IMO International Electrotechnical Commission IEC and International Hydrographic Organization IHO see also www IHO INT The ECDIS is compliant with the following IHO standards S 52 Ed 6 1 Chart Content and Display Aspects of ECDIS Presentation Library Edition 4 0 Annex A to S 52 S 57 Ed 3 1 Transfer Standard for Digital Hydrographic Data ...

Страница 23: ...is always WGS 1984 World Geodetic System ECDIS chart capabilities are S ENC o IHO S57 o IHO S63 encrypted o Jeppesen C MAP CM93 3 SENC distribution S Raster Charts RNC o ARCS S DNC S Unofficial charts o Jeppesen C MAP CM93 3 World or Professional Database NOTE The operational area for this ECDIS is between N85 and S85 ...

Страница 24: ...es indicate the different fragments of the paper charts You may view the source of the chart the chart name manufacturer date and much more by clicking the right mouse button 1 1 1 Charting Capabilities for CM93 3 Chart Types Legal Equivalence With Paper Charts In order an ECDIS to be the legal equivalent of paper charts the following condi tions must be true NOTE The system must display official ...

Страница 25: ...ndards especially S57 must be observed The rules of a recognized work quality assurance system e g ISO 9000 should be applied to data production A conceptual scheme describes a network of regional centers Each so called Regional Electronic Chart Coordinating Center RENC takes over the responsibility in its area for the collation of ENCs and updates for the region Through the exchange of the region...

Страница 26: ...the encapsulation described in the S57 Standard However such plain S57 encapsulated ENCs may become easily subject to unauthorized amend ment or illegal copying IHO has therefore issued the special publication S 63 IHO Data Protection Scheme as standard for protection of ENCs by encryption Encryption is a complex technical procedure S 63 defines security constructs and operating procedures for the...

Страница 27: ...and then stored On the screen of the ECDIS these pixels will be displayed In this way the complete paper chart equivalent is displayed on the screen As additional information only the geographically coordinates are displayed after selection by courser on the information panel Other for sea charts typically information as there are buoys light beacons wrecks or depth information can only be read ou...

Страница 28: ...r 2 2 Tool Bar chapter 2 4 Cursor chapter 2 5 Information Panel chapter 2 7 Chart Area chapter 2 9 Status Bar chapter 2 8 Trackball chapter 2 1 3 Operator Panel chapter 2 1 4 Starting the ECDIS chapter 2 1 1 The pictures can differ from the deliveries MFC Switch chapter 2 10 NSC Remote Panel Black Box Version Figure 2 1 Display Organization ...

Страница 29: ...erator Panel chapter 2 1 4 2 1 1 Starting the ECDIS Positioned on front lower right side Pressing the button switches on the power Afterwards the respective software starts ATTENTION Do not touch the trackball Do not press any key of the operator panel after switching ON Power key the ECDIS or after resetting Reset key the ECDIS until the booting process is completed 2 1 2 Terminating the ECDIS Se...

Страница 30: ... and click Using the trackball place the cursor e g over a command from the menu bar and press the button The corresponding pull down menu appears Point and drag relating with tool bar function Using the trackball place the cursor in the chart press and hold the button Drag the frame into the desired size Release the button The software zooms into the frame area The displayed zoom resolution depen...

Страница 31: ...or over the Raytheon Anschütz field and press the Right button 2 1 4 Operator Panel The operator panel is designed to execute the most commonly used functions Signaling Illumination of the keys and status indicators is switched on when the relevant action is activated Figure 2 3 Operator Panel 1 2 3 4 5 6 7 8 9 16 15 14 13 12 11 10 8 9 10 Figure 2 4 Operator Panel for Radar and ECDIS ...

Страница 32: ...to scan method Irregular echoes are suppressed on the radar video Regular echoes are indicated on the radar video 5 Hides the symbols in the radar video Press the button and the artificial symbols will disappear Press again to show the symbols Symbols are EBLs VRMs PL ARPA zones MAPs 6 1 Status indicators press toggle switch 7 The activated function is indicated by Use the dial 11 to adjust EBL Us...

Страница 33: ... Edition January 2016 13 Press and hold the button The Heading Line disappears during this time 14 Press button to change VECTOR LENGTH 15 Center to reset your own ship to the middle of the PPI or to activate OFF Center 16 Dial see 1 6 ...

Страница 34: ...ons hold down the Alt key and press the letter key Each menu command contains a letter that is underlined e g Plot Pressing Alt and the letter P on the keyboard invokes the plot menu Simultaneously pressing the Alt and the letter P followed by the letter N on the keyboard invokes the Plot Menu Start New Command 2 2 Menu Bar The ECDIS is a menu driven program To tell the ECDIS what to do simply sel...

Страница 35: ...on or off The check mark indicates that the command is on or active Selecting the command again turns it off and the check mark disappears 3 Shortcuts Use the keyboard to open the menu 4 Grayed command The command is disabled You cannot select the command at this time If a command is grayed your equipment may not be integrated correctly or the function is temporarily not available 5 The Screen Key...

Страница 36: ... the keyboard Press Esc 2 3 2 Using Dialog Boxes When you activate a command followed by an ellipsis ECDIS displays a dialog box Dialog boxes are windows that present options or require you to make a selection or acknowledgment 2 3 3 Command Buttons Command buttons execute or cancel a command Command buttons are labeled according to the action they carry out Save or Open for example Selecting a co...

Страница 37: ...pe the minutes If you express minutes to the tenth or hundredth of a minute be sure to include the decimal point 2 3 4 2 Specify a Coordinate Using the Keyboard Enter hemisphere degrees and minutes The input focus is automatically advanced to the next while you enter the values 2 3 4 3 Activate the Chart or Object Info window Pointing the cursor at an object or anywhere on the display and clicking...

Страница 38: ...ects located on the chart within the area at which you pointed the cursor You may then point and click Left on each item listed in the objects area Information about that object is then displayed in the properties area of the dialog box Object info The Object info window contains all information about a selected object Buoys wracks or special sea areas in the actual chart Occasionally the object w...

Страница 39: ... special info e g coastline or restricted area activates the Send to Radar button in the Object Info window Figure 2 9 To transfer e g the coastline to the Raytheon Radar push the Send to Radar button The coastline appears on the radar display NOTE For this function the ECDIS chart and chart scale must be synchronized with the current radar contact ...

Страница 40: ...ytheon Anschütz GmbH Germany R SYNAPSIS ECDIS 2 13 4343DOC020102 Edition January 2016 Figure 2 9 Object info and Send to Radar function Information in tif format Information in txt format Figure 2 10 Special object infos ...

Страница 41: ... up to 30 views 3 Free Zoom In Zooms into the frame area using the trackball Point and drag chapter 2 1 3 The displayed zoom resolution depends on the chart scale 4 Zoom In Zooms in the display keeping the same center location see The Zoom Feature chapter 6 1 1 5 Zoom Out Redraws the current view at a scale one and one half times larger see The Zoom Feature chapter 6 1 1 6 Center on Ship Centers t...

Страница 42: ...alog box chapter 11 1 3 11 NAVTEX The NavTex messages are automatically stored and can be displayed in the NavTex window OPTION 12 Toggle ARCS ENC 13 Select Chart Opens the Select Chart dialog box allowing you to select view a different chart for the area 14 Select Info Panel 15 MOB Starts the Man Overboard process see Man Overboard chapter 7 1 8 16 Standard Display switches to Standard presentati...

Страница 43: ...lbar space and select Customize see Figure 2 12 To remove all buttons select Reset to default Figure 2 12 Tool Bar Customization activation The customization dialog is shown see Figure 2 13 and buttons from the left list available buttons may be moved to the right list active buttons and buttons from the right list may be moved to the left list Figure 2 13 Customization Dialog Buttons may be moved...

Страница 44: ...reate Secondary Route Toggle Routes Route Monitoring Track Control 2 Toggle Color Palette Toggle color palette between Bright Sun and Night settings Additional drop down items Bright Sun Colors Day Colors White Day Colors Black Dusk Colors Night Colors 3 Take Screenshot Take an immediate screenshot Additional drop down items Screenshot 4 Draw Objects Open Draw Objects Dialog 5 LOP Open Line of Pos...

Страница 45: ...ormed the cursor changes into one of the following shapes and enters one of the following modes The cursor mode appears in the information panel in the cursor box area Chart Area used as cursor inside the chart area Target used to select objects on the display that you want to delete or modify Display Scroll down Display Scroll left Display Scroll right Display Scroll up Zoom In used to draw a box...

Страница 46: ...he chart is such that the ship cannot be drawn in its relative size It is also used during dead reckoning simulation It has a directional arrow displaying the ship s heading as well as a perpendicular shipboard line marking port and starboard sides This arrow head displays the expected ships position after for example 6 min No Heading With Heading Figure 2 17 Own Ships Symbol Circle 2 6 2 Rectangu...

Страница 47: ...radar autopilot gyro echo sounder speed log engine RPM sensor rudder position sensor as well as optional secondary position sensors such as Loran C The information is integrated into the information panel and graphical displays which allow the navigator to interpret the data in a single glance Figure 2 19 shows a possible example standard information panel ...

Страница 48: ...H Germany R SYNAPSIS ECDIS 2 21 4343DOC020102 Edition January 2016 1 15 14 9 3 4 5 6 7 8 10 11 12 13 NAV Information Panel TRACK Information Panel 1 3 4 5 7 9 10 11 12 16 17 12 Manua l 2 13 2 Figure 2 19 Information Panel Route Description ...

Страница 49: ...rse made good calculated by GPS Speed WT The ship s current speed through water displayed in knots Speed BT The ship s current speed over ground displayed in knots 5 Weather Wind Speed and Direction over Ground what the wind is doing if you are standing still Drift Depth 6 CTS Course to steer 7 Heading Gyro Ship s direction according to the gyro 8 Engine RPM The ship s main engine shaft or RPM 9 T...

Страница 50: ...and name of the mode in which you are currently operating Mode selection is made by using steer manually steer to track or steer to course heading menu commands under the waypoint menu You may transit between modes just by selecting a different command When you switch between modes ECDIS displays a message box asking you to confirm the change Figure 2 20 Track Control Warning When you switch betwe...

Страница 51: ...nual for more information on steering modes 1 Steering Mode Manual Control Steering is done manually ECDIS automatically switches to manual steering mode in the following situation When you select the steer manually command from steering mode selector switch 2 Steering Mode Track Control Defined by an open route with established waypoints and a turning radius While steering to a track the informat...

Страница 52: ... Heading Control Defined by an electronic heading or course over ground course made good rate of turn and turning radius Steering may be done manually or by the autopilot While steering to a course or heading the information panel will or say Heading Control Heading Control Figure 2 22 Information Panel Heading Control ...

Страница 53: ...stem Manual Figure 2 23 Example for an Alert Message When an alert alarm or warning message is triggered the ECDIS generates an acoustic signal to notify you that a message is being displayed The unacknowledged alert is flashing You may either Acknowledge the message or silence the audible signal If you Acknowledge the message the flashing will stop A history of messages is kept in the 24 Hour Log...

Страница 54: ...ell as the estimated time of arrival at that location assuming the ship s current speed and a direct route to that location The right hand corner box depends on the menu command you are currently performing Normally the cursor box displays the center position of the chart If you get the Route function the actual Waypoint information is indicate in this corner box If you select the EBL VRM function...

Страница 55: ...ing commands in the Display menu The ECDIS supports charts from government agencies ENC DNC and ARCS and private chart manufacturers like C MAP Consult your dealer for the availability of charts in your area NOTE All charts are displayed in a North up orientation Datum is always WGS 1984 World Geodetic System The opertional area of the ECDIS is between N 85 and S 85 2 9 1 Chart Boundaries While a ...

Страница 56: ...rge scale Z background small scale A overview B general C coastal D approach E harbor F berthing G These navigational purposes are extensions to S57 3 Where an overlapping between two charts into the same scale layer occurs this is resolved giving priority to one chart according to the following criteria If an ENC Electronic Navigational Chart data set overlaps a non ENC data set the ENC data set ...

Страница 57: ... the GPS or other positioning sensors The ship symbol is directional and is oriented according to your gyro heading An optional heading vector an arrow and search light the cone shape are displayed projecting from the bow of the ship symbol The information panel constantly displays updated information on your position speed heading and other information ...

Страница 58: ...ask identifiers these Task buttons allow direct access to special ECDIS and radar functions and conning pages see Figure 2 25 Status indications Status color Information green The application is working correctly white The application does not work yellow The application is in the start up process red The application is disturbed The context menu is used to control the applications for radar ECDIS...

Страница 59: ...ns will be closed The EggShell Utility Selec tion window appears after some seconds context menu ECDIS application ECDIS task Route Planning ECDIS task Route Monitoring Conning application Conning page Nav Conning page Stat Conning page CAM Radar application Radar task Collision Avoid right trackball key status indication Figure 2 25 MFC Switch ...

Страница 60: ...and conning applications After switching over to another application there are no differences in between the color schemes and common brightness dimming Changing display colors in a Multifunction System MFC with ECDIS radar and conning applications used in INS All MFCs of a bridge system support a synchronized system wide changeover of the color schemes in addition to the common brightness dimming...

Страница 61: ...Operator Manual 2 34 4343DOC020102 Edition January 2016 Intentionally left blank ...

Страница 62: ...ssing all other sensor inputs you cannot interact with ECDIS while printing takes place The main menu contains the following commands Figure 3 1 Main Charts ENC Options Printer Setup Print Screenshot Exit Step 1 Figure 3 1 Main Menu Table 3 1 Overview Main Menu Main Commands Function 3 1 1 Print Setup Allows you to select and configure a printer 3 1 2 Print Allows you to print the image 3 1 3 Scre...

Страница 63: ...the drop down list Step 2 Select either a portrait or landscape paper orientation Step 3 Click on OK Step 1 Step 2 Step 3 Figure 3 2 Print Setup Dialog Box 3 1 2 Print Procedure Step 1 To print the plotting area with heading labels click in a check box to choose the type of heading labels you desire Step 2 You may turn off the printing of the information panel and tool bar by removing them from th...

Страница 64: ...exported to a USB storage Within this dialog functions for the creating and the management of screenshots are provided Create new Screenshot For the creation of a screenshot the following options may be selected An alphanumerical file name prefix The scale of the screenshot 100 to 25 in 4 steps A delay of up to 10 seconds The delay time may be useful to capture menus or pop up windows If a delay i...

Страница 65: ... Screenshot Manage Screenshot The screenshots are saved as BMP files The file names are generated automatically form the given prefix current date and time and the options The maximum number of screenshots which may be stored in the system is 100 For the management of the stored screenshot select the appropriate tab Procedure Step 1 Click Manage Screenshot Step 2 By double clicking on a listed scr...

Страница 66: ...102 Edition January 2016 Step 2 Step 3 Step 1 Figure 3 5 Manage Screenshot 3 1 4 Exit NOTE Do not exit from ECDIS by turning off the computer This may cause to loose plot data or may damage your system Procedure Step 1 Select Exit Step 2 Click Yes Step 2 Figure 3 6 Utilities Menu ...

Страница 67: ...Operator Manual 3 6 4343DOC020102 Edition January 2016 Intentionally left blank ...

Страница 68: ...4 1 Chart Menu Table 4 2 Overview Chart Menu Charts Commands Function 4 2 Goto ARCS or Goto ENC Toggles between ARCS and ENC 4 3 Info Select 4 3 1 ENC CM93 3 4 3 2 DNC 4 3 3 ARCS Allows you to select and view the different charts you have available for the world or the currently displayed region 4 3 4 ENC CM93 3 Chart Catalog Allows you to view and verify the installed charts 4 4 CM93 3 4 5 IHO S6...

Страница 69: ...ition January 2016 Charts Commands Function 4 10 ENC and CM93 3 4 11 ARCS 4 12 DNC Updates 4 13 Chart Server Rights Option Allows you to take over the Chart Server Rights Chart Server Rights this command indicates the ECDIS status client ...

Страница 70: ... 3 4343DOC020102 Edition January 2016 4 2 Goto ARCS Or Goto ENC This function is available if the two chart types are stored on the ECDIS Procedure Step 1 Select Goto ARSC Chart or Goto ENC Chart Result The ECDIS switches over to ARCS chart and inversely to ENC chart ...

Страница 71: ...a continuous coverage The following scale layers are defined 1 Background small scale 2 Background medium scale 3 Overview 4 General 5 Coastal 6 Approach 7 Harbor 8 Berthing Where an overlapping between two charts into the same scale layer occurs this is resolved giving priority to one chart according to the following criteria If an ENC data set overlaps a non ENC data set the ENC data set takes p...

Страница 72: ...are marked in green Step 5 Point and click on the chart you wish to view inside the hatched box You may need to zoom in in order to see the individual charts NOTE You may receive a message which states Please center on a region covered by this chart In this case click on OK then point and click the cursor on an area of the chart you wish to view Step 6 Click on View to view the chart and leave the...

Страница 73: ...art Catalog License Installation Updates Step 2 Step 5 Step 1 Step 3 Step 6 Step 4 ENC Figure 4 2 Select Chart Dialog Box ENC CM93 3 Command Buttons View Click on View to view the chart and leave the dialog box open View and Close Click on View and Close to view the chart and close the dialog box ...

Страница 74: ...dure Step 1 Select Charts menu bar Step 2 Select Info Select The dialog box appears Step 3 Select DNC Step 4 Point and click on the different chart types i e Harbor Coastal etc In order to see all of your charts you may need to first click on the World Chart and click View Red boxes with hatch marks appear in the display and on top of the chart These are your charts Step 5 Point and click on the c...

Страница 75: ...93 3 Chart Catalog License Installation Updates Step 2 Step 5 Step 1 ENC Step 3 Step 4 Figure 4 3 Select Chart Dialog Box DNC Command Buttons View Click on View to view the chart and leave the dialog box open View and Close Click on View and Close to view the chart and close the dialog box ...

Страница 76: ...iodical update service of the ARCS sea charts is ensured by the manufacturer A sea chart in raster data format is divided into pixels and then stored On the screen of the ECDIS these pixels will be displayed In this way the complete paper chart equivalent is displayed on the screen As additional information only the geographically coordinates are displayed after selection by courser on the informa...

Страница 77: ...6 Procedure Step 1 Select Charts menu bar Step 2 Select Info Select The dialog box appears Step 3 Select ARCS Goto ARCS Chart Info Select ENC CM93 3 Chart Catalog License Installation Updates Step 2 Step 1 ENC Step 3 Figure 4 4 Select Chart Dialog Box ARCS ...

Страница 78: ... Set a double click onto the respective chart S The last used charts are listed in the box S Select by position In this case position coordinates longitude latitude can be input either manually or directly by cursor positioning Manual Inputs Editing the requested coordinates respective sea chart will be loaded and displayed Click on View and Close button By Cursor Position Set the cursor on this s...

Страница 79: ...Manual 4 12 4343DOC020102 Edition January 2016 Command Buttons View Click on View to view the chart and leave the dialog box open View and Close Click on View and Close to view the chart and close the dialog box ...

Страница 80: ...CM93 3 charts Procedure Figure 4 5 Step 1 Select the Database e g DE The left list box displays the cell names of of the Database DE Step 2 Select a cell name the cell information appears Step 3 Select Goto Cell in order to center the selected cell on the display Step 4 By selecting the check box the cell boundary is highlighted Step 1 Step 3 Step 4 Step 2 Figure 4 5 ENC and CM93 3 Chart Catalog ...

Страница 81: ...ls Step 1 Select Verify Update Status Step 2 The Report Options dialog box appears Fig 4 6 Step 3 Choose the kind of report Summary Report or Full Report Step 4 Choose the filter options Complete or Filtered by Routes NOTE The filter options are only available for IHO S63 charts Step 5 Select Start to create the report Figure 4 6 Report Options ...

Страница 82: ...ent of the left list box as a text file Summary Click on Summary to create a summary of the status report and an export function into HTML Detailed cell information is not included in the status report Figure 4 7 Summary Goto Cell Click on Goto Cell in order to center the displayed chart of the selected cell Close Click on Close for closing this window ...

Страница 83: ...he right side of this box and type the corresponding license string into the appropriate box The user has the option of subscribing to or purchasing licenses In case of subscription licenses are valid for 12 month after registration The subscription fee includes the update service performed through the CM93 3 Distribution Center plus two issues of the CD ROM that will be sent to the user after fou...

Страница 84: ...ears Step 3 Select Add license manually Step 4 Enter the license key 16 characters via OSK Step 5 The procedure must be confirmed via the Add license key Step 6 Select a zone or a zone area The zone or the areas are released and shown on the chart reader Step 1 Step 3 Step 4 Step 6 Step 5 OSK Goto ARCS Chart Info Select ENC CM93 3 Chart Catalog License Installation Updates CM93 3 License IHO S63 A...

Страница 85: ... the future are listed Procedure Figure 4 9 Step 1 and Step 2 Figure 4 8 Step 3 Select Expired licenses Step 4 Enter the desired date with the format Month Year via OSK Step 5 Select Create all known zones and areas are displayed Step 3 Step 4 Step 5 Step 3 Step 4 Step 5 Figure 4 9 C MAP93 3 License Administration box Expired licenses ...

Страница 86: ...lid are listed and displayed with the following information valid to e g 10 2002 Zone Area 16 character license code Procedure Figure 4 10 Step 1 and Step 2 Figure 4 8 Step 3 Select Licenses list All the licenses that are still valid are listed and displayed with the following information Step 3 Figure 4 10 C MAP93 3 License Administrations Licenses list ...

Страница 87: ...coordinates must be set The position data of the coordinates are entered in the list box Coordinates per mouse click in order Step 4 After a final calculation licenses can be ordered for this area using C MAP Step 5 Displays a selected zone area from the Chart collection area In this case the entire chart area is displayed in a reduced scale the zone area is overlaid as a red grid pattern Step 3 S...

Страница 88: ... charts that were recorded via the positions of the coordinates In this process the default chart type is taken into account Command buttons in the Chart collection area The result of the calculation is displayed in this list box In this connection the Zone is displayed with the affected Areas Delete list item allows a selected Zone or an Area to be deleted from the list box Chart collection Clear...

Страница 89: ...ECDIS Step 1 This window displays the imminent data transfer to the target directory a and the name of the license file e g RaytheonAnschütz Step 1 The action is executed by pressing the Yes button Send this CD to the chart manufacturer C MAP If you click on No the License Administration box appears again ...

Страница 90: ...ion in the CM93 3 background chart upon selection In this process the license folder is determined by the chart type assignment Procedure Figure 4 12 Step 1 and Step 2 Figure 4 8 Step 3 Select Order per route Step 4 Select the route name from Select route from list Step 5 Displays a selected zone area from the Chart collection for selected route area In this case the entire chart area is displayed...

Страница 91: ... route In this process the default chart type is taken into account Command buttons Chart collection for selected route area The calculated charts are listed within this list box Delete list item allows a selected zone or an area to be deleted Clear view deletes the license chart displayed Save list to file creats a license file with the contents of the list box Chart collection on the target driv...

Страница 92: ...GmbH Germany R SYNAPSIS ECDIS 4 25 4343DOC020102 Edition January 2016 Step 1 The action is executed by pressing the Yes button Send this CD to the chart manufacturer C MAP If you click on No the License Administration box appears again ...

Страница 93: ...MAP data structure and release the desired areas for a limited period Procedure Figure 4 13 Step 1 and Step 2 Figure 4 8 Step 3 Select Add license from file Insert the relevant medium into the appropriate drive Step 4 Open the directory structure of the ECDIS computer a PASSWORD USR click on this directory entry if there is a CD the letter for the partition has not been specified Step 1 Step 4 Ste...

Страница 94: ... ECDIS 4 27 4343DOC020102 Edition January 2016 Command button Add licenses Within the list box License file list all licenses are overlaid when the button is pressed At the same time the licenses are processed within the program The desired areas are released ...

Страница 95: ...der Selected areas of a zone e g 3 are removed from the License order list when the entire zone 3 is selected Procedure Figure 4 14 Step 1 and Step 2 Figure 4 8 Step 3 Select Order manually Step 4 Select a zone and area Step 3 Step 4 Area 3 Figure 4 14 CM93 3 License Administration box Order manually License Zone Areas displays all possible C MAP zones areas License order list displays the selecte...

Страница 96: ...names from the list box deletes all entries from the list box in sequence Clear list deletes all entries from the list box Create creates a license file from the list box Insert a CD into the target drive The following window appears when the button is pressed Yes No Step 1 Step 1 The action is executed via Yes Send this CD to the chart manufacturer C MAP If you click on No the License Administrat...

Страница 97: ...Figure 4 15 Step 1 Select Chart menu bar Step 2 Select IHO S63 License Step 3 Select User Permit The registration No is indicated in the field Step 1 Step 3 Goto ARCS Chart Info Select ENC CM93 3 Chart Catalog License Installation Updates OSK CM93 3 License IHO S63 ARCS License Step 2 ENC Figure 4 15 License dialog box User Permit ...

Страница 98: ...Figure 4 15 Step 3 Select Licenses list Licenses can be renewed and the status of the current license list reviewed Step 3 Status information Step 3 Figure 4 16 License dialog box Licenses list Command Buttons Delete selected License Delete the selected cell license Delete expired License Delete the expired cell license Delete all Licenses Delete all cell licenses ...

Страница 99: ... and Step 2 Figure 4 15 Step 3 Select Add Licenses from file Licenses can be added automatically by choosing Add licenses from file and pointing to the ENC PMT file received from IHO S63 All the licenses contained within this file will be automatically registered Step 3 Figure 4 17 License dialog box Licenses list ...

Страница 100: ...anuary 2016 4 5 4 Product List Procedure Figure 4 18 Step 1 and Step 2 Figure 4 15 Step 3 Select Product list The product list shows all available IHO S63 charts If you want to order a new license note the cell code and contact IHO S63 Service Step 3 Figure 4 18 License dialog box Product list ...

Страница 101: ...on or update of S 63 chart So there is usually no need to load the product list manually Procedure Figure 4 19 Step 1 and Step 2 Figure 4 15 Step 3 Select Import Product list The new product list overwrites the old one The old product list cannot be rewritten from an older CD version Step 3 Figure 4 19 License dialog box Import Product List ...

Страница 102: ... be displayed at the bottom of the window older ECDIS versions will only give an indication that the SA Public Key is stored in the system Step 4 To load the new IHO CRT file select the location of the file in the center window and select the IHO CRT in the right window Press the button Import SA Public Key Step 3 Step 4 Figure 4 20 License dialog box Certificate SA Public Key Confirm the replacem...

Страница 103: ...ense Step 3 If no security key software dongle is loaded the License Administrator dialog box appears Follow the instructions in the dialog box Step 4 Start the identification check Step 1 Step 3 Goto ARCS Chart Info Select ENC CM93 3 Chart Catalog License Installation Updates OSK CM93 3 License IHO S63 ARCS License Step 2 Step 4 ENC Figure 4 22 ARCS Permit List dialog box ...

Страница 104: ...nuary 2016 Command Buttons License Info Shows the license information In this case the user permit data file can be copied automatically Figure 4 23 ARCS License Information Load Permit file Select this button when a new license or a license update is available Figure 4 24 Load Permit File Path ...

Страница 105: ...Operator Manual 4 38 4343DOC020102 Edition January 2016 Add Permit Select this button when you get a new License or a license update per phone or fax Figure 4 25 Add Chart Permit ...

Страница 106: ... relevant chart and click on the Remove Permit button Practice If you got a license update sometime a chart permit is cancelled and replaced by another chart number Read SCHEDULE A AMENDMENT CHART SUPPLY DETAILS from the ADMIRALTY RASTER CHART SERVICE Figure 4 26 Remove Permit Remove All Select this function to remove all charts ...

Страница 107: ...s for the charts All other charts are stored on the CD ROM in encrypted format meaning that the user has to buy licenses to access and display them Each license corresponds to one electronic chart Procedure Figure 4 27 Step 1 Select Charts menu bar Step 2 Select Installation Step 3 Select ENC and CM93 3 Installation Step 4 Select Install CM93 3 Database To install a database place CD into the CD d...

Страница 108: ...CDIS 4 41 4343DOC020102 Edition January 2016 ENC and CM93 3 Installation ARCS Installation DNC Installation Goto ARCS Chart Info Select ENC CM93 3 Chart Catalog License Installation Updates Step 1 Step 2 Step 3 Step 4 ENC Figure 4 27 ENC Installation dialog box ...

Страница 109: ...Database button The installation takes 3 to 5 minutes If no CD is available a dialog box appears follow the instructions or Cancel this function Dialog Box Area Administration In the Administration area you can see available charts The n symbol indicates the selected charts Dialog Box Area Priority Up Down If you want to modify the layer priority select the chart you will have displayed first or l...

Страница 110: ...s an action Exit the dialog box is faded out Cancel a current procedure is aborted Import and convert unencrypted S57 data files Insert the data CD into the CD drive and select Import unencrypted The following dialog will be displayed Select the CD drive and the directory where the S57 data is stored country codes e g US Figure 4 28 Import Unencrypted Data File ...

Страница 111: ...se the program recognizes and selects all cells in a selected directory sub directories included These cells will be imported Procedure Figure 4 29 Step 1 Step 2 Step 3 Figure 4 27 Step 4 Select the folder S57 e g US Select the chart directory e g US step1 containing the data file to be converted Step 5 Select Check For Cells Step 4 Step 5 Figure 4 29 Automatic Selection ...

Страница 112: ...ual selection In this case only the manually selected cells will be imported without sub directories Procedure Figure 4 30 Step 1 Step 2 Step 3 Figure 4 27 Step 4 Select the folder S57 e g US Step 5 Select the chart directory containing the data file to be converted Step 4 Step 5 Figure 4 30 Manual Selection ...

Страница 113: ...C020102 Edition January 2016 Starting the conversion process Procedure Figure 4 31 Step 1 Select the Execute button The dialog box File conversion in progress appears and shows the processing Step 1 Figure 4 31 Conversion display ...

Страница 114: ...ed If you want to see the complete installation information then select View Log Step 2 The following dialog window appears Note If the following message appears Following cells were not installed XXXXXXXXXX That means The chart is invalid contact the chart manufacturer and state to the cell identifier For a detailed error information about a cell in the summary list select the cell step1 Step 2 F...

Страница 115: ...or Manual 4 48 4343DOC020102 Edition January 2016 Insert the data CD and select Import IHO S 63 The following dialog will be displayed Select the CD drive and the directory where the S63 data is stored country codes e g B1 Figure 4 34 Import Data File ...

Страница 116: ...omatic selection In this case the program recognizes and selects all cells in a selected directory and sub directories These cells will be imported Procedure Figure 4 35 Step 1 Step 2 Step 3 Figure 4 27 Step 4 Select the folder S57 e g US Select the chart directory e g US step1 containing the data file to be converted Step 5 Select Check For Cells step2 Step 4 Figure 4 35 Automatic Selection ...

Страница 117: ...s case only the manually selected cells will be imported without sub directories Procedure Figure 4 36 Step 1 Step 2 Step 3 Figure 4 27 Step 4 Select the cell folder containing the data file to be converted Normally the sub directory number is 0 Step 4 Figure 4 36 Manual Selection ...

Страница 118: ...NAPSIS ECDIS 4 51 4343DOC020102 Edition January 2016 Starting the conversion process Procedure Figure 4 37 Step 1 Select the Execute button The dialog box File conversion in progress appears and shows the processing Step 1 Figure 4 37 Conversion Display ...

Страница 119: ...e complete installation information then select View Log Step 2 The following dialog window appears Note If the following message appears Following cells were not installed XXXXXXXXXX That means The chart is invalid contact the chart manufacturer and state to the cell identifier For a detailed error information about a cell in the summary list select the cell step1 Step 1 Figure 4 39 Compilation l...

Страница 120: ...Installation Step 3 Select ARCS Installation The volume list shows already installed zones Insert an ARCS chart CD S57 and CM93 3 Installation ARCS Installation DNC Installation AML Installation Goto ARCS Chart Info Select ENC CM93 3 Chart Catalog License Installation Updates Step 1 Step 2 Step 3 ENC and CM93 3 Installation ARCS Installation DNC Installation ENC Figure 4 40 ARCS Installation ...

Страница 121: ...tion If available the provided update should be installed now The update process is also initiated by clicking on the Install Volume button chapter 4 11 Remove Volume Click on this button if you want to remove the selected volume View ARCS Zones Click on this button to view the ARCS zones Figure 4 42 ARCS Zones Exit Click on this button when you want to stop the process ...

Страница 122: ...re 4 43 Step 1 Select Charts menu bar Step 2 Select Installation Step 3 Select DNC Installation The volume list shows already installed zones ENC and CM93 3 Installation ARCS Installation DNC Installation Goto ARCS Chart Info Select ENC CM93 3 Chart Catalog License Installation Updates Step 1 Step 2 Step 3 ENC Figure 4 43 DNC Installation ...

Страница 123: ...button and follow instructions see following dialog The installation takes approximately one hour Procedure Step 1 Select the correct partition containing the CD and the right path Step 2 Select inside this dialog box a path to the DNC data DNC Digital Nautical Chart TOD Tactical Ocean Data If the path is not correct or the selected folder does not contain DNC data an error message will be display...

Страница 124: ...s of Verification is running If the verification is done a summary will be displayed in the window In case of errors or warnings the corresponding messages will be shown in the report window Report messages In case of Critical Errors the installation process stops Contact the chart manufacturer DNC In case of Warnings the installa tion process is going on Warnings describe location spe cific chart...

Страница 125: ...Close Step 1 Step 1 Figure 4 47 Database registered Procedure Figure 4 48 Step 1 Step 2 Step 3 Figure 4 43 Step 4 For activation of installed DNC database the check mark has been placed before the database Attention Activation of more than 4 results in slow database access Means e g open dialog DNC Legend takes some time Step 4 Figure 4 48 Activation of installed database Then click on the Apply b...

Страница 126: ...n Priority If you want to modify the priority select the database you will have displayed first or last and click Priority Up or Down Remove Database To remove a selected database click on Remove Database NOTE The removal of DNC database takes time Apply executes an action Cancel a current procedure is aborted ...

Страница 127: ... Step 2 Select Updates Step 3 Select ENC and CM93 3 Updates The dialog box appears Step 4 Select the chart type Goto ARCS Chart Info Select ENC CM93 3 Chart Catalog License Installation Updates Step 2 Step 4 IHO S 67 ENC and CM93 3 Update ARCS Update DNC Update Step 1 ENC select your chart type Figure 4 49 Auto Updating data dialog box ...

Страница 128: ...Will load and install only the selected charts from the list The list has to be filled by the function Get List before Create Order Insert a storage device and select Create Order An order file will be written on the disk The name of the order file is the name of the database with the extension ord e g World ord Send the order file as an attachment to the C MAP update server updates c map no You w...

Страница 129: ...S63 charts Click on the Update S 57 and S 63 the following dialog box appears Insert the storage device Select the disk icon in the dialog box Open the following folders look for a corresponding name and the version number indicated on the right side of the dialog box step 1 Figure 4 50 Update S 57 and S 63 dialog box Click on Start see step1 The compilation process starts Figure 4 50 If the updat...

Страница 130: ... related data of this zone are erased Inside the Review Updates window all applied updates are displayed relative to their designated folders Change the date to activate the filter button All Updates issued after the selectd dated are highlighted with orange marks on the chart See Figure 4 51 below For detailed information of an update the respective folder has to be selected With a double click r...

Страница 131: ...Operator Manual 4 64 4343DOC020102 Edition January 2016 Figure 4 51 Updating Log Update Review ...

Страница 132: ... Step 1 Select Charts menu bar Step 2 Select Updates Step 3 Select ARCS Update The volume list shows already installed zones Insert an ARCS chart CD Goto ARCS Chart Info Select ENC CM93 3 Chart Catalog License Installation Updates Step 1 IHO S 67 ENC and CM93 3 Update ARCS Update DNC Update Step 3 ENC Figure 4 52 ARCS Installation and Update ...

Страница 133: ...e installation process starts Figure 4 53 The ECDIS system checks the update edition If the edition is older than the actual ECDIS edition the following window appears update in progress Figure 4 53 ARCS update Exit Click on this button to stop the process OK Cancel Figure 4 54 Exit the Process ...

Страница 134: ... chart Within an ARCS chart all updates are entered and selected automatically To display the updates the functions ARCS Show Updates and ARCS Indicate Updates should be selected ARCS Update select this functions Figure 4 55 Show ARCS Updates in Chart Show Updates with this function the updates are overlaid in the chart area By toggling this function the update information can be detected Indicate...

Страница 135: ...Dialog Procedure Figure 4 56 Step 1 Select Info Select Step 2 Select ARCS Main Charts ENC Options displays the date of the published update Goto ARCS Chart Info Select ENC CM93 3 Chart Catalog License Installation Updates Step 1 Step 2 Figure 4 56 Info Select dialog box with update information ...

Страница 136: ...ation of the VDU Vector Product Database Update source and the DNC Database you want to use for this Update process Select the location to import the external VDUs Select the corresponding DNC Database Goto ARCS Chart Info Select ENC CM93 3 Chart Catalog License Installation Updates Step 1 IHO S 67 ENC and CM93 3 Update ARCS Update DNC Update Step 3 ENC Figure 4 57 Auto Updating data dialog box If...

Страница 137: ...ck on the Apply Up date button If you want to install all available updates select corresponding DNC database and click on the Apply All Updates button in this example the DNC Database DNC17 has to be selected before Figure 4 58 Select Available Updates If the VDU does not correspond to the selected DNC database the following error message will be displayed Figure 4 59 Error message ...

Страница 138: ...January 2016 The result of the update installation process is shown in the Processing Update window Figure 4 60 Execute DNC Update Show review update Procedure Figure 4 61 Step 1 Select Show Review Update Step 2 Select a name in the Updates Logbook Step 1 Step 2 Figure 4 61 Show Review Update ...

Страница 139: ... Show highlights Procedure Figure 4 61 Step 1 Select e g Relocate Buoy NT from 34 345 77 63 to 34 3333 Step 2 Select Highlight The chart will be centered automatically to the object and a circle appears around the object Step 1 Step 2 Figure 4 62 Highlight ...

Страница 140: ...eeds all ECDIS units with the same sea chart information installation and updates Client The sea chart can only be preset by installing the Chart Server Rights accordingly The following display information Chart Client indicates the data transfer between Chart Server and Client License The Chart License is to be entered on each unit independent of the ECDIS status Chart Server Rights or Client Sel...

Страница 141: ...ptions switching to Chart Server Goto ARCS Chart Info Select ENC CM93 3 Chart Catalog License Installation Updates Chart Server Rights switching to Chart Server the ECDIS with Chart Server Rights is in progress The switching over task is not possible Figure 4 63 Chart Server ...

Страница 142: ... to Mariners General Notices to Mariners Chart Warnings Show Updates Indicates Updates n Step 1 Figure 5 1 Option Menu ARCS Table 5 1 Overview ARCS Options ARCS Options Commands Function 5 1 1 Chart Information Open a dialog box with actual chart information Chart name Paper Chart Issued update information 5 1 2 View Chart Notes Show the Chart Legend 5 1 3 Notices to Mariners If available General ...

Страница 143: ...e Figure 5 2 Step 1 Select ARCS Option Figure 5 1 Step 2 Select Chart Information The dialog box appears Figure 5 2 Chart Information 5 1 2 View Chart Notes Within this menu ARCS chart notes of the currently loaded chart can be selected and displayed The chart notes are managed via a tree like icon directory Procedure Figure 5 3 Step 1 Select ARCS Option Figure 5 1 Step 2 Select View Chart Notes T...

Страница 144: ...tion menu is then displayed in grey 5 1 4 Show Updates and ARCS Indicate Updates Chart updates always refer to a complete chart In order to get an overview about all official updates as quickly as possible the entire chart display should be zoomed up On calling up the menu item ARCS Indicate Update updated chart zones are displayed in red lines square For a closer view of these zones the cursor is...

Страница 145: ... Map or Chart 1 including color differentiation diagram 5 2 2 Mariners Objects Add or delete chart symbols points lines and text 5 2 3 Manual Updates Add or delete chart data to or from a chart according to S57 Collars and Symbols 5 2 4 Legend Shows the Chart Legend 5 2 5 1 Base Display Select the Base Display 5 2 5 2 Standard Display Select Standard Display 5 2 5 3 Other Display Select Other Disp...

Страница 146: ... 6 Chart Scale Set the chart scale mechanism automatic size Normal Medium High switching to appropriate navigation purpose while zooming A G Z zooming on one defined navigation purpose e g harbor 2 5 8 Display Data Auto For the presentation of the dependent chart object 2 5 9 Chart Indications For the presentation of the dependent chart objects ...

Страница 147: ... Select Presentation Library The menu is displayed IHO S52 Edition 4 0 C Map Chart1 Figure 5 5 Presentation Library Menu 5 2 1 1 IHO S52 Edition 4 0 This menu applies the Standard Symbol Presentation IHO S52 5 2 1 2 C Map This menu item allows to apply the Symbol Presentation provided by the chart manufacturer C Map 5 2 1 3 Chart 1 selecting Chart 1 Presentation all Symbols used for the ECDIS disp...

Страница 148: ... function from the Display Menu Step 4 Position the Zoom In cursor to one of the corners of the color region then press the Left button several times Step 5 The following detailed window appears Step 6 Check the diagonal color line presentation on the ECDIS display or compare the diagonal color line pictures with the Color and Symbol Specifications for ECDIS handbook Step 7 Do the check by changin...

Страница 149: ...y 2016 OK Cancel Step 2 Step 3 Step 4 Step 5 Figure 5 6 Information window Problem solution If you cannot recognize any line adjust more Contrast Brightness If this does not solve the problem contact the Service department to change the ECDIS Display ...

Страница 150: ... the object attributes For each object a list of attributes is provided An object can only be positioned and placed on the chart when all attributes have been specified and assigned The entries of the Attribute List must be worked through in order Step 5 1 Select the 1st entry using the cursor the value of attribute window is opened Some of the entries can by specified by means of predefined attri...

Страница 151: ... In this case it is possible to specify a buoy with more details Buoys with special purpose Light only The Edit Manual Object window is displayed only if the selected object has additional functions Procedure Figure 5 8 Step 7 Select the Add button The dialog box List Of Attributes appears List Values shows the possible values for the function Light and colour Select the colour assignment White it...

Страница 152: ...tz GmbH Germany R SYNAPSIS ECDIS 5 11 4343DOC020102 Edition January 2016 Step 7 Figure 5 8 Edit Manual Objects dialog box By pressing the Close key the cursor is released for positioning the buoy Figure 5 9 Add a special object info ...

Страница 153: ...object line or area selected The line or area planning must be finished by clicking on the Add Object button Delete Objects On actuating this button the Delete functions are activated Review Mariner Obj This function logs all update activities which have been carried out on the ENC chart Procedure Figure 5 10 Step 1 Select the desired object The Object Info window appears Step 2 Select the object ...

Страница 154: ...iner Object Review Mariner Objects Procedure Figure 5 11 Step 1 Select ENC Options Step 2 Select Mariners Object Step 3 Select Review Mariner Obj The dialog box appears Figure 5 11 Review Mariner Objects Comand Buttons Close Click on Close when you ve seen enough Print Click on Print to print out the Log contents on a connected separate printer ...

Страница 155: ...Figure 5 12 Step 1 Select ENC Option Figure 5 1 Step 2 Select Manual Updates The dialog box appears Figure 5 12 Step 3 Select an object Step 4 Specify the representational form of a object within the chart If the object has not been assigned to a clear representational form one of the forms offers Point Line or Area can be selected Step 5 Specify the object Attributes For each object a list of att...

Страница 156: ...e object Step 3 Step 5 select object Attributes Step 6 Step 5 1 Step 4 Figure 5 12 Manual Updates In this case it is possible to specify a buoy with more details Buoys with special purpose Light only The Edit Manual Object window is displayed only if the selected object has additional functions Procedure Figure 5 13 Step 7 Select the Add button Figure 5 13 The dialog box List Of Attributes appears...

Страница 157: ...ual Update Procedure Figure 5 13 Step 1 Select ENC Options Step 2 Select Mariners Object Step 3 Select Review Mariner Obj The dialog box appears Step 7 Figure 5 13 Edit Manual Objects dialog box By pressing the Close key the cursor is released for positioning the buoy ...

Страница 158: ...ts This function is applied in connection with Type of object line or area selected The line or area planning must be finished by clicking on the Add Object button Delete Objects On actuating this button the Delete functions are activated Review Mariner Obj This function logs all update activities which have been carried out on the ENC chart Procedure Figure 5 15 Step 1 Select the desired object T...

Страница 159: ...anually deleted on the current chart layer Move Objects On actuating this button you can select the object using the appropriate symbols like and Procedure Figure 5 16 Step 1 Select the desired object The Object Info window appears Step 2 Select the Object Attribute The object gets a circle as an overlay marker Step 3 Select the Move Object button A pop up window appears asking you to do the job o...

Страница 160: ...ermined via the penetration depth zoom in out If an object is deleted or inserted in a scale range this action is restricted only to this scale range Previous or subsequent scale ranges are not considered in this process This means that deleted objects are still displayed new objects are missing In order to avoid missing information the object information of the scale ranges must be updated after ...

Страница 161: ...ly be presented at the smallest scale available At the same time tree list box and the Delete Object button will be enabled Press on the Next button to move to next navigation purpose e g harbour Now you can navigate through all chart scales using the Next or Prev button If there is no smaller scale containing the object then the Next button will be disabled If you are at most detailed navigation ...

Страница 162: ...20102 Edition January 2016 5 2 4 Legend This menu feature opens an info window for the currently loaded chart The info window shows all characteristic data for ENC charts Procedure Figure 5 17 Step 1 Select ENC Options Figure 5 1 Step 2 Select Legend Figure 5 17 Legend ENC chart ...

Страница 163: ...to be selected by the mariner 3 isolated underwater dangers of depths less than the safety contour which lie within the safe waters defined by the safety contour 4 isolated dangers above water which lie within the safe water defined by the safety contour such as fixed structures overhead wires etc 5 scale range and north arrow 6 units of depth and height and 7 display mode 5 2 5 2 Standard Display...

Страница 164: ...9 graticule 10 place names 5 2 5 4 User defined Display These functions allow to restore the user defined display settings by a single operator action See Chart Options using the command button Save settings as User defined Display 5 2 5 5 Chart Options With this menu item additional display information can be turned on or off by pressing the corresponding check boxes The availability of the check...

Страница 165: ...he safety depth can be linked to the safety contour by using the corresponding check box Command Button Save settings as User defined Display The button is used to store all currently made settings in this dialog for the user defined display which can be recalled by using the menu as described above active Other Display Figure 5 19 Option Menu ...

Страница 166: ... Automatic High or at fixed navigational purpose e g harbour approach Procedure Figure 5 20 Step 1 Select ENC Options Figure 5 1 Step 2 Select Chart Scale The dialog box appears Figure 5 20 Chart Scale Example Setting Approach With this setting the chart is always displayed as approach chart while it is zoomed So all chart object information contained in the approach navigational purpose will alwa...

Страница 167: ... as a traffic separation schema may have a date on which they are intro ducted or discontinued Procedure Figure 5 21 Step 1 Select ENC Options Figure 5 1 Step 2 Select Display Date Auto The dialog box appears Step 3 Select either Automatic Show all or Specific Date If Specific Date is selected the from date and the to date can be changed Step 4 Close the dialog with OK to confirm the changes or Ca...

Страница 168: ...te Check Results The Look Ahead Searchlight Indications will only be displayed while the Look Ahead Searchlight is enabled or during Route Monitoring or Track Control In order to avoid clutter the Look Ahead Searchlight Indications are NOT displayed while Route Planning Indications are active NOTE Turning off any of these indications will cause a corresponding permanent indication as long as a rou...

Страница 169: ...ght Example of Look Ahead Searchlight with highlight indication of safety contour red outline and fill Hazard and Special Condition Area yellow outline Figure 5 24 Look Ahead Searchlight Example Example of Route with highlighted indications of safety contour red outline and fill and Hazards yellow outline ...

Страница 170: ...S ECDIS 5 29 4343DOC020102 Edition January 2016 Figure 5 25 Route with highlighted indications of safety contour NOTE Categories which are not to be highlighted in Route Planning are marked with an asterisk in the review route check results see chapter 8 2 8 ...

Страница 171: ...ion 5 3 1 Mariners Objects Add or delete chart symbols points lines and text 5 3 2 Manual Updates Add or delete chart data to or from a chart according to DNC Collars and Symbols 5 3 3 Legend Shows the chart Legend 5 3 4 Overlays Select different display modes Base Display Standard Display Full Display Options 5 3 5 Symbol Type Change symbol type from simplified symbol to traditional symbols or th...

Страница 172: ...ear representational form one of the offers forms Point Line or Area can be selected Step 5 Specify the object attributes For each object a list of attributes is provided An object can only be positioned and placed on the chart when all attributes have been specified and assigned The entries of the attribute list must be worked through in order Step 5 1 Select the 1st entry using the cursor the va...

Страница 173: ...is case it is possible to specify a buoy with more details Buoys with special purpose Light only The Edit Manual Object window is displayed only if the selected object has additional functions Procedure Figure 5 28 Step 7 Select the Add button Figure 5 28 The dialog box List Of Attributes appears List Values shows the possible values for the function Light and colour Select the colour assignment W...

Страница 174: ... 4343DOC020102 Edition January 2016 Step 7 Figure 5 28 Edit Manual Objects dialog box By pressing the Close key the cursor is released to position the buoy The positioned buoy is displayed within the light cone code within the chart Figure 5 29 Add a special object info ...

Страница 175: ... or Area The line or area planning must be finished by clicking on the Add Object button Delete Objects On actuating this button the Delete functions are activated Review Mariner Obj This function logs all update activities which have been carried out on the ENC chart Procedure Figure 5 30 Step 1 Select the desired object The Object Info window appears Step 2 Select the Object Attribute The object...

Страница 176: ...e View Log File function and in the text box from the Object info window Procedure Figure 5 31 Step 1 Select DNC Option Figure 5 1 Step 2 Select Manual Updates The dialog box appears Figure 5 31 Step 3 Select an object Step 4 Specify the representational form of a object within the chart If the object has not been assigned to a clear representational form one of the forms offers Point Line or Area...

Страница 177: ...ribute descrip tions if possible for this object Step 5 1 select the object Figure 5 31 Manual Updates In this case it is possible to specify a buoy with more details Buoys with special purpose Light only The Edit Manual Object window is displayed only if the selected object has additional functions Procedure Figure 5 32 Step 7 Select the Add button Figure 5 32 The dialog box List Of Attributes ap...

Страница 178: ...343DOC020102 Edition January 2016 Step 7 Figure 5 32 Edit Manual Objects dialog box By pressing the Close key the cursor is released for positioning the buoy The positioned buoy is displayed within the light cone code within the chart Figure 5 33 Add a special object info ...

Страница 179: ...e or area The line or area planning must be finished by clicking on the Add Object button Delete Objects On actuating this button the Delete functions are activated Review Mariner Obj This function logs all update activities which have been carried out on the ENC chart Procedure Figure 5 34 Step 1 Select the desired object The Object Info window appears Step 2 Select the object attribute The objec...

Страница 180: ...layer Move Objects On actuating this button you can select the object using the appropriate symbols like and Procedure Figure 5 35 Step 1 Select the desired object The Object Info window appears Step 2 Select the object attribute The object gets a circle as an overlay marker Step 3 Select the Move Object button A pop up window appears asking you for doing the job or not Place the cursor at the new...

Страница 181: ...cale ranges must be updated after deletion or addition After the deletion insertion of an object the following steps are recommended Select View all chart it will display the updated object at the first navigation purpose where this object is available centred on the chart The displayed dataset will be automatically be presented at the smallest scale available At the same time tree list box and th...

Страница 182: ...rrently loaded chart The Info Window shows all characteristic data specific for DNC charts Procedure Figure 5 36 Step 1 Select DNC Options Figure 5 1 Step 2 Select Legend If you have only 1 database loaded the database name is shown in gray If you have a database DNC and TOD s loaded you can select it by name The corre sponding Legend displays Figure 5 36 Legend DNC chart ...

Страница 183: ...Operator Manual 5 42 4343DOC020102 Edition January 2016 This Warning will be displayed if the coefficients for the World Magnetic Model are out of date chapter 9 1 9 Figure 5 37 Magnetic Verification ...

Страница 184: ... be selected by the mariner 3 indication of isolated underwater dangers of depths less than the safety contour which lie within the safe waters defined by the safety contour 4 indication of isolated dangers which lie within the safe water defined by the safety contour such as bridges overhead wires etc and including buoys and beacons whether or not these are being used as aids to navigation 5 traf...

Страница 185: ...ng check boxes The availability of the check box group depends on the pre selected chart feature set Base Display Standard Display Full Display The values for three different depth contour lines and the safety depth can be set Routes and the antigrounding searchlight are checked against the safety contour The safety contour line is displayed in any mode The other contour lines are only used for vi...

Страница 186: ...Operator Manual Raytheon Anschütz GmbH Germany R SYNAPSIS ECDIS 5 45 4343DOC020102 Edition January 2016 Figure 5 39 Option Menu ...

Страница 187: ...function buoys and beacons can be displayed as Simplified Symbols according to IHO paper S52 Procedure Figure 5 40 Step 1 Select DNC Options Figure 5 1 Step 2 Select Symbol Type The dialog box appears Simplified Symbols selected Traditional Symbols selected or Figure 5 40 Symbol Presentation ...

Страница 188: ...of the display by zooming in or out or by specifying a new scale and center You can save display settings called areas so that at anytime you can return to it In addition you can use the ship auto center feature or the directional keys to scroll the display and ensure that your ship is always in view The information panel to the right of the display area shows the display scale in the chart inform...

Страница 189: ...opens and deletes area views pre defined by the user 6 1 6 Ship Auto Center Automatically repositions the display so that Own ship returns to the center when it reaches a user defined distance from the edge of the display 6 1 7 Ship True Scale Outline Own ship symbol will be displayed on scale as silhouette 6 1 8 Bright Sun Colors Changes display colors to bright on white background 6 1 8 Day Colo...

Страница 190: ...ts actual size 3 The vertical scale of the chart and the ratio at which the display chart can be viewed in order to be at scale 4 Indicates the current overlay status Base Display Standard Display Other Display 6 1 1 1 Zooming In Select Zoom In from the Display menu or press the Zoom In Key on the toolbar Procedure from display menu Step 1 Select the display menu Figure 6 1 Step 2 Select Zoom In t...

Страница 191: ...wn the box to the desired size but want to reposition it before you release the Left button hold down Shift and move the cursor until the box is in the desired position The box remains the same size while its position in the display changes Step 4 Release the trackball button when you are done Figure 6 3 Zoom In per Drag an Drop after pressing the Zoom In Key ...

Страница 192: ...s one and one half times 150 larger You can use the command repeatedly until the scale reaches 6 550 NM The Zoom Out command does not affect the center of the display Select Zoom Out from the Display menu or press the Zoom Out key on the toolbar Procedure Step 1 Select the display menu Figure 6 1 Step 2 Select Zoom Out select the desired Zoom Out factor The display is zoomed out 2x 5x 10x Maximum ...

Страница 193: ... Center of the Display Procedure Step 1 Select the display menu Figure 6 1 Step 2 Select Scale and Center The dialog box appears The current display center appears in the latitude and longitude boxes and the current scale appears at the bottom of the scale area Unit of measure is NM Step 3 To change the scale of the display either click on the desired scale or click in the text box then type the d...

Страница 194: ...and center on a specific chart that you have named and saved You will find the View Area feature especially helpful if there are certain geographic regions you display frequently When you change the area you are viewing your plot and route information remains open It is as if you are viewing a different part of the globe for a moment ECDIS continues to monitor your route for unsafe and restricted ...

Страница 195: ...ottom of the dialog box If there are no areas listed the scale and center of the current display is shown Step 3 Step 3 Figure 6 6 View Area dialog box 6 1 5 1 Save an Area Procedure Step 1 Select the display menu Figure 6 1 Step 2 Select View Area The dialog box appears Step 3 Set the display to the chart and dimensions you want to save Step 4 Click in the text box then type an area name of up to...

Страница 196: ...w Area The dialog box appears Step 3 Click on the name of the area you want to open The area name appears in the text box and its scale and center appear below the list box Step 4 Click on Open 6 1 5 3 Delete an Area Procedure Step 1 Select the display menu Figure 6 1 Step 2 Select View Area The dialog box appears Step 3 Click on the name of the area you want to delete Step 4 Click on Delete ...

Страница 197: ...r click the Center on Ship button on the toolbar Ship Auto Center automatically turns off if you scroll the display 3 times in any direction 6 1 6 1 Turning ON or OFF Auto Center Procedure Step 1 Select the display menu Figure 6 1 Step 2 Select Auto Center The dialog box appears Figure 6 7 Step 3 Click inside the Auto Center Enabled check box Allows the ship motion by using a value from 1 30 befor...

Страница 198: ...iety of color combinations for easier viewing When traveling at night it might be easier to see the screen using a black background with bright colors During the daytime hours it might be easier to view the display on a white background with dark colors The Bright Sun Colors Day Colors White Day Colors Black Dusk Colors and Night Colors command allows you to select the colors most appropriate for ...

Страница 199: ...nformation panel You can also select to remove them from the display area so that you may have a wider viewing area Procedure Step 1 Select the display menu Figure 6 1 Step 2 Select Info Panel The dialog box appears Figure 6 8 Step 3 Click on the desired Info panel e g Nav Step 4 Click on the OK button the Info panel appears Figure 6 8 Select Info Panel ...

Страница 200: ...ad Turn on or off course vector heading line or anti grounding search light 7 1 4 Mark at Ship Place a ship mark with a time level at the ship s position 7 1 5 Anchor Watch Allows ECDIS to monitor the drift of the ship while anchored 7 1 6 Guard Zone Show Hide Guard Zones defined on the Synapsis Radar 7 1 7 Acquisition Exclusion Zones Show Hide Acquisition Zones and Exclusion Zones defined on Syna...

Страница 201: ...0102 Edition January 2016 7 1 1 Ship Info The ship info dialog box provides information about the ship Procedure Figure 7 2 Step 1 Select the ship menu Figure 7 1 Step 2 Select Ship Info The dialog box appears Figure 7 2 Ship Info ...

Страница 202: ...onic charts have the most recent update If this is the case the error may be due to incorrect position information from your nav igational positioning device You may adjust this situation using the Position Off set command NOTE Ensure radar range and bearings are correct before performing offset ARPA Target Navigational Aid ARPA Target Navigational Aid Incorrect Ships Position Correct Ships Positi...

Страница 203: ...er which the target should appear The navigational aid label appears on the Selected area Enter the offset using latitude and longitude a Click on OK The new offset in meters appears in the Latitude and Longitude box and the ship is repositioned on the screen Step 4 To cancel an offset a Select Position Offset from the Ship menu The cursor changes to target shape and the Ship Offset dialog box app...

Страница 204: ...validation is being performed accurately for this chart Due to chart in accuracies anti grounding validation is not performed on Background World or general charts 7 1 3 1 Heading Line and Course Vector 1 Heading Line True Heading black in color which displays the ship s heading received from the gyro You may select to the vector drawn to the edge of the screen or as an indicator at the ship symbo...

Страница 205: ...Step 3 Figure 7 5 Own Ship Vector Step 3 Select your favored Ships Vector presentation in the chart Figure 7 6 Search Light Course Vector Heading Line Course Vector On Vector Length 6 minutes Path Predictor 6 minutes On Heading Line to Screen Edge Course Vector On Vector Length 6 minutes Anti grounding Searchlight On or Course Vector Path Predictor Figure 7 6 Ships Vector Presentation example ...

Страница 206: ...ks The Auto Label command will place a ship mark at your boat s location at specified time intervals nautical mile intervals or at specific headings Figure 7 7 Placing ship marks Figure 7 7 Placing Ship Marks Mark at Ship command will place a single ship mark at your ship s location when the command is chosen You may find these commands useful for docu menting such events as the arrival at a waypo...

Страница 207: ... Step 3 Click inside the Anchor Watch Enabled check box The ship s current location appears beneath the check box NOTE When you re open the Anchor Watch dialog box the displayed position is the position of the ship when you enabled Anchor Watch To re set the anchor watch to the current ship s position disable the Anchor Watch Enabled check box then re enable it Step 4 Enter the range distance from...

Страница 208: ... Radar and can be displayed on the ECDIS Procedure Step 1 Select the Ship menu Step 2 Select Acquisition Exclusion Zones 7 1 8 Man Overboard When the Man Overboard command is selected the ECDIS posts an entry to the Event Log You may sound the alarm immediately by clicking on Alarm but ton a second MOB entry and Alarm entry will be posted to the Event Log If the Alarm is signaled ECDIS disconnects...

Страница 209: ...menu Figure 7 1 Step 2 Select the MOB button or select Man Overboard command ECDIS places special MOB marker with time entry on the chart set an Alarm acoustic and visual in the message display area Following MOB information displays in the status bar Position of the MOB distance and bearing to the MOB ...

Страница 210: ...ermany R SYNAPSIS ECDIS 7 11 4343DOC020102 Edition January 2016 Step 2 special MOB marker with time entry Position of the MOB distance and bearing to the MOB Figure 7 9 Man Overboard event see log menu Figure 7 10 Current Log MOB information ...

Страница 211: ...12 4343DOC020102 Edition January 2016 7 1 9 Clear or Cancel Man Overboard Alarm Procedure Step 1 Select the ship menu Figure 7 1 Step 2 Select Overboard All Clear ECDIS turns off the alarm and posts an entry to the ship ...

Страница 212: ...he active waypoint Using the route planning feature a primary as well as a secondary route can be created The route priority can be selected via menu function as needed The primary route is displayed in thick red and dashed lines The secondary route is displayed in thin orange and dashed lines 2 The planned turning circle radius red in color the turning circle which was established when you entere...

Страница 213: ...Operator Manual 8 2 4343DOC020102 Edition November 2019 circle you will need to change either your ship s speed or the planned rate of turn see Autopilot dialog box chapter 12 1 4 ...

Страница 214: ... to Track dialog box has been opened and the active waypoint has been selected 1 Waypoint 2 Ship the position displays in field 2 from the information panel 3 Ships vector True Heading the arrowhead displays the ships position after 6 min 4 Planned speed 5 Limit for the XTD value data see information panel 6 6 Active waypoint value data see information panel 7 7 Scale bar 1 80 000 part length in g...

Страница 215: ...tablished as you entered the waypoint 4 Fairlanes defined by the current cross track error alarm setting 5 Ship s bearing to the active waypoint Primary Routes indicates in dashed red thick line Secondary Routes indicates in dashed orange thin line 6 Route planning You can create two routes in the actual chart The active route is called Primary Route indicates in dashed red thick line and the pass...

Страница 216: ...enu guide chapter 8 2 5 Toggle Routes The first route that has been created or loaded is defined as Primary Route the second one route will be defined as Secondary Route If the Primary Route is deleted by means of the menu function Clear Route the Secondary Route is automatically defined as Primary Route The Routes Menu indicates the current route situation Figure 8 2 there is only Primary Routes ...

Страница 217: ... Route and click the right button from trackball Primary Route Secondary Route Figure 8 3 Pop up windows for Primary and Secondary Route 8 1 1 3 Primary and Secondary Route used in an ECDIS systems with Server and Client management Using the context sensitive pop up window you will find following restrictions between the Primary and Secondary Route window Server and Client Rights chapter 8 2 19 Pl...

Страница 218: ...eon Anschütz GmbH Germany R SYNAPSIS ECDIS 8 7 4343DOC020102 Edition November 2019 Primary Route Server Secondary Route Primary Route Client Figure 8 4 Pop up windows for Primary and Secondary Route Server and Client Rights ...

Страница 219: ...Operator Manual 8 8 4343DOC020102 Edition November 2019 8 2 Routes Menu Commands Display Step 1 Ship Routes Nav Tools Figure 8 5 Routes Menu ...

Страница 220: ...oint of the open route 8 2 8 List Primary Route Shows a waypoint list of the route 8 2 9 Review Route Check Display the results of the last route check against the Vector Chart 8 2 10 Clear Primary Route Clears the open route from the display Turns off route tracking 8 2 11 Send Route to Radar Sends and displays route information to your radar This menu com mand will only appear if you have an ECD...

Страница 221: ...e menu Figure 8 5 a For creating a new route chapter 8 2 1 1 b For performing actions in a current loaded primary or secondary route chapter 8 2 1 2 Safety checks While you are entering waypoints ECDIS automatically checks the route and fair lane cross track limits for unsafe and restricted areas as well as to see if they are reasonable relative to their geometrical coordinates The check results m...

Страница 222: ...t Clear Route from the Routes menu chapter 8 2 10 Select the desired chart area for the route planning Procedure Figure 8 6 Step 1 Select the route menu Figure 8 5 Step 2 Select Clear Route If the menu entry is colored in black otherwise follow Step 3 Step 3 Select Create new Primary Route or select Create new Secondary Route Step 4 Select the first waypoint position by cursor press the Left butto...

Страница 223: ...Operator Manual 8 12 4343DOC020102 Edition November 2019 Step 4 6 Step 2 Step 3 Step 7 Figure 8 6 Creating a new Route ...

Страница 224: ... Floating docks Hulkes Pontons Unsurveyed areas Dangers and Hazards Fixed and floating aids to navigation AtoNs Virtual AtoNs Mooring warping facilities Piles Pylons Shallow obstructions wrecks underwater rocks or soundings Bridges Overhead cables and pipes Conveyors Fishing facilities Ice areas Offshore platforms Log ponds Oil barriers Prohibited and Special Condition Areas Traffic separation zon...

Страница 225: ...tep 2 If no route loaded select Route Manager select a route from the list box click Open as Primary or Open as Secondary button Step 3 Select Edit Primary Route or select Edit Secondary Route The Edit Primary dialog box appears Procedure using the pop up window per cursor Step 1 Place the cursor on a waypoint and click on the right button The pop up window appears Step 2 Select Edit Primary Route...

Страница 226: ...es in the Latitude and Longitude boxes within the new waypoint area Procedure e g using the pop up window per cursor Step 1 1 Place the cursor on a waypoint and click on right button The pop up window appears Step 1 2 Select Edit Primary Route entry Step 1 3 Select the action point Num Extend Step 1 4 Click on the Latitude and Longitude fields in the new waypoint area type in the hemisphere degree...

Страница 227: ...route extending is finished The Save Route dialog box appears displaying the name of the route Step 2 3 To save the route using the same name click on OK If you want to save the route using a new name of up to 25 characters then click on OK If you do not want to save your changes click on Cancel 3 Option button Route Change selected Figure 8 9 You can change a waypoint s location either by moving ...

Страница 228: ...tum is always WGS 1984 Step 3 2 Select the OK button if the a route changing is finished The Save Route dialog box appears displaying the name of the route Step 3 3 To save the route using the same name click on OK If you want to save the route using a new name of up to 25 characters then click on OK If you do not want to save your changes click on Cancel In this case you can change a selected way...

Страница 229: ... the existing waypoint then enter the new waypoint ECDIS redraws the route to include the inserted waypoint Step 4 1 Position the cursor over the waypoint that will follow the inserted waypoint and click Left button or directly select the waypoint in the waypoint list box Position the cross hairs at the location for the new waypoint and click Left button The waypoint is inserted and the route is r...

Страница 230: ...e the route using a new name of up to 25 characters then click on OK If you do not want to save your changes click on Cancel 6 Option button Route Reverse If you are using the Track Control command and you begin to make changes to a route the Edit Route dialog box is opened ECDIS automatically switches to manual steering Once you have made the changes you must reactivate track control chapter 8 2 ...

Страница 231: ...nd shown with a character preceding the XTD leg values Individual XTD values will be shown without any prefix characters In order to set XTD Limits individually click into the XTD field for a waypoint and edit the XTD Limit for the Track Leg leading to this waypoint Step 1 Figure 8 10 Enter a Cross Track error 8 Compact Display The layout of the Editor dialog may be switched to Compact or back to ...

Страница 232: ...eed and ETA estimated time of arrival fixes Any changes to speed or ETA items will recalculate other dependent variable speed and ETA values for the route Any value change will also fix that value showing it in amber color disabling it for further changes Selected value fixes may be removed by context menu see chapter 8 2 1 2 13 The edit controls for speed and ETA are limited to reasonable min and...

Страница 233: ...abled position on the route Label label Latitude latitude Longitude longitude Rad turn radius XTD cross track limit approaching that waypoint Spd planned speed approaching that waypoint In Voyage mode the following waypoint list columns are shown see Figure 8 13 with all columns disabled except enabled speed and ETA columns position on the route Label label Latitude latitude Longitude longitude Sp...

Страница 234: ...alculated To remove a speed or ETA fix press the right button on a waypoint and select Remove fix for Selected Waypoint see chapter 8 2 1 2 13 To list the current voyage click List button The list dialog is shown Figure 8 14 with applied voyage filter all or fixed ETA s only Fixed speed and ETA values are marked with an appended F character At all time options are shown with TTG Total Time and Tim...

Страница 235: ...ill re do the last route changing operation Up to 20 latest route changes are saved see ECDIS configuration Step 10 1 Click on Undo The last change operation is un done Step 10 2 Click on Redo The last change operation is re done 11 Datum Conv Option button Route Num Extend selected Enter coordinates found on paper charts with different datum not WGS 84 When entering waypoints by specifying coordi...

Страница 236: ...y Route entry Step11 3 Select the action point Num Extend Step 11 4 Click the Datum Conv Button and select the corresponding datum from the opening datum list click Ok Step 11 5 Select existing waypoint in the waypoint list box Step 11 6 Enter waypoint coordinates in the Datum Latitude Longitude fields and click on Convert The coordinates will be converted and filled automatically in the Lat Lon o...

Страница 237: ...m 12 Great Circle Navigation ECDIS provides a feature that allows you to navigate great circle routes Whenever you change the route that two neighboring waypoints exceed 200 NM distance from each other ECDIS prompts you with the following dialog Figure 8 16 Intermediate Waypoints dialog box ...

Страница 238: ...inue click No to bypass this single dialog or click Cancel to abort all dialogs i e undo all changes NOTE An explicit delete waypoint operation will not activate the Intermediate Waypoints dialog box NOTE To add intermediate waypoints between 2 neighbor waypoints which have at least 200NM distance select both waypoints in the waypoint list click on right button in the pop up window select Create I...

Страница 239: ...Figure 8 18 These points create a curved great circle route larger distance shortest way Figure 8 18 Rhumb Line Vs a Great Circle Route 13 List Context Operations Depending on current operating mode standard voyage a number of list context actions are available Depending on the currently selected list entries useless actions are not shown for exp do not show an action to fix an ETA which is alread...

Страница 240: ...d can be set simultaneously selected waypoints can be deleted all waypoints can be selected a route check operation can be triggered intermediate waypoints may be added and consecutive selected waypoints can be saved as a new route To trigger a context action press the right button on a single selected waypoint or on a waypoint which is part of a multi selection Figure 8 20 Voyage Mode Context Act...

Страница 241: ...ETA display mode can be set all ETA s fixed ETA s only the Time column display mode can be set TTG Total Time Time on Leg and the voyage can be deleted 8 2 1 3 If Track Control is active If the route modifications are finished the modified route has to be activated by the Activate bottom The text field at the bottom of the dialog box Information displays corresponding messages Figure 8 21 Change P...

Страница 242: ...endent on the version of the installed Professional database The route will be created as e new secondary route The route can be saved and reloaded as any other manually created route 8 2 2 1 Planning a Route In this case the route starts and the destination can be planned via a list or via a cursor positioning in the chart Following combinations are possible with the Add port button via a list on...

Страница 243: ...ponding port Step 3 Select the desired destination port as Step 2 describes Step 4 Select whether Inshore Traffic Zones and Rivers shall be considered for route planning Step 5 Adjust the Draft the default turning Radius the desired speed and the XTD limit Step 6 Special application buttons The button Reverse provides the possibility to swap the start and end destination The Remove button s is to ...

Страница 244: ...re 8 22 Automatic Route Planning Port Information 8 2 2 2 Planning with certain Passages Certain passages can be excluded from automatic route planning Procedure Figure 8 22 Step 1 Press the Passages button that shows a list of all available passages By using the default options all passages are enabled Clear the according check marks to disable passages and press the Apply button The new passage ...

Страница 245: ...ications If the system can not create a route between two locations this may have one of the following causes Either a port or a part of the route is too shallow for the given draft The route would contain a too sharp turn for a valid route All possible passages are disabled Possible solutions Select a manually entered start or end position outside the port Verify the given draft Enable Inshore Zo...

Страница 246: ...Operator Manual Raytheon Anschütz GmbH Germany R SYNAPSIS ECDIS 8 35 4343DOC020102 Edition November 2019 Step 2 Step 1 Figure 8 23 List of all available passages ...

Страница 247: ...st and simple way Four different types of SAR patterns are provided Expanding Square Sector Parallel Track Expanding Track Figure 8 24 Create SAR Pattern Route All SAR patterns can be adjusted by several parameters A preview of the resulting SAR pattern is immediately displayed on the chart All parameters are preset with reasonable values which supports a fast creation of a suitable SAR pattern ...

Страница 248: ...t if available otherwise to own COG Action what shall be done automatically after pressing OK Save set as Primary Route start Route Monitoring only available on Route Server Save set as Primary Route only available on Route Server Save set as Secondary Route Just save the Route Route Name default SAR date time e g SAR 20151209 093014 Optionally the chart display may be set in an auto scale mode Th...

Страница 249: ...he termination of track control Route monitoring will be terminated without confirmation Examples for SAR patterns Expanding Square and Sector SAR pattern are covering an area centered on the start position Opposed to that Parallel Track and Expanding Track are covering a search area in the given direction orientation of the pattern Figure 8 25 SAR Pattern Expanding Square ...

Страница 250: ...Operator Manual Raytheon Anschütz GmbH Germany R SYNAPSIS ECDIS 8 39 4343DOC020102 Edition November 2019 Figure 8 26 SAR Pattern Sector with One Cycle ...

Страница 251: ...Operator Manual 8 40 4343DOC020102 Edition November 2019 Figure 8 27 SAR Pattern Sector with Two Cycles ...

Страница 252: ...Operator Manual Raytheon Anschütz GmbH Germany R SYNAPSIS ECDIS 8 41 4343DOC020102 Edition November 2019 Figure 8 28 SAR Pattern Parallel Track ...

Страница 253: ...Operator Manual 8 42 4343DOC020102 Edition November 2019 Figure 8 29 SAR Pattern Expanding Track ...

Страница 254: ...in alphabetical order A short status information is shown dependent on currently selected routes i e total routes available selected route count statistic values for the single selected route like Waypoint Count and Last Edited Because routes are independent of plots you can handle any route while any plot is open 8 2 4 1 Open The Open as Primary and Open as Secondary commands allow you to load a ...

Страница 255: ...he name of the route you want to open Step 3 Click on either Open as Primary or Open as Secondary button Option Enable Auto Show Route to automatically show a loaded route on chart 8 2 4 2 Delete The Delete command allows you to delete routes from the route list that you no longer need Once a route is deleted it cannot be restored Procedure Step 1 Select Route Manager from the Routes menu Step 2 C...

Страница 256: ...d on ECDIS configuration The selected routes are exported using the selected format and written to the selected drive Figure 8 31 Formats The availability of the export formats depends on the system configuration The following route export formats are supported ROUTE Proprietary Raytheon Anschuetz Route format CSV Comma separated values may require additional configuration of columns and values GP...

Страница 257: ...s import formats You can only import routes which have been exported with a compatible software version Procedure Figure 8 32 Step 1 Select Route Manager from the Routes menu Step 2 Select the drive from which to import the routes Step 3 Click on Import button Select file s to import Step 4 Click on Import from button the route file s is are imported from the selected drive Figure 8 32 Import Rout...

Страница 258: ...lick on Protect or Deprotect button the button inscription is Protect or Deprotect depending on the protect state of the selected files The selected routes are protected or unprotected depending on the chosen operation 8 2 5 Toggle Routes The menu function Toggle Routes allows quick switching between a primary and a secondary route For this action both routes must be defined within the same part o...

Страница 259: ...t button Select List Secondary Route The following dialog appears NOTE The List Route dialog box appears confirming average ship s speed ECDIS automatically calculates it but you may enter a different speed if you wish to Step 3 Select your planned speed for the route legs or for the whole route Figure 8 34 List Route Step 4 Click on OK when done For detailed Information chapter 8 2 8 ...

Страница 260: ...Operator Manual Raytheon Anschütz GmbH Germany R SYNAPSIS ECDIS 8 49 4343DOC020102 Edition November 2019 Figure 8 35 Route List Step 5 Select Close when you have finished viewing the route list ...

Страница 261: ...foreseen relative to waypoint and track leg a message box appears informing that the route enters a restricted area Procedure Figure 8 36 Step 1 Select Open Route from the Routes menu Select Save Routes The Save Route dialog box appears with the current route name displayed in the text box If you have not saved this route before the box is empty Step 2 Click in the text box and enter a name for th...

Страница 262: ...point the first waypoint on the route Procedure Step 1 Select Open Route from the Routes menu Select Show Route The display is centered on either the active waypoint or first waypoint on the route 8 2 8 List Route Primary or Secondary The List Route command enables you to display information about the open route When you select the command TextView opens and displays information about your route c...

Страница 263: ... traveled so far This is continually updated Dist to Go The route distance to the last waypoint on the route from the current ship position Rad nm Turn radius at that waypoint XTD m Cross Track Limit approaching to that waypoint Plan Spd Planned speed for the route leg e g from waypoint 1 to waypoint 2 TTG Time to Go the time needed at the current speed to reach the next waypoint At the bottom of ...

Страница 264: ...lso be checked explicitly using the Routes Check Route menu command chapter 8 2 18 The results of the latest route check can be reviewed with this menu command The results are displayed in a window similar to the Object Information window The check results can either be ordered by Object Types e g Depth Area Land Area Restricted Area Wreck or by Waypoint Track Leg Figure 8 38 Route Check Results o...

Страница 265: ...ble clicking on an object the chart will be centered on the object For highlighting of route check result see also chapter 5 2 8 Chart Indications 8 2 10 Clearing Routes from the Display When you have finished navigating a route you can clear it from the display using the Clear Route command Be sure to save a new or updated route before using this command This command does not delete the route fro...

Страница 266: ...y device whose I O ports are according to designed NMEA 0183 8 2 11 1 Send to Radar Procedure Figure 8 40 Step 1 Click with the right button on the object you want to send to your radar e g Depth contour then press Send to Radar from the dialog box which appears NOTE The object information is sent to the radar If the Send to Radar command in not enabled check to make sure that the radar is the act...

Страница 267: ... to Radar 8 2 11 2 Send Route to Radar The Send Route to Radar function is used for the Primary Route Route Monitoring can be activated if you want to transfer a Primary Route to the connected radar display This is an automatic function without any pop up window information ...

Страница 268: ...ute can be selected by using the arrow buttons to switch between waypoints or directly by clicking a waypoint by cursor Window Select Active Waypoint displays position coordinates of the selected waypoint If you want to approach the first waypoint of a route a thin dashed line is drawn from the ship s symbol to the waypoint provided with information about planned speed and course to that waypoint ...

Страница 269: ...t Route Monitoring Alternative selection place the Target Cursor on a waypoint from a Route and click the right button Select Route Monitoring from the menu box which appears Step 2 Select the desired waypoint per left or right arrow button or per target cursor speed course to steer course line Step 2 Figure 8 41 Route Monitoring ...

Страница 270: ...t select an active waypoint until the Track Control command is selected Once the dialog box is open it selects the first waypoint on the route as the active waypoint Once an active waypoint has been selected ECDIS circles the active waypoint for which the waypoint alarm will be given and draws predicted and planned turning radius circle as well as a dotted course line planned track between the way...

Страница 271: ...erent Wheel Over Line presentations are provided on the ECDIS WOL crossing the WOP and vertical to actual track line WOL crossing the WOP and parallel to next track line If the ECDIS is connected with the autopilot NP5500 the WOL runs vertical to the actual track line Figure 8 42 ECDIS connected with NP5500 ...

Страница 272: ...cted with other autopilots 8 2 13 1 Information Panel NAV Route Description The NAV panel of ECDIS uses the TO WPT box to display information about the active waypoint you are approaching It provides you with the cross track deviation the bearing the distance the position and the estimated time of arrival ETA for the waypoint for detailed panel information chapter 2 7 Figure 8 44 Information Panel...

Страница 273: ...oint and the estimated time to move at the ship s current speed for detailed information chapter 2 7 Figure 8 45 Information TRACK Route Description 8 2 13 3 Activating Track Control NOTE Track Control is not an ECDIS function To activate this function an AUTOPILOT System has to be connected For detailed information ask Raytheon Anschütz NOTE Before activating Track Control ensure that the intende...

Страница 274: ...le suppose you are navigating a route from Seattle to Pusan and decide to stop in Prince Rupert When you are ready to continue on to Pusan open your route again and then using the Track Control command you can reassign the active waypoint and continue on the route Procedure Figure 8 46 Step 1 Select Track Control from the Routes menu Alterative selection place the Target Cursor on a waypoint and c...

Страница 275: ...Operator Manual 8 64 4343DOC020102 Edition November 2019 Step 2 indicated only if NP208x or NP5500 is installed Step 3 Figure 8 46 Activating Track Control ...

Страница 276: ...ack Control from the Routes menu Alterative selection place the Target Cursor on a waypoint and click the right button Select Track Control from the menu box which appears Step 2 Move the cursor over the waypoint to which you want to navigate and click or use the left and right arrow keys at the top left hand corner of the dialog box The following message will appear Figure 8 47 Stopping Track Con...

Страница 277: ...elect Track Control from the Routes menu Alterative selection place the Target Cursor on a waypoint and click the right button Select Track Control from the menu box which appears Step 2 Move the cursor over the waypoint to which you want to navigate and click or use the left and right arrow keys at the top left hand corner of the dialog box The following message will appear indicated only if NP20...

Страница 278: ...the ETA Based on the current speed for the whole route from current ship s position via the TO Waypoint to the end of the route Based on the planned speed for all Route legs except for the distance from current ship s position to the TO Waypoint and for all Route legs for which no planned speed is defined Optionally an Interim ETA at a selectable waypoint may be calculated The calculated ETA is di...

Страница 279: ...he complete route is visible Procedure Figure 8 51 Step 1 Select Distance To Run from the Routes menu The Distance To Run dialog box appears Step 2 Adjust the desired width of the interval either by typing it in or via the spinners Step 3 If the Enabled box is marked click on OK corresponding labels are displayed along the route indicating distances according to selected interval Step 2 Step 3 Fig...

Страница 280: ...out the chart such that the complete route is visible Procedure Figure 8 52 Step 1 Select Distance To Run from the Routes menu The Distance To Run dialog box appears Step 2 The adjusted range of D To R Intervals is 4 NM Enabled box is marked Step 3 Select the Planned Interval Pos directly by typing in or via the spinner Enabled box is marked Click on OK Next to this selected point in this example ...

Страница 281: ...Operator Manual 8 70 4343DOC020102 Edition November 2019 Info field Figure 8 52 Distance To Go and Planned Position ...

Страница 282: ... can be stored under a typical name so you can call it up every time Procedure Figure 8 53 Step 1 Select Pre Departure Checklist from the Routes menu The dialog box appears Select a new or an old file e g a new file Step 2 Click on NEW if you want to create a new checklist Now you can enter your text items Step 3 Click on the Save button and save file as e g HARBOUR CHECK Step 4 Click on the Expor...

Страница 283: ...g box appears The Waypoint Approach Alarm The Alarms dialog box allows also to adjust the time at which an alarm is to be given when the ship is approaching the wheel over point The alarm will be released at the specified time before the vessel will reach the wheel over point If the ECDIS is used with the Autopilot NP 20 this time value can be adjusted between 3 and 6 minutes Cross Track Error Ala...

Страница 284: ...ter 8 2 1 2 7 NOTE ECDIS calculates the current cross track error as the perpendicular distance between your ship s position and the intended track The cross track deviation limit establishes the width of the fair lanes and of the vessel s searchlight If the cross track error is set to 0 5 NM fair lane and searchlight width would be equal to 1NM see The Ship s Heading Vector and Anti Grounding Loo...

Страница 285: ...tion place the Target Cursor on a waypoint and click the right button Select Alarm from the menu box which appears The dialog box appears Step 2 Type the PreWarning time in minutes to be released before course change The Cross Track Deviation Limit text box displays the value in m which has been set in the Create Change Route dialog chapter 8 2 1 2 7 Step 3 Click on OK Figure 8 56 Alarms dialog bo...

Страница 286: ...ate new situations can arise Check Route examines the entire route to that and effect and release alarm messages if necessary The individual route sections are to be checked over chapter 8 2 1 2 Procedure Figure 8 57 Step 1 Select Open Route of the Routes menu the dialog box appears Select on the name route name of interest Step 2 Click on either Open or Open and Show Alterative double click on th...

Страница 287: ...dling and deleting of Primary and Secondary Routes The Primary Route is transferred to the Client ECDIS units and indicated there Track Control can only be activated via the ECDIS having the Route Server Rights Route Client Rights means The creation handling and deleting of Secondary routes The Primary Route can be indicated but not deleted Select Route Server means Procedure Figure 8 58 Step 1 Se...

Страница 288: ...view Route Check Results Clear Route Send Route to Radar Route Monitoring Track Control ETA Calculation Distance To Run Planned Position Pre Departure Checklist Alarms Check Route Edit Primary Route Edit Secondary Route Automatic Route Planning Port Information Route Manager Toggle Routes Save Route Show Route List Route Review Route Check Results Clear Route Send Route to Radar Route Monitoring T...

Страница 289: ...Operator Manual 8 78 4343DOC020102 Edition November 2019 Intentionally left blank ...

Страница 290: ...Operator Manual 8 78 4343DOC020102 Edition January 2016 Intentionally left blank ...

Страница 291: ...onic bearing line and variable range marker which display the range and bearing from own ship to another point 9 1 2 Show EBL VRM Labels Allows to enable disable the display of labels on fixed and free EBL VRMs 9 1 3 Rhumb Great Circle Line Do rhumb line and great circle line calculations 9 1 4 Datum Trans formation Allows to calculate datum transformations for selected positions 9 1 5 Cursor Info...

Страница 292: ...o determine ship s location when forced to operate in Dead Reckon ing mode DR or as a visual check of the ship s electronic positioning systems 9 1 8 Tidal Prediction Allows to calculate tidal predictions for more than 7000 tide stations available with Jeppesen C MAP database Professional or JeppesenPRIMAR 9 1 9 Magnetic Variation Allows you to actuate the magnetic variation ...

Страница 293: ...the display 9 1 1 1 Range and Bearing from One Point to Another Procedure Figure 9 2 Step 1 Select Free EBL VRM from the Nav Tools menu or click on the Free EBL button on the tool bar Step 2 Position the target cursor at the first point of interest then click the Left button This anchors the first base point for the electronic bearing line The other end of the line moves with the cursor In the cur...

Страница 294: ...Operator Manual 9 4 4343DOC020102 Edition January 2016 EBL VRM position inhumation field Step 2 Step 3 Figure 9 2 Range and Bearing from One Point to Another ...

Страница 295: ...The anchor point of the EBL is located at the ship s center Step 2 Position the target cursor at the intended location then click the Left button In the cursor boxes the range and bearing values at cursor position are displayed Step 3 ECDIS updates these values until you stop moving the cursor and press Left button Step 4 Press the Right button or Esc when you are done fix EBL VRM position informa...

Страница 296: ...102 Edition January 2016 9 1 2 Show EBL VRM Labels This function enables disables the display of labels on fixed and free EBL VRMs The label is displayed outside the VRM near the intersection of EBL and VRM Figure 9 4 EBL VRM Labels ...

Страница 297: ...itions on a rhumb line or a great circle line Procedure Figure 9 5 Step 1 Select Rhumb Great Circle Line from the Nav Tools menu The dialog box appears Step 2 Enter Start and End Coordinates The bearings and distances are calculated each time one of the coordinates is changed Step 3 Each of the lines may be shown on the chart by selecting the corresponding check box Step 2 Step 3 Figure 9 5 Line T...

Страница 298: ...on from the Nav Tools menu The dialog box appears Step 2 If you want to change the Source Datum press the Change button a library list window appears Select another datum item from the list via cursor Press the OK button or If you want to change the Target Datum press the Change button a library list window appears Select another target item from the list via cursor Press the OK button Step 2 Figu...

Страница 299: ...nformation menu provides configurable tooltip information Configurable items are Position as shown in the status bar or with selectable datum Range Bearing as shown in the status bar ETA based on current speed TOA calculated speed to reach position at time of arrival Depth Areas Vertical Clearance Point Objects Figure 9 7 Cursor Information ...

Страница 300: ... the Nav Tools menu The dialog box appears Figure 9 8 Cursor Information Dialog Box NOTE Depth Areas Vertical Clearance and Point Objects refer to chart objects and are only shown if chart database data is available NOTE The cursor field in the status bar is still giving cursor position for datum WGS 84 ...

Страница 301: ... from the Nav Tools menu The Cursor Information dialog box appears Figure 9 8 Step 2 To change the datum of the cursor position select the currently activated datum The Cursor Offset dialog box appears Step 3 Select Change The Select Datum dialog box appears Step 4 Select a datum and confirm decision with OK Step 2 Step 3 Figure 9 9 Cursor Information example ...

Страница 302: ...he display menu Fixed Position dialog box appears Select the Option button New Select the Method of fix Step 3 Position the cursor at the position of interest press the Left button or fill in the Latitude and Longitude fields via keyboard Then press the Accept button The Fix Symbol appears in chart Marked with the current fix time and the identification letter for Method of fix Step 4 For deleting...

Страница 303: ...ed to operate in the Dead Reckoning DR mode S As a visual check of the ship s electronic positioning systems Up to 4 Lines Of Position LOP may be entered Each of these LOP may be either a bearing line or a range arc The ECDIS stores the own ship s movement data for up to 4 hours for automatic determination of Course Over Ground COG and Speed Over Ground SOG which will be used for transferring the ...

Страница 304: ...Turns LOP Display ON or OFF 6 Error Bounds If there are known offset errors Gyro error or Radar index error these errors can be entered in the Error Bound dialog and will be considered automatically in subsequent drawings and calculations for LOP Figure 9 12 Error Bound 7 Position Fix The button Position Fix will apply the fix by placing a Position Fix Marker at the calculated or manually adjusted...

Страница 305: ...elect Bearing or Range Step 3 Place the cursor over the selected Nav Aid and press left button The Latitude Longitude values will appear in the Reference Position boxes Enter the sighted bearing or range Step 4 Click on the Add button The LOP appears in the list box The bearing line or the range displays on the chart For creating the next Line Of Position start with Step 2 again Step 5 Click on th...

Страница 306: ...wo equivalent groups e g as a result of two overlapping range arcs In this case the user may either select one of these two groups as the most likely position of the ship or add an additional LOP in order to achieve a unique accumulation of intersections for the fix While the group selection is displayed the groups are marked on the chart as well ...

Страница 307: ...g ports more than 5000 ports Use the scroll bar for selecting the desired port Position the cursor on the port name or the position of interest and press the Left button The max high and min low water tidal appears as a graphical display 2 Ports in View Shows only the existing ports for the current chart area By using the Zoom In function the existing ports in this area appear in the list box Posi...

Страница 308: ...tor Manual 9 18 4343DOC020102 Edition January 2016 Check box 4 for showing the tidal information marks on charts up to 1 500 000 only Symbol for the information mark 1 2 5 1 4 3 Figure 9 14 Tidal Prediction ...

Страница 309: ...version Figure 9 15 Warning Message Procedure Step 1 Select Magnet Variation from the Nav Tools menu showing the current geomagnetic field deflection or select OK button from the Warning message doing the update Figure 9 15 The dialog box appears Step 2 If you got the Update CD select Magnet Variation from the Nav Tools menu again Insert the CD into the CD drive Click on the Browser button and sel...

Страница 310: ...Operator Manual 9 20 4343DOC020102 Edition January 2016 Step 1 Step 2 Step 3 Figure 9 16 Magnetic Variation ...

Страница 311: ...ARCS CMAP ENC DNC exactly in the desired position and edited if needed The editing of the desired entries is possible at all times Entries are automatically saved in the currently active object group 10 1 Plot Layer Commands Step 1 Routes Nav Tools Plot Layer Draw Objects Clear Objects Merge Object Groups Export Object Groups Import Object Groups Figure 10 1 Draw Menu Table 10 1 Overview Draw Menu...

Страница 312: ...oup of chart entries deleting a desired group of chart entries 2 Edit Edit is subdivided into following groups Object for selecting the display mode Action for editing objects Color for the object attribute Color Style for the object attribute Style 3 Position shows the current cursor position during the recording phase Can be used for entering the position The position is taken over by clicking o...

Страница 313: ...he Circle selection mode the Radius and the Number of intermediate points will be determined by entering the respective values into an additional dialog box S Info for Object Area selection 3 points minimum An area consists of 3 points minimum An area can also be displayed as a circle 1 point In this selection mode the Radius and the Number of intermediate points will be determined by entering the...

Страница 314: ...g ANCHOR PLACE Click on the Add Group button Step 3 Select the Object e g Area Select the Color and the Line Style Step 4 Placing a new object Place the cursor in this chart area where you want to have the drawing Click on the Left button Follow the InfoText If you want to place a second object same type or another type under the name ANCHOR PLACE start with step 2 again It is possible to Insert t...

Страница 315: ...p is 200 points 1000 line points 1000 area points and 100 arrows Procedure Figure 10 3 Step 1 Select Merge Object Group from the Plot Layer menu The dialog box appears Step 2 Enter a name in the New Group text box Select the objects you want to merge Click on the Merge selected Groups into new Groups button Step 4 The new object group name appears in the object list attended by a text message in t...

Страница 316: ...Object Group from the Plot Layer menu The dialog box appears displaying the names of all the object groups saved in the list Step 2 Select a name of the object you want to export Step 3 Insert a storage device and click on the Export button The dialog box remains open for you to copy additional objects Click on Close when you are done Step 3 Step 2 Figure 10 4 Export Object Dialog Box ...

Страница 317: ...ware from Raytheon Anschütz Procedure Figure 10 5 Step 1 Select Import Object Group from the Plot Layer menu The dialog box appears displaying the names of all the object groups saved in the list Step 2 Insert a storage device and click on the Import from button The dialog box remains open for you to import additional objects Select a name of the object you want to import Step 3 Click on Close whe...

Страница 318: ...Operator Manual 10 8 4343DOC020102 Edition January 2016 Intentionally left blank ...

Страница 319: ...the last 14 days 11 1 Logs Menu Commands Nav Tools Logs Integration Help Current 24 Hour Log Manage 24 Hour Log Manual 24 Hour Log Entry Voyage Recording Plot Layer Figure 11 1 Logs Menu Log Commands Function 11 1 1 Current 24 Hour Log Shows the Current 24 Hour Log displayed in a tabulated dialog box 11 1 2 Manage 24 Hour Log Shows up to 30 previously recorded 24 Hour Logs in a list for viewing se...

Страница 320: ...leared Waypoint approach to next waypoint during track control Text manual entries Environmental data manual entries Voyage Start or End manual entries The columns Date Depth VoyDist and Wind and certain events may be hidden from the 24 Hour Log display by filter settings Procedure Figure 11 2 Step 1 Select Current 24 Hour Log from the Logs menu The dialog box appears The Current 24 Hour Log is au...

Страница 321: ... the box Print Click on Print to print out the 24 Hour Log contents on a separate printer Export Click on Export to create a file TXT format with the contents of the Current 24 Hour List in the view The export will be done on the selected media drive or USB drive attached to the system Follow the dialog box Figure 11 3 Figure 11 3 Export Dialog Box ...

Страница 322: ...u may optionally specify a time range for filtering the 24 Hour Log If any filtering event or time is applied a note Filtered is added to the title bar of the 24 Hour Log list box and an asterisk indicator is displayed on the filter button Figure 11 4 Filter Dialog Box Click on Cancel to close the dialog box without changing the filter settings Click on Ok when you are done Refresh Click on Refres...

Страница 323: ...eriod can be configured by a service technician The 24 Hour Logs are displayed in a list and may be viewed exported or deleted separately Procedure Figure 11 5 Step 1 Select Manage 24 Hour Log from the Logs menu The dialog box appears Figure 11 5 Manage 24 Hour Log Dialog Box Command Buttons View Click on View to display the selected 24 Hour Log The display of a complete previous 24 Hour Log looks...

Страница 324: ...llow the dialog box Figure 11 6 NOTE After exporting the user may choose to delete the exported logs Figure 11 6 Export Dialog Box Delete Click on Delete to delete a selected 24 Hour Log entry NOTE The 24 Hour Logs of the current and the previous day are protected and may not be deleted The protected 24 Hour Logs are displayed in dark red A larger number of protected 24 Hour Logs may be configured...

Страница 325: ... voyage All manual 24 Hour Log entries will be formatted as text in a separate row of the Current 24 Hour Log All other columns e g Time Position Heading will be filled automatically with the current values S Text Procedure Figure 11 7 Step 1 Select event type Text Step 2 Enter the text Step 3 The text string will be formatted as a text in a separate row of the Current 24 Hour Log dialog box Step ...

Страница 326: ...t the button Edit to define user text templates Step 2 Click the button New to enter user text Enter user text e g Hello World Step 3 Click the button Apply Step 4 Click the button Close to store the user text Step 2 Step 3 Hello World Step 1 Step 4 The defined text templates are selectable to enter log text Figure 11 8 Edit Log Text Blocks ...

Страница 327: ...t event type Environment Step 2 Enter the values for Air Temperature Air Pressure Water Temperat ure Wave Height Wave Direction Visibility Coverage The C button will clear the corresponding field Step 3 The text string will be formatted as a text in a separate row of the Current 24 Hour Log dialog box Step 1 Step 2 Step 3 Figure 11 9 Manual 24 Hour Log Entry ...

Страница 328: ...Procedure Figure 11 10 Step 1 Select event type Voyage Step 2 Select Start Voyage or Select End Voyage An End Voyage entry will stop measuring the voyage distance Step 3 Enter the value for Initial Voyage Dist Step 4 The text string will be formatted as a text in a separate row of the Current 24 Hour Log dialog box Step 1 Step 3 Step 4 Step 2 Figure 11 10 Voyage Dialog Box ...

Страница 329: ...ys This record is registered in the recorded track area of the voyage recording box using the UTC data of the record as reference name These registrations will loose their Write protect mark P after 14 days The latest registration is displayed as the last line of the recorded tracks area Procedure Figure 11 11 Step 1 Select Voyage Recording from the Logs menu The dialog box appears Figure 11 11 Re...

Страница 330: ...e label Display the Recorded Tracks To display the recorded tracks select the desired track via cursor from the recorded tracks list Command Buttons Show The recorded track is superimposed on the chart As a recorded track may be some weeks old its location has to be looked up manually if you want to see it on the screen zoom out as far as necessary and look for the recorded track then zoom in the ...

Страница 331: ...INS 12 1 2 Target Options Allows to select the specific target information displaying on the chart 12 1 3 Radar Overlay Settings Option Allows the user to display the real Radar PPI as an overlay on the ECDIS display The radar overlay settings allow the user to find the individual radar overlay quality 12 1 4 Autopilot Allows the user to turn on or off the transmission of data to the autopi lot as...

Страница 332: ...t management 12 1 10 1 Tender Configura tion Option Allows the user to set general tender options to maintain the list of configured tenders and to manage recorded tender trails 12 1 10 2 Tender In formation Option Allows the user to call up the alphanumerical tender information 12 1 11 Monitor Settings Allows the user to set the backlight brightness and the menu info panel brightness 12 1 12 Prof...

Страница 333: ...e s of navigation positioning device s speed device s and depth device s you have integrated into the ECDIS or Multifunction Console used as single system Console Black Box Version or used in the Integrated Navigation System INS Procedure Figure 12 2 Sensor selection Step 1 Select the ship menu Figure 7 1 Step 2 Select Nav Device Selection 1 2 3 4 5 6 status display Figure 12 2 CCRS Selection Mode...

Страница 334: ...is available in AUTO mode and MAN mode ENABLE means that the sensor information has been included in the CCRS rating DISABLE means that the sensor information has been included in the CCRS rating However this sensor information is not forwarded as active information to the down line applications Radar and ECDIS The quality indicator GREEN ORANGE and RED if corresponding to IEC 62288 edition 1 or G...

Страница 335: ...e ENTER key The online keyboard disappears 3 HEADING All sensors which can be used within a single system or INS are displayed at the heading display The SELECT soft buttons are available only in MAN mode ENABLE selection is available in AUTO mode and MAN mode ENABLE means that the sensor information has been included in the CCRS rating DISABLE means that the sensor information has been included i...

Страница 336: ...N YELLOW and ORANGE if corresponding to IEC 62288 edition 2 is always displayed within the STATUS display The additional entry of the device designation depends on the content of the data telegram received Failure of the speed sensors In case of the MANUAL select function is enabled After the failure of all speed sensors the last valid speed through water STW information is transferred to the MANU...

Страница 337: ...TATUS display The additional entry of the device designation depends on the content of the data telegram received 6 DEPTH All sensors which can be used within a single system or INS are displayed at the DEPTH display The SELECT soft buttons are available only in MAN mode The ENABLE selection is available in AUTO mode and MAN mode ENABLE means that the sensor information has been included in the CC...

Страница 338: ...ance is categorized in three rating levels GPS1 GPS2 GPS2 as result from CCRS rating this sensor has good integrity GREEN as result from CCRS rating this sensor has doubtful integrity ORANGE Data provided by this sensor can be used carefully but not for automatic control functions Please note If there is only one source for a certain type of data this source has doubtful integrity In this case dou...

Страница 339: ...sor has good integrity GREEN as result from CCRS rating this sensor has doubtful integrity ORANGE Data provided by this sensor can be used carefully but not for automatic control functions Please note If there is only one source for a certain type of data this source has doubtful integrity In this case doubtful integrity is not an indica tion for bad performance as result from CCRS rating this sen...

Страница 340: ... AIS targets can be displayed on the ECDIS screen detailed information on AIS targets can be shown on request and alerts for LOST and DANGEROUS AIS targets will be generated The Target Options function allows to change the following settings Figure 12 5 Options The display of AIS and ARPA targets can be enabled or disabled Draw the hull shape If only the AIS target symbol is displayed select the Z...

Страница 341: ...Target alerts can be adjusted Ship trails Past positions available in progressive mode only subdivided in selectable interval time and length time AIS Label The default AIS label is selectable with Ship name Call sign MMSI Target Association The Target Association is organized by factory predefined named groups such as CoastelWaters HarbourBerthing Default OpenSea Pilotage RadarAssosiation RadarOn...

Страница 342: ... 2016 AIS target filtering comprises of the two settings for Show AIS AtoN and Base Stations and the Visual Range Figure 12 5 Target Options Menu If the Own Ship AIS Transponder Data is available at the ECDIS an extended AIS Options dialog is displayed ...

Страница 343: ...Operator Manual Raytheon Anschütz GmbH Germany R SYNAPSIS ECDIS 12 13 4343DOC020102 Edition January 2016 Figure 12 6 Association Groups ...

Страница 344: ...ary 2016 Figure 12 7 Own Ship Voyage Settings The extended AIS Options dialog provides the possibility to change the own ship voyage settings and write them to the AIS Transponder The none voyage related own ship AIS Transponder data may be displayed ...

Страница 345: ...erous Targets Step 2 Click on the OK button The target presentation changes the dialog box is closed Or click on the Cancel button all changes are discarded The dialog box is closed Step 3 Click on the Target Info button the Target Information window appears This dialog can also be accessed by cursor right clicking trackball button on an AIS or ARPA target For changing the selected target place th...

Страница 346: ...Operator Manual 12 16 4343DOC020102 Edition January 2016 alternative selection via the Tool Bar Step 2 Step 3 Figure 12 9 Selecting an AIS Target ...

Страница 347: ...ADCAST or ADDRESSED Step 4 Click on the New Message button NOTE The reception of a new AIS message will be indicated by a warning in the ECDIS alert window The new message box appears The message may be send as Binary Text Message or as a Safety Related Message to either a dedicated AIS target or as Broadcast Message The arrow button on the right provides some standard distress messages which mess...

Страница 348: ...Operator Manual 12 18 4343DOC020102 Edition January 2016 Step 3 Step 4 5 6 7 Step 2 Figure 12 10 AIS Messages ...

Страница 349: ...h AIS Targets The AIS symbols are assigned in five different pieces of target information De pending on the situation each symbol has a different meaning see AIS sym bols The target information dialog box can be displayed as an additional source of target information All entered targets are listed in the upper window The information on a target selected from the list or via cursor is displayed in ...

Страница 350: ...heading nor COG shall be oriented toward the top of the operational display area Activated AIS targets Activated AIS target with neither reported heading nor COG Activated AIS targets shall be presented as acute isosceles triangles oriented to the tar gets reported heading or COG if heading is not reported and centered at the targets re ported position The base of the triangles shall be 4 mm and t...

Страница 351: ...ck solid line and shall flash until ac knowledged by the user Once acknowledged the symbols shall cease flashing but shall still be presented using the required basic color red until no longer consid ered to be a dangerous target Associated tar gets alterna tive Associated targets repre sented by radar target symbols The user may select to present associated tar gets i e activated AIS targets asso...

Страница 352: ... a single line extending at least 1 mm but not more than 2 mm perpendicular to the heading line in the direction of turn The indicator shall be drawn using a thin solid line style with the same basic color as used for their target symbols Turn indicators for dangerous targets shall be the required color red until no longer danger ous and shall flash with their symbol until ac knowledged by the use...

Страница 353: ... target past position Associated target past positions Optionally target past positions may be shown Past positions shall be presented as a series of small circular symbols of 1 mm diameter They may be connected by a line drawn from the current tracked or reported position of the target The line shall be drawn using a thin short dashed line style with the same basic color as their target symbols ...

Страница 354: ...hall be drawn indicating the purpose of the AIS AtoN On display containing an underlying chart AIS AtoN shall be drawn without indication of pur pose unless the object is selected in which case if available the symbol is drawn indicat ing the purpose of the AIS AtoN Purpose sym bol shall be drawn using a thin solid line style and shall be the same basic colour as the AIS AtoN symbol The height of ...

Страница 355: ...ng the purpose of the AtoN Purpose symbol shall be drawn using a thin solid line style and shall be the same basic colour as the AIS AtoN symbol The height of the purpose symbol shall be not more than 5 mm in length The absence of a charted physical AtoN is communicated as a combined state of virtual and off position This shall be indicated with yellow text Missing above the dotted outline diamond...

Страница 356: ...symbols An ac tive version of the AIS SART shall use the re quired red basic color If the equipment in cludes alert functionality based on active AIS SART then symbol shall flash until acknowl edged by the user AIS SART symbol has no associated speed or course vector If selected the operational mode is indicated as received from AIS Message 14 e g SART ACTIVE SART TEST MOB ACTIVE MOB TEST EPIRB AC...

Страница 357: ...gets Selected associated tar gets Selected AIS ATON Selected AIS SART Selected target symbols shall be presented as broken squares indicated by their corners cen tered on the selected target symbol by the user and clearly extending beyond it The square shall be drawn using a dashed line Alphanumeric text used to label a selected tar get shall be the same basic color as the se lected target symbol ...

Страница 358: ...e acknowledged the lost target symbol and its target symbol AIS SAR aircraft An AIS SAR aircraft shall be drawn with a thin solid outline with the same basic color as used for target symbols The symbol shall be oriented in the direction of the COG The length of the symbol shall be 6 mm AIS SAR vessel If provided a vessel performing SAR opera tions shall be presented by having a circle with cross d...

Страница 359: ... Target Symbol Description of symbol Tracked tender target Default target color Tracked tender target Dangerous Color red flash until acknowledged Associated tar gets From activated tender target and tracked tar gets from one or more radars Associated tar gets Dangerous Color red flash until acknowledged ...

Страница 360: ...r ID AIS MMSI Call Sign Ship s Name CPA in NM TCPA in minutes Distance from own ship in NM Bearing from Own Ship in degree Target Speed in knots and Target Course over ground in degree By clicking on one of the column headers the targets are arranged according to the selected feature Dependent on the number of targets the list may be scrollable The dialog can be resized in order to expand the list...

Страница 361: ... AIS Target Status The list in the lower part shows detailed information about the selected targets from the upper list For changing the selected target place the cursor at a User ID and click on the Left button or place the cursor at an AIS or ARPA target in the chart and click on the right button The list of target Information can be scrolled to display more parameters of the selected target Fig...

Страница 362: ...arget information which is currently not available is indicated as un known The contents of both lists are updated in regular intervals The button AIS Options will open the AIS Options dialog chapter 12 1 2 1 Targets which are currently not visible due to a disabled receive channel are marked with an in front of their ID value For such situations a pop up context menu may be used to re enable the ...

Страница 363: ...dates it periodically The transmission of the radar image S Band as well as X Band depends on the selected service setting All settings selectable via the ECDIS depend on the radar signal and are confined to the ECDIS display The dialog between radar and ECDIS is started via the soft button on the tool bar or the check box in the Radar Overlay Setting dialog box After a short initialization phase ...

Страница 364: ...Operator Manual 12 34 4343DOC020102 Edition January 2016 After the initialization the radar overlay appears on the ECDIS Step 1 Figure 12 16 Radar Overlay Settings Enable Radar Overlay ...

Страница 365: ...S ECDIS 12 35 4343DOC020102 Edition January 2016 12 1 3 2 Using the Radar Overlay Settings Procedure Figure 12 17 Step 1 Select Radar Overlay Settings from the Integration menu The Radar Overlay Settings dialog box appears Figure 12 17 Radar Overlay Settings ...

Страница 366: ... 48 0 Figure 12 18 Pulse Width Range Selection If the Pulse Width Range is changed on the RADAR the range of the radar overlay is automatically adjusted to the new range Figure 12 19 starts with 1 5 starts with 3 0 starts with 6 0 coming from MED1 starts with 12 0 coming from LONG starts with 24 0 RADAR Pulse Width Selection SHORT MED1 MED2 LONG ECDIS Range Selection Figure 12 19 Switch Over to An...

Страница 367: ...y adjusted the gain control results in noise appearing as a light speckle at the dim level This light speckle setting yields the maximum detectability of targets against a noise background If the Gain is set too low weak or distance targets could be missed Correlation Scan To Scan This process requires three complete antenna rotations or scans of the antenna to build up or decay detected targets T...

Страница 368: ...on after the initialization the radar overlay appears on the ECDIS Sweep To Sweep In the Sweep To Sweep Correlation mode the targets coast line etc are dis played in a permanent GREEN shade Figure 12 21 Correlation Sweep To Sweep Press the Apply button after the initialization the radar overlay appears on the ECDIS ...

Страница 369: ...ng the ship prior to reach ing the wheel over point position The WOP wheel over point marker moves to that location In case of an open route with an active waypoint changing the rate of turn will automatically change the predicted turning arc see Edit Route Command chapter 8 2 1 When integrating an autopilot make sure the autopilot is connected to an un shared port This is because autopilot data t...

Страница 370: ...rated with ECDIS You may use depth alert to alarm you when the depth beneath the ship is equal to or shallower than a depth you specify When the alert is triggered ECDIS displays a warning message and beeps every 5 seconds Procedure Figure 12 22 Step 1 Select Echosounder from the Integration menu The dialog box appears Step 2 Click in the Alarm Depth text box then type the depth at which you want ...

Страница 371: ...Operator Manual Raytheon Anschütz GmbH Germany R SYNAPSIS ECDIS 12 41 4343DOC020102 Edition January 2016 Figure 12 22 Echosounder Dialog Box ...

Страница 372: ...nforma tion panel will display True G wind direction True W Wind Speed and Direction over Water takes into consideration the effects of the wind and water currents on the vessel If ECDIS is not receiving speed and course over ground it will look for speed and course over water and will display True W direction Relative Wind Speed and Direction over Gyro takes into consideration wind and water curr...

Страница 373: ...APSIS ECDIS 12 43 4343DOC020102 Edition January 2016 12 1 7 Navigational Text Messages NavTex The NavTex messages are automatically stored and can be displayed in the NavTex window NavTex messages NavTex functions Enable Filter Figure 12 24 NavTex Dialog ...

Страница 374: ...e type NavTex message code UTC time from NavTex NMEA message if provided Frequency the message was received on Error rate in Protection indicator Each of the messages may be expanded to show the contents of the message or collapsed by double clicking on the message line Step 1 The list can be scrolled either with the cursor keys or with the mouse by using the scroll bars Step 2 Step 1 Step 2 Figur...

Страница 375: ...tracted automatically from the con tents of a NavTex message If valid latitude longitude coordinates are recog nized in a line of a NavTex message the ECDIS will automatically move the chart to this position after double clicking on the message line Geographic coordinates extracted from the selected NavTex message will be displayed on the chart Figure 12 26 NavTex Messages with Position Coordinate...

Страница 376: ...efresh the list of NaxTex message will be enabled after new messages have been received Close To close the window Newly received NavTex messages will also be indicated by a marker on the NavTex tool bar button Newly received NavTex messages Figure 12 27 NavTex Tool Bar Button with Marker Figure 12 28 NavTex Tool Bar Button with Drop Down If a new NavTex SAR message is received a corresponding warn...

Страница 377: ...the message has been received Not over air 490 kHz 518 kHz or 4209 5 kHz Last The age of the message between 1 hour and 72 hours Messages content The contents of the message text Message type The message type Protect To protect or unprotect the selected message from automatic deletion Each time the filter criteria have been changed the changes have to be applied by the corresponding button If the ...

Страница 378: ...43DOC020102 Edition January 2016 12 1 8 Entering Information about Your Vessel Ship Info Command Procedure Figure 12 30 Step 1 Select Ship Info from the Integration menu The dialog box appears Figure 12 30 Ship Info Dialog Box ...

Страница 379: ...est Alert The test alert is used to check the alert management in an INS system This test alert must be displayed in the display for alerts in all MFC consoles After acknowledging the alert message the check is finished This test alert can be set from the radar and ECDIS application Step 1 Figure 12 31 INS Test Alert ...

Страница 380: ...on the main ship allows the tender observation and recording The tenders are displayed as small violet circles with a course vector Furthermore tender information can be displayed via the Tender Information window Figure 12 32 Main Ship Jet Ski Tender B Tender A Tender B recorded line with colored depth in formation Figure 12 32 ECDIS with Tender Tracking ...

Страница 381: ...s subdivided into three configuration parts Options used to set general tender options Configuration Tender used to maintain the configured tenders Manage Recordings used to manage recorded tender trails Procedure Options Figure 12 33 Step 1 Select Tender Configuration from the Integration menu or alternative via tool bar key The dialog box appears Step 2 Enable the desired Tender Options such as ...

Страница 382: ... preselected in the service mode Autonomous mode means In this case the Time on Channel function is not used The tender channel selection is managed by Seetrac Basic Unit Step 3 Click on the Apply or OK button for closing the dialog Any changes to the tender configuration or the tender options become valid Step 3 alternative selection via the tool bar key Step 2 Figure 12 33 Tender Configuration O...

Страница 383: ...et in the corresponding tender unit A tender may be temporarily enabled or disabled by checking deselect the check box Name Each tender may be assigned a name for display purposes Ch The channel needs to be set to the corresponding coded channel which is set in the corresponding Seetrac Tender unit Rec Select when the tender shall be recorded using the Tender Recording function Before changing the...

Страница 384: ...43DOC020102 Edition January 2016 alternative selection via the Tool Bar Key Step 2 Step 3 Step 4 Step 1 Disable Tender Recording Enable or disable the record status double klick Record Status Figure 12 34 Tender Configuration ...

Страница 385: ...e or more recorded trails may be selected simultaneously for deleting or exporting The Export function will generate tab separated text files Procedure Manage Recording Figure 12 35 Step 1 Select Tender Configuration from the Integration menu or as an alternatively via the tool bar key The dialog box appears Select Manage Recording Step 2 Select individual by recorded tender trail Step 3 Delete al...

Страница 386: ...Operator Manual 12 56 4343DOC020102 Edition January 2016 alternative selection via the tool bar key Step 2 Step 5 Step 6 Step 3 Step 4 Step 1 Step 7 Figure 12 35 Manage Recording ...

Страница 387: ...dialog Procedure Tender Information Figure 12 36 Step 1 Select Tender Configuration from the Integration menu or as an alternatively via the tool bar key or by clicking on a Tender symbol in the sea chart The dialog box appears Step 2 To Stop Recording Step 3 To Clear All Tender Step 4 Change to Tender Options alternative selection via the tool bar key Step 1 Step 2 Step 3 Step 4 Figure 12 36 Tend...

Страница 388: ...ptimum brightness for the menu and info panel Procedure Figure 12 37 Step 1 Select Monitor Settings from the Integration menu The dialog box appears Step 2 Select Central or Local for setting the Backlight Brightness per slider Step 3 Setting the Menu and Infopanel Brightness per slider Figure 12 37 Monitor Settings NOTE The use of a brightness or contrast control may inhibit visibility of informa...

Страница 389: ... are see Figure 12 38 Predefined Settings contains profiles from special sea areas or route characteristics User Settings contains profiles with user modifications Console Settings contains ECDIS profiles from another MFC consoles in the INS system Bridge Profiles allows the operator to set the profiles for all applications radar ECDIS conning on all consoles Activate the check box in the Profile ...

Страница 390: ...le the ECDIS profile will be changed on this MFC console local User Settings The User Settings reflects the current ECDIS profile This profile can be saved under a name After loading a selected profile the ECDIS profile will be changed on this MFC console local Procedure Figure 12 39 Step 4 Step 2 Step 3 Figure 12 39 User Settings Step 1 Select Profile Administration from the Integration menu The ...

Страница 391: ...and conning within a selected MFC console These profiles are saved under an own defined name listed in the Bridge Profile Administration After loading a selected profile the ECDIS profile will be changed on this con cerning MFC console or consoles global Procedure Step 1 Select Profile Administration from the Integration menu The dialog box appears Step 2 Select Administrate bridge profiles Step 3...

Страница 392: ...Operator Manual 12 62 4343DOC020102 Edition January 2016 Step 2 Step 4 Step 5 Step 6 Step 7 Step 8 Step 9 Step 3 Figure 12 40 Bridge Profile ...

Страница 393: ...ion NOTE This functions is only available on systems with USB support With this function an USB Storage Device may be released for safe removal If one or more USB Storage Device are connected to the system a list of all de vices is displayed and a selected device may be released Procedure Figure 12 41 Step 1 Plug in the USB device Step 2 Select Release USB Storage Device from the Integration menu ...

Страница 394: ...Operator Manual 12 64 4343DOC020102 Edition January 2016 Step 3 Step 4 Figure 12 41 Release USB Storage Device ...

Страница 395: ...able 13 1 Help Menu Commands Functions Help Commands Function Help Index Shows Help System Information Shows detailed system information 13 1 1 About Shows version and copyright information 13 1 1 About ECDIS The About ECDIS command provides information concerning the serial number version of the installed software and copyright information Procedure Figure 13 2 Step 1 Select About from the Help m...

Страница 396: ...Operator Manual 13 2 4343DOC020102 Edition January 2016 Figure 13 2 About ECDIS ...

Страница 397: ...arnings see annex Bridge Alert Management The following is a list of alert messages which can be generated when working with ECDIS and Chart Station The list provides the alert message text the signi fication and the probable cause Alarm Message with symbol message number and alarm source time of occurrence cause of generation Scroll up and down Figure 14 1 Error Message in the ECDIS ...

Страница 398: ...icense INTERRUPT TRACK CONTROL B Track Control has been interrupted by ECDIS MAN OVERBOARD B Man over board TENDER ALERT B Tender Option Alert button pressed TENDER LOST B Tender Option One or more Tenders lost TENDER MAN OVER BOARD B Tender Option MOB active TENDER OUT OF RANGE B Tender Option One or more Tender out of range limit TRACK CONTROL EDITION MISMATCH B Invalid configuration of ECDIS an...

Страница 399: ...license is due to expire COURSE CHANGE IN xxx MIN OR LESS A Track control Autopilot is performing course change in xxx minutes or less COURSE CHANGE IN xxx SECONDS OR LESS A Track control Autopilot is performing course change in xxx seconds or less RADAR SIGNAL LOST B Radar overlay option NO radar signal SPEED SENSOR VALID B The speed sensor is available again after a failure SWITCH TO VALID SPEED...

Страница 400: ...e escalated to BNWAS All other warnings mentioned in this manual will be escalated to alarm All other alarms will be escalated to BNWAS Warnings repeated as warning Switch to valid speed source Speed sensor valid CM93 3 chart license will expire Autopilot not ready Autopilot not enough waypoints Autopilot init error The following list shows all alarms that will not be escalated to BNWAS All other ...

Страница 401: ...onning or Service Tool and affects all alarms The following standard procedure applies for the handling of warnings A warning that is not acknowledged is declared as an alarm after 60 seconds If this alarm is also not acknowlged within further 60 seconds an emergency call is triggered Apart from the alert escalation the SYNAPSIS INS also supports the resetting of the BNWAS watch alarm by expedient...

Страница 402: ...t real time The presentation time does not include the current date see 5 2 9 Presentation Date Chart information not up to date The displayed chart is out of date please up date the chart data Chart license expired not found No valid license for the displayed chart The chart can no longer be updated Please renew licenses RCDS Mode ECDIS is in RCDS mode ARCS Datum shift not known The displayed ARC...

Страница 403: ... the set safety contour in 5 2 6 Chart Op tions Larger scale ENC available For the displayed chart area a larger scale chart is available ENC Overlap Two or more displayed ENC of the same us age are overlapping each other Own Ship leaving Raster Chart The own ship is about to leave the ARCS chart Route plan indication of XXXX is OFF The indication for route planning across safety contour prohibite...

Страница 404: ...Operator Manual 14 8 4343DOC020102 Edition January 2016 Intentionally left blank ...

Страница 405: ...e made available by the responsible hydrographic services official raster data in RCDS mode can be used for navigation as a substitute For these areas how ever a reduced set of official and up to date paper charts is to be carried on board the vessel The selection of these charts is the duty of the captain and must comprise charts of following scales for planning an intended voyage or passage char...

Страница 406: ...ed with the required sensor data gyro compass log GPS via the Com 1 6 inter faces The AUTOPILOT is usually connected to the ECDIS in the operational area In case a discrepancy occurs within the tracking ECDIS and AUTOPILOT switch over to another tracking mode Sea Charts The ECDIS is rated for taking over and displaying different digitized charts For non officially approved chart formats an officia...

Страница 407: ...ifferent digitized charts For non officially approved chart formats an official redundant set of paper charts shall be provided chapter 15 1 Position Display The redundant position display is ensured by a separate sensor feeding Route Planning Route Planning with the ECDIS Routes may only be planned and navigated using officially approved and digi tized charts S57 and in connection with an autopil...

Страница 408: ...Operator Manual 15 4 4343DOC020102 Edition January 2016 Intentionally left blank ...

Страница 409: ... Wind components direction force surface Mean sea level pressure Air Temperature 2 meters above ground Current components direction force Significant height combined wind waves swell Mean direction of wind waves Mean period of wind waves Total cloud cover Wetterwelt combined weather symbol NOTE In the absence of 10 meter wind components the surface wind is shown when available The weather data is ...

Страница 410: ...Isobars Wind symbols and numeric values for wind speed and wind direction The user may customize the grid location spacing select the products to show and how to layout a single grid location as a combination of weather product symbols and numeric values see Options Dialog for details ...

Страница 411: ... Grid symbols Set Single Grid layout Set Double Grid layout Set Full Grid layout Enable Air Pressure Isobars Enable Air Temperature Isotherms Enable Waves Height Isolines Show Symbols Legend Figure 16 2 Example tool bar showing globally enabled Weather overlay with selected FULL layout The global Enable Weather switch is the main control to enable or disable the weather data shown on the current E...

Страница 412: ...file Figure 16 3 Example with 8 loaded GRIB files average validity of 1 day and 10 hours Med_W_Race_MS_01_42h grb with future validity and one file with expired validity a currently selected and en abled GRIB file Med_E_Race_01_42h_29112011 grb detailed information in the lower area for the selected file The upper area shows all currently loaded GRIB files in descending priority or der Whenever we...

Страница 413: ...e files 1 select any collection of files and 2 press the Delete button To purge files expired or invalid press the Purge button To enable or disable a file select the checkbox to the left of the file a disabled file will temporarily not be used to access any GRIB data Enable the Auto Follow checkbox to force the ECDIS view to display the geo graphic region of a selected GRIB file the area is shown...

Страница 414: ...cuted When prompted by a list click on the requested file loader to select and run that file loader On return from a file loader the newly loaded files will be inserted into the cur rent file list When exceeding the GRIB maximum total file size default 100 MB the loading of further files is aborted and that error condition must be confirmed by the user Figure 16 5 Example showing an error conditio...

Страница 415: ...her_Download showing 4 selected files with varying sizes The Load button will copy and load the selected files with an optional overwrite warning message when trying to overwrite an already existing file The Load Overwrite button will copy and load the selected files without warning messages In any case the dialog is closed and the control dialog will be reopened showing the newly loaded files opt...

Страница 416: ...ill reload the catalog This may be useful when waiting for a delayed GRIB file production see OnDemand mode below The Load button will copy and load the selected files with an optional overwrite warning message when trying to overwrite an already existing file The Load Overwrite button will copy and load the selected files without warning messages In any case the dialog is closed and the control d...

Страница 417: ...es resolution and an expected file size of 424 kb On startup the currently viewed ECDIS region is taken as base input to Top Left and Bottom Right coordinate edit fields Any valid geographic region may be se lected not exceeding 180 degrees longitude range The Package Selection list contains available packages defined by WetterWelt and a user selectable entry which allows free changing of Forecast...

Страница 418: ...a special notice that the GRIB file will be produced but is not available immediately In all these cases follow the ons creen instructions to retrieve the GRIB file Normally the estimated date of completion is shown with an attached filename The file is typically stored into the On Demand group within your catalog Figure 16 9 Example delayed production notice with estimated date of completion Tue ...

Страница 419: ...Example with selected full layout wind wind num waves waves num all 3 selected iso lines selected show units switch wind speed kn 70 kn limit current speed kn 3 0 kn limit air temperature ºC 60 ºC limit waves height m 10 m limit Four different layout setups are available Off no symbol and no numeric display Single display a single symbol or numeric field Double display two symbol and or numeric fi...

Страница 420: ...on 288 º wave period 9 s Full display example Figure 16 13 Top Left wind symbol with numeric gust 28 kn Top Right wind speed 22 kn wind direction 164 º gust 28 kn Bottom Left wave symbol with numeric period 9 s Bottom Right numeric wave height 2 5 m wave direction 288 º wave period 9 s For all layout configurations Single Double and Full the symbol or numeric value may be selected from the full pr...

Страница 421: ...ion gust Current current symbol coded to speed Current Num current numeric values speed direction Pres Num sea level pressure Temp Num air temperature Cloud cloud cover symbol 0 8 octants Cloud Num cloud cover numeric percentage value 0 100 Waves waves symbol coded to height opt numeric period Waves Num waves numeric values height direction period WetterWelt Wetterwelt combined weather symbol Wind...

Страница 422: ...speed direction Wind Numeric speed direction gust Current Symbol Current Numeric speed direction Pressure Numeric sea level pressure Air Temperature Numeric Degrees Celsius Cloud Symbol octans Cloud Numeric cloud cover percentage Waves Symbol Waves Symbol period Waves Numeric height Waves Numeric hight direction Waves Numeric hight direction period ...

Страница 423: ...ed air temperature unit Waves Height Iso shows consecutive iso lines for waves height in steps of 1 m Show Units shows unit indication near to all numeric values and isolines isobars will never show a unit indication i e fixed to hPa Large Symbols shows larger grid symbols and numeric grid values More Grids shows more grid locations i e reduces the visual grid space area between each other for sin...

Страница 424: ...ption Symbol Decription sky clear cloudy 30 cloudy 50 cloudy 100 haze fog rain with some clouds rain with clouds rain with blue sky snow with bue sky snow with some clouds havy rain with clouds snow with rain snow with clouds storm with rain snow with rain and clouds heavy storm with hail ...

Страница 425: ...nd period current used GRIB file name Med_W_Race_01_42h_05122011 current forecast time 2011 12 06 15 00 and mouse over geographic location The Info Dialog shows a number of current mouse over items Pos mouse over geographic location Wind direction speed Gust speed Current direction speed Air Pressure mean sea level pressure Air Temperature air temperature 2 meter Cloud Cover total cloud cover 8 oc...

Страница 426: ...e with activated animation mode selected forecast date time 2011 12 06 22 00 activated loop and play buttons actual value read outs corresponding to mouse over location NOTE The read outs will always be available within the geographic area of the selected GRIB files values are interpolated to the nearest available raw grid location Read outs will be available independent of currently selected and ...

Страница 427: ...on In this situation some files must be disabled to have the animation mode available i e press the Inst button and change the GRIB files configuration In animation mode the following actions are available List selection select the requested forecast time select the previous day select the previous time list entry Play start at the current time list entry and advance to the next entry every single...

Страница 428: ...an hourly weather forecast for the selected geographic location Time range starts with the current live time and ends with the last available forecast time Weather Info opens closes the weather info dialog Weather Legend opens the weather legend view Chart Information open the chart information view see ECIDS Basic User Guide Cancel close the context menu 16 5 1 Weather Report A weather report sho...

Страница 429: ...CDIS 16 21 4343DOC020102 Edition January 2016 Figure 16 18 Example showing a weather report starting on 2012 01 17 14 00 NOTE Values which do not exist for the specific forecast time are interpolated over time and marked with an asterisk after the product name ...

Страница 430: ...range colour when exceeding the respective limit Figure 16 19 Example legend with wind symbols wave symbols current symbols isoline symbols mean sea level pressure air temperature and wave height cloud cover symbol and WetterWelt example symbols An attached numeric value to a wind symbol stands for a gust kn value an attached numeric value to a Wave symbol stands for a wave period s value ...

Страница 431: ...ed It reduces the cognitive workload of the operator by minimizing the information presented which is necessary to draw attention to and to assess the situation On the bridge alerts are presented on the individual equipment and or on a central alert management human machine interface CAM HMI Alarms and warnings are classified and displayed in three categories Category A Category A alarms can only ...

Страница 432: ...egory A or B as assigned to it Category C alerts cannot be acknowledged on the bridge WARNING Warnings are not immediately dangerous but may become so As long as there is no active or unacknowledged alarm a current warning is displayed in the top line of the list in YELLOWISH ORANGE The warning text is displayed in ORANGE Unacknowledged warnings are flashing An acoustic signal is released with the...

Страница 433: ...m flashing Active acknowledged alarm Rectified unacknowledged alarm flashing Active responsibility transferred alarm Table 1 3 Warning Symbols Icon Symbol Description Active unacknowledged warning flashing Active silenced warning flashing Active acknowledged warning Rectified unacknowledged warning flashing Active responsibility transferred warning Table 1 4 Caution Symbol Icon Symbol Description ...

Страница 434: ...symbol the alert cannot be acknowledged on this device Table 1 6 Alert Signaling Colour Meaning visual Acoustic signals Red Alarm flashing Alarms faults and or dangerous situations Three short signals pulses every 7 seconds Continues until acknowledgment Yellowish orange warning flashing Warnings Two short signals pulses after the event without repetition Yellow Caution Status messages information...

Отзывы: