48
VERTICAL TERMINATING FLUES
Refer to Table 17 on page 47 for the maximum length of flue run.
Lubricant is available to lubricate the flue gaskets for ease of installation. DO NOT use soapy water.
1. The connection from the water heater to the vertical stack must be as direct as possible and shall
be the same diameter as the water heater flue outlet.
2. Fit the flue adaptor to the flue outlet located at the bottom back of the water heater and seal with
the screw clamp (supplied).
3. Fit one of the condensate drain/port sections with the drain pointing towards the ground and secure
to the adaptor with the clamp.
Note: the clamp will only fit one way. DO NOT try to force the clamp to close. If it is not
closing, it is the wrong way. If forced, be careful to use a screwdriver to release the clamp
as the releasing pressure may cause injury if attempting to release by hand.
4. The second flue drain/port section will be used to analyse the products of combustion during
commissioning and the port must be a minimum of 300mm away from the water heater flue outlet.
Fit the drain/port section (with the port NOT pointing towards the ground or the heater), straight flue
lengths and/or elbows and run to the terminal location. Secure each joint with the clamp.
5. Horizontal flue runs must have an upward slope towards the flue terminal of not less 1 in 20 or
50mm per linear meter. The horizontal portions of the flue shall also be supported every 1.5m to
maintain clearances and to prevent physical damage or separation of joints.
6. Use appropriate flue lengths or adjustable
lengths to achieve the desired outcome. DO
NOT cut the flue.
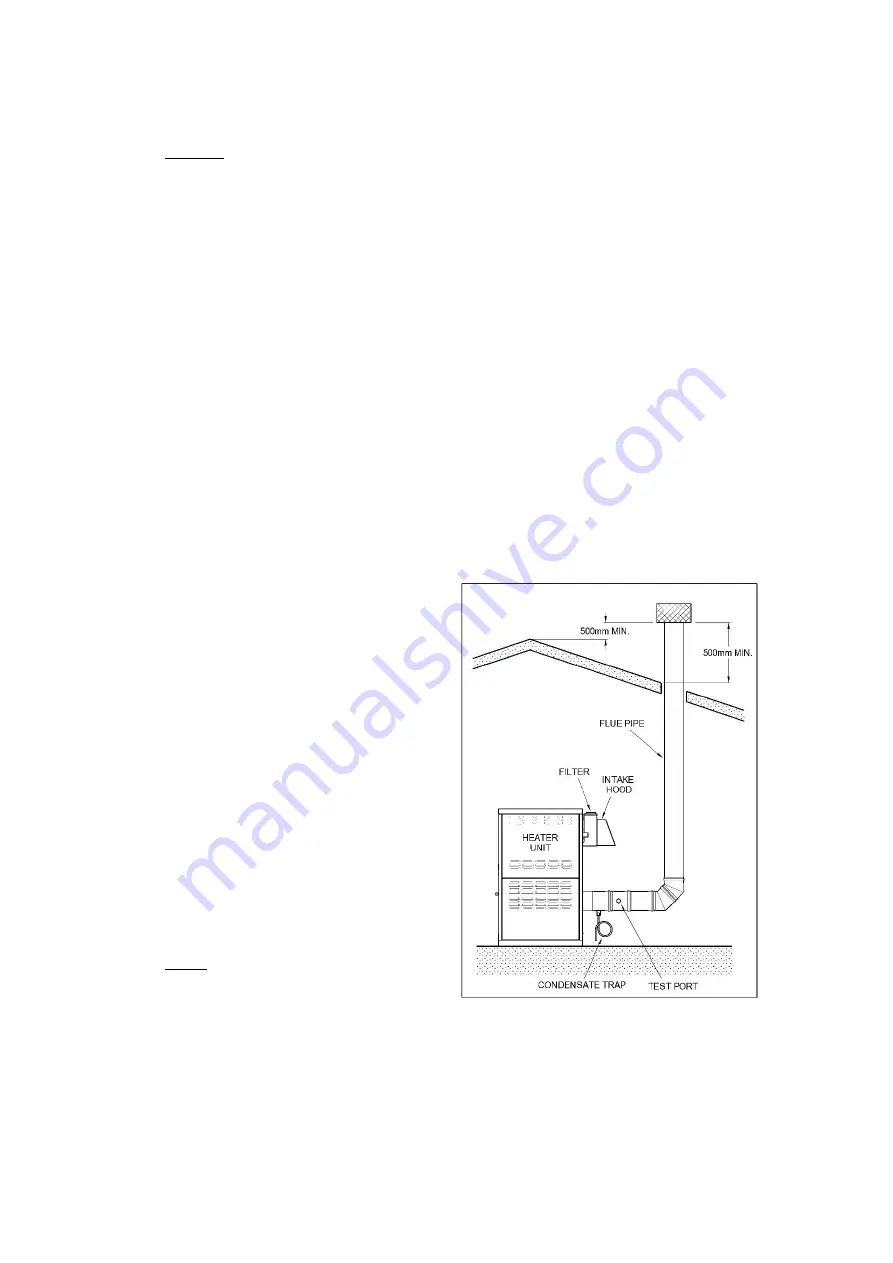
7. Install the vertical terminal (Top Stub with
Mesh) vertically and terminate outside the
building at least 500mm above the highest
point of the roof that is within 2.5m of the flue
terminal.
8. Flue penetrations through the roof shall use
flashing to prevent water ingress to the
building (not supplied) and if extended above
the roof more than 1.5m should be secured
with guy wires (not supplied) or braced.
9. Fit the flue terminal to the straight section and
secure with the clamp.
10. Fit the condensate trap to the condensate
drain section and fill with water.
Fig. 19: Vertical Flueing
Room Sourced Air Supply
Содержание 910500
Страница 69: ...69 Fig 36 Wiring diagram All MVB Models...
Страница 104: ...104 Fig 52 Closed Loop Water Sourced Heat Pump...
Страница 108: ...108 This page is intentionally left blank AQ0901093 Rev B March 2021...


