


B-2
hsb
2
Plus Series Fishfinders
A
ppendi
x B:
Usin
g
the
A
uxil
ia
ry
Junc
tio
n Box
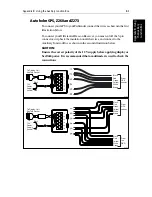
Raystar 112, 105, Apelco 182 and 182XT
In order to connect your GPS to your Fishfinder, you must first cut off the 6-
pin connector and strip back the insulation on all the wires. Connect to the
Auxiliary Junction Box as shown in the first illustration below.
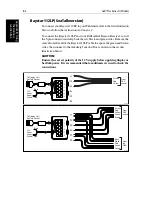
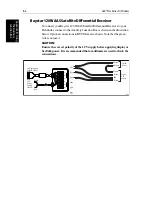
To connect your Differential Beacon Receiver, you must cut off the 5-pin
connector, strip back the insulation on all the wires, and connect to the
Auxiliary Junction Box as shown in the second illustration below.
CAUTION:
Ensure the correct polarity of the 12 V supply before applying display or
SeaTalk power. It is recommended that a multimeter is used to check the
connections.
12V
Power
Supply
(fused)
From
GPS
sensor
Yellow
Green
White
Brown
Red
Black
To Display Unit
SeaTalk Socket
D4294-3
Red
Black
12V
Power
Supply
(fused)
From
GPS
sensor
Yellow
White
Green
Red
Black
Yellow
Green
White
Brown
Red
Black
To Display Unit
SeaTalk Socket
D4295-3
From
the
DBR
Red
Black
Содержание hsb2 PLUS
Страница 1: ...hsb2 PLUS Series Fishfinders Owner s Handbook Document number 81195_2 Date August 2002...
Страница 2: ......
Страница 34: ...1 22 hsb2 Plus Series Fishfinders Database Lists...
Страница 64: ...2 30 hsb2 Plus Series Fishfinders Transmitted Data...
Страница 110: ...4 14 hsb2 Plus Series Fishfinders MOB...
Страница 160: ...5 50 hsb2 Plus Series Fishfinders Review Your Passage Plan...
Страница 172: ...6 12 hsb2 Plus Series Fishfinders Data Log Mode...
Страница 200: ...8 8 hsb2 Plus Series Fishfinders Worldwide Support...
Страница 204: ...A 4 hsb2 Plus Series Fishfinders Appendix A Specifications...
Страница 216: ...C 6 hsb2 Plus Series Fishfinders Appendix C C MAP Chart Card Features...
Страница 228: ...viii hsb2 Plus Series Fishfinders...


