9.1 Waypoints
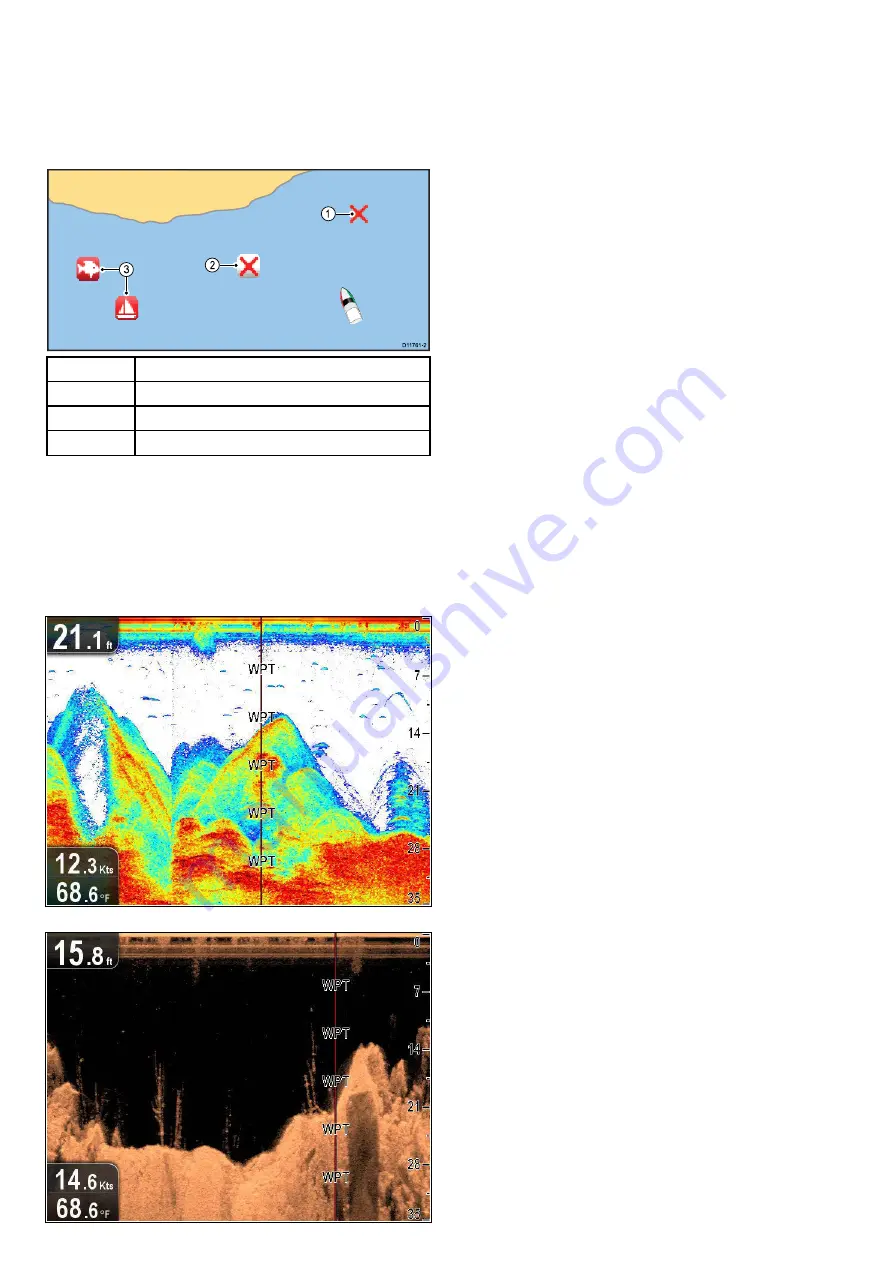
Waypoint display examples
Waypoints in the chart application
In the chart application both active and inactive waypoints are
shown. The active waypoint (i.e. the one you are heading
towards) has the box and symbol colors reversed.
D
11761-2
1
2
3
Item
Description
1
Inactive waypoint
2
Active waypoint
3
Alternative waypoint symbols
By default, all waypoints are indicated on screen by a waypoint
symbol (
x
). You can assign different symbols if required.
Waypoints in the sonar and DownVision applications
Waypoints can be placed in the Sonar and DownVision
applications.
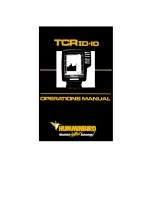
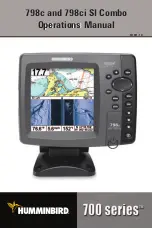
Waypoints in the sonar and DownVision applications are
represented by a vertical line labelled WPT.
Example 1 — Sonar application
Example 2 — DownVision application
Waypoint context menu
The waypoint context menu shows the waypoint's positional
data and related menu items.
The context menu provides the following positional data for the
waypoint in relation to your vessel:
• Latitude
• Longitude
• Range
• Bearing
For inactive waypoints the following menu items are available:
•
Goto Waypoint
/
Stop Goto
•
Erase Waypoint
•
Edit Waypoint
•
Move Waypoint
For active waypoints the following menu items are available:
•
Stop Goto
Accessing the context menu
You can access the context menu by following the steps below.
1. Use the
Joystick
to highlight the waypoint.
The cursor changes to the WPT cursor.
2. Press the
OK
button.
The Waypoint context menu is displayed.
Waypoint placement
Placing a waypoint
To place a waypoint follow the steps below.
1. Use the
Joystick
to highlight the desired location with the
cursor.
2. Press the
OK
button.
The context menu is displayed.
3. Select
Place Waypoint
.
A confirmation pop up message is displayed.
4. Select
Ok
to place the waypoint, or
Edit
to edit the waypoint
details.
A waypoint is placed at the cursor’s location.
Placing a waypoint at your vessel's position
From the Chart application:
1. If required press the
Back
button to enter motion mode.
2. Press the
OK
button again to open the menu.
3. Select
Place Waypoint
.
A confirmation pop up message is displayed.
4. Select
Ok
to place the waypoint, or
Edit
to edit the waypoint
details.
Navigation
Navigating to the cursor's location
In Cursor mode you can set the Chart application to guide you
to the cursor’s location.
1. Use the
Joystick
to move the cursor to the desired location.
2. Press the
OK
button.
The context menu is displayed.
3. Select
Goto Cursor
.
Navigating to a waypoint
You can set the Chart application to guide you to a waypoint.
1. Use the
Joystick
to highlight a waypoint.
2. Press the
OK
button.
The context menu is displayed and Goto waypoint is
highlighted
3. Press the
OK
button.
Navigating to a waypoint from the waypoints list
From the Chart application:
1. If required press the
Back
button to enter motion mode.
2. Press the
OK
button again to open the menu.
54
Dragonfly
Содержание E70085 Dragonfly
Страница 2: ......
Страница 4: ......
Страница 6: ...16 1 Technical specification 92 Chapter 17 Spares and accessories 93 17 1 Accessories 94 6 Dragonfly ...
Страница 10: ...10 Dragonfly ...
Страница 14: ...14 Dragonfly ...
Страница 18: ...18 Dragonfly ...
Страница 28: ...28 Dragonfly ...
Страница 32: ...32 Dragonfly ...
Страница 52: ...52 Dragonfly ...
Страница 70: ...70 Dragonfly ...
Страница 78: ...78 Dragonfly ...
Страница 82: ...82 Dragonfly ...
Страница 89: ...Chapter 15 Technical support Chapter contents 15 1 Raymarine customer support on page 90 Technical support 89 ...
Страница 93: ...Chapter 17 Spares and accessories Chapter contents 17 1 Accessories on page 94 Spares and accessories 93 ...
Страница 95: ......
Страница 96: ...www raymarine com ...


