37
RAV222 N
0525-M002-2
6
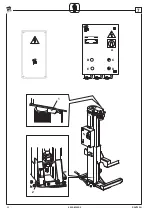
Si la procédure a été correctement suivie, les leds de L1 à L5
restent toutes allumées pendant 3 secondes. Après quoi la led
L2 s’allume indiquant le mode diagnostic.
Pour passer à la descente, utiliser P1 et P2 pour valider
respectivement:
- P1 validation colonne de commande 1 et 3
- P2 validation colonne opposée 2 et 4.
A ce point-là les deux cartes se trouvent en mode diagnostic;
on peut maintenant faire descendre la charge au sol, en agissant
comme suit:
Appuyer, en même temps, sur le bouton-poussoir de descente
et sur le poussoir situé sur la carte qui correspond à la colonne
qu’on veut faire descendre.
Se la procedura è stata eseguita correttamente i led da L1 a L5
rimangono tutti accesi per 3 secondi. Dopo questo si accende
il led L2 che indica la modalità diagnostica.
Per procedere alla discesa, utilizzare P1 e P2 per abilitare
rispettivamente:
- P1 abilitazione colonna comando 1 e 3.
- P2 abilitazione colonna opposta 2 e 4.
A questo punto le schede si trovano tutte e due in modalità
diagnosi; si può adesso fare scendere al suolo il carico
agendo come segue:
premere contemporaneamente il pulsante di discesa e il
pulsante posto sulla scheda che corrisponde alla colonna che
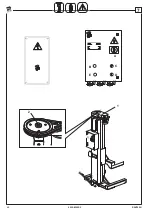
If the procedure has been successfully completed, L1 to L5
LEDs will all stay on for 3 seconds. Then L2 will come on as
well to signal that the diagnosis mode is enabled.
To proceed to lower the platform, press P1 and P2 to enable:
- P1 to enable control post 1 and 3,
- P2 to enable opposite post 2 and 4.
Now all boards are in the diagnosis mode, and in order to
lower the load act as follows:
press the down push-button and the push-button on the card
corresponding to the post to lower simultaneously.
Wurde das Verfahren korrekt durchgeführt, leuchten alle Leds
von L1 bis L5 3 Sekunden lang auf. Danach schaltet sich das
Led L2 ein, das den Diagnostikmodus anzeigt.
Für die Senkung P1 und P2 verwenden, um Folgendes
freizugeben:
- P1 Freigabe der Steuersäule 1 und 3
- P2 Freigabe der Säule 2 und 4 gegenüber.
Jetzt befinden sich beide Platinen in der Diagnose-Modalität;
die Last kann bis zum Boden wie folgt gesenkt werden:
Den Druckknopf für die Senkbewegung und den Druckknopf
auf der Platine, die der zu senkenden Säule entspricht,
gleichzeitig drücken.
Si el procedimiento ha sido efectuado correctamente, los led
de L1 a L5 permanecen encendidos por 3 segundos. Luego
se enciende el led L2 que indica la modalidad de diagnóstico.
Para efectuar la bajada utilizar P1 y P2 para habilitar
respectivamente:
- P1 habilitación columna mando 1 y 3
- P2 habilitación columna opuesta 2 y 4.
Ahora ambas las tarjetas se encuentran en la modalidad de
diagnóstico y para hacer bajar la plataforma efectuar las
siguientes operaciones:
presionar al mismo tiempo el pulsador de bajada y el pulsador
ubicado en la tarjeta correspondiente a la columna que se
ACHTUNG:
MIT DEM SENKSTEUERTASTE JEDE HEBEBÜHNE
DER REIHE NACH UM HÖCHSTENS 100 MM BEWEGEN,
WOBEI DARAUF ZU ACHTEN IST, DASS DAS GLEICHGEWICHT
DER LAST BEIBEHALTEN WIRD.
Wenn alle 4 Säulen am Boden sind, blinkt die Not-Aus-
Kontrolllampe schnell; das zeigt, dass alle Säulen
ordnungsgemäß am Boden sind und dass die Sperrung
beseitigt wurde. Die Schalttafel spannungsfrei schalten, sie
schließen und mit Hilfe des Hauptschalters wieder an
Spannung legen. Die Hebebühne ist nicht mehr im Notzustand
and kann zum Standardbetrieb zurückkehren.
ATTENTION :
UTILISER LE BOUTON DE DESCENTE ET DÉPLACER
CHAQUE ÉLÉVATEUR DE 100 MM MAX. À LA FOIS EN
PRENANT SOIN DE NE PAS DÉSÉQUILIBRER LA CHARGE.
Quand toutes les 4 colonnes sont au sol, le voyant lumineux
d’urgence clignote rapidement; celui-ci est le signal qui indique
que toutes les colonnes sont correctement au sol et que le
bloc ait été éliminé. A ce point, couper le courant du tableau, le
refermer et le remettre sous tension en agissant sur
l’interrupteur général. L’élévateur est sorti de l’état d’urgence
et on peut revenir au fonctionnement normal.
quiere bajar.
CUIDADO
POR MEDIO DEL PULSADOR DE BAJADA, BAJAR UNA
COLUMNA A LA VEZ, HASTA MAX. 100 MM EN SECUENCIA, DE
MODO QUE LA CARGA QUEDA CORRECTAMENTE
BALANCEADA.
Cuando todas las 4 columnas están bajadas, la luz de
emergencia centella veloz indicando que todas las columnas
están a tierra y el bloqueo ha sido eliminado. A este punto apagar
el cuadro, cerrarlo, y volver a encender el interruptor general. El
elevador ha salido de la modalidad de emergencia y está listo
para el funcionamiento normal.
WARNING
BY THE DOWN PUSH-BUTTON, MAKE A POST LOWER AT A
TIME, FOR MAX. 100 MM IN SEQUENCE, SO AS TO KEEP THE
CORRECT BALANCE OF THE LOAD.
When all 4 posts are down, the emergency warning lamp blinks
quickly, indicating that all posts have lowered correctly, and the
post lock has been eliminated. Now switch off the panel, close
it and switch on the main switch. The emergency mode is over
and the lifter is ready for normal operation.
si vuole fare scendere.
ATTENZIONE
MEDIANTE IL PULSANTE DISCESA, FAR SCENDERE PER
NON PIU’ DI 100 MM UNA COLONNA ALLA VOLTA IN SEQUENZA
COSI’ DA NON SQUILIBRARE IL
CARICO.
Quando tutte e 4 le colonne sono a terra la spia emergenza
lampeggia velocemente; questo è il segnale che indica che
tutte le colonne sono correttamente a terra ed il blocco è stato
eliminato. A questo punto togliere tensione al quadro, richiuderlo
e ridare tensione agendo sull’interruttore generale. Il sollevatore
è uscito dallo stato di emergenza e si può tornare al
funzionamento normale.
Содержание RAV222N
Страница 12: ...12 RAV222 N 0525 M002 2 2 Kg 4000...
Страница 22: ...22 RAV222 N 0525 M002 2 1 2 3...
Страница 24: ...24 RAV222 N 0525 M002 2 4 1 2 3 5 6 8 9 4 6...
Страница 28: ...28 RAV222 N 0525 M002 2 6 Q R1 R1 Q 4650 kg R1 2000 kg 2 3 4 1...
Страница 40: ...40 RAV222 N 0525 M002 2 7 2 3 4 1 E B D C A 2 3 4...
Страница 42: ...42 RAV222 N 0525 M002 2 7 1 2 E B D C A...
Страница 44: ...44 RAV222 N 0525 M002 2 7 2 3 4 1...
Страница 46: ...46 RAV222 N 0525 M002 2 7...
Страница 48: ...48 RAV222 N 0525 M002 2 2 1 E B D C A 7...
Страница 52: ...52 RAV222 N 0525 M002 2 9 1 2...
Страница 54: ...54 RAV222 N 0525 M002 2 9...


