OILER ADJUSTMENT
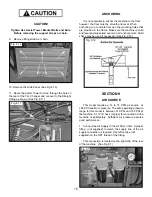
1. Check Oil Level on Oil Cup Site Glass. (See Fig. 9.2)
If Oil level is low refer to Section 17, Page 35 for filling
instructions
NOTE:
This adjustment will require two persons to perform.
2. With the Air source connected, depress the Bead
Breaker Pedal to operate the Bead Breaker.
3. Observe the site glass and adjust the oil flow of the oiler
by turning the Oiler Adjustment knob so that 2-3 drops of oil
drip through the site glass for each operation of the Bead
Breaker Pedal. (See Fig 9.3)
NOTE:
More detailed Maintenance procedures are
described in Section 17 on page 35.
SECTION 10
ELECTRICAL SOURCE
This unit requires power from a 15 amp electrical circuit.
The unit is supplied standard with a 110 Volt power cord
and plug. (See Fig. 10.1)
Refer to the serial tag of the machine for specific
electrical requirements. Have a licensed electrical
technician perform any necessary changes to the power
source and power cord before plugging in the unit. The elec-
trical source must have a solid connection between ground
and building ground.
WARNING!
GUARD AGAINST ELECTRIC SHOCK
.
This equipment must be grounded while in use to protect the
operator from electric shock. Never connect the green power
cord wire to a live terminal. This is for ground only.
DANGER!
The motor on this machine contains high voltage. Disconnect
power at the receptacle before performing any electrical
repairs. Secure plug so that it cannot be accidentally plugged
in during service.
WARNING!
RISK OF EXPLOSION
.
This equipment has internal arcing or sparking parts which
should not be exposed to flammable vapors.
This machine should not be located in a recessed
area or below floor level.
16
Fig. 9.3
Fig. 10.1
WARNING!
Failure to properly maintain proper Oil level
and adjust the Oil flow may void the warranty
and damage the bead breaker cylinder and
other air components.
Fig. 9.2
Содержание R980X
Страница 39: ...39 ...
Страница 48: ...48 ...
Страница 49: ...49 RECORD ALL MAINTENANCE NOTES AND SERVICE HISTORY HERE ...
Страница 50: ...50 TIRE AND WHEEL DATA ...
Страница 51: ...51 This page intentionally left blank ...

