63
4.1. precautionary measures
This machine may only be used with foodstuffs. It
cannot be used for heating liquids or grinding any
other kind of product that could damage and pollute
it.
The manufacturer cannot be held responsible
for damage to people or things caused by
unsuitable, erroneous or irrational use.
5. TRANSPORT
5.1. Packaging
The machine is delivered in a strong cardboard box
with internal protection.
The packaging bears symbols which must be
observed during handling and stocking of the
item.
Always keep the package in a vertical position
during transport. Do not turn it over or lay it
on its side and avoid bumping and exposure to
atmospheric agents.
5.2. Inspection on receipt
Check that the machine received corresponds to the
one indicated on the delivery note, including any
accessories.
Check that it has not been damaged during transport
and, if so, inform the forwarder and our customer
service office immediately.
The packing elements (plastic bags,
expanded polystyrene, nails, cardboard, etc.)
must not be left within reach of children as
they are potential sources of danger. Do not
dispose of the packing elements in the
environment; consign them to fir ms
authorized for their disposal.
If the machine is wet or very damp, wait until it is
completely dry before installing or using it. It is always
necessary to request an accurate control to qualified
service people in order to find any possible damage
to the electric components.
Reserve an area near the machine for the installation
of the coffee grinding and dosage machine (see
relevant documentation).
The machine is usually equipped with a water
softener, type DP2 or DP4, which must be connected
by the user in compliance with the laws in force.
Should a different softener be installed, refer to the
documentation of the relevant product.
A dreg drawer should be fitted by the installer.
6.1. Connections to be made by the
user.
Hook-up must be carried out by qualified
personnel in full accordance with federal,
state and local regulations.
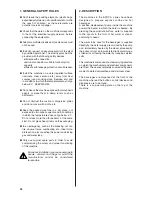
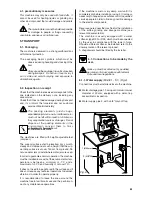
6.1.1. Water supply
(Mod.E1 - S1)
(Fig.6)
Connections must be installed close to the machine.
●
Water drainage pipe 1, having a minimum internal
diameter of 30 mm, equipped with a water-trap
accessible for inspection.
●
Water supply pipe 2, with a 3/8"G cut-off tap.
6. INSTALLATION
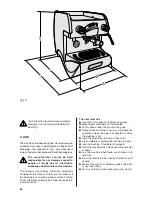
The machines are fitted with height adjustable feet
(only rear).
The support surface shall be levelled, dry, smooth,
steady and stable and at such a height that the cup-
warming surface is at over 150 cm from ground. Do
not use water jets or install where water jets are used.
In order to guarantee normal operation, the machine
must be installed in areas that the environmental tem-
perature is between a minimum of -1°C and a
maximum of +32°C end humidity of not over 70%.
It does not need to be anchored to the surface and it
does not require any technical operations to dampen
vibrations in order to operate properly.
It is recommended to leave the area around the
machine free to facilitate its use and the performan-
ce of any maintenance operations.
4
Lo
va
to
L
2 (3/8"G)
1 (Ø30mm)
Fig. 6
Содержание Epoca S
Страница 1: ...epoca USE AND MAINTENANCE S CD DE version 2 0...
Страница 5: ...2 1 Specifications and composition Fig 3 4...
Страница 11: ...7 OPERATION 7 1 Controls Fig 8 Fig 8 10...
Страница 17: ...epoca PARTS BREAKDOWN CD DE version 1 01...
Страница 18: ......
Страница 19: ......
Страница 20: ......
Страница 21: ......
Страница 22: ......
Страница 23: ......
Страница 24: ......
Страница 25: ......
Страница 26: ......
Страница 27: ......
Страница 28: ......
Страница 29: ......
Страница 30: ......
Страница 31: ......
Страница 32: ...epoca DIAGRAMS S CD DE version 1 01...
Страница 33: ......
Страница 34: ......
Страница 35: ......
Страница 36: ......
Страница 37: ......
Страница 38: ......
Страница 39: ......
Страница 40: ......
Страница 41: ......
Страница 42: ......
Страница 43: ......
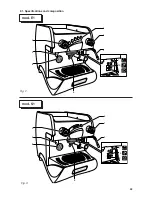
Страница 50: ...59 2 1 Specifications and composition mod S1 mod E1 Fig 3 Fig 2 1 2 3 4 5 6 7 9 10 8 1 2 3 4 5 6 7 9 10 8...
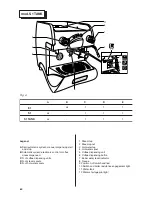
Страница 56: ...65 7 OPERATION 7 1 Controls Fig 8 Fig 8 A B C D E 4 mod E1 S1 mod S1 TANK mod S1 TANK 1 2 2 3 5 6 7 8 8 9 1...
Страница 65: ...91 REV 00 J5 J6 J4 GR...
Страница 66: ...92...
Страница 67: ...93...
Страница 70: ...96 EPOCA E1...
Страница 71: ...97 PV EPOCA S1...
Страница 72: ...98 EPOCA S1 TANK...

