12
8. USE
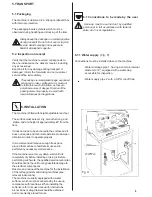
If ground coffee is left on the rim of the filter,
a leak tight seal is not ensured, and water or
coffee grounds may leak out of the filter.
Lock the filter-holder into the dispensing group firmly
to obtain a leak tight seal.
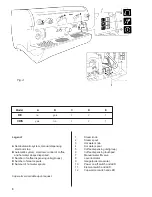
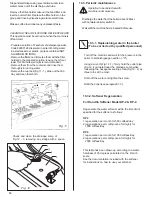
Place the cups under the spouts; begin dispensing
using control 3 or button panel 4 according to model
(Fig. 8).
When the coffee has been poured, leave the filter
holder attached to the dispensing group until the
next coffee is required.
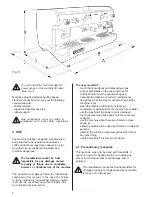
When pouring, beware of the hot parts of the
machine, especially the coffee dispensing
units and the steam and hot water spouts. Do
not put your hands under the spouts or the
groups while they are operating.
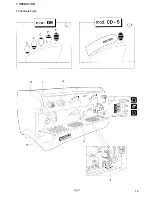
8.2. Preparing cappuccino
(Fig. 9)
·
Make a cup of cappuccino with the espresso coffee.
·
Use a tall, narrow frothing pitcher, half-filled with milk.
·
Place the pitcher under the spout so that the nozzle
touches the bottom.
·
Turn the steam knob and lower the pitcher so that
the nozzle is just under the surface of the milk.
·
Now slowly lower the pitcher as the foam rises,
always keeping the nozzle slightly immersed in the
milk until you have sufficient froth.
·
Turn off the steam knob and pour the frothed milk
into the waiting cappuccino cup.
Immediately after carrying out this operation, clean
the spout with a sponge or a clean cloth so that the
milk does not dry on it. Be careful - the spout is hot
and may burn your hand.
8.3. Heating a beverage
Immerse the steam spout into the liquid to be
heated.
Gradually turn the steam knob(Fig.8 - 7); the
steam that disperses into the liquid heats it to
the desired temperature.
Turn off the steam knob when the desired temperature
has been reached.
Immediately after carrying out this operation, clean
the spout with a sponge or a clean cloth so that the
milk does not dry on it. Be careful - the spout is hot
and may burn your hand.
Fig. 9
The machine's top shelf is a cup warming plate on
which cups are kept heated and ready for use.
This feature is very important to obtain good coffee
as the pre-warmed cups prevent the coffee from
cooling too quickly.
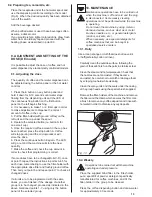
8.1. Preparing coffee
·
Unclamp the filter-holder from the dispensing unit
and knock out any grounds into the receptacle
provided for purpose, making sure not to damage
rim of the filter.
·
Use the filter for 1 or 2 coffees, according to need.
·
Fill the filter with coffee, level it off, and press down
gently with the tamper.
·
Remove any ground coffee that clings to the rim
of the filter after tamping.
Proper grinding of coffee beans is of fundamental
importance to producing good coffee. The granular
texture of the fresh grounds should be such that it
takes 25-30 seconds to produce the beverage. If the
coffee grounds are too coarse, the coffee will be pale
in color and weak in flavor, with only a very small
amount of white crema. If the grounds are too fine,
the coffee will be dark with no crema. Good coffee
can only be made if the beans are freshly and
uniformly ground by sharp grinding burrs. Then the
coffee must be measured out into uniform doses of
approximately 6 grams each.
Freshly ground coffee beans are very important
because they quickly lose their aromatic qualities
once they've been ground, and the fats present in
the beans become rancid.
Содержание Epoca S
Страница 1: ...epoca USE AND MAINTENANCE S CD DE version 2 0...
Страница 5: ...2 1 Specifications and composition Fig 3 4...
Страница 11: ...7 OPERATION 7 1 Controls Fig 8 Fig 8 10...
Страница 17: ...epoca PARTS BREAKDOWN CD DE version 1 01...
Страница 18: ......
Страница 19: ......
Страница 20: ......
Страница 21: ......
Страница 22: ......
Страница 23: ......
Страница 24: ......
Страница 25: ......
Страница 26: ......
Страница 27: ......
Страница 28: ......
Страница 29: ......
Страница 30: ......
Страница 31: ......
Страница 32: ...epoca DIAGRAMS S CD DE version 1 01...
Страница 33: ......
Страница 34: ......
Страница 35: ......
Страница 36: ......
Страница 37: ......
Страница 38: ......
Страница 39: ......
Страница 40: ......
Страница 41: ......
Страница 42: ......
Страница 43: ......
Страница 50: ...59 2 1 Specifications and composition mod S1 mod E1 Fig 3 Fig 2 1 2 3 4 5 6 7 9 10 8 1 2 3 4 5 6 7 9 10 8...
Страница 56: ...65 7 OPERATION 7 1 Controls Fig 8 Fig 8 A B C D E 4 mod E1 S1 mod S1 TANK mod S1 TANK 1 2 2 3 5 6 7 8 8 9 1...
Страница 65: ...91 REV 00 J5 J6 J4 GR...
Страница 66: ...92...
Страница 67: ...93...
Страница 70: ...96 EPOCA E1...
Страница 71: ...97 PV EPOCA S1...
Страница 72: ...98 EPOCA S1 TANK...


