


EN
.
9
2. Use Cases
The Flush Dimmer can be used in many different scenes, which can help make your life more
comfortable. We have prepared a few of them for you so you can get an idea for your next
smart home project. Of course, there are countless of other options for how to use Qubino
Flush Dimmer to remotely control devices via your smartphone.
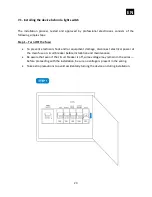
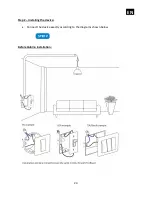
2.1. Installation examples where Flush Dimmer is installed behind a wall switch
•
Remotely dim the lights or turn them
ON/OFF
•
Remotely trigger different scenes with two
additional inputs (I2, I3)
–
for example
scene 1: turn on all the lights in the house,
scene 2: turn off all the lights in the house
Содержание ZMNHDD2
Страница 18: ...EN 18 4 Package Contents Flush Dimmer Device Installation Manual...
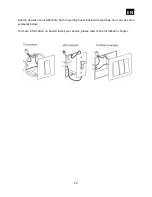
Страница 25: ...EN 25 After Qubino installation Wiring with one switch...
Страница 26: ...EN 26 INSTALLATION WITH ON OFF SWITCH AND SCENE SWITCHES...
Страница 27: ...EN 27 INSTALLATION WITH 3 WAY SWITCH...
Страница 28: ...EN 28 INSTALLATION WITH 2 OR MORE SWITCHES CONTROLLING THE SAME LIGHT Before Qubino installation...
Страница 29: ...EN 29 2 WAY SWITCH...
Страница 30: ...EN 30 MULTI WAY SWITCHES...
Страница 31: ...EN 31 INSTALLATION WHERE THERE IS NO NEUTRAL LINE N IN SWITCH BOX Before Qubino installation...
Страница 32: ...EN 32 After Qubino installation...
Страница 38: ...EN 38 Step 2 Switch of the power supply Step 3 Connect the temperature sensor as shown below...
Страница 39: ...EN 39 Step 4 Place the temperature sensor in the switch box Step 5 Turn the fuse on...
Страница 40: ...EN 40 Step 6 Re include the device to your network...
Страница 41: ...EN 41 Step 7 Start using the temperature sensor in connection with your device...


