


EN
.
51
Parameter no. 12 - Turn Load 1 (Q
⬆
) On Automatically with Timer
If Load (Q
⬆
) is OFF, you can schedule it to turn ON automatically after a period of time defined
in this parameter. The timer is reset to zero each time the device receives an OFF command,
either remotely (from the gateway (hub) or associated device) or locally from the switch.
Values (size is 2 byte dec):
•
default value 0
•
0 - Auto ON Disabled
1 - 32535 = 1 - 32535 seconds Auto ON enabled with define time step is 1 second.
Parameter no. 20
–
Enable/Disable the 3-way switch/additional switch
Dimming is done by using a push-button or a switch, connected to I1 (by default). If the the 3-
way switch option is set, dimming can be controlled by a push-button or a switch, connected to
I1 and I2.
Values (size is 1 byte dec):
•
default value 0
•
0- single push-button (connected to I1)
•
1 - 3-way switch (connected to I1 and I2)
•
2 - Additional switch (connected to I2)
Содержание ZMNHDD2
Страница 18: ...EN 18 4 Package Contents Flush Dimmer Device Installation Manual...
Страница 25: ...EN 25 After Qubino installation Wiring with one switch...
Страница 26: ...EN 26 INSTALLATION WITH ON OFF SWITCH AND SCENE SWITCHES...
Страница 27: ...EN 27 INSTALLATION WITH 3 WAY SWITCH...
Страница 28: ...EN 28 INSTALLATION WITH 2 OR MORE SWITCHES CONTROLLING THE SAME LIGHT Before Qubino installation...
Страница 29: ...EN 29 2 WAY SWITCH...
Страница 30: ...EN 30 MULTI WAY SWITCHES...
Страница 31: ...EN 31 INSTALLATION WHERE THERE IS NO NEUTRAL LINE N IN SWITCH BOX Before Qubino installation...
Страница 32: ...EN 32 After Qubino installation...
Страница 38: ...EN 38 Step 2 Switch of the power supply Step 3 Connect the temperature sensor as shown below...
Страница 39: ...EN 39 Step 4 Place the temperature sensor in the switch box Step 5 Turn the fuse on...
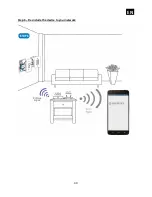
Страница 40: ...EN 40 Step 6 Re include the device to your network...
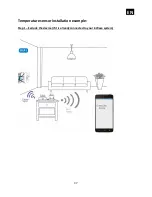
Страница 41: ...EN 41 Step 7 Start using the temperature sensor in connection with your device...


