


EN
.
13
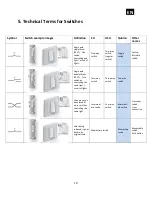
3. Qubino Flush Dimmer Advantages and Highlights
3.1. Advantages
•
The Qubino Flush Dimmer allows the
easiest and quickest installation possible
. Because
of its small size, it fits smoothly in even the smallest, most shallow and most crowded
flush mounting boxes, which are stuffed with lots of electrical cables and where
every
millimetre counts
. All this is possible because the Qubino Flush Dimmer is
the smallest
Z-Wave dimmer in the world
.
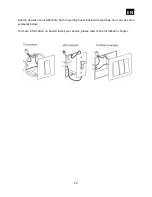
•
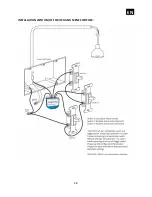
The Qubino Flush Dimmer has the
option to connect a temperature sensor*
, through
which users can monitor the ambient air or water temperature
. It’s the only Z
-Wave
dimmer in the world which offers this option. With a connected sensor, the user can
monitor accurate measurements of the room temperature, pool water temperature,
etc., and remotely change conditions as desired. Qubino dimmer, along with the
temperature sensor, is connected directly to the power supply. Install it and forget it
–
no need to worry about dying batteries, like with battery-powered sensors.
*The temperature sensor is sold separately - for more info, please see Qubino
catalogue. Product ordering code (model number): ZMNHEA1
ⓘ
Please do not put the temperature sensor directly into the water! The temperature
sensor is designed to measure the water temperature by being mounted to the water pipe.
Содержание ZMNHDD2
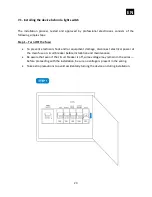
Страница 18: ...EN 18 4 Package Contents Flush Dimmer Device Installation Manual...
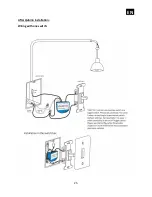
Страница 25: ...EN 25 After Qubino installation Wiring with one switch...
Страница 26: ...EN 26 INSTALLATION WITH ON OFF SWITCH AND SCENE SWITCHES...
Страница 27: ...EN 27 INSTALLATION WITH 3 WAY SWITCH...
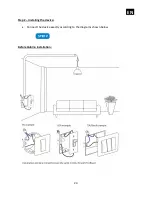
Страница 28: ...EN 28 INSTALLATION WITH 2 OR MORE SWITCHES CONTROLLING THE SAME LIGHT Before Qubino installation...
Страница 29: ...EN 29 2 WAY SWITCH...
Страница 30: ...EN 30 MULTI WAY SWITCHES...
Страница 31: ...EN 31 INSTALLATION WHERE THERE IS NO NEUTRAL LINE N IN SWITCH BOX Before Qubino installation...
Страница 32: ...EN 32 After Qubino installation...
Страница 38: ...EN 38 Step 2 Switch of the power supply Step 3 Connect the temperature sensor as shown below...
Страница 39: ...EN 39 Step 4 Place the temperature sensor in the switch box Step 5 Turn the fuse on...
Страница 40: ...EN 40 Step 6 Re include the device to your network...
Страница 41: ...EN 41 Step 7 Start using the temperature sensor in connection with your device...


