Guía de inicio de Scalar i500
65
Al hacer esto se alinean los rieles en "Y" con los rieles en "Y" del módulo debajo de éste.
i.
Repita estos pasos para cada módulo de expansión que vaya a instalar.
4
Instale el módulo de control.
a. Abra la puerta de la estación I/E y la puerta de acceso del módulo de control.
b. Levante el módulo de control y colóquelo en la ubicación deseada.
c. Si va a apilar el módulo de control sobre otro módulo, junte los dos módulos apretando los dos
tornillos de palometa que se encuentran en la base de la parte anterior del módulo y los dos
tornillos de palometa que se encuentran en la base de la parte posterior del módulo. A
continuación, baje el poste guía del módulo (que se encuentra en la base de la parte anterior
del módulo) girándolo y presionándolo hacia abajo.
d. Apriete todos los tornillos de palometa que se encuentran en la base de las partes anterior y
posterior de los módulos.
e. Use las lengüetas del bastidor para sujetar el módulo de control al bastidor. Para obtener
instrucciones, consulte “Instalación del kit de montaje en bastidor” en la
Guía del usuario de
Scalar i500
.
5
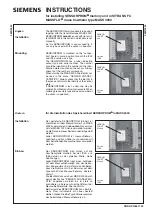
Desestacione el componente robótico.
a. Levante suavemente el componente robótico de modo que ya no se apoye en la lengüeta de
estacionamiento.
PRECAUCIÓN
Compruebe que no haya espacio entre los rieles en "Y" superior e
inferior en la parte anterior y posterior de la biblioteca. Si hay un
espacio, el mecanismo de la biblioteca no podrá iniciarse.
PRECAUCIÓN
Dé soporte al componente robótico sosteniéndolo de la placa ancha
metálica en el eje X. Si levanta el robot sosteniéndolo por la varilla de
metal la varilla se doblará.
Riel en "Y" en posición des-
bloqueado y funcional
Содержание Scalar i500
Страница 4: ...4 Scalar i500 Getting Started Guide...
Страница 22: ...22 Scalar i500 Getting Started Guide...
Страница 58: ...58 Guide de d marrage rapide de la bandoth que Scalar i500...
Страница 76: ...76 Gu a de inicio de Scalar i500...
Страница 78: ...78 Scalar i500 1 1 2 3 4 Scalar i500 5 Scalar i500 6 Scalar i500 Scalar i500 5U 26 5 9U 29...
Страница 80: ...80 Scalar i500 1 a 1 2...
Страница 81: ...Scalar i500 81 3 a 9U Scalar i500...
Страница 82: ...82 Scalar i500 Y Y Y Y Y Y Y Y...
Страница 83: ...Scalar i500 83 Y Y 4 a Scalar i500 Y Y...
Страница 84: ...84 Scalar i500 5 a...
Страница 87: ...Scalar i500 87 Fibre Channel 1 Fibre Channel Fibre Channel 2...
Страница 89: ...Scalar i500 89 SCSI SAS 1 SAS SAS 2 SAS SAS...
Страница 91: ...Scalar i500 91 4 7 1 a 2...
Страница 93: ...Scalar i500 93 4 Scalar i500 5 Assign IE Assign IE Scalar i500 6 7 Scalar i500...
Страница 94: ...94 Scalar i500 8 Scalar i500 Help www quantum com 5U 14U 23U www quantum com...
Страница 96: ...96 Scalar i500 1 1 2 3 4 Scalar i500 5 Scalar i500 6 Scalar i500 Scalar i500 5U 26 9U 29 2...
Страница 98: ...98 Scalar i500 1 a I E b c 1 d 2 1 X...
Страница 99: ...Scalar i500 99 3 a 9U b c 2 2 d e Scalar i500...
Страница 100: ...100 Scalar i500 f Y Y g I E Y h Y Y Y Y Y...
Страница 101: ...Scalar i500 101 Y Y i 4 a I E b c 2 2 d e Scalar i500 5 a Y X Y...
Страница 102: ...102 Scalar i500 b c...
Страница 103: ...Scalar i500 103 4 Scalar i500 1 LCB 2 3 4 FC I O 5 I E 5 SCSI I O SAS Serial Attached SCSI SCSI FC SAS I O Scalar i500...
Страница 105: ...Scalar i500 105 1 2...
Страница 106: ...106 Scalar i500 I O 1 2 I O 3 6 I O 3 I O 1 2 4...
Страница 107: ...Scalar i500 107 SAS Serial Attached SCSI 1 SAS SAS 2 SAS SAS...
Страница 108: ...108 Scalar i500 6 1 a b 2 LCB 3 1 I O LCB I O I O a LCB 4 b 9U I O UPPER I O LOWER SCSI SCSI...
Страница 109: ...Scalar i500 109 4 1 7 1 a b c 2 3 Setup Wizard Setup Wizard Startup Wizard DCHP I E 6 0 SCSI FC SAS...
Страница 111: ...Scalar i500 111 8 Scalar i500 Help Help Help www quantum com 1 5U 14U 23U www quantum com...
Страница 112: ...112 Scalar i500...
Страница 114: ...114 Scalar i500 1 1 2 3 4 Scalar i500 5 Scalar i500 6 Scalar i500 Scalar i500 5U 26KG 58LBS 9U 29 5KG 65 LBS...
Страница 116: ...116 Scalar i500 1 a I E b c 1 d 2 1 1 X...
Страница 117: ...Scalar i500 117 3 a 9U b c 2 2 2 d e Scalar i500...
Страница 118: ...118 Scalar i500 f Y Y g I E Y h Y Y Y Y Y...
Страница 119: ...Scalar i500 119 Y Y Y i 4 a I E b c 2 2 2 d e Scalar i500 5 a Y X Y...
Страница 120: ...120 Scalar i500 b c...
Страница 123: ...Scalar i500 123 Fibre Channel 1 Fibre Channel Fibre Channel 2...
Страница 125: ...Scalar i500 125 SAS Serial Attached SCSI 1 SAS SAS 2 SAS SAS...
Страница 127: ...Scalar i500 127 4 1 AC 7 1 a b c 2 3 Setup Wizard Setup Wizard Setup Wizard DCHP 6 I E 0 SCSI FC SAS...
Страница 129: ...Scalar i500 129 8 Scalar i500 Help Help Help www quantum com 5U 14U 23U www quantum com...
Страница 130: ...130 Scalar i500...
Страница 134: ...134 Scalar i500 1 a I E b c 1 d 2 X...
Страница 135: ...Scalar i500 135 3 a 9U b c d e Scalar i500 Installing the Rackmount Kit...
Страница 136: ...136 Scalar i500 f Y Y g I E Y h Y Y Y Y Y...
Страница 137: ...Scalar i500 137 Y Y i 4 a I E b c d e Scalar i500 Installing the Rackmount Kit 5 a Y Y X Y...
Страница 138: ...138 Scalar i500 b c...
Страница 141: ...Scalar i500 141 1 2...
Страница 142: ...142 Scalar i500 I O 1 2 I O 3 6 I O 3 I O 1 2 4...
Страница 143: ...Scalar i500 143 SCSI SAS 1 SAS SAS 2 SAS SAS...
Страница 144: ...144 Scalar i500 6 1 a b 2 LCB 3 I O LCB I O I O a LCB b 9U I O UPPER I O LOWER SCSI SCSI...
Страница 145: ...Scalar i500 145 4 7 1 a b c 2 3 Setup Wizard Setup Wizard Setup Wizard DCHP 6 I E 0 SCSI FC SAS...
Страница 147: ...Scalar i500 147 8 Scalar i500 Running the Library Help www quantum com 5U 14U 23U www quantum com...
Страница 148: ...148 Scalar i500...