7-14
Field
–
Replaceable Units (FRUs)
501510 Rev. S
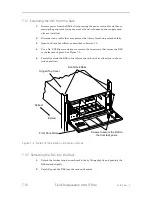
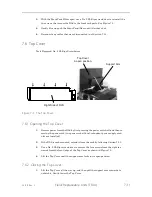
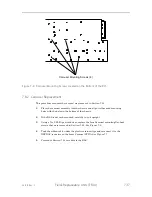
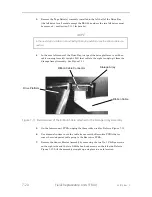
Figure 7-5 Bottom View of the RLS showing the Carriage Assembly Screws
CAUTION
Only use the holes in its top of the Carriage Assembly to lift it. Reaching under-
neath its top plate may damage the assembly by bending the delicate drive shafts.
6.
Place the thumb and second finger of each hand into the pair of grip holes on the
left and right sides of the Carriage Assembly top plate. If the slider is blocking a
pair of holes, gently push it out of the way. Lift the Carriage Assembly straight
up and out. When the assembly has cleared the chassis, rotate it and place its
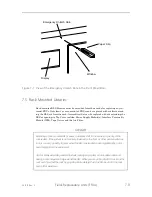
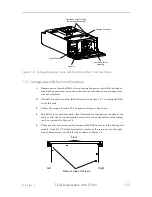
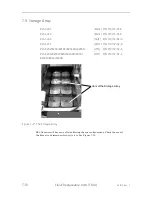
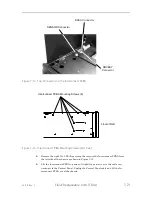
backside on top of the chassis. See Figure 7-6.
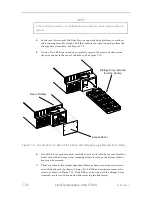
CARAGE Connector
Bottom View of the
Handler/Carriage Assembly
Ribbon Cable
RLS Chassis
Figure 7-6 Carriage Assembly on the Chassis with a Detail of the Ribbon Cable
7.
Disconnect the wide ribbon cable from the bottom, left side of the Carriage As-
sembly. The assembly may now be set aside. See Figure 7-6.
7.7.2
Carriage Assembly Replacement
CAUTION
Only use the holes in the top of the Carriage Assembly to lift it. Reaching un-
derneath its top plate may damage the assembly by bending the delicate
drive shafts.
Содержание RLS-4470
Страница 1: ...RLS 8000 Tape Library Technical Service Manual 501510 Rev S...
Страница 2: ......
Страница 14: ...xiv 501510 Rev S This page left blank intentionally...
Страница 16: ...1 2 Introduction 501510 Rev S Table 1 1 Applicable Documents...
Страница 20: ...1 6 Introduction 501510 Rev S This page left blank intentionally...
Страница 23: ...501510 Rev S Description and Theory of Operation 2 3...
Страница 34: ......
Страница 50: ...3 16 The Operator Interface 501510 Rev S This page left blank intentionally...
Страница 64: ...4 14 The Maintenance Menu 501510 Rev S This page left blank intentionally...
Страница 65: ...501510 Rev S The Private Menu 5 1 5 The Private Menu...
Страница 69: ...501510 Rev S The Private Menu 5 5 10 Close the Front Panel Door...
Страница 144: ...7 40 Field Replaceable Units FRUs 501510 Rev S 4 Reinstall the Carriage Assembly into the RLS as described in Section 7...
Страница 184: ...8 6 Firmware Updating 501510 Rev S Figure 8 2 Sample of the Library Firmware Upload Progress Screen...
Страница 188: ...8 10 Firmware Updating 501510 Rev S Figure 8 7 Properties Screen...
Страница 205: ...501510 Rev S RLS Expansions 9 13 This page left blank intentionally...


