


14
SLIDE ‘N CLICK ANCHORAGE INSTALLATION - Q8-7580-A
A
B
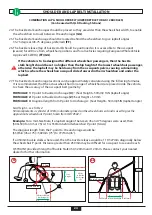
Determine location of Anchorages, refer to
Figure 1 & 2
*For Mini Slide’n Click – proceed to next page
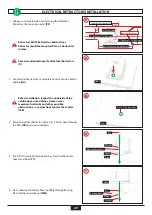
1. Route area in floor for each floor anchorage, 34mm
diameter and 11mm deep. Clean out debris (A).
2. Remove rubber plug. Insert pocket into floor and use it
as template to mark centre hole for drilling. Drill 10mm
hole through floor (B).
3. Place sealant inside floor opening and install Slide’n
Click floor anchorage into floor (C).
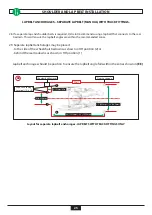
4. Put bolt through Anchorage, floor, Backing plate and
Washer
(D).
We recommend using sealant between
Backing Plate and floor
5. Secure Bolt with Locknut, leaving a minimum of 2-3
threads from Bolt sticking out
Recommended torque, 35 FT/LB (47 Nm).
6. Insert Rubber Plug into Floor Anchorage and push it
down firmly onto Bolt head (E).
Leave a minimum distance of approximately
.20” (5.08mm) from Rubber Plug to top
of Floor Anchorage (about the width of a
standard pencil eraser)
8
.44” (11mm) Deep
8
1.34” (34mm) Diameter
8
Floor
8
Mark Center Hole
8
8
Floor
E
8
Rubber Plug
8
Anchorage
.20” (5.08mm)
D
8
Anchorage
8
Floor
8
Bolt
8
Backing Plate
8
Washer
C
8
Floor Anchorage
8
Sealant
8
Floor