


Installation
12800-040 Installation
1-14
D000140-001
B
S
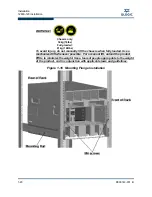
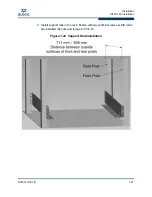
2. Install support rails in the rack. Fasten with two (2) M6 screws per EIA rail to
pre-installed clip nuts and torque to 30 in-lb.
Figure 1-10 Support Rail Installation
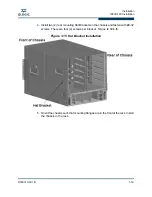
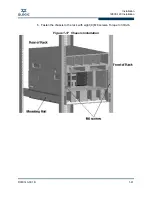
3. Orient the chassis such that mounting flanges are in the front of the rack. Install
the chassis in the rack. Fasten chassis to the rack with four (4) M6 screws.
Torque to 30in-lb.
WARNING!!
To avoid injury, use a team of people appropriate to the weight of the
product and in conjunction with applicable laws and guidelines.
4. Fasten chassis to the rack with four (4) M6 screws. Torque to 30in-lb.
Fully-loaded:
43kg (95lbs)
Содержание QLogic 12000 Series
Страница 1: ...D000140 001 B QLogic 12000 Hardware Installation Guide...
Страница 42: ...Installation 12800 360 Installation 1 34 D000140 001 B S Figure 1 27 12800 360 Front and Rear Cabling...
Страница 53: ...Installation 12800 360 Installation D000140 001 B 1 45 A Figure 1 37 Fasten the Chassis to the Back of the Rack...
Страница 92: ...QLogic 12000 Series Product Specifications 12800 Series A 8 D000140 001 B S Notes...
Страница 97: ...Safety and Regulatory Compliance Information Safety Information D000140 001 B 5 A 2...
Страница 108: ...Safety and Regulatory Compliance Information Safety Information B 16 D000140 001 S 7 QLogic 12000 MPFD EMI...
Страница 109: ...Safety and Regulatory Compliance Information Safety Information D000140 001 B 17 A...
Страница 110: ...Safety and Regulatory Compliance Information Safety Information B 18 D000140 001 S Notes...
Страница 113: ...Serial Port Pinouts D000140 001 B C 3 A...
Страница 114: ...Serial Port Pinouts C 4 D000140 001 B S Notes...
Страница 125: ......


