Pulsar INTE Скачать руководство пользователя страница 7

www.pulsar.pl   


INTE 


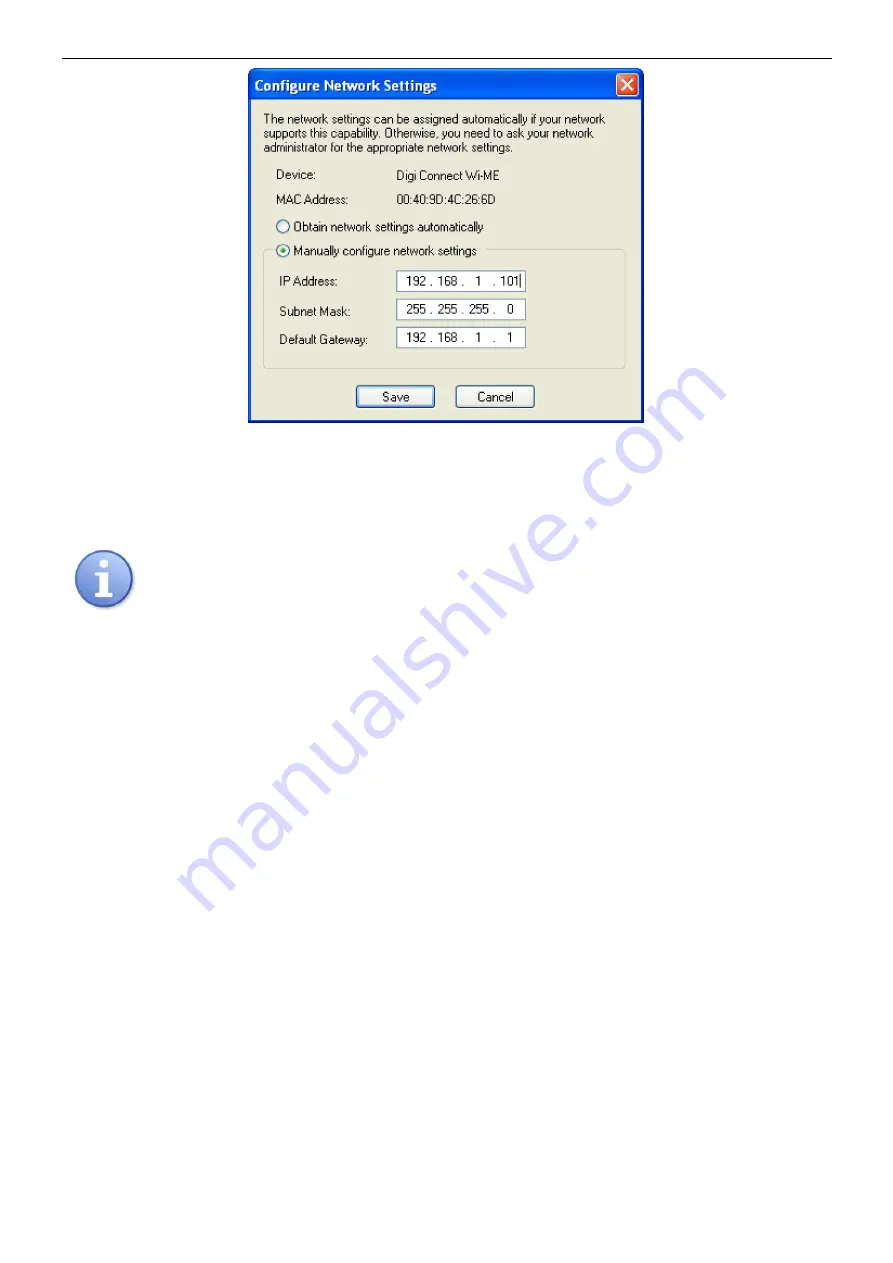
Fig. 5. The window of network settings. 


In the settings window, select the „Manually configure network settings” option and change the IP 

address  of  the  interface  in  the  unblocked  area  to  192.168.1.101.  The  subnet  mask  and  the  default 
gateway IP address should be left unchanged.  


Before setting the network address, make sure it is not used by any device on the network. 


Confirm the changes by pressing the „Save” button.  The ” Digi Device Discovery” application will 

display  the  message  about  the  need  to  restart  the  interface,  which  should  be  confirmed  by  pressing 
"OK”. A reset progress window will be displayed.  

From now on, the router will "see" our interface at the new address. 


4.5 STEP 3 – Setting the serial port parameters. 


After  entering  the  above  settings  of  the  router  and  Ethernet  interface,  configure  the 

communication  channel  between  the  Ethernet  interface  and  the  power  supply  to  which  the  interface  is 
connected. 
To do that,  double-click on the line of the selected interface in the „Digi Device Discovery” program. The 
default web browser window will open.  Log in correctly to configure the interface.  
 

Содержание INTE

Страница 1: ...Interface ETHERNET v 1 0 CODE INTE EN Edition 3 from 05 12 2013 Supercedes edition 2 from 19 12 2012...

Страница 2: ...Setting the serial port parameters 7 5 PSU configuration 11 5 1 Configuration of power supplies of PSBEN series with LCD display 11 5 2 Configuration of power supplies of PSBEN series with LED display...

Страница 3: ...upplies of the PSBEN or EN54 series to a PC via the Ethernet connection The PowerSecurity software enables remote monitoring of parameters through a cyclical preview of the current status of the power...

Страница 4: ...ed to a PC via Ethernet cable Fig 2 Schematic diagram of Ethernet network communication Interface installation 1 Install the Ethernet interface in the enclosure of the PSU 2 Connect the SERIAL sockets...

Страница 5: ...t solution is to own a separate router or to restore the factory settings of already owned router if possible The information included in the following subsections show step by step how to configure t...

Страница 6: ...or the time of configuration process Run the Digi Device Discovery program with icon After launching the program will display the Ethernet interface logged in to the router Identification of the modul...

Страница 7: ...ry application will display the message about the need to restart the interface which should be confirmed by pressing OK A reset progress window will be displayed From now on the router will see our i...

Страница 8: ...the Login button The adjustment window will be displayed Select the Serial Ports option from the Configuration menu on the left side of the window Fig 7 The interface configuration panel Select the Po...

Страница 9: ...oading the page select the Basic Serial Settings tab at the bottom and enter the same settings as in the picture below The power supplies of the EN54 series allow higher transmission speed and therefo...

Страница 10: ...the settings in the TCP Settings section as shown below Confirm by pressing the Apply button Fig 10 The interface configuration panel the TCP tab Reset the Ethernet interface again To do that press t...

Страница 11: ...h LCD display which enables setting the communication parameters of the serial port from the LCD panel To enter the setup mode press the SET button from the main screen use the or buttons to display t...

Страница 12: ...ost and leftmost buttons on the LED panel The Adr parameter will be displayed press the right arrow The trS parameter will be displayed press OK The display will show one of the two parameters 9 6 or...

Страница 13: ...with LCD display which enables setting the communication parameters of the serial port from the LCD panel To enter the setup mode press the SET button from the main screen use the or buttons to displa...

Страница 14: ...tons on the LED panel 5 4 1 Setting the transmission speed simultaneously press the rightmost and leftmost buttons The tSt parameter will be displayed use the or buttons in order to display the trS pa...

Страница 15: ...splayed use the or buttons in order to display the trP parameter press OK The information about the parity of transmission will be displayed use the or buttons in order to set the required communicati...

Страница 16: ...connection configuration window PSU Description Name PSU s name The name that should be assigned individually to each PSU Address 1 Fixed address Refresh period of the preview ms 100 60 000ms Refresh...

Страница 17: ...efresh cycle Fig 12 Remote desktop windows of the power supplies PSBEN right and EN54 left 7 Technical parameters Power supply 5V from the SERIAL socket of the PSU Current consumption max 180mA TTL tr...

Страница 18: ...www pulsar pl INTE 18...

Страница 19: ...www pulsar pl INTE 19...

Страница 20: ...ww zasilacze pl WEEE Label Waste electrical and electronic equipment must not be disposed of with normal household waste According to the European Union WEEE Directive waste electrical and electronic...

Отзывы: