


Pr
o
Minent
®
Page 13
Assembly and Installation
S
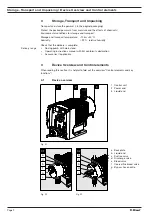
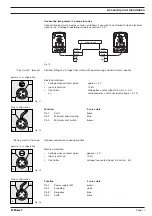
Place the gamma/ L on a firm surface with the relay opening press-out section at the top
(see fig. 15:a)
S
Place a punch (dia. 8-15 mm) in the centre of the relay opening press-out section , and
strike briefly and sharply with a hammer (approx. 250 g)
S
If necessary clean up the edges of the opening
S
Remove the pressed out section from the gamma/ L
a
a
Fig. 15
Fig. 16
Inserting the relay component
S
Hold the relay component with your right hand gripping the left and right hand edges of the
relay cover, and tilt the front end slightly to the left (see fig. 17)
S
Push the relay component through the relay opening, holding the upper corner of the lower
edge against the guide rail on the pump base, until the contact of the relay component has
reached the controller contact. (See fig. 18: test: can you still move the end of the circuit
back and forth?)
S
Gently push the relay component right into the opening.
S
Screw the relay cover firmly onto the housing using the screws provided.
S
Insert the relay cable plug seal into the relay cover and screw on the plug (see fig. 19)
b
Fig. 17
Fig. 18
Fig. 19