background image

P r i m a L u c e L a b   S . p . A .

E A G L E   L E   U s e r   M a n u a l

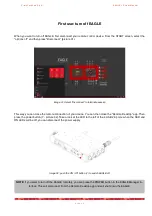
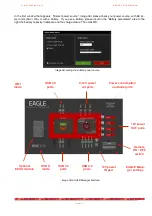
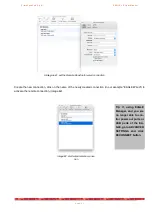
In the first window that appears   (“Select power source”, image 38) please check your power source, with AC po-
wer units (5A or 14A) or with a battery.   If you use a battery, please insert in the “Battery parameters” area to the 
right the battery capacity in Ampere and the charge status. Then click OK.

p a g e   3 7

Image 38: setting the EAGLE power source

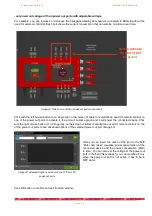
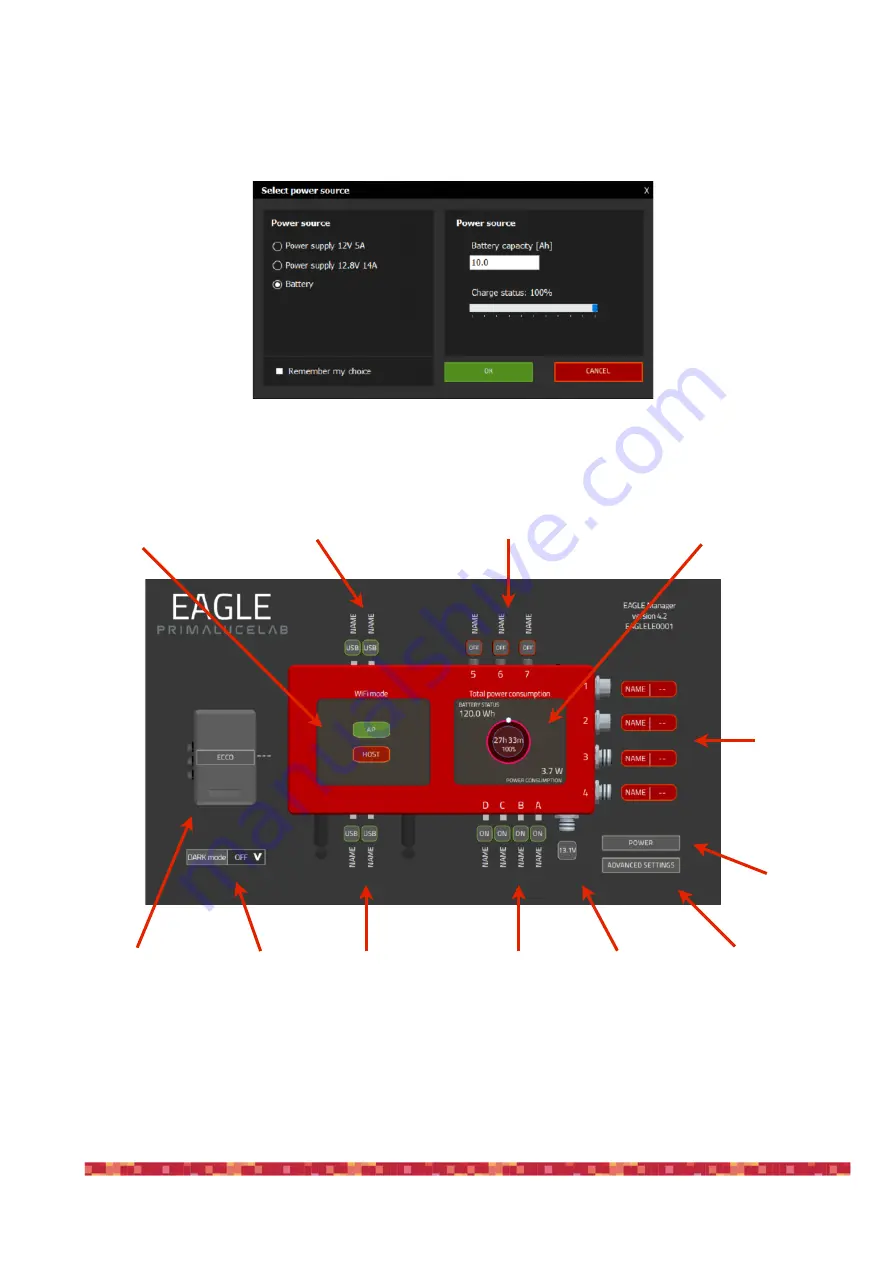
USB 3.0 

ports

USB 2.0 

ports

USB 3.0 

ports

0-12V power 

out ports

12V power 

OUT ports

WiFi 

mode

Power consumption 

and battery life

12V power 

IN port

EAGLE Mana-

ger settings

Remote 

ON / OFF 

switch

Image 39: EAGLE Manager interface

Optional 

ECCO module

DARK 

mode

Содержание EAGLE LE

Страница 1: ...r any matters relating to the use service and warranty please refer to the addresses given in the relevant documents PrimaLuceLab S p A Vi a R o v e r e d o 2 0 B 3 3 1 7 0 P o r d e n o n e w w w p r i m a l u c e l a b c o m EAGLE L E control unit for telescopes and astrophotography ...

Страница 2: ...ry EAGLE unit is tested by PrimaLuceLab technical experts to verify the correct operation of all components the integrated computer stability and speed of the wire less connection and the power bridge p a g i n a 1 CAUTION in order to connect EAGLE to other mechanical PLUS elements please avoid to use too long screws that may touch the internal electronics of the EAGLE THE THREADED PART OF THE SCR...

Страница 3: ...to the EAGL E 3 4 First use remotely control devices with EAGLE Manage r 3 6 connect or disconnect every power out port of EAGL E 3 8 set power out voltage of the 3 power out ports with adjustable voltag e 3 9 connect or disconnect devices attached to the 4 USB 2 0 port s 4 0 check for power in voltage and battery lifetim e 4 0 set WiFi connectivit y 4 1 remotely turn on off the entire telescop e ...

Страница 4: ...e at temperatures above 50 C Do not burn or incinerate any component Do not wet any electronic or electric componen t Do not bend modify or force any part of EAGL E NOTICE In case you check any malfunction please contact us immediately 39 0434 1696106 or sup port primalucelab com Do not try to disassemble repair or modify yourself EAGLE without our written approval in order not to loose the manufa...

Страница 5: ... c component Read the paragraphs below for detailed operation de scription p a g e 4 Power IN 12V HDMI port for external monitor 3 4 n 2 USB 3 0 ports 5 n 2 USB 3 0 ports 7 On Off switch 8 n 4 12V power OUT 2 Network port n 4 USB 2 0 ports WiFi Antenna 1 6 n 3 power out ports with regulated voltage 9 10 Status LEDs 11 ...

Страница 6: ...n system that can power the entire system for 8 hours for example for the duration of an astronomical night you will need a bat tery with a capacity of at least 7 2Ah consumption per hour x 8 hours duration 57 6 A h p a g e 5 CAUTIO N EAGLE must be powered with 12V regulated voltage You can use a power supply with 12V output voltage or a fi eld battery If you use a battery this MUST be provided wi...

Страница 7: ...m the application can also be found under the name RD Client Microsoft The Remote Desktop client is free and compatible with all operating systems iOS Android Windows and macOS As an alternative you can also use the Parallels RDP Client that is free and available for different operating systems Install the 2 WiFi antennas 9 included in the package by threading them onto the the proper ports on the...

Страница 8: ...t to power EA GLE from the 110 220V wall plug replace the power cable with the optional 12 8V power supply Then press the power button 7 The ON LED will light up and the SSD LED will start blinking this means Windows is booting p a g e 7 Image 2 Connect the power plug into the socket 1 Image 3 press the Start button 7 to switch EAGLE on ...

Страница 9: ...s on the control device you use so if you do not know how to search for WiFi networks please read the manual of your device and select the network created by EAGLE picture 4 A window will appear where you will be asked to enter the password of your network image 5 The password is primalucelab Using the keyboard virtual or physical of your device enter the password paying attention to appropriate u...

Страница 10: ...o longer need to enter your password your device will connect automatically when you select the network created by EAGLE p a g e 9 Image 6 connection to WiFi network NOT E On Windows operating systems when you select EAGLE s WiFi network you may be requested to insert a PIN from the router label Please click on the Connect using a security key instead and then type the password primalucelab ...

Страница 11: ...visible in the image 7 Click the button top right then select Add PC In the window that opens in PC name enter 192 168 137 1 Then select the User Account fi eld and choose Add user account A window will open picture 8 where you can enter your username and password to log on to Win dows The values are Username PrimaLuceLab Password that shown on the quick guide in the EAGLE box Then press the butto...

Страница 12: ... smartphones click the central button at the top image 12 and select the hand but ton the icon next to the house To simulate a single mouse click like pressing the left button of the mouse just tap on the screen To simulate the right mouse button place a fi nger on the screen and do not move it and then tap with another fi nger to make options appear NOTE You can also use another Remote Desktop cl...

Страница 13: ...rnet connection for example when or if it doesn t have a 4G connection In this case please proceed this way 1 In the iPhone iPad please go to Settings Wi fi and select your EAGLEXXXXXX network Once selected tap on the i icon to the right 2 Next tap on Con fi gure DNS and change the selection from Automatic to Manual and tap on Add server Here you type the IP address of your EAGLE 192 168 137 1 as ...

Страница 14: ... A E AGLE LE U ser Manual p a g e 1 3 3 With the IPv4 address and DNS settings con fi gured manually the Remote Desktop should work correctly Please launch again the Microsoft Remote Desktop app and start the connection ...

Страница 15: ...ton top right then select Desktop In the window that opens in PC name enter 192 168 137 1 Then select the User Account fi eld and choose Add user account A window will open picture 15 where you can enter your username and password to log on to Windows The values are Username PrimaLuceLab Password that shown in the fl yer in the EAGLE box Then press the button Save to save the access data WARNING w...

Страница 16: ...ntrol your telescope NOTE You can also use another Remote Desktop client the Parallels Client you can download from here https www parallels com products ras capabilities rdp client This client has to be set as the Mi crosoft one the only difference is that this will ask also the Port number please set it to 3389 p a g e 1 5 Image 17 Select the created link Image 18 EAGLE start screen ...

Страница 17: ... the window that opens in PC name enter 192 168 137 1 Then select the User Account fi eld and choose Add user account A window will open picture 20 where you can enter your username and password to log on to Windows The values are Username PrimaLuceLab Password that shown in the fl yer in the EAGLE box Then press the button Save to save the access data WARNING when entering your data check that yo...

Страница 18: ...ntrol your telescope NOTE You can also use another Remote Desktop client the Parallels Client you can download from here https www parallels com products ras capabilities rdp client This client has to be set as the Mi crosoft one the only difference is that this will ask also the Port number please set it to 3389 p a g e 1 7 Image 22 Select the created link Image 23 EAGLE start screen ...

Страница 19: ...tion and give it a name in the fi eld pro vided 2 Next select the name of the WiFi network of your EAGLE With the network selected click Advanced Click on the TCP IP tab and click on the pulldown menu for Con fi gure IPv4 to change from Using DHCP to Manually With Manually selected you must enter a valid IP address for the network of your EAGLE The IP address of your EAGLE s AP interface is 192 16...

Страница 20: ...t the Remote Desktop connection If you still have the same error this could be related to the access data saved in your Mac memory In order to delete previous saved access data please enter the Keychain and type in the upper right fi eld the name of your EAGLE s WiFi network Then select all the results make a right mouse click and select Delete All This will remove all the access data saved relate...

Страница 21: ... 24 Click the button top right then select Add PC In the window that opens in PC name enter 192 168 137 1 Then select the User name fi eld and choose Add user account A window will open pictu re 25 where you can enter your username and password to log on to Windows The values are Username PrimaLu ceLab Password that shown in the fl yer in the EAGLE box Then press the button Save to save the access...

Страница 22: ...image 28 Now you are ready to use the software you prefer to control your telescope NOTE You can also use another Remote Desktop client the Parallels Client you can download from Play Store This client has to be set as the Microsoft one the only difference is that this will ask also the Port number please set it to 3389 p a g e 2 1 Image 27 Select the created link Image 28 EAGLE start screen ...

Страница 23: ...ual IP address for the network of your EAGLE The IP address of your EAGLE s AP interface is 192 168 137 1 An address must be selected in the same network range and it must be uni que This is done by changing the last octet of the network address Your EAGLE ends in 1 You can se lect any other address starting with 2 up to 254 Remember if you have multiple devices accessing your EAGLE you should cho...

Страница 24: ... With the IPv4 address and DNS settings con fi gured manually the Remote Desktop should work correctly Please launch again the Microsoft Remote Desktop app and start the connection If the Certi fi cate can t be veri fi ed window appears please select Never ask again for connections to this PC and click CONNECT button to start ...

Страница 25: ...crium Re fl ect and press Next button to proceed p a g e 2 4 Before installing your devices driver and your astronomy software in the Windows operating system of the EAGLE we suggest you to create a backup copy of your SSD In fact after production and testing of your EAGLE we always record a Windows Restore Point that you can use if the software and driver you use create problems in Windows and yo...

Страница 26: ... disks of your EAGLE Select the SSD disk of the EA GLE the fi rst line by checking the leftmost box option and click Image This Disk In the next window choose your destination disk the one that will house your SSD copy Note that this will erase all data on the disk so be careful which one you choose p a g e 2 5 ...

Страница 27: ...maLu ceLab S p A E AGLE LE U ser Manual In the next window please leave the options as they are and press Next to continue In the next window please press Finish button fi nish the backup wizard p a g e 2 6 ...

Страница 28: ...K button to start the backup of your SSD drive Finally Macrium Re fl ect will begin the cloning process This can take some time depending on the size of your SSD unit and on the speed of the USB pen or drive you use to make the backup so give it time to do its thing p a g e 2 7 ...

Страница 29: ...USB stick This contains a lightweight version of Windows with a full version of Macrium Re fl ect and it allows you to use your SSD backup copy also if Windo ws won t boot In order to to this insert a USB stick in one of the USB 3 0 ports of your EAGLE then start Macrium Re fl ect on the left select the Bac kup tab then select Other Tasks and click Create bootable Rescue media Please follow the on...

Страница 30: ... an integrated CD or DVD reader If you have to install software that comes on CD or DVD you may connect the external CD or DVD reader to the USB port of EAGLE Then insert the CD or DVD of your software and follow the on screen instructions to complete the installation 2 If you have software to install from a USB thumb drive connect the USB stick to the USB port of the EAGLE and follow the onscreen...

Страница 31: ...close the Remote Desktop app Then press the power button 7 picture 32 Take a look at the LED to the left of the 4 USB 2 0 ports when the SSD and ON LEDs will be off you can disconnect the power supply p a g e 3 0 Image 32 push the ON Off button 7 to switch EAGLE off Image 31 Select Disconnect to terminate session NOTE if you want to turn off the EAGLE remotely you can press the POWER button in the...

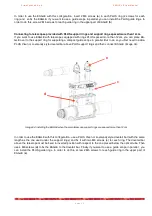
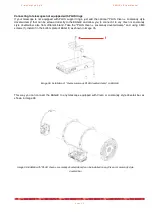
Страница 32: ...nd support rings spaced up to 12cm When using compact refractor telescopes the distance of the support rings is set by the PLUS Vixen or Losmandy style dovetail clamp installed with the telescope In this case the EAGLE can be installed directly above the sup port ring as if it were a dovetail bar image 33 Thanks to the M5 threaded holes present in the upper part of the EAGLE you can install in par...

Страница 33: ...llel But to do so you fi rst need to add a PLUS Vixen or Losmandy style dovetail bar above PLUS support rings and then connect EAGLE image 34 In order to use the EAGLE with this con fi guration use a PLUS Vixen or Losmandy style dovetail bar with the same length as the one used under the support rings and fi x it with two M6 screws c for each ring The dovetail bar above the telescope must be fi xe...

Страница 34: ... Losmandy style dovetail bar also from different brand Take the PLUS Vixen Losmandy dovetail clamp and using 3 M6 screws f install it in the bottom plate of EAGLE as shown in image 35 This way you can connect the EAGLE to any telescope equipped with Vixen or Losmandy style dovetail bar as shown in image 36 p a g e 3 3 Image 35 installation of Vixen Losmandy PLUS dovetail clamp on EAGLE f Image 36 ...

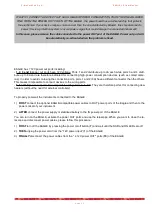
Страница 35: ...UTION EAGLE distribute power only at 12V If the instrument you want to use requires a different voltage do NOT connect it to the power ports of EAGLE CAUTION the power output from the OUT port of EAGLE depend on power supply or battery connected to the IN power port of the EAGLE Since several instruments for astronomy strictly require a fi xed 12V power you have to check that your power source pro...

Страница 36: ... power supply or stabilised battery to the IN power port of the EAGL E You can turn on the EAGLE activate the power OUT ports and use the telescope When you want to close the te lescope and disconnect power cables please follow this procedure 1 FIRST turn off the EAGLE by pressing the power on off button 7 and wait until the SSD and ON LEDs are of f 2 THEN unplug the power cord from the 12V power ...

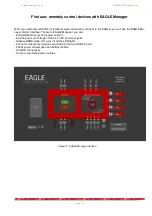
Страница 37: ...rol interface Thanks to EAGLE Manager you can Enable Disable every 12V power out port Set the power out voltage of the 3 x 0 12V power out port s Activate DARK mode this turns off all the LED light s Connect or disconnect devices connected to the four USB 2 0 port s Check power consumption and battery lifetim e Set WiFi connectivit y Set your automatic power routine s p a g e 3 6 Image 37 EAGLE Ma...

Страница 38: ...rt in the Battery parameters area to the right the battery capacity in Ampere and the charge status Then click OK p a g e 3 7 Image 38 setting the EAGLE power source USB 3 0 ports USB 2 0 ports USB 3 0 ports 0 12V power out ports 12V power OUT ports WiFi mode Power consumption and battery life 12V power IN port EAGLE Mana ger settings Remote ON OFF switch Image 39 EAGLE Manager interface Optional ...

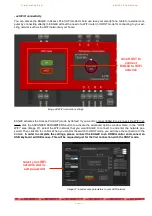
Страница 39: ...it the port will become green and it will power the connected device Click with the right mouse button or a 2 fi nger tap on the screen of tablet or smartphone used for remote control on one of the 12V power out ports to see advanced options of the selected power out port image 41 Here you can insert the name of the port in the fi eld Enter new label check for power consumption of the connected de...

Страница 40: ... right mouse button or a 2 fi nger tap on the screen of tablet or smartphone used for remote control on one of the power out ports to see advanced options of the selected power out port image 43 Here you can insert the name of the port in the fi eld Enter new label visualize power consumption of the connected device and the power consumption Watt in time You can also set the voltage of the power o...

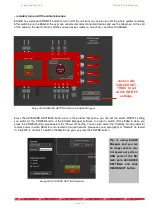
Страница 41: ... remote control on one of the power out ports to activate it the port will be come green and it will con nect the device Double click on the NAME label to change its name check for power in voltage and battery lifetim e if you power your EAGLE with a battery a dedicated menu allows you to set the Ampere capacity of your bat tery and charge percentage when EAGLE is powered on enabling you to monito...

Страница 42: ...METERS button to activate the advanced options window Here in the HOST WiFi area Image 47 select the WiFi network that you want EAGLE to connect to and enter the network pas sword Then click OK to con fi rm When you con fi rm the switch to HOST mode you will loose the connection to the EAGLE In order to complete the settings please connect the EAGLE to an HDMI monitor and connect an USB keyboard a...

Страница 43: ... options of Remote Desktop software image 48 in the device you use to control the EAGLE from instead of 192 168 137 1 as previously set Click on Save to save software connection options Going back to main page you will fi nd a new connection Connect your computer or other device you use to control the EAGLE from to the same WiFi network you connected EA GLE to and click on the new connection just ...

Страница 44: ...u prefer for the POWER button of the EAGLE Manager software In order to switch off the EAGLE when you press the POWER button please select the Power off setting You can also select the Standby mode useful for remote power in when EAGLE is connected to a wired network please see next paragraph or Restart to restart it Click OK to con fi rm To switch off EAGLE now you can press the POWER button p a ...

Страница 45: ...t work name created by your EAGLE AP WiFi You can modify the password fi eld with the password you prefer and click OK to con fi rm image 51 NOTE The password has to be 8 characters long it may contain both letters and numbers without spaces p a g e 4 4 This way if you re using the telescope together with other EAGLE users only you will be able to access to your EAGLE AP WiFi network Image 51 ADVA...

Страница 46: ...ether Thanks to the new DARK mode the EAGLE is now a welcome guest at star parties where standard computers may be prohibited because of uncontrolled light emissions from LEDs and screens the EAGLE doesn t need for a screen to operate In order to activate DARK mode please select ON in the bottom left switcher of the EAGLE Manager interface All the LED lights of the EAGLE will turn off and the EA G...
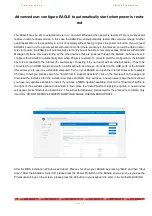
Страница 47: ...l computerised controller you can also see air tempe rature humidity and pressure EAGLE Switch ASCOM driver this allows third party softwares that supports power switches control to take control of the EAGLE s power and USB 2 0 ports A B C and D in order to automate ports management Image 54 EAGLE s ASCOM drivers are already installed in your system Updates can be found at https www primalucelab c...

Страница 48: ...n the Con fi guration before shutdown fi eld allows you to set the status of the ports when EAGLE turns off Image 55 To enable this feature click on the Con fi guration after startup or Con fi guration before shutdown you want to set Then click on the ports to set if you want them ON green or OFF red and select Enable close to STATUS You can also press the Load from con fi guration button in order...

Страница 49: ...ces If you want to remotely control the EAGLE in a different way than the one here described please contact us and we will help you customize your sy stem The simplest way of remote control is the wired one with a direct connection from a single computer to EAGLE For this use you will need a cross type Ethernet network cable to be connected to the EAGLE ethernet port and in the one of your control...

Страница 50: ...255 255 0 Then click OK to con fi rm Also the computer you want to use to control EAGLE must have a static IP then in this computer repeat the steps above but entering the following value IP address 192 168 100 20 0 Subnet mask 255 255 255 0 they are the same numbers it only changes the last digit of the IP ad dress Then click OK to con fi rm image 59 In order to remotely turn on EAGLE now you nee...

Страница 51: ...l need to set up a new connection to the Microsoft Remote Desktop software on your computer to control it In this example we will see how to set it from a Mac computer but it is also valid for Windows computers From the computer where you want to control EAGLE from start the Remote Desktop software then click the New button to set up a new connection Then set In Connection name fi eld enter a name...

Страница 52: ...xample EAGLE Wired to activate the remote connection Image 62 p a g e 5 1 Immagine 61 set the Remote Desktop for wired connection Image 62 start wired remote connec tion Tip if using EAGLE Manager and you are no longer able to con trol power out ports or USB ports of the EA GLE go to ADVANCED SETTINGS and click RECONNECT button ...

Страница 53: ... ethernet cable it has to be connected to an HDMI monitor and with a USB keyboard and mouse connected to the USB ports of the EAGLE this allows you to use it as a standard computer Turn on your EAGLE and open the Internet browser for example Chrome In Google please search for Intel Driver Support Assistant click on the fi rst result on the page and download the installer Start the installer and pr...

Страница 54: ...er failure change it from Stay off to Power on Now press F10 on the keyboard to save then press YES to con fi rm This will reboot your EAGLE Now every time you connect EAGLE to the power it will automatically start without having to press the power on button of the EA GLE In order to come back to the previous setting please select Stay Off in the After power failure option p a g e 5 3 ...

Страница 55: ...this you need to have 1 a computerized moun t 2 installed the ASCOM driver of the computerized mount into the EAGLE the ASCOM platform is pre installed in the EAGLE Please follow this easy steps in order to remotely control the mount using Cartes du Ciel planetarium software 1 Start Cartes du Ciel you will see this window 2 Select Telescope and then Telescope Settings this will open a new window p...

Страница 56: ... Telescope then Control panel This will open a new window ASCOM interface Click on Select and this will open a new window ASCOM Telescope Chooser Now based on the way you connect the mount to the EAGLE here you need to select the ASCOM driver p a g e 5 5 ...

Страница 57: ...rtes du Ciel planetarium software The EQMOD crea tes a virtual COM port you need to know the number In or der to do that go to Windows Control Panel then select System and then Device Manager In the window that opens double click on Ports COM LPT and look at the USB Serial Port number that opens Please note in Eagle Observatory the COM1 and COM3 are used for other ap plications In our example the ...

Страница 58: ...he right number port in Port fi eld and then press OK to close the window 5 Press OK in the ASCOM Telescope Chooser window and then press the Connect button in the ASCOM interface win dow The red button will become green and the EQMOD window will appear Now you re connected to the mount and you can remotely control it p a g e 5 7 Actual telescope position ...

Страница 59: ...w you can select the object make a right mouse click select Tele scope and then Slew The mount will move to the selected object 7 If after automatic pointing of the mount you see that the object is not perfect centered you can easily align and synchronize the telescope position In order to do that after the telescope is moved to the required position select the object then make a right mouse click...

Страница 60: ...r object centering and center the object in the telescope fi eld of view in your eyepiece or in the camera 9 When done select the object you re pointed in in this example Vega star make a right mouse click select Telescope and then Synchronize A new window will appear asking if the telescope is pointed at the object Press YES to con fi rm p a g e 5 9 Zoom buttons Speed selector and direction butto...

Страница 61: ...ll be synchronized and the sky chart position will be set to the object 11 When you want to disconnect the planetarium software from the mount select Telescope then Control panel and then Disconnect You will be able to close the Cartes du Ciel software p a g e 6 0 ...

Страница 62: ...rallel to the main one or to an off axis guider the autoguide camera generates the guide star image that is analyzed by a special software the autoguide software that automati cally sends tracking correction signals to the mount everything is done to obtain even with long exposures perfect images with pinpoint stars Follow these steps to get started easily in autoguiding 1 Start PHD2 Guiding the f...

Страница 63: ...te grates an ST4 autoguide port Press Connect and then press Close This will close the Connect Equipment window 4 Now select a proper exposition time for the guide camera usually 1 or 2 seconds and press the Looping button the one with 2 green arrows This will start expositions of the guide camera and you will see the image in the preview window p a g e 6 2 ...

Страница 64: ...eds that are too short usually 1 to 2 seconds are fi ne 5 Now even if the software does not strictly require it it is advisable to match the X and Y camera axes columns and rows of the sensor with the axes of movement of the mount in practice it is better to see on the screen that if for example you slightly move the mount in RA or DEC the reference star moves horizontally or vertically but not di...

Страница 65: ... third button on the left the one with the green icon PHD2 Guiding will automatically start the calibration pro cess that allows the software to understand which direction to move the guide star when a shift in the four mount movements AR AR DEC DEC p a g e 6 4 ...

Страница 66: ...cally guiding 9 To check for guide quality you can see the graph in the lower part of the PHD2 Guiding window This guide allows you to easily start guiding but PHD2 Guiding also has many advanced options to adjust and further improve performance So if you still need help with getting pinpoint stars or improving your guiding we invite you to read the PHD Gui ding user manual for additional informat...

Страница 67: ...ur scope is balanced and ready for guiding Try to get your mount s polar axis roughly aligned by using your mount s polar alignment scope if it has one Otherwise make sure the mount s polar axis is pointing towards the pole and the altitude setting corresponds to your local latitude Make sure you can see your computer screen when you are standing at the mount Start PHD2 and connect your equipment ...

Страница 68: ...Pri maLu ceLab S p A E AGLE LE U ser Manual Azimuth Alignmen t Open the Drift Align Tool You will see a window like this p a g e 6 7 ...

Страница 69: ...ope for the Azimuth axis adjustment Point near the Meridian and the celestial equator You can either click the Slew button or move the mount manually Your scope should now be pointing something like this And the Drift Align window will look like this p a g e 6 8 ...

Страница 70: ...the Dec trend line will be jumping up and down but soon the noise should average out and the slope of the line will become somewhat stable When that hap pens you are ready to adjust the mount s Azimuth Our goal is to make the Dec trend line fl at neither trending up nor down over time By adjusting the mount s azimuth you will change the slope of the Dec trend line If this is your fi rst time adjus...

Страница 71: ...e shows how far the guide star needs to move The magenta circle is larger when the Dec slope is steeper and it may initially be so large that it is not visible on the screen That s to be expected if it is not visible just move the guide star approximately the width of the screen If you do see the magenta circle you should move the guide star to the circle like this p a g e 7 0 ...

Страница 72: ...rizontal or worse away from horizontal Make a note to yourself in the Azimuth adjustment notes area of describing how you adjusted azimuth and which direction the Dec slope mo ved You can use this information next time you drift align so you do not have to guess which way to make the azimuth adjustment For example with my setup turning the azimuth knob clockwise makes the slope go down Having the ...

Страница 73: ... Altitude Alignmen t Now you will need to repeat the process for the mount s Altitude adjustment Click the Altitude button the Drift tool will now look like this Click Slew or manually slew your mount towards the horizon East or West p a g e 7 2 ...

Страница 74: ...circle Again the goal is to get the dec drift line to be horizon tal Note about ASCO M The instructions and screenshots above correspond to what you see in PHD2 with an ASCOM connection to the mount There are a couple differences if you do not have an ASCOM connection The scope pointing information and the Slew button are disabled You ll need to manually slew the mount to the required location The...

Страница 75: ...ny smartphone tablet running iOS or Android or computer with Windows or MacOS installing the application Microsoft Remote Desktop or Parallels RD client For ease of use we recommend devices with a screen size of at least 8 inches Q Can I command EAGLE from my Apple computer A Sure Access to the OS X App Store and search for Microsoft Remote Desktop or Parallels RD client app Install it and follow ...

Страница 76: ...ave a 480 000 000 000 bytes storage drive into a Windows computer that computer converts the number of bytes into gigabytes by dividing by 1024 all the way up through the scale not by dividing by 1 000 So 480 000 000 000 Bytes 1 024 468 750 000 actual Kilobyte s 468 750 000 KB 1 024 457 764 actual Megabyte s 457 764 MB 1 024 447 actual Gigabyte s This is why a 480GB SSD will be correctly reported ...

Страница 77: ...s 1 label mount http localhost 1380 getregout idx 5 replies with the voltage set in the RCA ports the ones for dew heaters with indexes from 5 to 7 their currents vol tages and label value Example result OK voltage 8 4 current 1 23 power 10 label dew heater http localhost 1380 setpwrout idx 1 state 1 Turn on or off the 12V power out ports with indexes from 1 to 4 Reply result OK http localhost 138...

Страница 78: ...al state of the ECCO module Reply 1 result OK ecco Not connected Reply 2 result OK ecco Connected temp 25 1 hum 45 dew 26 2 temp5 25 3 temp6 25 4 temp7 25 5 http localhost 1380 setdarkmode active 1 Turn on DARK mode http localhost 1380 setdarkmode active 0 Turn off DARK mode http localhost 1380 getdarkmode Replies result OK darkModeActive 0 1 http localhost 1380 geteye idx 0 Front EYE senso r http...

Страница 79: ...e t the parameter t is a number set the time in seconds to freeze the EAGLE Manager interface For example When a user start the control of the EAGLE ports from third party software you have to send the command lockInterface t 36000 to lock it for example for 10 hours When the user disconnects the EAGLE control at the end of the capture before disconnecting from third party software you have to sen...

Страница 80: ...r to fi x this please connect a USB mouse and keyboard to the EAGLE and click on Windows search fi eld Here type net plwiz then press ENTER in the keyboard This will open a new window and you have to deselect the fi rst option Users must enter a name and password to use this computer Then press Apply and if prompted re enter your password to con fi rm the changes Then reboot and Windows should sta...

Страница 81: ...he EAGLE to a place away from possible interferen ces for example in the backyard where you use your telescope and check if WiFi connection becomes stable If you still experience WiFi disconnections please move to point C C Update WiFi card driver in Windows please select START button select Control Panel and then Device Mana ger Here you will fi nd the list of devices connected to the EAGLE Selec...

Страница 82: ...B 2 0 ports please verify that the status of the port is ON in the Eagle Manager go to Windows Device Manager Here you will see the list of the hardware devices of the EAGLE and connected to it 2 If you still have to install the device driver in the EAGLE you device won t be automatically reco gnized and it will be marked with a yellow sign this means that the device can t be used until the driver...

Страница 83: ...m you have a problem on one of the power out cables so test all of them with a multimeter tester and when you fi nd the not working cable change or fi x it if you want to fi x it and you have no experience on electrical parts you may need the help of an expert If you still have sudden shutdowns please move to point C C Check for software settings inside Windows operating system there are settings ...

Страница 84: ... your EAGLE from the power unit and wait for more than 10 seconds Then press the power button of your EA GLE a couple of times Do this with no power source connected then connect your EAGLE to the power unit again and try to turn it on If it still doesn t start please disconnect the EAGLE power unit and open the EA GLE s chassis Here please check that the SSD drive is seated securely to the mother...

Страница 85: ...el 2 select Recovery 3 select Open System Restore then press Nex t 4 choose the restore point you will fi nd the EAGLE new restore point 5 press Next and then Finish NOTE if you perform a Windows Update Windows will automatically delete this Recovery Point because it won t be compatible anymore with the previous Windows version If you apply a Windows Update and the EAGLE new recovery point is dele...

Страница 86: ...o return it to the reseller upon the purchase of a new type of equivalent equipment one by one Properly differentiated collection for the subsequent start of dismantled equipment for recycling treatment and en vironmentally compatible disposal helps to avoid possible adverse effects on the environment and health and fa vors the reuse and or recycling of the materials contained in the equipment The...

Страница 87: ... wear 4 THE GUARANTEE DOES NOT APPLY IN THE FOLLOWING CASES Repair by anyone not authorised by PrimaLuceLab Invasive interventions or tampering with internal and or external parts Missing of the invoice or receipt of purchase TERMS OF SERVICE Technical assistance is performed exclusively by PrimaLuceLab or its authorised resellers All returns must be received with our permission to be asked writin...

Отзывы: