Using the Memory Slot inside the Memory Compartment
Follow the steps below on how to upgrade the memory modules:
1. Make sure the system is powered off and that no peripheral devices are attached.
2. Turn the system over and locate the screw on the memory compartment.
3. Remove the K/B cover, K/B and Middle plate.
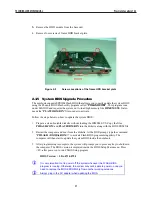
4. Locate the memory module socket. Align the notch with the notch in the socket connector
and insert the module as follows:
−
Hold the DIMM at a 60-degree angle and align the DIMM connector with the
socket in the system. Push the connector into the socket.
−
Press down on the edge of the DIMM until the locking tabs on the sides snap into
place, securing the module.
5. To remove a DIMM, press the locking tabs away from the sides of the module until the
module pops up. Then, remove the DIMM.
6. Reassemble the notebook components as follows.
−
Put the DIMM door back.
−
Replace the screw and turn the system over.
2.3.4 Hard Disk Upgrade Procedure
The notebook provides a built-in hard disk for the primary IDE controller. The HDD is an
industry standard 2.5
”
IDE disk drive and can be upgraded with another standard 2.5
”
HDD.
1. Make sure the system is powered off and that no peripheral devices are attached.
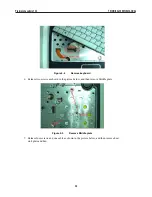
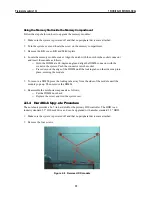
2. Remove the four screws.
Figure 2-8 Remove HDD module
TECHNICAL SERVICE MANUAL
Prestigio Cavaliere 142
30
Содержание CAVALIERE 142
Страница 1: ...PRESTIGIO CAVALIERE 142 TECHNICAL SERVICE MANUAL...
Страница 107: ...w w w p r e s t i g i o c o m...


