


C762, C764, C764i Stairclimber
Page 80
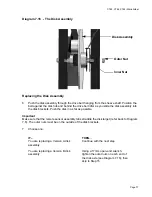
Procedure 7.19 - Replacing the Sheave, Sheave Shaft or
Sheave Bearings
Removing the Sheave Assembly
The sheave assembly consists of the sheave, the sheave shaft, and the bearing assemblies.
1.
Remove the covers as described in Procedure 7.1.
WARNING
Before continuing with this procedure, review the Warning and Caution statements listed in
Section One, Things You Should Know.
2.
Press down a stairarm with one hand. With your other hand, grasp and pull the end of the
stairarm belt connected to the return spring. Release the stairarm. Remove the belt from the
toothed pulley and idler pulley (refer back to Diagram 7.10). Repeat this step for the second
stairarm belt.
3.
Choose one:
IF...
THEN...
You are replacing the right sheave
Perform Steps 4 and 5 for the right
bearing toothed
pulley
You are replacing the left sheave
Perform Steps 4 and 5 for the left
bearing toothed
pulley
You are replacing both bearings or the
Perform Steps 4 and 5 for both toothed
sheave shaft or the sheave assembly
pulleys
4.
Using the snap ring pliers, remove the retaining ring from the toothed pulley (refer back to
Diagram 7.15).
5.
Remove the five thrust washers, toothed pulley, and wave washer from the end of the
sheave shaft.
6.
Loosen the drive belt by pushing down on the top of the drive belt idler arm. Hold the idler
arm down while you pull the belt out of the sheave rim. Place the belt on the left end of the
sheave shaft.
7.
Remove the fasteners that secure the left sheave bearing to the sheave bracket. Repeat
this step for the right sheave bearing.
8.
Remove the sheave assembly from the sheave brackets and away from the drive belt.
Содержание Cardio Theater Integrated Bracket C764i
Страница 23: ...C762 C764 C764i Stairclimber Page 23 Diagram 5 3 Magnet Wiring ...
Страница 59: ...C762 C764 C764i Stairclimber Page 59 Diagram 7 6 Speed Sensor and Target Disk Assembly Speed Sensor Target ...
Страница 61: ...C762 C764 C764i Stairclimber Page 61 Diagram 7 7 Magnet Wiring ...
Страница 100: ...C762 C764 C764i Stairclimber Page 100 Wiring Diagram 8 1 C762 C764 120 Vac ...
Страница 101: ...C762 C764 C764i Stairclimber Page 101 Block Diagram 8 2 C762 C764 120 Vac ...
Страница 102: ...C762 C764 C764i Stairclimber Page 102 Wiring Diagram 8 3 C762 C764 240 Vac ...
Страница 103: ...C762 C764 C764i Stairclimber Page 103 Block Diagram 8 4 C762 C764 240 Vac ...


