


C762, C764, C764i Stairclimber
Page 63
Replacing a Magnet Assembly
Do not tighten the bolts more than finger tight when you perform the next step.
5.
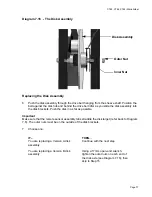
Position the magnet assembly against the frame upright (see Diagram 7.9). Install the
fasteners that secure the magnet assembly to the frame upright.
6.
If you are replacing only one magnet assembly
...
THEN...
OTHERWISE...
Continue with the next step.
Repeat Step 5 for the second magnet
assembly; then continue with the next
step.
7.
Inspect the gaps between the disk and the magnet assemblies as described in Procedure
5.1.
Diagram 7.9 - The Magnet Assembly
Содержание Cardio Theater Integrated Bracket C764i
Страница 23: ...C762 C764 C764i Stairclimber Page 23 Diagram 5 3 Magnet Wiring ...
Страница 59: ...C762 C764 C764i Stairclimber Page 59 Diagram 7 6 Speed Sensor and Target Disk Assembly Speed Sensor Target ...
Страница 61: ...C762 C764 C764i Stairclimber Page 61 Diagram 7 7 Magnet Wiring ...
Страница 100: ...C762 C764 C764i Stairclimber Page 100 Wiring Diagram 8 1 C762 C764 120 Vac ...
Страница 101: ...C762 C764 C764i Stairclimber Page 101 Block Diagram 8 2 C762 C764 120 Vac ...
Страница 102: ...C762 C764 C764i Stairclimber Page 102 Wiring Diagram 8 3 C762 C764 240 Vac ...
Страница 103: ...C762 C764 C764i Stairclimber Page 103 Block Diagram 8 4 C762 C764 240 Vac ...


