background image

Opening messages

To open a message:

1. Open your Inbox (see

To open the Inbox:

on the previous page

).

2. Scroll to the message and then press the

Open

context key.

View message details

You can view the details of received messages.

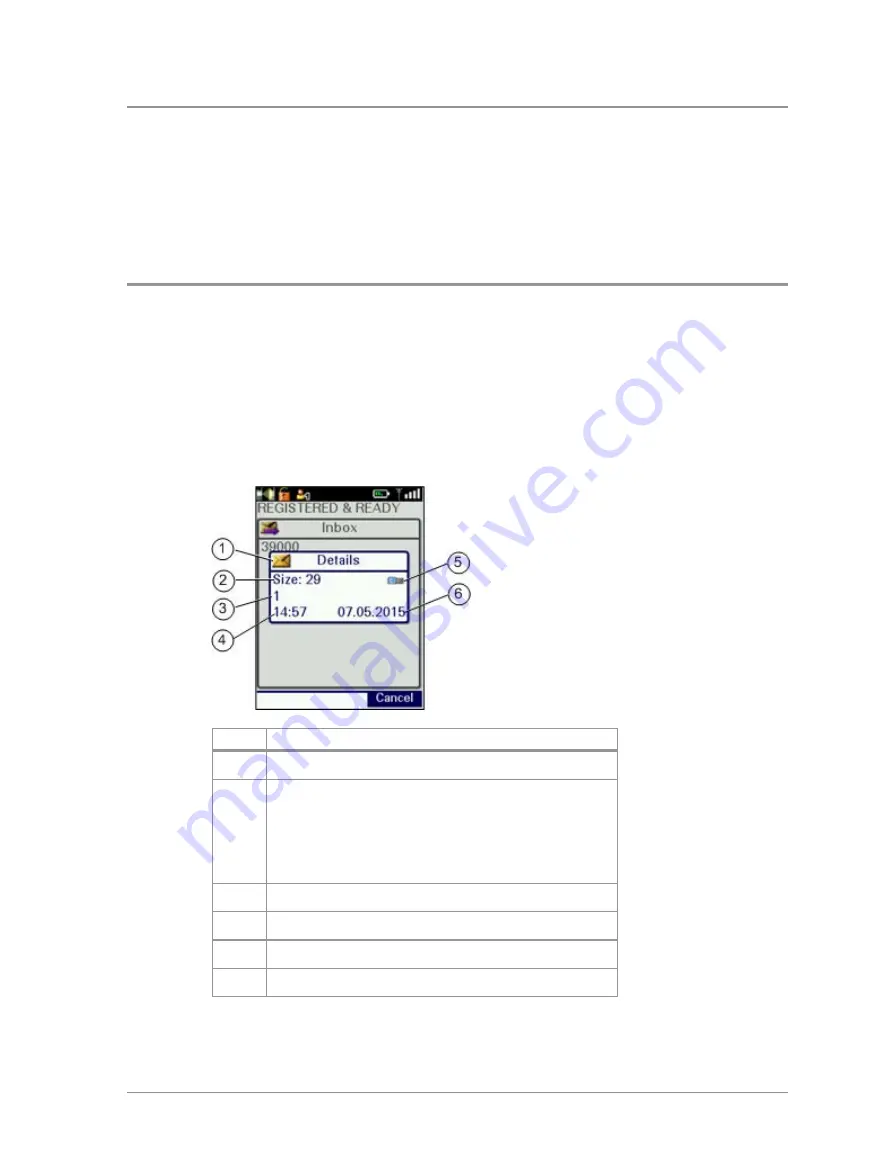
To view message details:

1. Open your Inbox (see

To open the Inbox:

on the previous page

).

2. Select a message then use

Options > Details

.

3. To exit the Details screen press

Cancel

.

Item

Description

1

Message location (Inbox)

2

Size.

Note: this is a relative measure of the

message size (not number of characters)

. You

can use Size to decide which message(s) to
delete if Saved Messages becomes full (see

Message Inbox

on page 84

)

3

Sender

4

Time received

5

Dial mode

6

Date received

86

HTT-500-2 – 12/2016

Содержание HTT-500-2

Страница 1: ...User Guide HTT 500 2 hand portable radio ...

Страница 2: ...and omissions Teltronic S A U and or PowerTrunk Inc welcomes any comment as a way to improve any delivered documentation The information contained herein has been prepared for the use of appropriately trained personnel and it is intended for the purpose of the agreement under which the information is submitted Any party using or relying upon this information assumes full responsibility for such us...

Страница 3: ... Removing the battery 11 Using Sepura approved batteries 11 Controls indicators 13 Navi knob 13 Navigation Keys 13 Soft keys 14 Context keys 15 Status icons 16 LED indicators 21 Emergency button 22 Getting Started 23 Fitting a microSD card 23 Fitting a Smart card 24 Antenna 25 Power on 26 Power off 26 Locking and unlocking the keypad 27 Home screen 28 Shortcut Bar 29 Notifications 30 User Guide ii...

Страница 4: ...s 41 Vibration alerts Haptics 42 Personalising your radio 43 Invert the display 43 Adjusting the backlight 43 Day Night mode 44 Adjusting text and icon size 45 Setting the display language 46 Menu style 46 Time and Date 48 Talkgroups and folders 49 Special folders 50 Typical folder arrangement 52 Talkgroup Selection Mode 53 Folder Selection Mode 58 Contacts 65 Searching and filtering contacts 66 V...

Страница 5: ...Smart Calls 78 Modifying your call setup 79 Text entry 81 Cursor movement 81 Character sets 82 Messages 84 Message Inbox 84 Opening messages 86 View message details 86 Reply to a message 87 Saved messages 87 Picture messages 92 Paging alerts 92 Networks 94 Authentication 94 Change Network 95 Transmit Inhibit 95 Fallback Mode 96 Operating Modes 98 DMO Mode 99 User Guide v ...

Страница 6: ... Screen 121 View images 121 Connector Protector 122 User profiles 123 Man Down 125 Lone Worker 127 WAP 128 Using WAP 128 Browser menu 129 Navigation menu 130 Settings 130 History menu 132 Using bookmarks 133 Call handling 134 GPS 137 GPS position 137 GPS direction 138 GPS reporting options 139 Bluetooth 140 Bluetooth on off 141 Audio devices 141 Data devices 143 vi HTT 500 2 12 2016 ...

Страница 7: ... 148 Unlocking the radio after incorrect PIN entry 148 End to End Encryption 148 Zeroising 150 Asset management 151 Labelling 151 RFID tag 152 Customising your radio 153 Accessories 155 Belt clip 156 Klick fast stud 157 Fit an accessory 159 GLOSSARY 161 User Guide vii ...

Страница 8: ...viii HTT 500 2 12 2016 ...

Страница 9: ...ing the use of Radio Frequency RF devices are observed PowerTrunk products are designed for use by mobile workforces often working alone and are intended for use in occupational and controlled conditions It is recommended that you obtain training on how to operate this product Your personal safety could be at risk if you do not understand how to operate this product correctly PowerTrunk products h...

Страница 10: ...d or commercial waste Some countries have set up collection and recycling systems for waste electrical and electronic products By ensuring that this product is disposed of correctly you will help prevent potentially negative consequences for the environment and human health and help conserve natural resources Please dispose of your waste product according to your national and local regulations Con...

Страница 11: ...normal accessible external controls All instructions detailed in this manual must be followed in order to ensure compliance with SAR and RF exposure limits Failure to observe these restrictions may result in exceeding the FCC RF exposure limits US and Canada Markets PowerTrunk radios may be restricted in frequency by the relevant IC FCB or FCC TCB Grant Refer to the Grant for allowed frequency ran...

Страница 12: ...CC Rules Operation is subject to the condition that this device does not cause harmful interference HTT 500 2 This radio is restricted to occupational use only to satisfy FCC RF energy exposure limits Read the user guide for awareness and control information How to use this document Icons and other visual cues are used throughout this document to help the reader with important information These ic...

Страница 13: ...e general text Bold typeface Used to highlight parts of the radio such as keys and buttons key presses and menu options Menu Phone Contacts Indicates navigation through the menu structure to the desired option based on the default language strings Note your radio may be customised to use different language strings User Guide 5 ...

Страница 14: ...ntext key Press to activate the feature or option that appears directly above the key 5 Right context key Press to activate the feature or option that appears directly above the key 6 Cancel Home key Press and hold 2 seconds to power on your radio From the Home screen press and hold 4 seconds to power off Press and hold 2 seconds to return to the Home screen from any other screen 6 HTT 500 2 12 20...

Страница 15: ...audio accessory and held in the hand 13 Tri colour LED indicator Indicates various operational states of the radio 14 Blue LED indicator Indicates a missed event such as a call Callout or message Also indicates Bluetooth status 15 Navi knob A continuously rotating knob used to adjust the speaker volume 16 Side Button A B Press to activate a programmed feature 17 PTT Press to talk button Press and ...

Страница 16: ... amount of battery charge before lengthy periods of operation A fully charged battery should provide continuous operation for a full shift depending on a number of operational factors such as how the radio is operated the operating environment temperature and network signal strength and the condition of the battery When the radio is powered on the amount of charge remaining may be displayed as a p...

Страница 17: ...rvals if enabled see GPS reporting options on page 139 Charging the battery Your radio is powered by a rechargeable battery The battery may be recharged many times but it will eventually need replacing to ensure continuous maximum performance from your radio First time battery charging New batteries Standard battery part no 300 01174 and High Capacity battery part no 300 01175 are supplied in stor...

Страница 18: ...k The battery may be charged separately from the radio using a battery only charger Charging a flat battery If the battery is completely flat without charge during storage or after a long period of non activity it may fail to recharge or stop charging after 20 minutes If this happens disconnect and then reconnect the charger or power off the charger then power on to reset the battery Tip Avoid cha...

Страница 19: ...wnwards until it clicks into position Removing the battery Caution Power off before removing the battery Push the safety latch on the bottom of the battery Lift the battery upwards and remove Using Sepura approved batteries Your radio checks the authenticity of the battery when it is powered on and has a number of battery management features that only work when a genuine User Guide 11 ...

Страница 20: ...wering down and your radio powers off Caution Non approved batteries may not have inbuilt safety protection features and could potentially damage your radio invalidating your warranty and affect your radio s safety and IP compliance ratings Getting information about your battery You can see information about the battery attached to your radio such as the remaining battery charge whether the batter...

Страница 21: ...de customisable Rotate Navi knob Move cursor and select characters in text entry mode Rotate Navi knob in Text Entry Mode or Editing Mode Scroll through available talkgroups From the Home screen press Groups rotate the Navi knob Scroll through available Status Messages From the Home screen press Groups 2 times rotate the Navi knob Scroll through available User Profiles From the Home screen press G...

Страница 22: ...ork in opposite directions Soft keys Note In P25 Mutual Aid mode most soft keys are not supported Some keys on your radio may be customised to provide one touch access to regularly used features These programmable keys are referred to as soft keys To activate the soft key function assigned to a programmable soft key press and release assigned to other keys such as the keypad Cancel Home and Select...

Страница 23: ...ions displayed adjacent to them Context labels appear at the bottom of the screen directly above each context key These labels show the action of the key when it is pressed either activating a feature or performing a function such as clearing a call Clear or selecting an option Select The labels and actions of the context keys in the Home screen are Context key Label Action Left Menu Press to ente...

Страница 24: ...pen the Home screen 2 Press and hold the context key until the Context Key Selection box appears 3 Navigate to the shortcut in the list and press Select The key is reconfigured and the new shortcut label appears in the Home screen Status icons Icons appear on the status line at the top of the display when the radio is engaged in certain activities or when certain functions are active Icon Descript...

Страница 25: ...call in progress You are in a call that you initiated Incoming TMO call in progress You are in a call that was initiated by another person or your dispatcher on the TMO network Missed incoming TMO call You have missed an incoming TMO call The blue LED flashes A notification alerting you to the missed call appears in the Shortcut Bar Scanning enabled You radio is scanning listening to all available...

Страница 26: ...e of the repeater Repeater ignored Repeater mode off General icons Migrated Your radio is registered on a Visited Network Signal Strength Shows the current signal strength More bars indicate a stronger signal Good radio coverage Indicates good radio coverage No service Indicates poor signal or no radio coverage Battery Strength Indicates the level of charge in your battery More bars indicates more...

Страница 27: ... is enabled preventing any calls from other talkgroups other than the selected talkgroup connecting to the radio User Profile Appears when a user profile is activated Your radio may be programmed for a number of user profiles The number next to the icon indicates the chosen user profile Connector Protection enabled Indicates that you have enabled connector protection You can use your radio in salt...

Страница 28: ...th on no device connected Shows that you have activated Bluetooth but do not have a device connected Lone Worker protection enabled Indicates that you have enabled the Lone Worker feature on your radio Man Down motions and tilt sensors active You have enabled the Man Down feature and the motion and tilt sensors are active Man Down Tilt sensor active You have enable the Man Down feature but only th...

Страница 29: ...econds Missed event One flash every 10s Bluetooth function is enabled Continuous rapid flashing radio is in Bluetooth discoverable visible mode Not supported in P25 Mutual Aid mode Tri colour LED The tri colour LED indicates the operational state of the radio LED Colour Description Solid green Radio is powering on or in a call and receiving Solid red Radio is in a call and transmitting Intermitten...

Страница 30: ...rogrammed to activate an Alarm Call See Emergency operation on page 36 Press and hold 2 seconds the Emergency button to initiate an Alarm Call If the radio is powered off press and hold 3 seconds to power on and initiate an Alarm Call It may take several seconds for the radio to complete its power on process before initiating the Alarm call 22 HTT 500 2 12 2016 ...

Страница 31: ... the FAT16 file system 1 Lift the cover using a small screw driver or tweezers 2 Carefully lift the metal retainer and insert the card as shown Caution Use care when opening closing the metal card retainer If it becomes detached it can be clipped back into place 3 Carefully close the metal retainer User Guide 23 ...

Страница 32: ...P rating Fitting a Smart card If required by your network operator you may need to fit a Smart card to your radio 1 Lift the compartment cover using a small screw driver or tweezers The cover is secured by two tabs located at the top of the cover either side of the recess 2 Insert the card into the slot on the underside of the cover as shown ensuring that the card is secured between the two tabs 2...

Страница 33: ... RSM during operational periods Transmitting without an antenna attached my damage the product Your radio is designed for use with PowerTrunk approved antennas Always ensure that the seal between the antenna and the radio is maintained Never touch the antenna when the radio is transmitting Ensure your radio is powered off before fitting or removing the antenna Fitting the antenna 1 Insert the base...

Страница 34: ... accessory A message may appear if your software licence has or is about to expire Note If your radio supports Radio User Assignment RUA which authenticates your radio on the network you may be prompted to log on to your network See Authentication on page 94 Note Transmitting in 3W RF is only available when using a PowerTrunk 3W battery During power on the radio checks the authenticity of the batt...

Страница 35: ...utomatically after a period of inactivity Note If customised your radio s keypad can be locked when an accessory is attached Receiving calls with locked keypad If you receive a telephone call when the keypad is locked your radio can be customised so that the Select Send key can still be pressed to answer it If the call is accepted the whole keypad is unlocked Your radio can also be customised so t...

Страница 36: ...ad You can set the radio to automatically lock the keypad after a period of inactivity 1 Select Menu Options Settings Timed Keypad Lock 2 Press Toggle to enable disable auto keypad lock Home screen The top level screen known as the home screen appears when the radio powers on and when it is idle Note In P25 Mutual Aid mode the Home screen is simplified See P25 Mutual Aid mode described on page 105...

Страница 37: ... This is customised by your service provider or organisation It may show date and time your selected talkgroup folder and network name Mobile Network Code Alias 3 Context key options available in the Home screen Shortcut Bar You can easily access commonly used radio features such as your Inbox and turn features on and off using the Shortcut Bar The Shortcut Bar can contain up to 5 radio features a...

Страница 38: ... functions are enabled such as mute and transmit inhibit Your radio can display up to 5 notifications and up to 5 shortcuts commonly used radio features Some features can be paired with notifications such as your Inbox so when a message is received a notification appears in the Shortcut Bar to alert you to the unread message When paired with a feature the feature icon appears with a notification b...

Страница 39: ...at are accessed from the main menu To open the main menu in the Home screen press Menu To open a sub menu or menu option scroll to the option highlight it and press Select To return to a higher level menu press Back To return to the Home screen at any time within the menu hierarchy press and hold 2 seconds the Cancel Home key Menu options The following icons are used to identify the sub menus that...

Страница 40: ...ations Short Data Applications to help you in your role Access WAP sites Networks Manage your network connections and DMO options Change your operating mode TMO DMO Repeater Enable disable Transmit Inhibit mode when working in RF sensitive areas Options Manage your Bluetooth devices and settings Personalise your radio settings such as backlight text size and language Enable Connector Protector whe...

Страница 41: ...Menu Structure SmartMenus SmartMenus are designed to provide quick access to regularly used radio features usually with a common theme Your service provider or User Guide 33 ...

Страница 42: ... list of options on the SmartMenu Options are labelled with a number shown to the right of the option To select the option press the key that corresponds to the number of the option for example to select option 3 press the 3 key Note that using this method only options numbered 1 to 12 can be selected using the keys on the keypad press 0 for option 10 the Star key for option 11 and the Hash key fo...

Страница 43: ...Press the Up navigation key or Shortcut to open the Shortcut Bar then select Help Press a dedicated soft key default is normally key 0 zero Press Menu Help User Guide 35 ...

Страница 44: ... individual the dispatcher or a talkgroup and or Send a position report GPS dependent If you are working in RF sensitive areas and have enabled Transmit Inhibit prohibiting radio transmission initiating an Alarm call will override the Transmit Inhibit feature and the Alarm call will be transmitted Your service provider or organisation can provide information on how your radio is customised for Ala...

Страница 45: ...s Live Microphone is cancelled when the time expires or by pressing the PTT button Making an Alarm call You can still make an Alarm call if the keypad is locked To make an Alarm call 1 Press and hold 2 seconds the Emergency button a confirmation beep sounds 2 Release the button and speak into the microphone During an Alarm call the microphone is live for a programmed period seconds allowing you to...

Страница 46: ...on the call originator s radio it will not remove the alarm from the system Radios alerted to the emergency may depending upon the infrastructure configuration remain in the TETRA Alarm call condition until the dispatcher clears the call from the system When the Alarm call is cancelled your radio returns to the talkgroup that was selected before the call was initiated Power on Alarm call If your r...

Страница 47: ...User Assignment RUA which authenticates your radio on the network you may be prompted to log on to your network before the Alarm call is initiated Contact your service provider for information See Authentication on page 94 User Guide 39 ...

Страница 48: ...tone at the new volume level Loudspeaker on off Tip A soft key may be customised to toggle the speaker on and off 1 Select Menu Options Settings Loudspeaker ON OFF 2 Press Toggle or press the Select Send key Whisper mode Whisper mode allows you to talk more quietly than normal but still be heard and understood by the person you are calling It can be useful to switch to Whisper mode when providing ...

Страница 49: ...to its loudest level then attempt to increase the volume further The radio sounds a low high level alert when Whisper mode is disabled Audible tone alerts Certain events on your radio initiate audible tone alerts These alerts are attenuated when you select a user profile which uses covert mode see User profiles on page 123 1 To toggle audible alerts 2 Select Menu Options Alerts Audio Alerts 3 Pres...

Страница 50: ... vibrate on incoming individual half duplex or full duplex calls Vibrator Data vibrate on incoming SDS or Status messages Vibrator Alarm Key vibrate when Emergency Button is pressed Vibrator Key Press vibrate when any key except Emergency Button and PTT is pressed 3 Press Toggle or the Send Select key to enable disable it as required 4 To return to the Display Settings menu press Back or the Cance...

Страница 51: ...signed to a soft key or SmartMenu To invert the display 1 Select Menu Options Settings Display Settings Invert Display 2 Press the Toggle context key When a tick appears in the check box the display is flipped and when the check box is empty the display is set to normal Note When the display is inverted the navigation keys work in opposite to their normal function Press the Up key to scroll down a...

Страница 52: ...d keypad illumination to suit your working conditions Night mode reduces the glare from the display making it ideally suited for when the radio is cradled in a vehicle at night time Night mode reduces the glare from the display making it ideally suited for night time use When the preferences for day and night mode have been set switching between the modes automatically adjusts the backlight and di...

Страница 53: ...ery Large Mode displays the talkgroup number or talkgroup name as customised in an extra large size on the Home screen with all other screens in Large mode Custom displays the Home screen menu and WAP browser in predefined text sizes set during customisation Only the Home screen supports Very Large mode with other screens set to either Normal or Large mode Note Depending on the customisation of th...

Страница 54: ...t key or provide an option on a SmartMenu to change the display language See SmartMenus described on page 33 1 Select Menu Options Settings Language 2 Scroll to the language option and then press the Select context key The Home screen appears and the display shows the selected language Menu style You can display the menu in Grid List or Compatibility style 1 Select Menu Options Settings Display Se...

Страница 55: ...style highlight items using the Down and Up navigation keys to open an item press Select to return to the top level screen press Cancel or the Cancel Home key Compatibility style card highlight items using the Left and Right navigation keys to open an item press Select to return to the top level screen press Cancel or Cancel Home key User Guide 47 ...

Страница 56: ...e Wednesday 20 May Your radio may be customised to use shortened forms for the day Wed To view and edit the time and date 1 Select Menu Options Settings Time and Date 2 Press Edit or press the Select Send key 3 Enter the digits required see Text entry on page 81 4 Press OK or the Select Send key to save your changes press Cancel or the Cancel Home key to abandon your changes 48 HTT 500 2 12 2016 ...

Страница 57: ...op level folder can have a number of sub folders similar to a folder structure on a computer and a folder can contain both folders and talkgroups If a folder contains sub folders and talkgroups two tabs appear one for sub folders and the other for talkgroups You can use the Left or Right navigation keys to switch between the tabs Your radio may be customised for Talkgroup Selection Mode or Folder ...

Страница 58: ...alkgroup programmed into your radio including those in special folders Only available on radios customised for Talkgroup Selection mode DGNA contains up to 50 dynamically assigned groups The contents are automatically maintained by the radio and are not customisable in Talkgroup Selection Mode You can select a DGNA talkgroup In Folder Selection Mode the scan state scanning enabled or disabled of a...

Страница 59: ...Background talkgroups which the radio scans continuously for activity You cannot select a background talkgroup in this folder as your requested talkgroup User Guide 51 ...

Страница 60: ...Typical folder arrangement The following illustration shows how the folders can be used to organise talkgroups 52 HTT 500 2 12 2016 ...

Страница 61: ...can prioritise calls between the scanned talkgroups See User Defined Scan Lists on page 56 Selecting a Talkgroup You can use one of the following methods to select a talkgroup From the Home screen press Groups From the Menu navigate to the Groups menu Use a soft key to return to your Quick Group Note Talkgroups in the Smart Call Folder 1 or Smart Call Folder 2 folders can only be accessed when the...

Страница 62: ...an search for talkgroups or folders by filtering on a text string Items which do not match the string are temporarily filtered out of the list You can use either Search card to filter the current talkgroup folder folder Search all to filter across all talkgroups and folders 1 To search inside a specific folder open that folder 2 Press Options then select Search card or Search all 3 Enter character...

Страница 63: ...es folder Tip If the New Group option is not available you do not have edit permissions on the Favourites folder The Favourites folder must be set to Edit at customisation Quick Groups You can quickly change to a different talkgroup by pressing a customised Quick Group soft key specified for that talkgroup To select the Quick Group talkgroup Press the customised Quick Group soft key Alternatively ...

Страница 64: ...ect a UDSL in the same way as you select a talkgroup see Selecting a Talkgroup on page 53 the talkgroups it contains are scanned allowing your radio to receive calls from any of the talkgroups in the UDSL the UDSL icon is displayed in the right hand corner of the radio display calls are made to the talkgroup designated as the selected talkgroup If there is no selected talkgroup in the UDSL calls a...

Страница 65: ...t Options Save Add a talkgroup 1 Press Options Add 2 The talkgroup selection box is activated Select a talkgroup as described in Selecting a Talkgroup described on page 53 then press Select 3 Select Edit Options Save Remove a talkgroup Select the talkgroup you wish to remove then 1 Select Edit Options Delete 2 Select Edit Options Save Changing group scanning priority 1 Select Edit Options Change P...

Страница 66: ... the radio powers on the message No Folder appears on the Home screen When a folder is selected that does not have a selected talkgroup the message No Selected Group appears All the TMO talkgroups within the selected folder that are scan enabled1 and valid for the current network contribute to the scan list that the radio uses to prioritise calls If a talkgroup is editable2 you can change its scan...

Страница 67: ...or Smart Call folder as your selected folder Additionally you can select a folder by pressing a soft key to select a Quick Folder or select a folder by entering its Folder ID see Selecting a folder using the folder ID below if customised Tip A talkgroup within the folder must be selected before you can make calls See Selecting a talkgroup on the next page To select a folder 1 From the Home screen ...

Страница 68: ... selected talkgroup within the folder is indicated by the icon Tip You can only select a talkgroup that is editable1 To select a talkgroup 1 From the Home screen press Groups to list the talkgroups in the current folder 2 Scroll to the talkgroup you want as your requested talkgroup and press Select 1In Radio Manager folder properties the talkgroup option Editable is selected Copy a talkgroup to an...

Страница 69: ...ority and scan state will be overridden by the properties set in the Always Attached folder To copy a talkgroup 1 From the Home screen press Groups then press Select to open the current folder If you want to open another folder press Back to navigate up the folder list select the folder and then press Open 2 Select highlight the talkgroup you want to copy 3 Press Options scroll to the Copy option ...

Страница 70: ...kground talkgroup scanned To scan a talkgroup 1 From the Home screen press Groups then press Select to open the current folder If you want to open another folder press Back to navigate up the folder list select the folder and press Open 2 Select the talkgroup you want to scan and press Options then select the Scanned option and press Select The scanning icon appears in the right hand corner of the...

Страница 71: ...older 1 Select the folder and press Options 2 Scroll to the Restore Defaults option and press Select and then select the Restore Folder Defs and press Select To restore all folders When all the folders are restored the DGNA folder is emptied of talkgroups and the radio will reboot on completion of restoring the folders 1 From the folder list press Options then scroll to the Restore Defaults option...

Страница 72: ...w the talkgroup information To assign a folder as a Quick Folder 1 From the Home screen press Groups to open the current folder then press Back to navigate back up the folders list 2 Select the folder you want to assign to a Quick Folder Press Options scroll to the Set Quick Folder option and press Select 3 Scroll to the Quick Folder Folders 1 to 5 you want to assign this folder to and press Selec...

Страница 73: ... radio or to a telephone of the first number associated with it Contacts are arranged in a series of up to 64 folders including the following All contains all contacts in the Phone book Menu contains options to create and delete contacts in your Personal folder Search allows you to search the entire Phone book for contacts and numbers Initially lists the names of all the folders in the phone book ...

Страница 74: ...Navigate to the Search folder 2 Press the Up navigation key to open the Search Bar 3 Enter a search string see Text entry on page 81 and press the Search context key 4 When the search is complete any folder containing a possible match to your search and the number of possible matches within that folder appear in the Search folder To open a folder select it and then press the Open context key 5 To ...

Страница 75: ... create are added to your Personal folder To create a contact 1 Select Menu Phone Contacts 2 Navigate to the Menu card and select Create Contact 3 Enter the contact name see Text entry on page 81 then press the Save context key 4 Select a dial mode for this contact either TETRA Network default or telephone mobile network To change the dial mode press the Up navigation key to select the dial mode l...

Страница 76: ...it personal contacts 1 Select Menu Phone Contacts and then select the Personal folder 2 Navigate to the contact you want to edit then press Open To edit the name 1 Select the name and then press Edit 2 Make changes as required then press Save To edit a number 1 Select the number and then press Options Select Edit and press Select 2 Make changes to add additional digits press the number keys to del...

Страница 77: ...ersonal folder Tip You can also delete individual contacts or numbers associated with them see Editing contacts on the previous page To delete all contacts 1 Select Menu Phone Contacts 2 Navigate to the Menu card then select Delete User Contacts User Guide 69 ...

Страница 78: ...ys a half duplex call Users can join and leave the call at any time Group calls are initiated by pressing the PTT button See Talkgroups and folders on page 49 Individual A call to another user or dispatcher in the TETRA network Full duplex and half duplex calls are supported Individual calls to outside the TETRA network can be made between a terminal or a dispatcher and a telephone subscriber in a...

Страница 79: ...he PTT or the Select Send key Smart Call A special individual call made in Smart Call mode which allows you to make group or broadcast calls to specific talkgroups without the need to notify the network about the talkgroup change Smart Call mode is initiated from a configured soft key Smart call priority can have a call priority value from 0 undefined to 15 pre emptive priority 4 emergency in TMO ...

Страница 80: ...g Calls or both sets of call types in a list The following icons are used to distinguish different types of TETRA and PBX PSTN call events Icon Description Received TMO call Sent TMO call Missed call Call was not answered or cleared TETRA Alarm Call Received TETRA DMO Call Sent TETRA DMO Call Caution The call history is deleted if you do not switch off your radio correctly using the Cancel Home ke...

Страница 81: ...smitting and an audible tone is heard and your radio status text changes to Talk 2 When you have finished talking release the PTT button and listen to audio received through the loudspeaker The LED changes to solid green whilst the group call is active and your radio status text changes to Group Call 3 You can also clear the group call by pressing Clear Call soft key if customised Cancel Home key ...

Страница 82: ...ur phone book or the ISSI of the caller Privacy mode You can press a customised Privacy Mode soft key before dialling or during a call to prevent interruptions from other calls during important or sensitive call When you have Privacy Mode enabled calls made to your radio are marked as missed calls see Call History on page 72 Making individual calls half duplex mode Calling a contact 1 Select Menu ...

Страница 83: ... full duplex mode Calling a contact 1 Select Menu Phone Contacts to open the contacts menu 2 Navigate to a contacts folder such as the All folder and select your contact Press the Open context key then choose the phone number 3 To initiate the phone call press the Dial context key 4 To end the call press the Clear context key or the Cancel Home key Note If your radio has been customised with a sin...

Страница 84: ...be answered before any alerts are audible Answering phone calls in half duplex mode You can answer an incoming full duplex phone call as a half duplex call This is useful for example where a full duplex call could pick up too much background noise for clear communications 1 Press the PTT button to answer the call in half duplex mode 2 Continue as for Group calls and individual half duplex calls To...

Страница 85: ...During a broadcast call the display changes to Broadcast Call and the Broadcast Call icon is displayed User Guide 77 ...

Страница 86: ... a radio which is making or receiving an emergency call or if your radio is in Transmit Inhibit mode See Emergency operation on page 36 and Transmit Inhibit on page 95 Smart Calls A Smart Call is a high priority group or broadcast call to a specific talkgroup This can be useful for example where you need to make an announcement to everyone in the vicinity of an incident not just those in your sele...

Страница 87: ... or press the Select context key or the Select Send key to transmit to the chosen talkgroup To leave Smart Call Mode 1 Open the Smart Call menu either of the following Press a preconfigured soft key Use the Speech Call Settings menu see Speech call settings below 2 Select Group or Individual Group returns you to your previous talkgroup Individual allow you to make an individual call by dialling Sp...

Страница 88: ... icons and information elements displayed inform you about the type of the ongoing call Once the call is established the characteristics of the new call are the same as those of any call of that type For example if the new call is half duplex you need to press PTT before starting to speak releasing the PTT allows other parties to take the speech item and the top microphone and half duplex loudspea...

Страница 89: ...nter special characters To insert punctuation full stop comma or semi colon press zero 0 repeatedly until the symbol is highlighted in the Character Selection Box then press the Select context key or wait for the character to be auto inserted To insert a space press 1 on the keypad To insert symbols press the hash key repeatedly until the symbol is highlighted in the Character Selection Box then p...

Страница 90: ...c The first letter is entered in upper case with all following characters in lower case New sentences start with a capital letter and end with a full stop question mark or exclamation mark followed by one or more spaces Upper case ABC All characters are entered in upper case Lower case abc All characters are entered in lower case Numeric 123 All characters are numbers Special characters You can se...

Страница 91: ...aracters is displayed above the Context keys When the right and or left arrow icons are displayed in the character selection box use the Left and Right navigation keys to select from the characters displayed To see further characters press the Down navigation key and press the Up navigation key to return to characters already viewed The characters are displayed in sets of seven To enter the highli...

Страница 92: ...r example if there are 5 messages in your Inbox a new message will appear on tab number 6 If you want to read older messages use the navigation keys to scroll through the message tabs Unread message appear on black labelled tabs Note To keep the Inbox to a manageable size it is recommended that messages are deleted or saved after reading them See Saved messages on page 87 When a new message arrive...

Страница 93: ...g the message Its contents are lost or damaged Saved Messages is nearly full to capacity customisable SDS message with Paging Alert unread SDS message with Paging Alert Picture message unread Picture message Inbox operations You can perform a number of functions from the Inbox With a message selected press the Options context key to perform one of the following functions Open the message View the ...

Страница 94: ...n your Inbox see To open the Inbox on the previous page 2 Select a message then use Options Details 3 To exit the Details screen press Cancel Item Description 1 Message location Inbox 2 Size Note this is a relative measure of the message size not number of characters You can use Size to decide which message s to delete if Saved Messages becomes full see Message Inbox on page 84 3 Sender 4 Time rec...

Страница 95: ...in a URL which you can open in the WAP Browser Note If your radio has been customised to do so URLs in text messages can open automatically in the WAP Browser when they are received Saved messages You can save up to 50 messages in your Saved messages folder When the remaining space is insufficient to save a particular message an error is displayed which indicates the amount of space required to st...

Страница 96: ...es Create Message An empty message box appears 2 Enter your message text see Text entry on page 81 3 EITHER send the message immediately save the updated message Tip To return to the top level menu screen either wait for the inactivity timer to expire or press and hold the Cancel Home key or press and hold the clear soft key To send the message immediately See Sending messages on the facing page T...

Страница 97: ...tination you key in Note For setting default destination see Set default destination on page 91 1 Choose one of the following methods Create a text message described on the previous page Select a saved text message see Saved messages on page 87 Select a status message from the Send Status List see Status messages on page 1 2 Select Send or Options Send 3 Select a destination see below Send to defa...

Страница 98: ...Press Shortcut to open the Shortcut Bar then select Quick Status if customised From the Home screen 1 In the Home screen double press the Groups key 2 Press the Left and Right navigation keys to scroll through the status messages 3 To send the message press Send then select Send to default or choose another destination such as your talkgroup contact in your phone book or dial the number Soft key Q...

Страница 99: ...These cause a pop up box to open when sent messages are successfully delivered and read respectively 1 Select Menu Messages SDS Report Status 2 Navigate to a report type and press Toggle to toggle the report on ticked and off Set default destination You can enter and update the default destination address that your radio offers when you send a status or SDS message This can be either a talkgroup o...

Страница 100: ...feature allows the radio to act as a pager when it is in normal operating mode or when you select a user profile which results in the radio appearing to be switched off See User profiles on page 123 The Paging Alerts feature is triggered by receipt of a Status message which is automatically displayed If there is also an associated SDS message to explain the reason for the Paging Alert this is auto...

Страница 101: ...Tip Your radio can be customised so that a Paging Alert automatically makes it fully operational on receipt of the Status message which triggered the Paging Alert User Guide 93 ...

Страница 102: ...dentify you by you user name TETRA services including individual voice and data Status and SDS communication can be set up using your user name provided your user name and your corresponding user ISSI are in the Phonebook Caution If you power on your radio using the Emergency button you must log on to the network before an Alarm call can be initiated Note Network log on off may be initiated by you...

Страница 103: ...ork the Migrated icon is displayed in the Radio Status Line RSL To manually change network 1 Select Menu Networks Change Network 2 Navigate to the required network then press Select or the Select Send key Note When you manually select a network it remains selected regardless of whether your radio is able to obtain service on that network To automatically change network 1 Select Menu Networks Chang...

Страница 104: ...Inhibit on off When Transmit Inhibit mode is activated The Transmit Inhibit icon appears in the Shortcut Bar as a notification or the status line on the Home screen The Tri colour LED flashes orange four times approximately every 2 seconds Tip There may be a soft key programmed to toggle Transmit Inhibit on off For a list of programmed soft keys refer to the radio s Help Menu Help Fallback Mode If...

Страница 105: ...isable text message the RSSI antenna icon flashes continuously the tri colour LED flashes amber intermittently indicating limited service mode the radio generates a warning tone When your radio leaves Fallback Mode the radio status bar returns to normal Ready or similar the RSSI antenna icon stops flashing the tri colour LED stops flashing a text box pops up indicating normal operation the radio g...

Страница 106: ...nd messages by operating as a repeater See also Repeater Mode on page 101 In P25 Mutual Aid mode P25 Mode your radio communicates on one channel at a basic level with the emergency services in the event of a major incident See also P25 Mutual Aid mode on page 105 When you are in P25 Mutual Aid mode you can select Tetra Mode to return to full TETRA radio operation To change operating mode from the ...

Страница 107: ...ergency operation on page 36 Individual calls Your radio can be customised to allow you to make individual calls to other radios working in DMO which are attached to the same talkgroup In this case individual calls are initiated by pressing the PTT key See Making individual calls half duplex mode on page 74 Individual calls to radios which have selected different DMO talkgroups are prevented unles...

Страница 108: ...ons You can select the following DMO options Presence Check Specify whether Presence Checking is performed before DMO Individual calls are made When Presence Checking is On your radio checks whether the intended receiving radio is available and in radio contact before it attempts to set up the call GW Rep Filter Specify whether your radio uses or ignores any gateway and or repeater it detects In t...

Страница 109: ...y are using the same frequency and your radio is configured to use both devices that is option Use GW Rep is selected Repeater Mode A radio acting as a repeater provides a service to other radio users It extends the range and enhances the reliability of Direct Mode communication compared with basic direct communication between radios You can use a repeater to enable communication between radios wh...

Страница 110: ... users are do not have line of sight with each other The following diagram shows radios A and B and a repeater which are on the same DMO talkgroup A and B are in range of the repeater Because of its location the repeater can pass communications between A and B even though they cannot communicate directly 102 HTT 500 2 12 2016 ...

Страница 111: ... phonebook view the library of pre defined Status messages Participating in repeated calls A radio in Repeater Mode may depending on its customisation operate either as a Standard Repeater or as a Repeater with Call Participation Standard Repeater If your radio is configured to operate as a Standard Repeater you cannot take part in calls which are being relayed through it User Guide 103 ...

Страница 112: ...f time or as a permanent installation in a remote location we recommend that you configure it as required select and attach the required Direct Mode talkgroup and then power the radio off This will save the configuration each time the radio is powered on again it will re start with the saved configuration This will ensure that the radio is always running with the correct repeater configuration eve...

Страница 113: ... channel is being used In this case repeater operation is suspended In Call Repeater A call is in progress through the repeater Talk Repeater Participating in a call and transmitting P25 Mutual Aid mode Your radio supports P25 Mutual Aid mode which gives you a basic level of interoperable communication with emergency services users on dedicated channels in the event of a major incident When you se...

Страница 114: ...ve P25 Mutual Aid mode Follow the steps described in To change operating mode from the Home screen on page 98 and select Tetra Mode Home screen The P25 Mutual Aid mode top level screen Home screen appears in P25 Mutual Aid mode when the radio powers on or you switch to P25 Mutual Aid mode and when the radio is idle Description 1 Status line showing the radio coverage activity on selected channel b...

Страница 115: ... Mutual Aid channel See Changing P25 Mutual Aid channel below Right Squelch Press to select a squelch mode See P25 Mutual Aid squelch modes on the next page Changing P25 Mutual Aid channel Note Changing P25 Mutual Aid channel when you are transmitting in a call ends the call To change P25 Mutual Aid channel 1 In the Home screen press Channel Different types of P25 Mutual Aid channels are indicated...

Страница 116: ...signalling is compatible with the Rx NAC configured for the selected channel AND the TGID in the received signalling either matches the TGID configured for the selected channel or is equal to the All Call talk group AND the Group Address in the received signalling either matches the TGID configured for the selected channel or is equal to the All Call talk group Monitor routine group voice calls ar...

Страница 117: ...nd the call release the PTT button The status returns to Idle Note When you are transmitting calls end automatically after a preconfigured time period Receiving P25 Mutual Aid calls Calls you receive are always unencrypted group calls any encrypted calls and individual calls are ignored Calls you receive may be emergency or non emergency but your radio does not distinguish between them Call recept...

Страница 118: ...tting distracted and to focus your attention on an incident To view Callout messages Press Menu then select Phone Callout Alternatively press the Up navigation key or Shortcut to open the Shortcut Bar then select Callout If Callout messages have been received they are listed with Callout icons on page 116 To see the options for a Callout Highlight a Callout and press Options OR press the Select Se...

Страница 119: ...only one acceptance message is programmed in your radio an informative message is displayed to show that it has been sent to the originator of the Callout If multiple messages have been programmed select one of them and press Select to send it Alternatively if customised you can compose and send a free form text message Depending how the Callout has been configured it may either exit once the acce...

Страница 120: ...he message was received the severity of the Callout Alert the Callout ID icons to show whether the Callout is to a group or an individual whether the Callout is incoming or outgoing whether or not the Callout is End to End Encrypted User Response Allows you to compose and send a free form text message to the originator of the Callout customisable Callouts not requiring a response Some Callouts do ...

Страница 121: ...up or an individual whether the Callout is incoming or outgoing whether or not the Callout is End to End Encrypted Callout Test alert If you receive a Callout Test Message either respond or cancel the alert to cancel the Callout Test alert press the Cancel context key The Callout exits and the radio displays the top level screen You can still view the details from Messages Callouts to indicate tha...

Страница 122: ...ess the Back context key to display the previous screen When a Callout ends When a Callout times out or is cleared by the Callout originator the Callout ends your radio displays the top level screen and the functionality which had been suspended is restored Protected Callout Mode When it receives a Callout alert your radio goes into Protected Callout Mode and many features are disabled for a set t...

Страница 123: ...has ended select Messages Callout The blue LED flashes and the Missed Call and or Missed Callout icons display after the new Callout has ended Missed Callouts To view information about the missed Callout select Menu Messages Callout Your radio ignores Callouts received when any of the following functions are active Ongoing Alarm Call a highest priority call Alarm Call Quick Call when customised as...

Страница 124: ... header text customisable 6 Information icons 7 Backdrop image customisable radios with colour display only Indicates severity of the Callout 8 Date received 9 Explanatory text about the Callout 10 Left Right Navigational keys available for more options Callout icons Icon Description Callout Alert message response required Missed Callout Callout Alert message user response has been sent 116 HTT 50...

Страница 125: ...on active Either the Callout originator or the receiving radio has End to End Encryption switched off The Callout is addressed to an individual The Callout is addressed to a group Left and Right navigation keys The left and right arrow icons are displayed between the Context keys during Protected Callout Mode when there are more options than are shown on the Context keys EITHER Press the Left or R...

Страница 126: ...ving a group call the ISSI or shortened ISSI or identity of the transmitting party is displayed in place of CALLOUT on the Radio Status Line at the top left of the screen When the Callout has exited depending on the customisation the radio either reattaches to the group it was attached to before receiving the Callout or remains attached to the new group Information Phase Some Callouts do not exit ...

Страница 127: ...llout Alternatively you can select from a list of preconfigured messages Select View Response to check the complete message text before sending it Accept Sends an acceptance message to the originator of the Callout Reject Send a rejection message You are notified by an informative message confirming that the rejection message has been sent to the originator of the Callout and your radio exits from...

Страница 128: ...icons to show whether the Callout is to a group or an individual whether the Callout is incoming or outgoing whether or not the Callout is End to End Encrypted 120 HTT 500 2 12 2016 ...

Страница 129: ...ur radio such as maps product diagrams or photographs or if you will be referencing WAP sites Tip Image details are best viewed in Normal Text Mode See Adjusting text and icon size on page 45 After fitting images and WAP sites are uploaded to the card using Radio Manager During customisation the data is encrypted to prevent undesirable viewing of the data by unapproved persons should the radio or ...

Страница 130: ...orting hazardous material the comments could give advice on what precautions need to be taken when dealing with the incident The date and time and other details are also shown Note No details are available if the image has been loaded on to the microSD card as a Bitmap 5 To exit the image press the Cancel context key Connector Protector When working in salt water environments or in an area with hi...

Страница 131: ...bled until the radio is removed from the charger car kit or data accessory In these circumstances it is not necessary to re enable Connector Protector Tip If the water drop icon is displayed on a radio the radio cannot be programmed User profiles User profiles are pre set combinations of alerts and settings on your radio They allow you to switch settings easily to match your circumstances or envir...

Страница 132: ...file allows you to prevent any individual calls or group calls from any talkgroup other than the selected talkgroup from being connected to your radio Note Any calls made to a radio which has Group Focus selected are not recorded as Missed Calls Do Not Disturb This user profile allows you to focus on an important task It assumes you do not want to be distracted by a call or alert on your radio The...

Страница 133: ...ated users being detected you should not regard it as a substitute for compliance with appropriate risk assessment and other safety procedures and practices Do not entrust your safety to the Man Down Alarm Warning Test the Man Down Alert and Alarm regularly to ensure they are functioning correctly Warning Once started the Man Down Alarm sounds either until you switch it off see Cancelling false al...

Страница 134: ...n Down off Cancelling false alarms If the active sensors detect a possible Man Down situation the Man Down Alert is sounded and a Man Down Alert message is displayed on the screen If you are safe that is this is a false alarm you need to switch off the alert otherwise a genuine Man Down Emergency situation is considered to have occurred and depending on the customisation of your radio various auto...

Страница 135: ... you can use the Lone Worker feature to let your dispatcher know that you are safe When Lone Worker is enabled your radio periodically sounds an alert which you must acknowledge usually by pressing a pre programmed key otherwise the radio sends an emergency status message to your dispatcher To enable Lone Worker scroll to a user profile which has Lone Worker enabled then press the Select context k...

Страница 136: ... automatically Open a URL in a message on page 87 Using WAP Exiting the browser Exit at any time by pressing Back or the Cancel Home key if customised Navigation Press the Left navigation key to display the previous screen page and the Right navigation key to display the next screen page Entering text If customised your radio supports the entering of text to specify a URL and entering of data into...

Страница 137: ... Select after browsing has been suspended or when you have exited from the browser The browser displays the last page viewed Bookmarks Select to view all the available bookmarks some of which may be collated into bookmark folders If customised you can create edit and delete bookmarks and bookmark folders and organise the bookmarks into different folders If there are no saved bookmarks the browser ...

Страница 138: ... the creation and or editing of bookmarks Creates a bookmark for future reference so that the web page may be downloaded quickly Forward Back Use these options to move to the next or previous page in the History if more than one page is stored in History Reload Reloads the current page Settings Selecting Settings from the Browser menu provides access to the Advanced settings Advanced Settings Home...

Страница 139: ... Fast Medium or Slow Key Press Timeout This option allows you to set the Key Press Timeout to one of Fast Medium Slow or Off Connection Timeout This options allows you to set the timer that specifies how long the browser will wait before cancelling idle network requests Resend Data Prompt This option allows you to set on off whether the browser confirms whether to resend data to the radio This cou...

Страница 140: ...ate Info If this option is selected information about the root digital certificates installed in the browser is displayed Clear Select this option to clear any or all of History Cache or Cookies Restart Browser Select this option to restart your browser About Select this option to view information about the browser History menu The History page displays a list of up to nine of the most recently vi...

Страница 141: ... to the number of the bookmark or folder or by selecting it and pressing Go New bookmarks and folders If you have no saved bookmarks or folders the screen displays the message No saved bookmarks You can create up to 100 bookmarks and up to 10 folders a single folder can contain 100 bookmarks Press Bookmarks Menu to create your bookmarks New Bookmark Select this option to create a new bookmark Pres...

Страница 142: ...ft keys have been customised on the radio which are not related to the WAP browser the Hotkeys function will not function Additionally the following options are available for bookmarks Move to folder allows you to move the bookmark into a folder and name the folder Set as Homepage allows you to set the page as your Home page in the browser This page is displayed when you select the Go to Homepage ...

Страница 143: ... active but the user is only able to view the current page and pages that have already been viewed If the user makes a Alarm Call while the browser is active the browser will automatically be closed and the radio will display the top level screen in Call Mode Incoming When an individual call is received while the browser is active the call information box is visible on top of the browser and you c...

Страница 144: ...een customised so that the keypad lock may be selected by pressing and holding the soft key the browser will close and the radio will display the top level screen Transmit Inhibit If the radio is operating in Transmit Inhibit mode you can still view any pages in the browser that have been stored locally but it is not possible to browse pages online If an attempt is made to browse pages online the ...

Страница 145: ...on to which the GPS reports are sent may be changed over the air If your radio accepts a change of GPS destination command it sounds a customisable tone and sends you an SDS message to inform you Tip If customised you can enable disable the GPS function see GPS reporting options on page 139 Tip For the best GPS performance your radio needs an uninterrupted view of the sky GPS position To locate yo...

Страница 146: ...ong ago the position was first displayed to refresh the reading press Locate again GPS direction To read the direction your radio is moving 1 Select Menu GPS Direction The Direction screen gives information about the current direction and speed of travel If the radio is stationary no information is displayed However if the radio becomes stationary after a period of movement the direction informati...

Страница 147: ...ns sent over the air The warning icon is displayed on the top line of the screen as a reminder that GPS reporting has been explicitly disabled Always Send GPS reporting is enabled regardless of any instructions sent over the air No Override your radio will respond to instructions sent over the air GPS reports are sent if requested and is switched off if requested User Guide 139 ...

Страница 148: ... When you re customise or update the software on your radio the device pairings are preserved Therefore if the radio is being re customised and allocated to a different user with a different set of Bluetooth devices any unnecessary existing pairings must be manually deleted before the radio is reassigned to the new user Caution If you pair your radio in a public place beware of eavesdropping by un...

Страница 149: ...to or disconnect from a Bluetooth device while a call is in progress either using the Bluetooth menu screens or a soft key disconnection only if customised It is also possible to connect to a headset by pressing the button on the headset Tip Before attempting to pair check that the audio device is switched on is set to the discoverable visible state and is close to your radio before attempting a n...

Страница 150: ...nd Tip If a device is not found check that the data device is switched on is set to the discoverable visible state and is close enough to your PowerTrunk radio before attempting a new search Any audio devices found are listed on the screen as they are found Audio devices which may be worn on the body show the headset icon and non wearable audio devices such as a car kit or similar device show the ...

Страница 151: ... Bluetooth range while wearing a Bluetooth headset and then you move back within range Note that with these headsets the radio display may indicate that the headset is connected whether or not the audio is routed to the headset Tip If you are choosing a Bluetooth headset it is worth considering that some Bluetooth headsets have a single combined button for Power On and Accept which only requires o...

Страница 152: ...ur radio using the generated passcode Refer to the User Guide of the device for details of how to do this Input and accept the generated passcode this passcode is not required after pairing 6 On your radio press Accept to accept the request and to connect with the device A message is displayed to confirm the pairing and the device is listed in the list of paired devices You can also Modify the dev...

Страница 153: ... attempting a new search Any PCs laptop desktop or server found show a PC icon and hand held PDAs show a PDA icon Different classes of Bluetooth Device show no icon is shown alongside the name of a device which has a from a PC or PDA 4 Select the required device in the list and then press Pair The message Pairing appears 5 When a device has been paired the search results are lost and the radio dis...

Страница 154: ... screen You can edit the name of these devices or delete them 1 Press Menu then select Options Bluetooth Devices 2 Select the device name and press Modify To edit a device name Select Edit to rename different devices of the same type to make it easier to distinguish between them To delete a device Select Delete Device to delete the device from the list of paired devices 146 HTT 500 2 12 2016 ...

Страница 155: ... within these areas can be monitored using the RFID tag in the radio and an RFID reader at the location PIN entry You will need to enter the radio s 4 digit PIN at power on Your radio may be customised to allow you to change your PIN see Change PIN on the next page Caution if you incorrectly enter the PIN 3 times the radio will lock You will then need the 8 digit Master Reset PIN or PUK to unlock ...

Страница 156: ...0000000 but this can be changed by your Communications or Security Manager To unlock the radio 1 Enter your 8 digit Master Reset PIN 2 Press Confirm or the Select Send key Note If you enter the Master Rest PIN incorrectly you need to wait at least 5 seconds before attempting to enter the PIN again If the Master Reset PIN is successful the radio reverts back to the last known PIN If you radio is cu...

Страница 157: ...t SDS calls your radio may allow you to toggle End to End Encryption on off with a soft key When you are in a voice call the Secure Comms icon indicates whether End to End Encryption is operational When the radio participates in a call that is not end to end encrypted a periodic non intrusive audible alert is generated if customised When you receive an SDS text message or picture messages if you s...

Страница 158: ...ustomised soft key or use the following procedure 1 Press Menu then select Security Crypto Settings 2 Scroll to New Key and press Send When the key update is in progress the Key agreement status icon appears Zeroising Radios that support End to End Encryption are loaded with sensitive cryptographic keys To avoid a potential security compromise you may be able to delete zeroise these cryptographic ...

Страница 159: ... the State of Health of the battery which can also assist with auditing and end of life strategies Labelling The simplest form of asset management is to attach labels to your radios and batteries Self adhesive labels those with an adhesive backing are recommended as they are easy to apply and commercially available such as 3M Thermal Transfer Polyester label material 7815 Your radio and PowerTrunk...

Страница 160: ... or the opening closing of the card compartment Place a label on the battery in the Label ID area RFID tag Radio Frequency Identification RFID tags can be useful for asset tracking allowing you to automate audit tracking of pool radios tracking radios in out of service centres and stock tracking It is also useful for pairing pool radios with resources persons and vehicles and facilitating the righ...

Страница 161: ...e RFID read write unit even when the radio is powered off or has the battery removed Note The distance between the RFID tag and read write unit may differ depending on the type of read write unit being used Always read the instructions supplied with the RFID Reader on how to operate it Customising your radio Your radio has a large number of parameters that can be customised using the programming s...

Страница 162: ...single radio A data programming cable with either an RS232 D type connector or a USB connector is available from PowerTrunk for customising a single radio 1 Connect the USB programming cable to the computer 2 Connect the cable to the radio by inserting the hook on the connector into the slot as shown 3 Secure the cable in position Do not over tighten 4 When programming is complete disconnect the c...

Страница 163: ...rovider to ensure that appropriate EMC testing has been conducted on accessories When your radio powers on and when you attach an accessory during operation your radio performs an authenticity check on any attached accessories including the battery If the accessory is not authenticated a message appears and the accessory should be removed Your radio has two connectors for attaching accessories The...

Страница 164: ...lt The clip is fitted to the carrying aid attachment recess on the back of your radio Caution Damage to product Always remove the battery before fitting or removing the clip Fit the belt clip 1 Remove the battery 2 Slide the stud into the carrying aid attachment recess 3 Slide until it clicks into place Remove the belt clip 1 Remove the battery 2 Lift the clip 156 HTT 500 2 12 2016 ...

Страница 165: ...age to your radio or the clip 4 Slide the clip out of the carrying aid attachment recess Klick fast stud The Klick fast stud is used to attach your radio to clothing The stud is fitted to the carrying aid attachment recess on the back of your radio Caution Damage to product Always remove the battery before fitting or removing the stud User Guide 157 ...

Страница 166: ...s 3 Slide until it clicks into place Remove the stud 1 Remove the battery 2 Lift the spring Caution Failure to compress the spring sufficiently to remove the stud will result in damage to your radio or the stud 3 Slide the stud out of the carrying aid attachment recess 158 HTT 500 2 12 2016 ...

Страница 167: ...sory Fit an accessory to the sRAC 1 Remove the cover from the sRAC connector 2 Insert the hook on the accessory connector into the slot as shown 1 Secure the accessory by rotating the screw clockwise User Guide 159 ...

Страница 168: ...y to the sDAC 1 Connect the cable to the radio by inserting the hook on the connector into the slot as shown 1 Secure the accessory in position by rotating the screw clockwise Do not over tighten 160 HTT 500 2 12 2016 ...

Страница 169: ...ter environment or an area with high salt laden humidity for example sea mist fog without potential risk of corrosion to the connector S context key User programmable key on a PowerTrunk radio that can be customised to provide a shortcut to a menu option such as the Contacts list or Talkgroups Radios may typically have left centre and right context keys S Direct Mode Operation DMO The facility for...

Страница 170: ...ordinates if an emergency situation is detected See also User Profiles Man Down A operating function of a radio associated with a user profile that initiates an emergency signal when the radio is tilted at a nominated angle for a set duration of time An active smart personnel monitoring system Man Down checks for abnormal lack of motion and raises an emergency call or sends an Emergency Status mes...

Страница 171: ...tities see S sf short data services SDS Text messages that can be sent or received on a TETRA radio soft key A programmable key on a PowerTrunk radio that can be customised as a shortcut to a function for example a context key on the radio that can be customised as a shortcut to the Contacts list On some radios the Select Send key and the Cancel Home key along with all 12 keys of the radio keypad ...

Страница 172: ...eature has been customised it allows you to switch easily between user profiles When a user profile is selected an icon is displayed on the status line at the top right of the display to indicate which user profile is active S WAP Wireless Application Protocol sf whisper mode A customisable feature on a PowerTrunk radio which adjusts the sensitivity of the microphone to allow the user to whisper v...

Страница 173: ...PowerTrunk Inc 66 York Street Jersey City NJ 07302 U S A T 1 201 630 4520 F 1 201 630 4522 powertrunk com ...

Отзывы: