3
GB/IE/CY
Introduction / Safety instructions
Multi-Purpose Ladder
Q
Introduction
Familiarise yourself with the product before using it for the first
time. In addition please refer carefully to the operating instructions
below and the safety advice. Use the product only as described
and for the indicated purpose. Keep these instructions in a safe place. If you
pass the product on to anyone else, please ensure that you also pass on all
the documentation.
Q
Intended use
The product is designed for use outdoors. Any use other than that described
or any modification of the product is not permissible and may result in injury
and / or damage to the product. The manufacturer is not liable for damage
caused by improper use. The product is not intended for commercial use.
Q
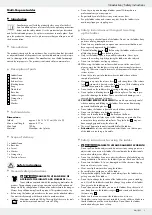
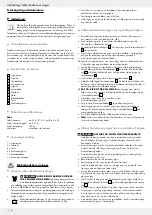
Description of parts
1
Ladder frame
2
Ladder hinge
3
Release lever
4
Blocking device
5
Rung
6
Plastic foot
7
Base bar
8
Ladder stringer
9
Storage tray
10
Screw
11
Washer
Q
Technical data
Dimensions:
folded:
approx. 35 x 127 x 21 cm (W x H x D)
Max. overall length:
approx. 4.17 m
Max. load:
150 kg
Material:
Aluminium, steel, plastic
Q
Scope of delivery
1 x Ladder frame
2 x Base bar
4 x Screw
4 x Washer
1 x Storage tray
1 x Directions for use
Safety instructions
Q
General safety instructions
J
WarnInG!
DanGer To LIfe anD rISk of
accIDenTS for InfanTS anD chILDren!
Never
leave children unattended with the packaging material or the
product. The packaging material can cause danger of suffocation and
danger to life by strangulation. Children often underestimate the danger.
Always keep children away from this product. This product is not a toy.
J
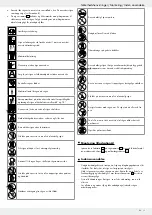
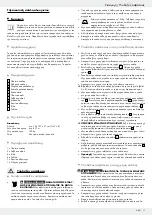
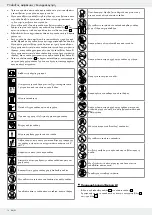
Before using the ladder, please observe the icons on the attached stickers.
You must strictly comply with them in order to avoid accidents.
J
150 kg
Maximum total load 150 kg. The weight of the user plus tools
and other materials must not exceed 150 kg.
J
Do not try to repair a damaged ladder yourself. Always have a
professional carry out any repairs.
J
Be particularly careful if there is any wind, rain or frost.
J
Keep the ladder clean and remove any dirt. Keep the ladder try to
avoid any slippage or toppling over.
Q
Safety instructions with regard to setting
up the ladder
J
Before using it, check all parts of the ladder. Do not use the ladder if any
parts are missing, damaged or worn.
J
Do not use any attachments, components or accessories that have not
been expressly approved for this ladder.
J
Check all blocking devices
4
. Before using the ladder, make sure that
all blocking devices
4
are locked in place.
J
Only set the ladder up on a dry and firm subsurface. Never try to
increase the working height by placing the ladder on other objects.
J
Do not use the ladder on slippery surfaces.
m
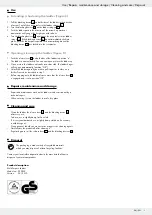
When using the ladder on surfaces which are not at the same level,
please ensure that the ladder is set up at the correct angle (as shown
in fig. B). Otherwise it would be misuse of the product which can cause
serious injuries.
J
Do not try to turn part of a ladder when the ladder has not been
completely unlocked.
J
Never try to operate the release lever
3
with strong force. If the release
lever
3
is jammed, it has to be released. To do so, lift the ladder part a
little and then operate the release lever
3
.
J
Do not stand on the ladder when releasing a blocking device
4
.
J
Do not pull on a blocking device
4
with strong force. You may injure
yourself or damage the ladder. Please note that such damage is not
covered by the guaranty / warranty.
m
cauTIon! rISk of cruShInG!
You must be particularly careful
when extending and folding up the ladder. Keep away from moving
parts and the blocking devices
4
.
J
Do not place the ladder in front of doors that have not been locked.
J
Do not use the ladder as a bridging structure.
J
Make sure that all plastic feet
6
are firmly on the floor.
J
Be particularly careful when you set the ladder up on protective film,
a carpet or other protective subsurfaces. The plastic feet
6
may not
have enough grip and may, therefore, slip.
J
The use of frame attachments is prohibited for this ladder.
J
attention!
Metal is an electrical conductor! Make sure that no part
of the ladder is touching a live cable.
Q
Safety instructions for using the ladder
J
WarnInG!
DanGer To LIfe anD DanGer of accIDenTS!
Do not pull too hard on objects and do not exert any strong pressure on
objects when you are on the ladder. This could make the ladder topple
over and could injure or kill you.
J
Do not use the ladder if you are under the influence of alcohol, drugs or
strong medication. Do not use the ladder if you are ill or do not feel well.
J
Do not use the ladder if it is wet, damaged or if it has become slippery
because of water, ice or snow.
J
Wear non-slip footwear when using the ladder.
J
Be careful when getting on or off the ladder.
J
Always hold on tightly to the ladder and always face the ladder when
getting on and off the ladder.
J
Do not try to change the location of the ladder when you are standing
on it. Get off the ladder first and then change the position of the ladder.
Then get onto the ladder again.
J
Do not lean out too far when you are on the ladder. Keep the centre of
your body between the ladder stringers
8
and stand with both feet on
the same rung
5
.
J
Make sure that no-one is under the ladder when it is in use.
J
This ladder is not a toy and is not suitable for use by children. Make sure
that the ladder cannot be used by children. Do not leave the ladder
unattended after you have set it up.


