19
Power-Flo Pumps & Systems • 877-24PUMPS • www.powerflopumps.com
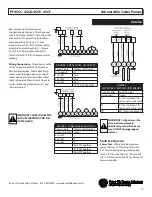
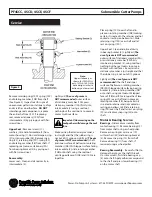
Reassemble by first making wire
connections per Figure 4. Attach ground
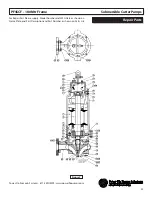
wire (30) to cover plate (5) with screw (26)
and washer (27). Apply thread locking
compound to cap screws (19), and
along with washers (20) and cover plate,
assemble to motor housing (1). Torque
to 16 ft lbs. Tighten cable connectors
(32) and (36) to 15 ft lbs to prevent water
leakage.
Wiring Connections -
Check power cable
(29) and control cable (34) for cracks or
damage and replace if damaged. Bring
motor wires through opening in top of
motor housing (1) and reconnect motor
leads to power cable and sensor leads to
control cable using connectors (31) and
(33) per Figure 4.
IMPORTANT! - WIRE COLORS MAY
VARY. USE IDENTIFICATION TAG
ON EACH LEAD.
FIGURE 4 - THREE PHASE 230 VOLT AC
Power Cable
Motor Lead Number
G (Ground)
G
L1 or W1
1 & 7
L2 or W2
2 & 8
L3 or W3
3 & 9
T4, T5 & T6 Together
FIGURE 4 - THREE PHASE 460 VOLT AC
Power Cable
Motor Lead Number
Green (Ground) Green
L1 or W1
1
L2 or W2
2
L3 or W3
3
T4 & T7 Together
T5 & T8 Together
T6 & T9 Together
FIGURE 4
MOISTURE & TEMPERATURE SENSORS
Control Cable
Lead Number
G (Ground)
Green
S1
P1 (Temp Sensor) In
series with starter coil
S2
P2 (Temp Sensor) In
series with starter coil
W1
W1 (Moisture Sensor)
IMPORTANT! - All parts must be
clean before reassembly.
Handle seal parts with extreme
care. DO NOT damage lapped
surfaces.
Shaft Seal Service:
Lower Seal -
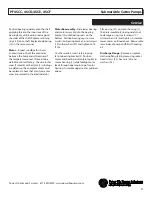
With oil drained, expose
lower shaft seal (10) for inspection, by
first disconnecting power, remove cap
screws (45) and washers (47) from volute
(40). Lift motor assembly from volute and
remove impeller.
Service
PF4SCC, 4SCD, 4SCE, 4SCF
Submersible Cutter Pumps

