background image


Page 18 

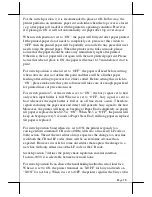
For the switch position 2, it is recommended to place at Off. In this way, the 
printer performs an automatic paper cut each time when the top cover is closed 
(e.g. after paper roll loaded) with the printer in operating condition. However, 
if it placing in ON, it will not automatically cut paper after top cover closed.  


When switch position 3 set to “ON”, the paper will fully cut after paper printed. 
If the printed-paper do not needs to completely cut, please set this switch to 
“OFF” then the printed paper will be partially cut and left a tiny piece that user 
needs to rip the printed paper. When the printer set to full-cut mode, please 
notice that the paper should be take away immediately right after printed. 
Otherwise, the last paper will cut again with the next printed-paper cut. Please 
notice that when it place to ON, the paper will retract 14.5 mm before it start to 
print.  
 
For switch position 4

when it set to “OFF”, the paper will feed before cutting 

when software does not define this point and there will be a further paper 
feeding after cutting to prevent last 2 lines cutted. Before setting this switch to 
“ON”, please make sure that your software will take care of enough paper feed 
for printed lines cut prevention issue. 


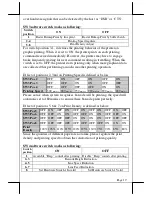
For switch position 5, if the switch is set to “ON”, the busy signal set to host 
only when input buffer is full. When it is set to “OFF”, busy signal is sent to 
host  whenever  the  input  buffer  is  full  or  an  off  line  status  occurs.  Therefore, 
signals including the paper near end detect will generate busy signal to the host. 
Moreover, the printer will keep on beeping at Paper End (completely no paper) 
till paper is replaced when S2-5 is “ON”. When S2-5 is “OFF”, the printer will 
keep on beeping every 3 seconds at Paper Near End (still long paper in replace) 
till paper is replaced.  
 
For switch position 6 and when it is set to ON, the printer responds to a 
carriage return command (CR code or 0Dh) with also a line feed (LF code or 
0Ah) action. Then if the text editor always expresses the change to a new line 
with both the CR and LF codes, there will be an extra line advance than 
expected. However it works for some old editors that express the change to a 
new line with only either one of the LF code or the CR code. 


Switch position 7 defines the parity check regulation in serial interface. 
In Aura-9000, it is selectable between even and none. 


For switch position 8 can choice the handshaking method in serial interface. 
When it is set to ON, the printer transmits an “XOFF” for busy and sends an 
“XON” for not busy. When it is set to OFF, the printer signifies the busy status 

Содержание Aura-900

Страница 1: ...orial or other errors or omissions contained herein nor for direct indirect incidental consequential or otherwise damages including without limitation loss of data or profits resulting from the furnishing performance or use of this material This information is provided as is and Posiflex Technology Inc expressly disclaims any warranties expressed implied or statutory including without limitation i...

Страница 2: ...can be use to drive a separately purchased kitchen bell for reminder function in noisy environment This series make beeping sound as response to Paper End or Paper Near End signals 20 plus code pages are supported in the standard model for application convenience Other useful functions such as paper saving and 1D 2D barcode printing are design in this printer to help user to gaining the convenienc...

Страница 3: ...ura 9000W d USB cable for Aura 9000U 5 One of the power sources a Power adaptor power cord depend on country type ordered b Power supply cable when no power adaptor and no powered USB cable ordered 6 User s Manual 7 Driver CD for Aura 9000U and Aura 9000L W OPTIONS Kitchen bell Alarm type KL 100 Wall Mount Kit Parallel Interface Kit Serial Interface Kit LAN Interface Kit Wi Fi Interface Kit Langua...

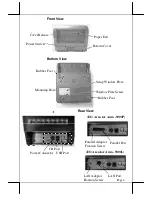
Страница 4: ...er Connector CR Port Rubber Foot Window Plate Screw Setup Window Plate Rubber Foot Mounting Hole Bottom Cover Power Switch Cover Release Paper Exit LAN Port I O Area for Aura 9000L LAN Adaptor Fixation Screw I O Area for Aura 9000P Parallel Port Parallel Adaptor Fixation Screw ...

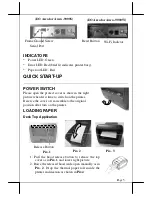
Страница 5: ...mble to the original position after turn on the printer LOADING PAPER Desk Top Application 1 Pull the hood release button to release the top cover as in Pix 1 and lower right picture 2 Raise the released hood wide open manually as in Pix 2 Drop the thermal paper roll inside the printer in direction as shown in Pix2 Pix 3 Pix 1 Pix 2 Release Button I O Area for Aura 9000W Wi Fi Indictor Reset Butto...

Страница 6: ... a 9 PIN D sub Female connector at the left in this area Apply the male connector of RS232 cable to this port for serial application The default protocol used in serial connection is 115 200 bps none parity 8 data bits 1 stop bit Virtual Serial Port A virtual serial port is a redirector driver used in USB interface which is usually used to create a pair of back to back virtual COM ports on the sam...

Страница 7: ...tion To use Wi Fi connection please set up through official utility Posiflex Wi Fi POS Printer Manager There are two interfaces to organize Aura 9000W which are USB and Wi Fi When the first time use Aura 9000W please set the host terminal s Wi Fi configuration to AD HOC peer to peer mode when setting through Wi Fi interface Another method to setup Aura 9000W is by USB interface and please uses Wi ...

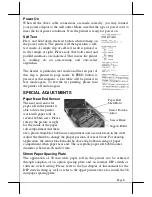
Страница 8: ...gain SPECIAL ADJUSTMENTS Paper Near End Sensor The near end sensor for paper roll in the printer is able to have the printer work with paper rolls of several bobbin sizes Please refer to the picture at right for the inside of the paper roll compartment that there are a plastic thumb for bobbin size adjustment and a sensor block in the wall Adjust the thumb to change the proper position of sensor b...

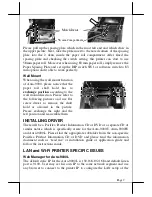
Страница 9: ...wing pictures and use flat screw driver to remove the shaft hold as arrowed in the picture Please exchange the right and the left position and reassemble them INSTALLING DRIVER There will be a Posiflex Product Information CD or DVD or a separate CD of similar nature which is specifically create for the Aura 9000U Aura 9000W and Aura 9000L Please find the appropriate subfolder from the non specific...

Страница 10: ...rectly connected local printer So for direct I O control by tools like HyperTerminal all commands applicable to the serial or parallel interface model can work on Aura 9000L in the same way as Aura 9000 except the port must be TCP IP with the IP address of the printer Similarly for Windows printer driver setup please Add Printer and select for Local printer and select port TCP IP with the printer ...

Страница 11: ...is located underneath the roll paper passage at the exit as in the picture below You can clean the thermal elements of the print head and paper sensor gently using a cotton swab moistened with isopropyl alcohol solvent Before putting back the paper roll for printing alcohol solvent must be dry completely NOTE Never do this when print head is still hot Do not touch the print head thermal elements a...

Страница 12: ...l it audibly clicks into place If both situations are not the cause please try pulling the hood lock forward If the top hood won t release automatically check for paper jam described in next item If there is no paper jam and the print head is not overheated turn off the printer and wait for half a minute then turn it back on If the problem still remains contact a qualified service person Nothing c...

Страница 13: ...information such as driver installation DIP switch settings and command sets etc if required Place the printer on a sturdy level surface Choose a place that is well ventilated and free of excessive dust smoke or fume Do not put the printer under direct sunlight or near a heater Ideal room temperature is from 5ºC to 40ºC Ideal humidity is from 20 to 85 RH no condensation Do not set any liquid or dr...

Страница 14: ...may be transferred between the surfaces Since the paper roll is highly thermal sensitive please keep them in a dark place that is 20º and 65 RH when not installed in the printer Avoid extended exposure to direct light Use only products made from polyethylene polypropylene or polyester for storage of thermal paper SPECIFICATIONS PRINTER ITEM SPECIFICATION Interface USB Interface Maximum Printing Sp...

Страница 15: ...ddition to Parallel port For Aura 9000S there are 2 connectors for host connection USB Port and in addition to the Serial port For Aura 9000L there are 2 connectors for host connection USB and in addition to the LAN port Please always connect only one interface at a time Simultaneous multiple host connections could result in unexpected results UPOS CONCERNS The UPOS compliance and WEPOS compliance...

Страница 16: ...of the firmware The information below applies to the latest version to the date of print of this manual The 8 position SW1 DIP switch works as following Switch position ON OFF 1 2 Baud rate definition ref separate table below 3 5 Paper Width Printable Width 6 USB interface Default Other interface 7 Auto Cutter Disable Auto Cutter enable 8 Firmware Update Enable Firmware Update Disable Effect of po...

Страница 17: ...software switch setting which means other functions must be change by software utility Please visit our web site http www posiflex com or http www posiflex com tw to download the Aura 9000 software switch utility Software switches has divided into SW1 SW2 SW3 and SW4 Following information is going to describe these settings SW2 software switch works as following Switch position ON OFF 1 Paper Back...

Страница 18: ... for printed lines cut prevention issue For switch position 5 if the switch is set to ON the busy signal set to host only when input buffer is full When it is set to OFF busy signal is sent to host whenever the input buffer is full or an off line status occurs Therefore signals including the paper near end detect will generate busy signal to the host Moreover the printer will keep on beeping at Pa...

Страница 19: ...ON ON OFF OFF SW3 Pos 4 OFF OFF OFF OFF ON ON Printing Speed 300 mm sec 280 mm sec 250 mm sec 220 mm sec 200 mm sec 180 mm sec Please notice when system recognizes barcode will be printing the speed will automatic set to 180mm sec to ensure these barcode prints perfectly Effect of positions 5 6 7 on Print Density is defined as below SW3 Pos 5 OFF ON OFF ON OFF ON OFF ON OFF ON OFF SW3 Pos 6 OFF OF...

Страница 20: ...Line Space Reduction as in table below SW4 Pos 4 OFF ON OFF ON SW4 Pos 5 OFF OFF ON ON Line Space Reduce Disable Reduce 25 Reduce 50 Reduce 70 For switch 4 position 6 7 it can reduce the spare space between paragraphs No matter how many blank lines this function will reduce the total unused space for three particular percentages which are 25 50 and 75 Please refer to the following table to adjust ...

Отзывы: