


Miscellaneous Options
66
m52L Installation Guide
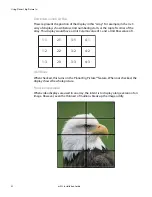
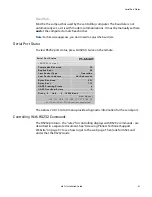
Curtain Pattern
The curtain pattern determines what the m52L will show when you press the
CURTAIN
button.
(EDID) Plug and Play
Plug and Play allows the source computer’s video card to query the display and send
the correct resolution. Most video cards work with Planar displays. For the few that
don’t, you may need to turn off Plug and Play and manually specify the video card
settings based on the display’s capabilities.
EDID Detailed Timing 1
EDID Detailed Timing 1 is part of the Plug and Play information that informs the
source computer about the native resolution of the display. This field is set
automatically to the native resolution of the product. This value cannot be changed.
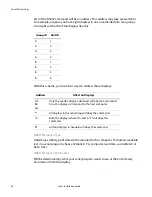
Preferred Source Detection
Analog computer video cards provide only vertical and horizontal frequencies.
Sometimes, this is not enough information for the display to properly detect the
signal. In certain cases, a display receiving such “ambiguous” signal modes could
misinterpret the resolution to be any of three different modes. For example,
1024 x 768, 1280 x 768, and 1360 x 768 all have the same respective horizontal and
vertical frequencies but represent different aspect ratios, 4 x 3, 15 x 9, and 16 x 9,
respectively. By specifying the correct source detection mode, the display can
correctly interpret the signal and display the incoming image in the proper aspect
ratio. The default preferred source detection is 16 x 9. This is the native aspect ratio of
this display. If you are attempting to display a 4 x 3 signal and it is not working, try
changing the preferred source detection to 4 x 3.
Allow Frame Lock
Frame lock causes the display to synchronize its vertical refresh timing with that of
the incoming source. This prevents frame tearing or frame dropping. To frame lock,
the incoming signal must be within the refresh parameters of the display itself, which
is from 48 Hz to 62 Hz.
Содержание m52L
Страница 1: ...m52L Installation Guide ...
Страница 2: ......
Страница 4: ...iv m52L Installation Guide ...
Страница 10: ...Table of Contents vi m52L Installation Guide ...
Страница 20: ...Tools and Other Things You May Need 10 m52L Installation Guide ...
Страница 28: ...Lining Up Screen Brackets 18 m52L Installation Guide ...
Страница 32: ...About UPS Supplies 22 m52L Installation Guide ...
Страница 58: ...Sharpness Settings 48 m52L Installation Guide ...
Страница 60: ...Picture Position 50 m52L Installation Guide ...
Страница 64: ...Using Planar s Big PictureTM 54 m52L Installation Guide ...
Страница 68: ...Viewport Adjustment 58 m52L Installation Guide ...
Страница 74: ...Tips for Color Balancing 64 m52L Installation Guide ...
Страница 88: ...Turn Backlight Off With No Source and DPMS Delay 78 m52L Installation Guide ...
Страница 92: ...Controlling With RS232 Commands 82 m52L Installation Guide ...
Страница 102: ...Deleting a Configuration 92 m52L Installation Guide ...
Страница 106: ...Where to Go From Here 96 m52L Installation Guide ...
Страница 116: ...106 m52L Installation Guide ...
Страница 118: ...Rear View 108 m52L Installation Guide Rear View 0 3 0 7 5 7 2 7 21 0 00 3 ...
Страница 120: ...110 m52L Installation Guide ...