


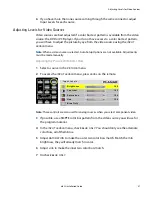


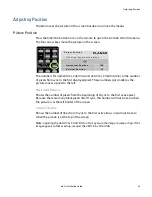

Adjusting Levels for Analog Sources
34
m52L Installation Guide
2
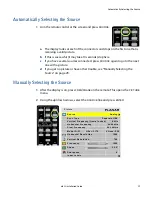
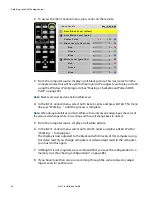
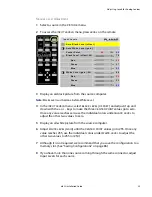
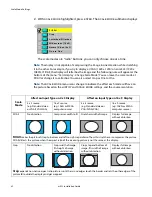
To access the
INPUT
LEVELS
menu, press
LEVEL
on the remote.
3
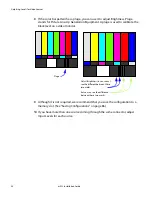
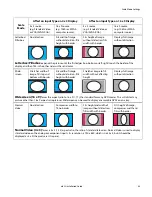
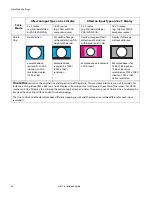
From the computer source, display an all-black picture.
This must come from the
computer source that will be used for the program.
We suggest you display a screen
using the Windows Paint program. (See "Making a Checkerboard Pattern With
Paint" on page 39)
Note:
Black Level
must
be done before White Level.
4
In the
INPUT
LEVELS
menu, select
AUTO
BLACK
LEVEL
and press
ENTER
. This menu
line says “Working…” until the process is complete.
Note:
When doing Auto Black and Auto White with an interlaced analog input, the color of
the picture will change while it is working and then will change back to normal.
5
From the computer source, display an all-white picture.
6
In the
INPUT
LEVELS
menu, select
AUTO
WHITE
LEVEL
and press
ENTER
. Wait for
“Working…” to disappear.
The display is now adjusted to the black and white levels of
this
computer using
this
video card. If you change computers or video output cards in the computer,
you must do this again.
7
Although it is not required, we recommend that you save the configuration to a
memory slot. (See "Saving Configurations" on page 86)
8
If you have more than one source coming through the same connector, adjust
Input Levels for each source.
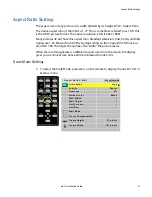
I n p u t L e v e l s
A u t o B l a c k L e v e l ( o f f s e t )
A u t o W h i t e L e v e l ( g a i n )
C e n t e r P o i n t
6 4
1 2 4
9 9
B l a c k L e v e l ( o f f s e t ) - A l l
7 9
R e d
8 9
G r e e n
6 7
B l u e
8 3
W h i t e L e v e l ( g a i n ) - A l l
9 9
R e d
9 9
G r e e n
9 9
B l u e
9 9
Содержание m52L
Страница 1: ...m52L Installation Guide ...
Страница 2: ......
Страница 4: ...iv m52L Installation Guide ...
Страница 10: ...Table of Contents vi m52L Installation Guide ...
Страница 20: ...Tools and Other Things You May Need 10 m52L Installation Guide ...
Страница 28: ...Lining Up Screen Brackets 18 m52L Installation Guide ...
Страница 32: ...About UPS Supplies 22 m52L Installation Guide ...
Страница 58: ...Sharpness Settings 48 m52L Installation Guide ...
Страница 60: ...Picture Position 50 m52L Installation Guide ...
Страница 64: ...Using Planar s Big PictureTM 54 m52L Installation Guide ...
Страница 68: ...Viewport Adjustment 58 m52L Installation Guide ...
Страница 74: ...Tips for Color Balancing 64 m52L Installation Guide ...
Страница 88: ...Turn Backlight Off With No Source and DPMS Delay 78 m52L Installation Guide ...
Страница 92: ...Controlling With RS232 Commands 82 m52L Installation Guide ...
Страница 102: ...Deleting a Configuration 92 m52L Installation Guide ...
Страница 106: ...Where to Go From Here 96 m52L Installation Guide ...
Страница 116: ...106 m52L Installation Guide ...
Страница 118: ...Rear View 108 m52L Installation Guide Rear View 0 3 0 7 5 7 2 7 21 0 00 3 ...
Страница 120: ...110 m52L Installation Guide ...