


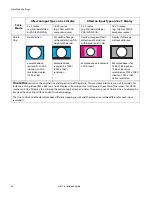


Adjusting Input Levels
m52L Installation Guide
33
Adjusting Input Levels
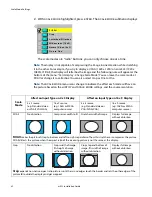
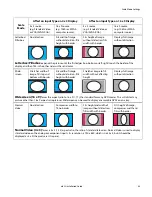
For all sources, adjusting to the source’s picture means learning what that source
means by black and white.
For analog sources, black is supposed to be a voltage of zero coming from the
computer’s video card, but it almost never is. White is supposed to be a voltage of 0.7
volts, but it usually isn’t either.
For digital sources, black is supposed to be a code of 0, but in some cases it is a code
of 16. White is supposed to be a code of 255, but in some cases it is a code of 235.
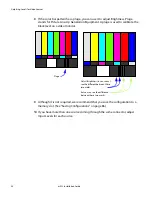
The Input Level adjustment process asks you to provide a picture from the source
that is black, then one that is pure white. With these, you can quickly and
automatically make the display “learn” what
this
source means by black and white.
The result? Good pictures, using the dynamic range of color coming from the source.
Note:
For Input Levels, you must use the computer or source you will use for the program.
For example, don’t make this adjustment with your work laptop and then switch to another
computer for the display’s program of pictures.
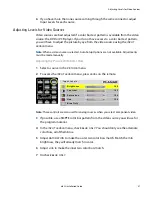
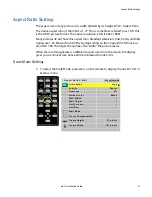
Adjusting Levels for Analog Sources
This section applies to Analog RGB (computer) pictures only. The levels are best
adjusted semi-automatically.
Why Adjust Levels?
For Analog RGB pictures, the levels for black and white vary from one computer to
another, or from one video processor to another. They even vary between video
outputs from a multiple-output video card in a computer.
Your pictures will not look their best on the display until you adjust for these
differences. This is
not
about adjusting color or contrast. It’s about telling the display
what the computer or processor means by black and by white.
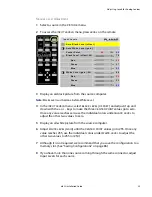
Semi-Automatic Level Adjustment
1
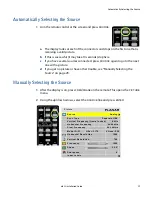
Select a source in the
PICTURE
menu.
Содержание m52L
Страница 1: ...m52L Installation Guide ...
Страница 2: ......
Страница 4: ...iv m52L Installation Guide ...
Страница 10: ...Table of Contents vi m52L Installation Guide ...
Страница 20: ...Tools and Other Things You May Need 10 m52L Installation Guide ...
Страница 28: ...Lining Up Screen Brackets 18 m52L Installation Guide ...
Страница 32: ...About UPS Supplies 22 m52L Installation Guide ...
Страница 58: ...Sharpness Settings 48 m52L Installation Guide ...
Страница 60: ...Picture Position 50 m52L Installation Guide ...
Страница 64: ...Using Planar s Big PictureTM 54 m52L Installation Guide ...
Страница 68: ...Viewport Adjustment 58 m52L Installation Guide ...
Страница 74: ...Tips for Color Balancing 64 m52L Installation Guide ...
Страница 88: ...Turn Backlight Off With No Source and DPMS Delay 78 m52L Installation Guide ...
Страница 92: ...Controlling With RS232 Commands 82 m52L Installation Guide ...
Страница 102: ...Deleting a Configuration 92 m52L Installation Guide ...
Страница 106: ...Where to Go From Here 96 m52L Installation Guide ...
Страница 116: ...106 m52L Installation Guide ...
Страница 118: ...Rear View 108 m52L Installation Guide Rear View 0 3 0 7 5 7 2 7 21 0 00 3 ...
Страница 120: ...110 m52L Installation Guide ...