background image


Chapter 4 

PD735 & PD736 User’s Manual 

Setup Execution 

••••

 55 


 Motion:

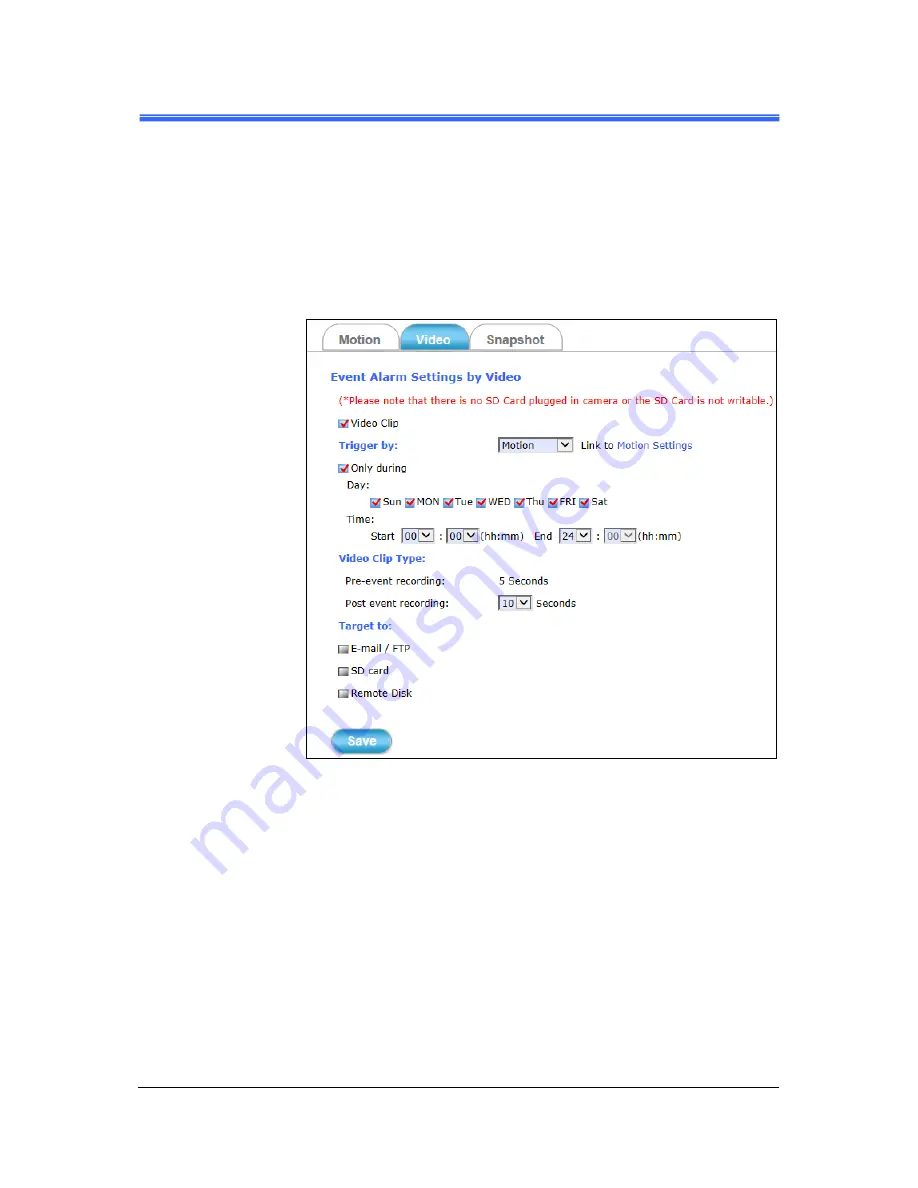
 This method will trigger the Camera video surveillance/recording 

operation whenever motion is detected within the defined days of the 
week and at the time of the set days.  
Each recording time-span is in accordance with the total value of 
Pre-event recording and Post event recording (in seconds). And the 
video record may be provided to host by E-mail/FTP, stored in the 
SD card, Remote Disk as selected or through all of them. 


Figure 4-23  Video Recording with “Motion” Method Selected 


Содержание PD735 2MP

Страница 1: ...735 2MP D735 2MP P P P PD736 D736 D736 D736 5 5 5 5MP Dome Type Dome Type Dome Type Dome Type Panorama Panorama Panorama Panorama Network Camera Network Camera Network Camera Network Camera User s Man...

Страница 2: ...D products To minimize the risks associated with customer applications customers should provide adequate operating safeguards PiXORD is under no obligation to provide any further technical support ser...

Страница 3: ...t 3 Camera Live View UI Sett 3 Camera Live View UI Sett 3 Camera Live View UI Settings ings ings ings 14 14 14 14 3 1 Quick Access Buttons 16 3 2 Camera Live View UI Setting Tools 17 4 4 4 4 Setup Exe...

Страница 4: ...iv 4 5 Local Storage Setup Execution 62 4 5 1 Local Storage Tab 62 4 5 2 Playback Tab 63 4 6 Remote Storage Setup Execution 64 4 6 1 Remote Storage Tab 64 5 5 5 5 Appendix Appendix Appendix Appendix 6...

Страница 5: ...PD736 User s Manual v Revision History Doc Version Revision Description Date 3 0 Integrate PD735 UM content into this file 2014 07 11 2 0 Add more functional descriptions 2014 02 24 1 0 Initial Offic...

Страница 6: ...Revision History PD735 PD736 User s Manual vi This page is blank...

Страница 7: ...nded Heed All Warnings Do not drop or hit the device Sensitive electronics inside the camera are vulnerable to excessive impact Do not install the device under high temperature less than 45 C environm...

Страница 8: ...technical assistance please contact your nearest PiXORD distributor dealer You may also access the PiXORD website at www pixord com for following supports Find answers to resolved your problems from...

Страница 9: ...s hallway store and office without the need to install multiple cameras The hardware base panorama video processing ability provides user flexible video layout including Panorama Original View Double...

Страница 10: ...s built in an internal microphone which is hidden in the pinhole located on the front panel Lens Focus Adjustment Rotate the lens to adjust the focal length to the best image If necessary clean the le...

Страница 11: ...rd slot The IP Camera has built in a MicroSD card slot which can accepts MicroSD memory card for image video event recording Audio In Connect a microphone to the IP Camera be noted to use actively mic...

Страница 12: ...elay on Normal Open status External device can directly connect to the terminals However the current that will go through the 2 nodes must not exceed 130mA An external Relay can also be connected to t...

Страница 13: ...d Setup 2 1 Camera s Mounting Bracket Installation Please attach the supplied alignment sticker to the place you would like to set up first And then follow the drilling and installing instructions on...

Страница 14: ...otebook is used connect the LAN port of the device to the network router with an RJ45 network cable 1 1 1 1 2 2 2 2 3 Plug the DC power jack of the power adaptor 3 3 3 3 4 4 4 4 to Camera and connect...

Страница 15: ...omplete the installation NOTE 1 In order to ensure CAM FINDER utility has the best compatibility with Camera kindly please goes to the PIXORD website for the latest version downloading 2 In order to e...

Страница 16: ...grams PIXORD CAM FINDER path to run the software 2 Click the Device Search to search the device in the LAN Figure 2 4 Find the Camera Device via Device Search button 3 Under your selected item double...

Страница 17: ...Setup 4 Check Static IP address or Use DHCP Service item to select the network connection method of the camera Figure 2 6 Enter the Camera Device s network setting manually Figure 2 7 Check Use DHCP S...

Страница 18: ...D736 User s Manual 10 Installation and Setup 5 After modifying the camera properties click Set button to save and enable the configuration modifications Figure 2 8 Click Set button to save and enable...

Страница 19: ...9 Select multi Camera Devices and then configure their properties together via Batch Device Setting item Figure 2 10 Check Increase IP setting to set Camera Device s IP address increasing one by one T...

Страница 20: ...n authentication of camera webpage 3 For first time user there will be a prompt to install the ActiveX control Comply with the ActiveX installation as they are needed to view the video stream and some...

Страница 21: ...min admin Verify and Complete the Installation from Your Browser If your IE Browser can t get the ActiveX download properly you may have to temporarily lower your security settings to perform a one ti...

Страница 22: ...dress gotten via CAM FINDER utility NOTE For first time user there will be a prompt to install the ActiveX control Conply with the ActiveX installation as it is needed to view the video stream and som...

Страница 23: ...etting window will then display offering all the necessary set up tools for changing the live view reconfigurations The functions of each of these tools are explained in the following sections Figure...

Страница 24: ...e disable talk function to someone facing the network Camera from your computer For ideal voice reception the distance of the person on view should be kept within 2 meters from the Camera Snapshot Cli...

Страница 25: ...Camera can offer the following live view display modes 360 degree Broad View 360 degree Full View Quad View Double Broad View 180 degree Ultra Wide Angle View x 2 Triple View 180 degree Ultra Wide An...

Страница 26: ...s magnifying power x1 to x10 and dragging the frame with mouse could move the amplified region In the meanwhile you could also see region s amplification effect displayed real time in the lower left u...

Страница 27: ...or rotate the scene to select and zoom a specific area 1 of 4 maximum to be monitored To reset the scene back to its original status click the Home button You can also directly click the mouse button...

Страница 28: ...video recordings you are going to take The base filename will auto expand for each saved video recording To start recording click the Recording button Click Browse button to define Snapshot Path and S...

Страница 29: ...you may want to change or update a number of its settings to further upgrade its performance This can be accomplished by clicking the Setup button indicated in the above figure The Setup dialog see fo...

Страница 30: ...Setup Execution 22 4 4 4 4 Setup Setup Setup Setup Execut Execut Execut Execution ion ion ion Figure 4 1 Camera Setup Selection Buttons NOTE For Live View setup execution please refer to the previous...

Страница 31: ...PD735 PD736 User s Manual Setup Execution 23 4 1 System Setup Execution Clicking the System button will display the following tabbed panes relative to system configurations Figure 4 2 System Setup Tab...

Страница 32: ...ation Tab Figure 4 3 Information Tabbed Pane The Information tabbed pane provides the existing system status of the Camera which includes Model Name System Time Firmware Version MAC Address ActiveX Co...

Страница 33: ...e Where System Time The Network Camera current date and time is applied and displayed here based on the setup status of the System Time Settings as detailed below Time Zone Select the applicable Time...

Страница 34: ...Saving Select this option only when applicable at your location Two setup settings the Start time and End time are needed to implement the feature After setups are completed click Save button to appl...

Страница 35: ...when check box is enabled User Group Three group options are available namely Administrator User is allowed to change Camera settings and perform all Camera functions Operator User is allowed to logi...

Страница 36: ...ttings to factory default Where Upgrade Firmware Download the latest firmware file from the website by executing the following steps 1 Click the Browse button to access and select the appropriate firm...

Страница 37: ...ws user to restore Camera s backup setting by executing the below steps 1 Click the Browse button to access and select saved config_backup tar gz file from the PC 2 Click the Restore button to process...

Страница 38: ...amera s basic log on another browser page or Remote Log Server Where Remote Log Settings Check Enable remote log selection first and then manual entering IP address port setting of Remote Log Server A...

Страница 39: ...Network Setup Tabbed Panes 4 2 1 General Tab The General tabbed pane shown above allows you to redefine the network and port protocol settings of the Network Camera Where Network Settings DHCP This o...

Страница 40: ...nder E mail Address through SMTP service So you won t worry about the difficulty in Camera s Webpage access As for the settings of SMTP Service kindly please contact with your E mail service provider...

Страница 41: ...of Wireless Networks Displays the list of wireless networks Access Points currently available grouped under SSID Mode Security and Signal Strength categories Click the Refresh button to refresh the l...

Страница 42: ...a host name instead of the IP Address Where DDNS Enable Enable the check box to support DDNS function Host Name Enter the Host name which you registered and got through DNS Service Provider The assign...

Страница 43: ...to see the videos So the more the client number is the larger the network bandwidth required and the bigger loading of the camera In other words the camera can send just one streaming and each client...

Страница 44: ...eny its access to camera End IP address Fill in the last address of IP range which you would like to deny its access to camera please note that total device numbers listed in the Deny list would be li...

Страница 45: ...l Setup Execution 37 4 3 Video Audio Setup Execution Clicking the Video Audio button will display the following tabbed panes for defining Camera streaming video and audio functions PD735 2MP camera mo...

Страница 46: ...Chapter 4 PD735 PD736 User s Manual Setup Execution 38 PD736 5MP camera model s max resolution is 1920x1920 Figure 4 11 Video Audio Tabbed Panes...

Страница 47: ...o see Section 4 4 2 is enabled an alert message will display requiring you to disable the feature first before proceeding to change the Streaming settings Otherwise adjustments to video quality stream...

Страница 48: ...distance between two I Frames Lager value means longer distance between two I Frames and this selection is suitable for the stable Network Bandwidth Environment so we suggest the smaller value selecti...

Страница 49: ...Chapter 4 PD735 PD736 User s Manual Setup Execution 41 After setups are completed click Save button to implement the settings 4 3 2 Video Tab Figure 4 13 Video Tabbed Pane...

Страница 50: ...t parameters it is recommended that you use the default setting by pressing the Reset button see figure below in the pinhole of the Camera Figure 4 14 Reset Button in the pinhole of Camera NOTE Pressi...

Страница 51: ...purity of a specific color Try to assign the fit value according to the environment Contrast The brightness ratio of the lightest to the darkest part of the video image Try to assign the fit value acc...

Страница 52: ...onment Day Night Threshold Set the illumination lux value 5 100 to auto trigger the Camera into day or night mode relative to luminance of the area under surveillance When the environment luminance be...

Страница 53: ...darkness of your picture through sliding the bar Try to assign the fit value according to the environment Pre Noise Reduction 2D Noise Reduction Both of them are one kind of technology to provide cle...

Страница 54: ...images even under backlighting White Balance Because camera doesn t have ability to automatically adjust different color temperature to the environment six templates are provided to let you choose for...

Страница 55: ...era Mount Three camera mounting types could be chose and will also bring different kinds of Display Mode Ceiling Wall Hi FPS raise to 30 frames per second and the max resolution value is 1600x1200 30f...

Страница 56: ...one into the Audio In port of camera be noted to use actively microphone normally with power supplier on microphone for this application Enable or disable Gain 20dB function of the Camera microphone E...

Страница 57: ...acy Mask Tabbed Pane 1 Select a masking shape to block the private area you wish to obstruct from surveillance 2 Lay out masking screens on the areas to be blocked from surveillance 3 Enable the check...

Страница 58: ...ice that the laid out screen turns into phantom block 3 If the laid out screen needs correction click Delete button and redo the masking screen lay out process 4 Once the masking screen is acceptable...

Страница 59: ...he defined schedules 4 4 1 Motion Tab From the Motion tabbed pane you can define specific target areas within the scope of surveillance to focus the motion detection function Figure 4 18 Defining a Si...

Страница 60: ...o add more detection area frames NOTE Total defined motion detection areas cannot exceed 10 frames Figure 4 19 Defining Multiple Motion Detection Areas for the Camera 3 To assign unique names to each...

Страница 61: ...pane sets the video recording trigger method to use when motion is detected by the Camera The four methods available for selection are Period Schedule Motion and GPIO Input each of which can be set u...

Страница 62: ...the defined days of the week and set time of the set days are met Motion is ignored with this method Each recording time span is in accordance with the setting value of Post event recording in second...

Страница 63: ...in the defined days of the week and at the time of the set days Each recording time span is in accordance with the total value of Pre event recording and Post event recording in seconds And the video...

Страница 64: ...IO Input Signal when its state changes Each recording time span is in accordance with the total value of Pre event recording and Post event recording in seconds And the video record may be provided to...

Страница 65: ...ecord file target destination Always Under this method the Camera automatically continuous to capture 6 snapshots of the area under surveillance at every 1 or 2 seconds interval 3 previous snapshot fr...

Страница 66: ...a will continuously capture 6 snapshots of the area under surveillance at every 1 or 2 seconds interval 3 previous snapshot frames are collected from the Camera buffer and 3 snapshot frames are captur...

Страница 67: ...otion is detected within the defined days of the week and at the time of the set days Single or 6 snapshots may be captured as defined The stream of accumulated snapshots may be sent to host by E mail...

Страница 68: ...nds when its state changes Single or 6 snapshots may be captured at a time as defined Figure 4 28 Snapshot Recording with GPIO Input Method Selected The stream of accumulated snapshots may be sent to...

Страница 69: ...mail service provider After you confirm all parameters are correct and working properly you may enter them into the text area manually As for the settings of FTP Service kindly please contact with yo...

Страница 70: ...s the SD card total capacity Total size available memory Free size used memory Used size and used memory ratio Use It also display the current Camera operation condition Recording status and provide S...

Страница 71: ...r snapshots is performed from files recorded on particular date range as explained in the following figure Figure 4 31 Playback Tabbed Pane 1 Select type of files to playback 2 Search for the files to...

Страница 72: ...server disk Figure 4 32 Remote Storage Tabbed Pane Where Type NFS and SMBFS two kind of Remote Server are provided Remote Folder Path If NFS Server type is selected shared folder path will be filled i...

Страница 73: ...Web based UI via CamFinder utility Chapter 2 3 1 Below are the tips to let you understand how to solve NetcamViewer installation problems more easily If below picture is always popped even NetcamView...

Страница 74: ...Chapter 5 PD735 PD736 User s Manual Appendix 66 Find Tools icon and then select Compatibility View settings Or...

Страница 75: ...Chapter 5 PD735 PD736 User s Manual Appendix 67 Click Add button to add camera webpage as a compatible website After successful adding camera webpage should be set as compatible view website...

Страница 76: ...anual Appendix 68 Then camera webpage would be refreshing real time and starting to load camera webpage Click Allow button to enable NetcamViewer component running Manual entering camera s username pa...

Страница 77: ...PMD dll is always popped during NetcamViewer installation kindly please turn of all browser windows include CDWizard application and then try NetcamViewer installation again So before NetcamViewer ins...

Страница 78: ...nstallation you may see below prompt windows are always popped This will mainly remind you to close all running browser applications and then press OK button to continue NetcamViewer installation Or t...

Страница 79: ...ppendix 71 2 Manual input username admin password admin to pass login authentication of camera webpage 3 After Live View page is entering successfully find the SETUP button Clicking it could change or...

Страница 80: ...ab of Camera Setup Webpage Chapter 4 1 4 5 In order to have the best performance with Camera kindly please goes to the PIXORD website for the latest firmware version downloading 6 After downloading it...

Страница 81: ...ct firmware version mapped with your camera to upgrade or there will be danger to damage camera system 7 Click the Upgrade button and then one prompt window will pop to tell you wait about 30 seconds...

Страница 82: ...firmware you chose 10 Please don t power off camera or do any unnecessary jobs during firmware upgrade Until the process goes to 100 there will be messages popped to suggest you restart the Web Brows...

Страница 83: ...12 After camera Web based UI is re login successfully go to Information Tab of Camera Setup Webpage to check if the firmware version is different with before or check if the firmware version is the sa...

Отзывы: