


PRV-LX10
164
1
2
3
4
1
2
3
4
C
D
F
A
B
E
3
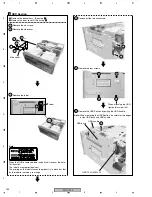
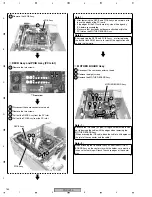
DECB Assy and PCIB Assy (PCI slot)
4
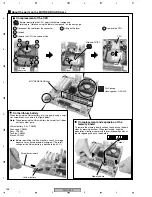
MOTHER BOARD Assy
1
Remove the two screws.
2
Disconnect the some connectors at need.
3
Remove the two screws.
4
Pull out the DECB Assy from the PCI slot.
5
Pull out the PCIB Assy from the PCI slot.
1
Disconnect the some connectors at need.
2
Remove the eight screws.
3
Remove the MOTHER BOARD Assy.
DECB Assy
PCIB Assy
MOTHER BOARD Assy
1 1
3
2
3
2
2
2
2
2
2
2
3
5 4
Rear view
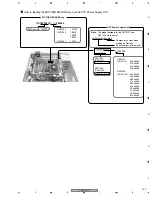
• After removing the DECB and PCIB Assys, be careful not to
touch the edges of the PCI card.
• If the edges of the PCI card are dirty, clean the edges by
IPA before reassembling.
• Make sure that dust does not become attached within the
PCI slot on the MOTHER BOARD Assy.
Note 1:
Because the IDE cable (40 pins) is fragile, care must be taken
not to damage the cable with the edges when removing the
MOTHER BOARD Assy.
(When dressing the IDE cable, bend the cable to 45 degrees at
the joint of the connector and the cable.)
Note
∗
1:
When attaching the Connector Assy 4P from the MOTHER
BOARD Assy on the center stay with the holder, care must be
taken so that nothing will touch the sharp edges of the center
stay.
Note
∗
2:
∗
1
∗
2
After replacing the DECB and PCIB Assys, or after replacing
the built-in flash ROM, be sure to reinstall the application and
update the firmware.
Note 2:
7
Remove the JKOB Assy.
JKOB Assy
7


