background image


The Initial Setup menu

14


112


En


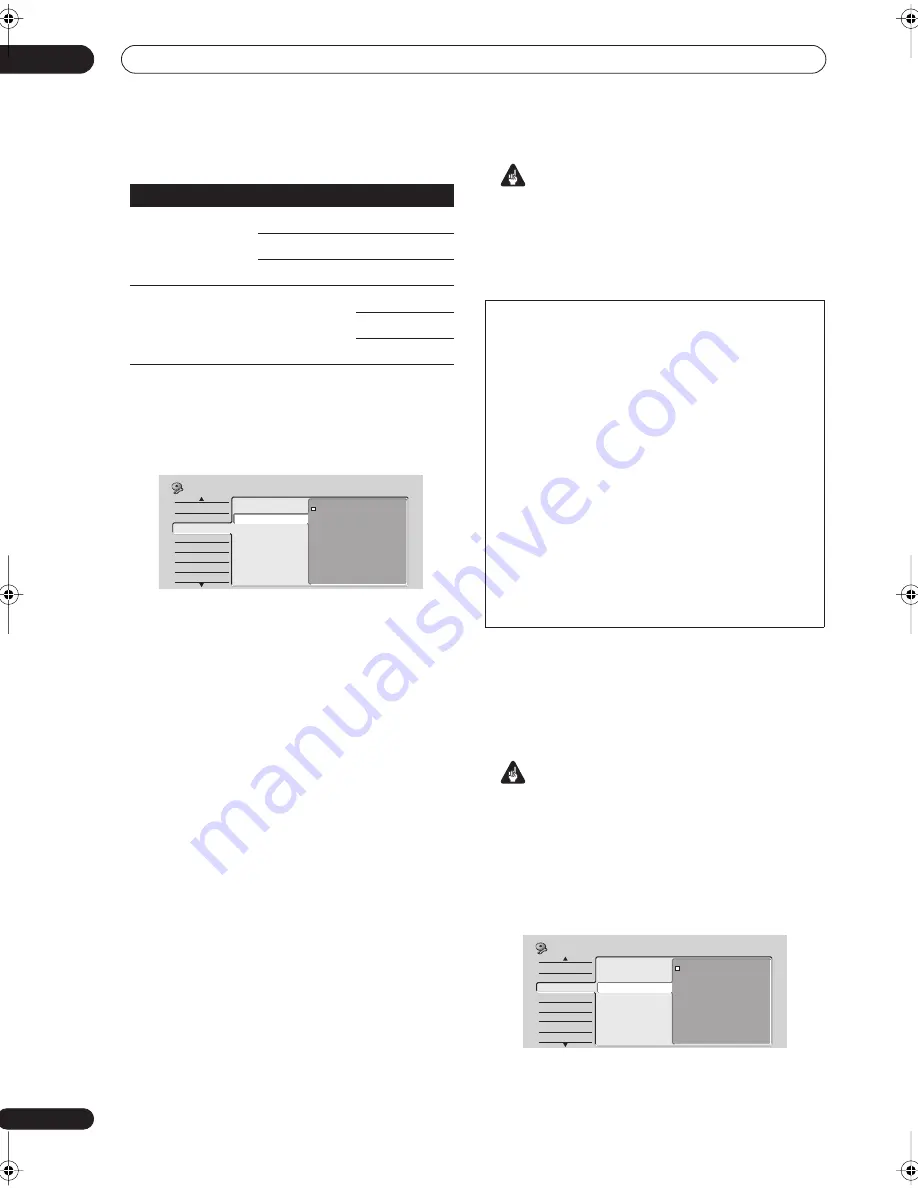
Component Video Out


• Default setting: 


Interlace


You only need to make this setting if you connected this 
recorder to your TV using the component video jacks.

If your TV is compatible with progressive-scan 
component video, set this 


Progressive (Full)


 for the 

highest quality picture. (If when set to 


Progressive (Full)


4:3 programs are ‘stretched’ and you can’t fix this with 
the controls on your TV, try the 


Progressive (Normal)


setting.)

If your TV is not compatible with progressive-scan video, 
leave it set to 


Interlace


.

Note that when 


AV1 Out


 (see page 112) is set to 


RGB


, no 

video is output from the component video jacks.

See also 


Progressive scan video


 in the glossary on 

page 136.


 Important


If you switch to one of the progressive settings when 
using a TV that is not compatible with progressive-scan 
video, you will not be able to see anything displayed on 
your TV. If this happens, press and hold the 


 button on 

the front panel, then press 


DISC NAVIGATOR


. This will 

set the recorder’s video output back to 


Interlace


.


AV1 Out


• Default setting: 


Video


You only need to make this setting if you connected this 
recorder to your TV using the 


AV1(RGB)-TV


 SCART AV 

connector.


 Important


• If you make a setting here that is incompatible with 

your TV, the TV may not display any picture at all. If 
this happens either switch everything off and 
reconnect to the TV using either the supplied video 
cable, or an S-video cable (see 


Using the S-video or 

component video output


 on page 15 for more on this), 

or reset the recorder (see 


Resetting the recorder


 on 

page 123 for how to do this).


Video


 – Compatible with all TVs, but lowest quality of 

the three AV settings.


Input Line System

Built-in tuner

External input

625 System

Auto

Auto

PAL

PAL

SECAM

SECAM

525 System


n/a 


Auto

3.58 NTSC

PAL–60

Basic
Tuner
Video In/Out
Audio In
Audio Out
Language
Recording
Playback

Input Colour System
Component Video Out
AV1 Out
AV2/L1 In
NTSC on PAL TV

Interlace
Progressive (Full)
Progressive (Normal)

Initial Setup


Compatibility of this unit with progressive-scan TVs


Consumers should note that not all high-definition television sets 
are fully compatible with this product and may cause artifacts to 
be displayed in the picture. In case of 525 progressive scan 
picture problems, it is recommended that the user switch the 
connection to the ‘standard definition’ output (


Interlace


). If there 

are questions regarding our TV set compatibility with this model, 
please contact our customer service center.
This recorder is compatible with the following Pioneer displays 
and monitors


Plasma display


• PDP-505XDE, PDP-435XDE, PDP-505HDE, PDP-435HDE, PDP-
435FDE, PDP-615EX, PDP-505HD, PDP-5030HD, PDP-4330HD, 
PDP-5040HD, PDP-4340HD, Pro-1000HD, Pro-800HD, Pro-
1000HDI, Pro-800HDI, Pro-1110HD, Pro-910HD, PDP-4300, PDP-
5031, PDP-502MX


Projection monitor receiver


• SD-533HD5, SD-643HD5, Pro-710HD, Pro-610HD, Pro-510HD, 
Pro-720HD, Pro-620HD, Pro-520HD, Pro-730HD, Pro-630HD, Pro-
530HD, Pro-730HDI, Pro-530HDI, Pro-700HD, SD-641HD5, SD-
582HD5, SD-532HD5

Basic
Tuner
Video In/Out
Audio In
Audio Out
Language
Recording
Playback

Input Colour System
Component Video Out
AV1 Out
AV2/L1 In
NTSC on PAL TV

Video
S-Video
RGB

Initial Setup

DVR-04_HDD_UK.book 112 ページ 2004年9月10日 金曜日 午後7時3分

Содержание DVR-920H

Страница 1: ...DVD Recorder DVR 920H Operating Instructions ...

Страница 2: ...ure the unit has been installed so that the power cord can be easily unplugged from the AC outlet in case of an accident To avoid fire hazard the power cord should also be unplugged from the AC outlet when left unused for a long period of time for example when on vacation D3 4 2 2 2a_A_En WARNING The voltage of the available power supply differs according to country or region Be sure that the powe...

Страница 3: ...s The power cords should be routed such that they are not likely to be stepped on A damaged power cord can cause a fire or give you an electrical shock Check the power cord once in a while When you find it damaged ask your nearest PIONEER authorized service center or your dealer for a replacement S002_En If the AC plug of this unit does not match the AC outlet you want to use the plug must be remo...

Страница 4: ...31 Making your first recording 32 Using the built in TV tuner 33 Basic playback 34 Using the Home Menu 37 Displaying disc information on screen 37 05 Using the GUIDE Plus electronic program guide The GUIDE Plus System 40 Using GUIDE Plus 40 Areas 42 GUIDE Plus FAQ and troubleshooting 49 06 Playback Introduction 51 Using the Disc Navigator to browse the contents of a disc 51 Navigating discs and th...

Страница 5: ...gs 103 Optimize HDD 103 HDD Initialize 103 13 The Video Audio Adjust menu Setting the picture quality for TV and external inputs 104 Setting the picture quality for disc playback 105 Audio DRC 106 14 The Initial Setup menu Using the Initial Setup menu 107 Basic settings 107 Tuner settings 109 Video In Out settings 111 Audio In settings 113 Audio Out settings 114 Language settings 115 Recording set...

Страница 6: ...s still recording the program 15 minutes ahead of you Simultaneous recording and playback Playback and recording for both DVDs and the built in hard disk drive HDD are completely independent For example you can record a broadcast program to either a recordable DVD or the HDD while watching another recording you already made on the same DVD or on the HDD Disc Navigator The on screen Disc Navigator ...

Страница 7: ...VD or HDD for editing You can also transfer DVD or HDD content back to the camcorder if you need to Safe non destructive editing When you edit a DVD RW the actual content of the disc the Original content is not touched The edited version the Play List content just points to various parts of the Original content Chapter marking You can easily add chapter markers anywhere in your recordings for easy...

Страница 8: ...he batteries when you notice a fall off in the operating range of the remote When the batteries run down or you change the batteries the remote control mode and TV preset codes are automatically reset See Remote Control Mode on page 109 and Setting up the remote to control your TV on page 123 to reset them Use within the operating range and angle as shown You can control this recorder using the re...

Страница 9: ...r before playing Unfinalized VR mode and Video mode discs may not play 2 Cannot read the CPRM information will show in the display when you load a disc However this will not affect playback 3 Copy once protected disc titles will not play CD R RW compatibility This recorder cannot record CD R or CD RW discs Compatible formats CD Audio Video CD Super VCD ISO 9660 CD ROM containing MP3 WMA or JPEG fi...

Страница 10: ... The most important difference between DVD R and DVD RW is that DVD R is a record once medium while DVD RW is a re recordable erasable medium You can re record erase a DVD RW disc approximately 1 000 times For more information see About DVD recording on page 60 What s VR mode VR Video Recording mode is a special mode designed for home DVD recording It allows flexible editing of recorded material c...

Страница 11: ...e a cause of HDD failure While the recorder is switched on or the front panel display shows EPG do not unplug from the wall socket or switch the electricity off from the breaker switch Do not move the recorder immediately after switching it off or while the front panel display shows EPG If you need to move the recorder please follow the steps below 1 After the message POWER OFF is shown in the dis...

Страница 12: ... OUT HDMI output providing a high quality interface for digital audio and video 8 INPUT 3 Stereo analog audio video and S video inputs for connection to a VCR or other source component 9 OUTPUT Stereo analog audio video and S video outputs for connection to a TV or AV amplifier receiver 10 CONTROL IN Use to control this recorder from the remote sensor of another Pioneer component with a CONTROL OU...

Страница 13: ...annel preset download This feature allows you to set up the channel presets of this recorder very simply using the channel presets and preset names already in your TV See Switching on and setting up on page 26 and Auto Channel Setting Download from TV on page 110 for more on this feature NexTView timer programming download NexTView timer programming download allows you to program a timer recording...

Страница 14: ...nnecting a VCR in the chain connect it to the ANTENNA IN jack on this recorder and skip the next step 2 Use an RF antenna cable one is supplied to connect the antenna output of your VCR to the ANTENNA IN of this recorder 3 Use another RF antenna cable to connect the ANTENNA OUT of this recorder to the antenna input on your TV 4 Use a SCART cable not supplied to connect the AV1 RGB TV AV connector ...

Страница 15: ...plied to connect the S VIDEO OUTPUT jack to an S video input on your TV For a component video connection use a component video cable not supplied to connect the COMPONENT VIDEO OUT jacks to a component video input on your TV See also Component Video Out on page 112 for how to set up the component video output for use with a progressive scan compatible TV 2 Connect the AUDIO OUTPUT jacks to the cor...

Страница 16: ... 4 Plug the supplied G LINK cable to the G LINK jack This enables you to control the tuner in the external receiver through GUIDE Plus Position the IR transmitter end of the G LINK cable so that the IR receiver on your cable satellite digital terrestrial receiver will pick up the control signals see diagram See the manual that came with your cable satellite digital terrestrial receiver if you re n...

Страница 17: ... Connect the cable from the antenna cable TV outlet to the antenna input on your VCR satellite receiver cable box 2 Use a SCART cable not supplied to connect your decoder to your VCR satellite receiver cable box See the manual for your decoder box for more detailed instructions 3 Use a SCART cable to connect your VCR satellite receiver cable box to the AV2 INPUT 1 DECODER AV connector on this reco...

Страница 18: ...or on your TV This enables you to watch discs 3 Use another SCART cable to connect the AV2 INPUT 1 DECODER AV connector to a SCART AV connector on your decoder box This enables you to record scrambled TV channels Note 1 In order to use this setup you will need to make the following settings from the Initial Setup menu Set the AV2 L1 In setting to Decoder from the Initial Setup menu see AV2 L1 In o...

Страница 19: ...antenna cables as shown This enables you to watch and record TV channels 2 Connect one of the DIGITAL OUT OPTICAL jack on this recorder to an optical digital input on your AV amplifier receiver This enables you to listen to multichannel surround sound 3 Connect the analog AUDIO OUTPUT and VIDEO OUTPUT jacks on this recorder to an analog audio and video input on your AV amplifier receiver 4 Connect...

Страница 20: ...PCM signals as well as Dolby Digital DTS and MPEG audio bitstream About HDMI HDMI High Definition Multimedia Interface supports both video and audio on a single digital connection for use with DVD players and recorders DTV set top boxes and other AV devices HDMI was developed to provide the technologies of High Bandwidth Digital Content Protection HDCP as well as Digital Visual Interface DVI in on...

Страница 21: ... recorder and digitally transfer DV tapes or DVD R RW discs to DVD R RW Important This jack is for connection to DV equipment only It is not compatible with digital satellite tuners or D VHS video decks 1 Use a DV cable not supplied to connect the DV in out jack on your DV camcorder deck to the front panel DV IN OUT jack of this recorder Plugging in Before plugging in for the first time make sure ...

Страница 22: ...rrently playing title to DVD or the HDD 11 page 33 35 63 Use to change TV channels skip chapters tracks etc 12 STANDBY ON Press to switch the recorder on into standby The upper half of the button is backlit blue when the recorder is on 13 Front panel display See Display on page 23 for details 14 IR remote sensor page 8 15 REC Press to start recording The upper half of the button is backlit red whe...

Страница 23: ...order is in Play List mode 5 2 3 page 109 Shows the remote control mode if nothing is displayed the remote control mode is 1 6 REM Lights when the character display is showing the remaining available recording time 7 page 112 Lights when the component video output is set to progressive scan 8 V Lights when an unfinalized Video mode disc is loaded 9 R RW Indicates the type of recordable DVD loaded ...

Страница 24: ...age or channel When the recorder is stopped press to change the tuner audio SUBTITLE page 58 Displays changes the subtitles included in multilingual DVD Video discs ANGLE page 59 Switches camera angles on discs with multi angle scenes PLAY MODE page 55 Press to display the Play Mode menu for features such as search repeat and program play 8 GUIDE page 40 Press to display the GUIDE Plus screen 9 Al...

Страница 25: ...older or to display the previous or next menu page When in the GUIDE Plus system use to display the previous next page of TV listings information STEP SLOW page 54 During playback press to start slow motion playback while paused press to show the previous or next video frame When in the GUIDE Plus system use to display TV listings information for the previous next day 19 Recording controls page 32...

Страница 26: ...o choose a language then press ENTER 4 Press ENTER to start setting up using the Setup Navigator If you don t want to use the Setup Navigator press cursor down to select Cancel then press ENTER to exit the Setup Navigator 5 Select the Auto Channel Setting Auto Scan or Download from TV or Do not set then press ENTER DVDRECORDER STANDBY ON ENTER Basic Tuner Video In Out Audio In Audio Out Language R...

Страница 27: ... Off for summer time then press ENTER Select On if you are currently using summer time Basic Tuner Video In Out Audio In Audio Out Language Recording Playback Clock Set Input Line System On Screen Display Front Panel Display Power Save Remote Control Set AV Link Setup Navigator Setup Navigator Country Selection Country UK Initial Setup Tuning 32 107 Cancel Downloading Cancel Pr 5 Basic Tuner Video...

Страница 28: ... there is no station as well as manually tune to stations See Manual CH Setting on page 110 Setting up the remote to control your TV You can set up the supplied remote control to control many brands of TV See Setting up the remote to control your TV on page 123 Basic Tuner Video In Out Audio In Audio Out Language Recording Playback Clock Set Input Line System On Screen Display Front Panel Display ...

Страница 29: ...rmation for your country or region you need to set up the GUIDE Plus system and download the TV listings information The initial download can take up to 24 hours but once this is done all future updates are automatic 1 Press GUIDE to display the GUIDE Plus setup menu The language and country settings are already set to whatever you selected in the Setup Navigator 2 Use the cursor up down buttons t...

Страница 30: ...ion EPG download A If you are not using an external receiver this recorder will automatically scan all channels for the host channel Leave the recorder in standby overnight do not leave it switched on B If you are using an external receiver you need to identify the host channel from the table below Tune your external receiver to the appropriate host channel and leave the receiver on and the record...

Страница 31: ... and on which program number The source may be the built in tuner of this recorder or an external receiver The program number is the number on which the channel can be found on its receiving device source The entry in the Editor screen must match this number for correct recording of that channel The above is especially important for the host channel Please make sure that the host channel is always...

Страница 32: ... TV channel you want to record from You can also use the buttons on the front panel if the recorder is stopped Channel presets are numbered 1 99 If the recorder is connected to your TV using a SCART cable and your TV supports Direct Recording it s possible to quickly start recording whatever channel your TV is tuned to See Direct recording from TV on page 63 for detailed instructions 6 Press REC t...

Страница 33: ...ut with Bilingual recording selected see External Audio on page 114 you can switch the audio channel between left L right R or both L R 2 Switching between TV and DVD When the recorder is stopped or recording you can choose whether to have the audio video from the built in TV tuner or external input play on your TV DVD mode or watch the channel that the TV is currently set to TV mode During playba...

Страница 34: ...ad a disc Load a disc with the label side facing up using the disc tray guide to align the disc if you re loading a double sided DVD Video disc load it with the side you want to play face down If you want to play a DTS audio CD please first read the note on page 36 5 Press PLAY to start playback If you re playing a DVD Video or Video CD a disc menu may appear when you start playback Use the cursor...

Страница 35: ...tedly to change the playback speed While paused press to advance a single frame in either direction Press to display the top menu or menu of a DVD Video disc these are often the same Use the cursor buttons to navigate DVD Video disc menus press ENTER to select items Press to return to the previous level of a DVD Video disc menu PLAY STOP PAUSE REV SCAN FWD SCAN PREV NEXT CLEAR ENTER SKIP CM BACK S...

Страница 36: ...PREV NEXT CLEAR ENTER Press to start playback Video CD only If RESUME is displayed on screen playback starts from the place last stopped Press to stop playback Video CD only You can resume playback from the same point by pressing PLAY Press STOP again to cancel the resume function Pauses playback or restarts playback when paused Press to start scanning Press repeatedly to increase the scanning spe...

Страница 37: ...il it disappears The example displays below are a guide only actual displays vary according to the disc loaded etc Note 1 Some options in the Home Menu may be grayed out sometimes indicating that they are not available at the present time For example the PhotoViewer option is grayed out unless there is a disc loaded that contains JPEG image files Home menu options GUIDE Plus page 40 Disc Setup pag...

Страница 38: ...t name or preset number for the currently selected channel 7 Audio mode Shows the broadcast audio mode for the current channel preset Mono Stereo etc 8 Copy control information Shows recording restrictions of the current channel program 9 Disc name Shows the disc name For CDs this area shows playable files other than CD audio tracks for example Multi format WMA MP3 10 Finalized Shows Finalized if ...

Страница 39: ...t of space left on the disc in the current recording mode 5 Recording mode Shows the current recording mode FINE SP LP etc and the total recording time of the disc Note 1 The frame number is shown next to the elapsed time display when the disc is paused 2 Data transfer rate shows the amount of video and audio information recorded on the disc It is not an indication of picture audio quality Play DV...

Страница 40: ...ffiliates Legal Notice GEMSTAR TV GUIDE INTERNATIONAL INC AND OR ITS RELATED AFFILIATES ARE NOT IN ANY WAY LIABLE FOR THE ACCURACY OF THE PROGRAM SCHEDULE INFORMATION PROVIDED BY THE GUIDE PLUS SYSTEM IN NO EVENT SHALL GEMSTAR TV GUIDE INTERNATIONAL INC AND OR ITS RELATED AFFILIATES BE LIABLE FOR ANY AMOUNTS REPRESENTING LOSS OF PROFITS LOSS OF BUSINESS OR INDIRECT SPECIAL OR CONSEQUENTIAL DAMAGES...

Страница 41: ...r will switch to the correct channel and start recording1 You can review the shows you have set to record in the Schedule Area see also The Schedule Area on page 45 Key What it does GUIDE Press to access GUIDE Plus also use to exit GUIDE Plus Use to navigate screens highlight an item RED GREEN YELLOW BLUE Action buttons that change functionality depending on the Area MENU Press to jump directly to...

Страница 42: ...GUIDE Plus system consists of seven Areas All Areas can be accessed from the Menu bar Grid The GUIDE Plus Home Area Displays TV listings information for the next seven days by time and channel Search Search for TV programs by category eg Sport subcategory eg Football or keyword My TV Set up a profile and receive recommendations according to your preferences Schedule Shows all scheduled recordings ...

Страница 43: ... as a TV magazine 1 Select Search from the Menu bar 2 Use the buttons to select a category and a subcategory If you choose All as the subcategory all programs in the category you selected will show up in the search results 3 Press ENTER to start the search The search results are shown sorted by time and date If no search results are displayed it means there are no programs for the current day that...

Страница 44: ...6 keywords 1 Select My TV from the Menu bar 2 Press the YELLOW Action button to set a profile Channels is now highlighted 3 To add a channel to your profile press the YELLOW Action button Select a channel from the mosaic of channel icons and press ENTER Repeat this step to add up to 16 channels 4 To add a theme to your profile highlight Themes and press the YELLOW Action button Select a theme from...

Страница 45: ...e recording quality frequency destination timing or group settings skip to step 6 below 2 Press the GREEN Action button Edit 3 Use the cursor and number buttons to edit the recording date start time end time and channel Use the cursor up down buttons or the number buttons to edit Press the GREEN Action button to go to continue or the RED Action button to go back 4 Enter a name for the scheduled re...

Страница 46: ... fit on to a single DVD disc Can also be used when recording to HDD 2 For a DVD timer recording if Optimized Rec see Optimized Rec on page 117 is set to On and VPS PDC is off the recorder will adjust the recording quality to try and fit the recording on the disc If the recording will not fit onto the disc even on MN1 recording quality then the Re covery Recording feature will automatically make th...

Страница 47: ...covered by GUIDE Plus you may also have to input a channel number Follow the on screen display to do this 4 Press ENTER to confirm is a trademark of Gemstar Development Corporation The VIDEO Plus system is manufactured under license from Gemstar Development Corporation Setting a manual recording 1 Select Schedule from the Menu bar 2 Press the GREEN Action button Manual 3 Use the number and buttons...

Страница 48: ...e the Editor Area if new channels become available in your area or if you change from cable to satellite say or move house From the Editor Area you can Display hide channels in the grid switch the channel on off Select a channel source Tuner Ext Rec 1 Ext Rec 2 etc Enter a channel program number Switching a channel on off You can choose whether or not to display a channel in the Grid Area by switc...

Страница 49: ...ase try other codes for your brand under satellite cable or terrestrial Go to the Setup Area and choose one of the three options cable satellite or terrestrial that you have not already tried Follow the on screen prompts to make sure that GUIDE Plus can change channels on your external receiver If it does not work repeat the process choosing different reception and external receiver combinations u...

Страница 50: ...ting it up again see Setting up the GUIDE Plus system on page 29 Your cabling and setup is OK but the recorder has not been connected for enough time to receive the TV listings data Leave the recorder in standby overnight For external receiver users only The connections and setup are OK but the external receiver was not tuned to the correct host channel Check the list of host channels see step 5 o...

Страница 51: ...udio CD Video CD Super VCD WMA or MP3 files MP3 files Using the Disc Navigator to browse the contents of a disc Use the Disc Navigator to browse the contents of a disc and start playback Using the Disc Navigator with playback only discs 3 1 Press HOME MENU and select Disc Navigator from the on screen display Alternatively for a CD Video CD Super VCD or WMA MP3 disc you can press DISC NAVIGATOR whi...

Страница 52: ...dable discs 1 Press HDD or DVD to select the hard disk drive or the DVD drive 2 Press HOME MENU and select Disc Navigator from the on screen display Alternatively you can press DISC NAVIGATOR to go straight to the Disc Navigator screen 3 Select Play from the menu options Press ENTER to move to the thumbnails area of the screen 4 Use the cursor buttons to select a title to play 5 Press ENTER to sta...

Страница 53: ... To clear and start again press CLEAR 2 Optionally Press ENTER Alternatively just wait a few seconds and playback will jump to the new title 1 During playback use the number buttons to input a track number For example for track 6 press 6 for track 24 press 2 then 4 To clear and start again press CLEAR 2 Optionally Press ENTER Alternatively just wait a few seconds and playback will jump to the new ...

Страница 54: ...put when scanning DVDs with Dolby Digital or Linear PCM sound on forward SCAN 1 Linear PCM is output from the optical digital output except during chase playback and simultaneous recording playback No sound is output when using other scan speeds No sound is output when scanning from the HDD except on forward SCAN 1 Linear PCM is output from the optical digital output during forward SCAN 1 2 The pi...

Страница 55: ... current title press 2 5 0 0 For 1 hour and 15 minutes and 20 seconds into the title press 1 1 5 2 0 Time Search Video CD 3 For example for 45 minutes into the disc press 4 5 0 0 Title Chapter Folder Track Search For example for track 6 press 6 Alternatively you can use the cursor up down buttons 4 Press ENTER Tip You can often select what you want to watch on a DVD disc from the disc menu Press M...

Страница 56: ...isc Repeat Folder or Repeat Track or Repeat Off 3 To resume normal playback select Repeat Off from the Repeat Play menu You can also press CLEAR to cancel repeat play if no menu OSD such as the Play Mode menu is displayed Program play This feature lets you program the play order of titles chapters folders tracks on a disc 1 Select Program from the Play Mode menu 2 Select Input Edit Program from th...

Страница 57: ...ram list by selecting Input Edit Program from the Play Mode Program menu During program play press to skip to the next program step Press CLEAR during playback to switch off program play if no menu OSD such as the Disc Navigator is displayed Press while stopped to erase the program list You can use repeat play with program play Start playback of the program list then select Program Repeat from the...

Страница 58: ...annel or both L R 3 When playing Video CDs and audio CDs you can switch between stereo just the left channel or just the right channel Note 1 Some discs only allow you to change subtitle language from the disc menu Press TOP MENU to access DVD Video SUBTITLE CLEAR Subtitle 1 2 English The toucan lives in tropical forests 2 The sound may drop out for a few seconds when switching soundtracks Some di...

Страница 59: ...annel 2 R Soundtrack 2 Right channel Switching camera angles Some DVD Video discs feature scenes shot from two or more angles check the disc box for details it should be marked with a icon if it contains multi angle scenes When a multi angle scene is playing the same icon appears on screen to let you know that other angles are available this can be switched off if you prefer see Angle Indicator on...

Страница 60: ... like 3 The capacity of the hard disk drive means that you can store many hours of video on it even in the higher quality recording modes 4 To help you organize the contents the HDD is divided into four groups You can name and use these groups as you like for example you might have a group for movies another for TV shows and one for camcorder recordings Important It is possible to record both PAL ...

Страница 61: ...below When recording a TV broadcast or through an external input you can display copy control information on screen see Displaying disc information on screen on page 37 CPRM CPRM is a copy protection system with scramble system regarding the recording of copy once broadcast programs CPRM stands for Content Protection for Recordable Media This recorder is CPRM compatible which means that you can re...

Страница 62: ... front panel to select the channel number 3 Use the REC MODE button to set the picture quality recording time See Setting the picture quality recording time on page 61 for detailed instructions 4 Use the AUDIO button to select the audio channel to record See Changing audio channels on page 33 for more on this When recording in VR mode if a broadcast is bilingual both audio channels are recorded al...

Страница 63: ...more space on the HDD DVD or after eight hours of HDD recording whichever is sooner Tip You can press TV DIRECT REC while the recorder is in standby to switch on and immediately start recording Please note that you can t record from another component VCR etc that is connected by a SCART cable to the AV2 INPUT 1 DECODER connector using the TV Direct Recording feature Setting a timer recording Using...

Страница 64: ...mer recording it means that the HDD is not recordable Approximately two minutes before a timer recording is set to start the recorder will go into timer recording standby In timer recording standby you cannot use some functions The maximum length for timer recordings made to the HDD is 24 hours However because one title is limited to eight hours recordings over eight hours will be spread over two ...

Страница 65: ... to move the cursor to the recording end time on the grid As you move the cursor around the grid an arrow stretches from the start time to the current cursor position representing the length of the recording A recording of up to six hours can be set 6 Press ENTER to set the end time 7 Select Yes to set the timer recording and exit or No to go back to the timer recording screen You can check the ti...

Страница 66: ...r won t let me enter a timer program Why not You can t enter a timer program if the clock isn t set What happens when two or more timer programs overlap Basically the program with the earlier recording start time has priority However the recorder will start recording the program with the later start time after the earlier program is finished If two programs have the same times but different channe...

Страница 67: ...al input The current input is shown on screen and in the front panel display L1 Input 1 L2 Input 2 front panel L3 Input 3 DV DV input output front panel Check that the Audio In settings for External Audio Bilingual Recording and DV Input are as you want them see Audio In settings on page 113 If the aspect ratio is distorted squashed or stretched adjust on the source component or your TV before rec...

Страница 68: ...nt panel DV IN OUT jack Also set the camcorder to VTR mode 2 Set up the recorder Use REC MODE to set the recording quality See Setting the picture quality recording time on page 61 for detailed information Make sure a recordable disc is loaded if you want to record to DVD 3 From the Initial Settings menu check that the DV audio input is setup as you require See DV Input on page 114 for more on thi...

Страница 69: ...1 and Stereo 2 Recording from the DV output You can record non copy protected material from the hard disk drive or from a DVD to a camcorder connected to the DV IN OUT jack 1 Connect the camcorder to the DV IN OUT jack of this recorder 2 Select the HDD or DVD for playback 3 Find the place you want to start recording from 4 Start recording on the camcorder 5 Play the source material Playing your re...

Страница 70: ...ake up to one hour to finalize A disc recorded in Video mode can take up to 20 minutes Initializing a DVD RW disc When you first load a blank disc the recorder will initialize it automatically for recording You can also manually initialize DVD RW discs You can initialize a disc for either Video mode recording or VR mode recording 2 Important Initializing a disc will erase everything recorded on it...

Страница 71: ...orry about the quality getting worse with each copy generation It also means that copying can be carried out at the maximum speed possible When copying from HDD to DVD the speed of copying depends on the recording mode and the kind of DVD disc you re using The table at the bottom of the page shows the minimum copying time for one hour of material Important Not all discs are compatible with high sp...

Страница 72: ... it s been copied the title is erased from the HDD it is therefore not possible to copy a locked title that is copy once protected You can identify copy once protected material during playback by displaying disc information on screen If the current title is copy once protected an exclamation mark is shown see Play display 2 on page 39 Copyright Recording equipment should be used only for lawful co...

Страница 73: ... erased Copying from HDD to DVD3 From the HDD to DVD Copy screen you can build up a Copy List of titles to copy to DVD From this screen you can also edit chapters so that the titles appear as you want them on your finished DVD Note 1 See also Copyright on page 72 2 The maximum title length for copying is six hours Title name and chapter markers are also copied except when copying from a finalized ...

Страница 74: ... options on the left from the thumbnail area of the Copy List screen When selecting HDD titles you can display titles from a particular HDD group by pressing cursor up then using the cursor left right buttons and ENTER to select a group Press cursor down to get back to the HDD title thumbnail area HDD to DVD Copy List menu options Use the following commands when making an HDD to DVD Copy List Add ...

Страница 75: ...he Copy List menu options 2 Use the cursor left right buttons to select a title from the HDD to add to the Copy List then press ENTER The thumbnail appears in the Copy List section in the lower half of the screen If there are already titles in the Copy List the title is added at the end 3 Repeat step 2 to add more titles to the Copy List or press RETURN to go back to the Copy List menu options Not...

Страница 76: ... to input a name on page 90 Press RETURN to go back to the Copy List screen without changing the name 4 To confirm the name and return to the main Copy List screen highlight OK and press ENTER 5 Repeat steps 2 to 4 to name other titles in the Copy List or press RETURN to go back to the Copy List menu options Divide Use this command to make two titles from a title already in the Copy List 1 1 Selec...

Страница 77: ... playing You can return to the Copy List screen by pressing STOP otherwise playback will continue until the end of the Copy List During preview you can select a new thumbnail for the Disc Navigator by pressing NAVI MARK 3 Repeat step 2 to preview other titles or press RETURN to go back to the Copy List menu options Move Use this command to change the order of titles in the Copy List 1 Select Move ...

Страница 78: ...he chapter is erased after confirming Divide Divide a chapter into two or more new chapters See Chapter Edit Divide below Combine Combine two chapters into one See Chapter Edit Combine below Move Change the order of the chapters See Chapter Edit Move below Preview Check the content of a chapter Use the cursor buttons to select a chapter then press ENTER Once the preview has started press STOP to r...

Страница 79: ...you rearrange the chapters within a Copy List title 1 Use the cursor buttons to select the chapter you want to move then press ENTER 2 Use the cursor buttons to select a new position for the chapter then press ENTER The thumbnails in the chapter list reflect the new order Note 1 When Frame Accurate is set to Off see Frame Accurate on page 118 the divide point may move by up to half a second after ...

Страница 80: ...pressing ENTER a marker appears under the bar to show the start of the section 4 In the same way find the end of the section to erase then with To highlighted press ENTER After pressing ENTER another marker appears under the bar to show the end of the section with the section itself marked in red 5 Select Yes to confirm or No to cancel then press ENTER In the thumbnail viewer you can see a few sec...

Страница 81: ...le to copy from a DVD disc that was recorded on a different DVD recorder or PC 1 Load the recordable DVD disc that contains the material you want to copy to the HDD 2 Press HOME MENU and select Copy Note that the Copy option will not be available if the TV system of the recorder and the disc do not match See Input Line System on page 108 for how to change the TV system of the recorder Note 1 See a...

Страница 82: ...ee Recording the Copy List below Recording the Copy List After putting together your Copy List you re ready to record it 1 Select Conf List to display the Copy List settings screen 2 Use the cursor left right buttons to select the Recording Mode High Speed Copy Only available when copying Original content from a VR mode disc The Copy List is copied at the same recording quality as the original See...

Страница 83: ...ss ENTER The thumbnails in the Copy List are updated to reflect the new order 4 Repeat steps 2 and 3 to move other titles in the Copy List or press RETURN to go back to the Copy List menu options Note 1 Titles which were recorded directly to a VR mode disc or have already been copied real time and which contain bilingual audio or are re corded in recording modes MN12 MN20 can be added to the Copy ...

Страница 84: ...first to the hard disk drive then on to another recordable DVD disc 2 1 Press HOME MENU 2 Select Copy 3 Select Disc Back up 4 Select a back up option There are three back up options Start new disc back up Start making a back up of a disc Resume writing data Record the back up data already on the HDD to a recordable DVD Erase back up data Erase the back up data on the HDD 5 Press OPEN CLOSE to open...

Страница 85: ...sable although if you are using a DVD RW disc you can re initialize it in order to make it usable again see Initializing a DVD RW disc on page 70 9 After the recorder has finished recording the back up disc you can select whether to make another back up of the same data or exit Select Start to make another back up copy or Cancel to finish If you want to make another back up copy return to step 6 a...

Страница 86: ...ntent of the disc or you can create and edit a Play List The Play List doesn t actually change any of the content on the disc but just controls how the content is played back rather like the program play feature found on CD players Editing material recorded on the HDD is similar to editing the Original content of a VR mode DVD RW with similar commands for erasing naming and locking titles as well ...

Страница 87: ...current setting of the recorder During recording these titles cannot be played HDD All 1 1 12 30 Wed 4 11 Pr 5 LP Recording Time 0h30m40s 1 2 3 4 5 6 Disc Navigator Play Erase Ttl Name Chpt Edit Erase Sec HDD Remain 6h12m FINE All Group1 Group2 Group3 Group4 NEW Auto Replace Recording indicator Disc Navigator menu options Selected Group Number of title pages Locked title indicator Information for ...

Страница 88: ... names appears above the title thumbnails see Editing HDD groups on page 93 for more details You can access these by pressing cursor up repeatedly until the All group is highlighted then using the cursor left right buttons to select a group Press ENTER to open the highlighted group Titles on the HDD marked with a icon are timer recordings set to Auto Replace Recording see Editing a scheduled recor...

Страница 89: ... Play List titles into one page 98 Divide Divide a Play List title into two page 98 Erase Section Erase Sec Erase a part of a title page 96 Editing VR mode Original Video mode and HDD content These commands affect the actual content stored on the DVD R RW or HDD Remember If you are editing a VR mode disc use the PLAYLIST button to switch to the Disc Navigator Original screen Play Use this function...

Страница 90: ...key shortcuts to input a name below For discs formatted on a different DVD recorder you will see only a limited character set 4 Highlight OK then press ENTER to enter the name and return to the main Disc Navigator screen To return to the main Disc Navigator screen without saving changes to the title name press RETURN 5 Press RETURN to go back to the Disc Navigator menu options or select another ti...

Страница 91: ...s RETURN again or select Back from the menu options on the left Inserting chapter markers into a title You can create new chapters within a title using the CHP MARK button while playing the title or during recording 3 This is useful not just for navigation of the disc content but also for editing purposes 1 Start playback of the title you want to create new chapter markers in You can use the Play ...

Страница 92: ...ion itself marked in red 5 Select Yes to confirm or No to cancel then press ENTER In the thumbnail viewer you can see a few seconds of video either side of the marked section to see how the edit will look When editing VR mode Original content you may not be able to erase very short sections less than five seconds 6 Erase another section from the same title or press RETURN to get back to the main D...

Страница 93: ...ard playback controls to find the place you want to divide the title 4 With Divide highlighted press ENTER to divide the title at the current playback position 5 Select Yes to confirm you want to divide the title Select No if you want to cancel and leave the title intact 6 Press RETURN to go back to the Disc Navigator menu options or select another title to divide Editing HDD groups The large capa...

Страница 94: ...content on the disc and it allows greater control over editing so that you end up with the content exactly as you want it Remember Use the PLAYLIST button to switch to the Play List edit screen The Play List can contain a maximum of 99 titles Play Use this function to start playback of a title 1 Select Play from the Disc Navigator Play List menu options 2 Select the title you want to play then pre...

Страница 95: ...select another title to name Chapter Edit Chpt Edit When editing VR mode DVDs you can edit individual chapters within a title with commands for erasing moving combining and dividing You can also play individual chapters to check their content 1 Select Chpt Edit from the Disc Navigator Play List menu options 2 Select the title that contains the chapters you want to edit then press ENTER After selec...

Страница 96: ... the section to erase then with From highlighted press ENTER The bar at the bottom of the screen shows the current play position in the title After pressing ENTER a marker appears under the bar to show the start of the section 4 In the same way find the end of the section to erase then with To highlighted press ENTER After pressing ENTER another marker appears under the bar to show the end of the ...

Страница 97: ... the title you want to move then press ENTER 3 Select a new position in the Play List for the title then press ENTER After pressing ENTER the new updated Play List is displayed 4 Press RETURN to go back to the Disc Navigator menu options or select another title to move Play List 1 1 Undo DVD Disc Navigator Create Move Divide Combine Erase All DVD Remain 0h37m FINE 1 2 Play List 1 1 Undo DVD ORG1 O...

Страница 98: ...rase All This command erases all the titles from the Play List 1 Select Erase All from the Disc Navigator Play List menu options 2 Select Yes to confirm or No to cancel then press ENTER Undo If you make a mistake while editing you can generally undo it There are three levels of undo in other words you can undo the last three edits you made Select Undo from the Disc Navigator Play List menu options...

Страница 99: ...c is finalized the information for that disc disappears from the Disc History 2 When you initialize a DVD RW disc or record a DVD R disc for the first time the recorder automatically names the disc DISC where is a number from 1 to 99 You can rename the disc if you want to see Input Disc Name on page 102 VR mode Video mode Disc History LP DVD Remain Disc Name Title 1 Title 2 Title 3 Today s Footbal...

Страница 100: ...mber of files and or folders you can still view all the images using the reload function 3 1 Use the cursor down button to navigate to the last entry in the folder list Read next 2 Press ENTER to load the next batch of up to 999 files 99 folders from the disc It will take a moment at most a minute to load in the images Note 1 Up to 999 files or 99 folders are viewable but if there are more files f...

Страница 101: ...presses cycle between zoom off 2x zoom and 4x zoom The zoom factor is displayed on screen 2 Use the cursor buttons to move the zoomed area within the picture Rotating the screen You can rotate the displayed picture during a slideshow so you can always view pictures the right way up whichever way they were taken During a slideshow press ANGLE to rotate the displayed picture clockwise by 90º Press A...

Страница 102: ...lete the whole name For other remote control key shortcuts see Using the remote key shortcuts to input a name on page 90 For discs formatted on a different DVD recorder you will see only a limited character set Note You cannot input a name for a disc if the TV line system of the disc is different to the current setting of the recorder See Input Line System on page 108 for how to change the recorde...

Страница 103: ... then Undo Finalize from the finalize options 2 Select Start Optimize HDD The Optimize HDD option is only visible when the recorder determines that the HDD needs optimizing you ll see a message appear on screen recommending you optimize the HDD As you record erase and edit recordings the HDD file system gradually becomes fragmented Periodically the HDD will need optimizing to clean up all the frag...

Страница 104: ... which you can save your own set of picture quality settings 1 Follow Choosing a preset above and select one of the user presets Memory 1 2 or 3 2 Select Detailed Settings 3 Use the cursor up down buttons to select the picture quality setting you want to adjust You can adjust the following settings Prog Motion Adjusts the motion and still picture quality when video output is set to progressive Pur...

Страница 105: ...al settings for the current preset TV CRT PDP or Professional 4 Press ENTER to select the preset Creating your own set There are three user presets in which you can save your own set of picture quality settings for disc playback 1 Follow Choosing a preset above and select one of the user presets Memory 1 2 or 3 2 Move the cursor down and select Detailed Settings 3 Select the picture quality settin...

Страница 106: ...ht buttons to adjust the currently selected picture quality setting 5 When you have all the settings as you want them press HOME MENU to exit Tip To see more of the picture as you adjust different settings press ENTER after selecting the setting you want to adjust Audio DRC Default setting Off When watching Dolby Digital material at low volume it s easy to lose low level sounds completely includin...

Страница 107: ...rea are broadcasting time signals you can set the clock manually Set your time zone You can set this by selecting a city or a time relative to GMT Move the cursor down and select On for summer time if you are currently on summer time then press ENTER GUIDE Plus Disc Navigator Copy Easy Timer Disc History Disc Setup Initial Setup Video Audio Adjust Play Mode PhotoViewer Basic Tuner Video In Out Aud...

Страница 108: ...d instead If when this setting is changed the screen goes blank due to incompatibility with your TV you can switch back by pressing and holding the front panel button then pressing STOP REC also front panel while the recorder is stopped When you switch the Input Line System setting the Copy List is erased You can t mix recordings of different TV line systems on the same disc When you change this s...

Страница 109: ... built in TV tuner for recording PAL B G PAL I SECAM L and SECAM D K TV programs off the air or from analog cable TV We recommend that you first use the Auto Channel Setting described here to tune into the channels in your area then if there are any unwanted channels you can disable them using Channel Skip described below You can also fine tune individual stations using the Manual CH Setting featu...

Страница 110: ...arameters you can set Skip If you want to skip the displayed channel because there is no station assigned to that channel change the Skip setting to On CH System Set the channel system used in your area or region Channel Change the channel number assigned to the current preset AFT Auto Fine Tune When set to On the station is automatically tuned set to Off to manually fine tune see below Level Set ...

Страница 111: ...M 3 58 NTSC or PAL 60 You may however occasionally need to set it manually if the picture is not displayed properly 1 Select Input Colour System then Next Screen 2 Use the CHANNEL buttons or the INPUT SELECT button to switch between the built in tuner and the external inputs 3 Use the cursor left right buttons to change the input colour system for the current input or built in tuner The available ...

Страница 112: ...page 15 for more on this or reset the recorder see Resetting the recorder on page 123 for how to do this Video Compatible with all TVs but lowest quality of the three AV settings Input Line System Built in tuner External input 625 System Auto Auto PAL PAL SECAM SECAM 525 System n a Auto 3 58 NTSC PAL 60 Basic Tuner Video In Out Audio In Audio Out Language Recording Playback Input Colour System Com...

Страница 113: ...tting NICAM If you want to record the non NICAM audio in a TV broadcast select Regular Audio otherwise set to NICAM When set to NICAM you can still select Regular Audio using the AUDIO button See Changing audio channels on page 33 Tuner Level Default setting Normal Set to Compression if the audio level from the built in tuner is excessively high causing distortion Note 1 Many recent PAL TVs are ca...

Страница 114: ... off the digital audio output set this to Off otherwise leave it On Dolby Digital Out You only need to make this setting if you connected this recorder to an AV amp receiver or other component using the digital output Default setting Dolby Digital Note 1 If you re recording in VR mode except when set to FINE MN32 both channels will be recorded and you can switch them as you like on play back Basic...

Страница 115: ... otherwise set to 96kHz 48kHz Check the manual that came with the connected component if you re unsure whether it is compatible with high sampling rate audio MPEG Out You only need to make this setting if you connected this recorder to an AV amp receiver or other component using the digital output Default setting MPEG PCM If your AV amp receiver or other connected component is MPEG audio compatibl...

Страница 116: ...Language and Subtitle Language settings For Auto Language to work the Audio Language and Subtitle Language settings must be the same see Audio Language on page 115 and Subtitle Language above Tip You can still switch audio and subtitle languages on playback using the AUDIO and SUBTITLE buttons DVD Menu Language Default setting w Subtitle Language Some multilingual discs have disc menus in several ...

Страница 117: ...een Optimized Rec Default setting Off On the default setting if a timer program standard easy or VIDEO Plus programming system is set but there isn t enough space on the disc at the recording quality set the recording will start but it will be cut off when the disc is full Set Optimized Rec to On to have the recorder automatically adjust the recording quality to fit the available disc space 2 Basi...

Страница 118: ...own using the full screen area When playing software recorded in conventional 4 3 format the settings on your TV will determine how the material is presented see the manual that came with your TV for details on what options are available If you have a conventional TV choose either 4 3 Letter Box or 4 3 Pan Scan In Letter Box mode widescreen software is shown with black bars at the top and bottom o...

Страница 119: ...assword that you will need to enter if you want to play a disc with a parental lock level higher than the recorder 1 Select Set Password 2 Use the number buttons to input a four digit password 3 Press ENTER to set the password Parental Lock Change Password To change your password confirm your existing password then enter a new one 1 Select Change Password Note 1 Not all discs that you may consider...

Страница 120: ...Audio In Audio Out Language Recording Playback TV Screen Size Still Picture Seamless Playback Parental Lock Angle Indicator Change Password Change Level Country Code Initial Setup TV Screen Size Still Picture Seamless Playback Parental Lock Angle Indicator Parental Lock Basic Tuner Video In Out Audio In Audio Out Language Recording Playback Parental Lock Change Level Password Off 1 2 3 4 Initial S...

Страница 121: ...ices RGB Use this setting if colours appear overly rich on the Full Range RGB setting Component 12 bit 1 Outputs 12 bit component video format If your connected device is compatible with this setting 12 bit output provides very fine gradations of colour Component Outputs 8 bit component video format This is the standard setting for HDMI compatible devices Audio Output2 If the monitor or device you...

Страница 122: ...e automatically set HDMI compatible device Aspect Progressive Full Colour Component 12 bit However if the connected device is not compatible with 12 bit component colour format then the setting will be Component Audio Output Auto However if the connected device is compatible only with PCM audio then the setting will be PCM Bilingual Setting If Audio Output is set to Auto then this is set to On HDC...

Страница 123: ...st If the maker s name of your TV doesn t appear in the table below you will not be able to use this remote to control your TV 2 Press TV to check that the remote works with your TV If the remote is set up correctly the TV should switch on off If it doesn t and there is another code given for your maker repeat step 1 with a new code Using the TV remote control buttons The table below shows how to ...

Страница 124: ...f the program are cropped so that the picture fills the whole screen 4 3 16 9 The program appears squashed Set to either 4 3 Letter Box or 4 3 Pan Scan 4 3 Letter Box 4 3 Pan Scan The program is presented correctly on either setting When viewing on a widescreen TV or monitor Screen format of disc Setting Appearance 16 9 16 9 The program is presented in widescreen 4 3 16 9 Your TV will determine ho...

Страница 125: ... condensation in the recorder Leave the recorder for an hour or so for the condensation to evaporate During HDD recording you can t play discs that are recorded with a Line System different to the current recorder setting All settings are reset If the recorder is unplugged or there is a power failure while the recorder is on all the settings will be lost Make sure that you switch the recorder into...

Страница 126: ...rn page 123 It is possible that none of the codes listed will work with your particular model of TV even if the maker appears in the remote control code list Can t record or does not record suc cessfully Check that there is some remaining blank space on the DVD HDD For a Video mode disc check that the disc isn t already finalized The HDD may contain up to 999 titles one DVD disc 99 Original titles...

Страница 127: ...wer switches off Problem Remedy Problem Remedy The connected HDMI or DVI device does not display any picture and the front panel HDMI indicator does not light Try disconnecting then reconnecting the HDMI cable while the power of both components is on Try switching the power of the HDMI DVI device off then back on Try switching off the HDMI DVI device and this recorder Next switch on the HDMI DVI d...

Страница 128: ...nly the audio channel set in the Bilingual Recording setting in the Initial Settings menu will be recorded If you need to record both channels of audio please record using a VR mode DVD RW disc See also Bilingual Recording on page 114 Can I record continuously on the HDD for more than eight hours Yes timer recordings made to the HDD can by set for up to 24 hours excluding those set using the Easy ...

Страница 129: ...s playback or plays an unrecorded section of tape or if the power fails in the source component or the DV cable becomes disconnected DV related messages You may see the following messages appear on your TV screen when using the DV IN OUT jack No DV camcorder connected The camcorder is not connected properly or the camcorder is switched off The DV camcorder is recording The camcorder is recording s...

Страница 130: ...mins MN 3 360 mins EP MN 3 360 mins MN 4 330 mins MN 4 330 mins MN 5 300 mins MN 5 300 mins MN 6 285 mins MN 6 285 mins MN 7 270 mins MN 7 270 mins MN 8 255 mins MN 8 255 mins MN 9 240 mins LP MN 9 240 mins MN 10 230 mins MN 10 230 mins MN 11 220 mins MN 11 220 mins MN 12 210 mins MN 12 210 mins MN 13 200 mins MN 13 200 mins MN 14 190 mins MN 14 190 mins MN 15 180 mins MN 15 180 mins MN 16 170 min...

Страница 131: ...sy mg 1307 Maori mi 1309 Macedonian mk 1311 Malayalam ml 1312 Mongolian mn 1314 Moldavian mo 1315 Marathi mr 1318 Malay ms 1319 Maltese mt 1320 Burmese my 1325 Nauru na 1401 Nepali ne 1405 Norwegian no 1415 Occitan oc 1503 Oromo om 1513 Oriya or 1518 Panjabi pa 1601 Polish pl 1612 Pashto Pushto ps 1619 Quechua qu 1721 Rhaeto Romance rm 1813 Kirundi rn 1814 Romanian ro 1815 Kinyarwanda rw 1823 Sans...

Страница 132: ... clean it and retry If the error persists use a new disc If the error appears even with a new disc please consult a Pioneer Service Center Incompatible or unreadable disc The disc loaded is a DVD RAM DVD R RW or some other incompatible disc type This display may also appear if the disc is dirty or damaged Cannot record to a disc that is not CPRM com patible Cannot record this content using Video m...

Страница 133: ...all point pen or other sharp tipped writing instrument These could all damage the disc For more detailed care information see the instructions that come with discs Do not load more than one disc into the recorder There is no DV input or the input signal is unre cordable Cannot preview because there is no DV input or the input signal is unrecordable No signal was detected at the DV input output jac...

Страница 134: ...come so please bear in mind the following points when choosing a suitable location for it Do Use in a well ventilated room Place on a solid flat level surface such as a table shelf or stereo rack Don t Use in a place exposed to high temperatures or humidity including near radiators and other heat generating appliances Place on a window sill or other place where the recorder will be exposed to dire...

Страница 135: ...pment used to record it For detailed information please see the instruction manuals or help files that came with your PC or other WMA recording equipment and or software DTS DTS stands for Digital Theater System DTS is a surround system different from Dolby Digital that has become a popular surround sound format for movies DTS and DTS Digital Out are registered trademarks of Digital Theater System...

Страница 136: ...nning rate PureCinema DVD Video may be either video material originally shot on video or film material originally shot in film Video material has a frame rate of 30 frames per second fps NTSC or 25 fps PAL compared with film s 24 fps PureCinema converts film material to 60 fps in progressive scan for NTSC output or 50 fps in progressive scan for PAL output Regions DVD only example region code mark...

Страница 137: ... Timer Programs 1 month 32 programs Clock Quartz lock 24 hour digital display Power off memory Approx 5 years after manufacture Input Output VHF UHF antenna input output terminal VHF UHF set 75 Ω IEC connector Video input Input 1 3 rear 2 front Input level 1 Vp p 75 Ω Jacks AV connector 2 Input 1 RCA jack Input 2 3 Video output AV1 Output Output level 1 Vp p 75 Ω Jacks AV connector 1 AV1 RCA jack ...

Страница 138: ...ini jack AV Connectors 21 pin connector assignment AV connector input output 21 pin connector This connector provides the video and audio signals for connection to a compatible colour TV or monitor PIN no AV1 RGB TV AV2 INPUT 1 1 Audio 2 R out Audio 2 R out 2 Audio 2 R in 11 G out G in 3 Audio 1 L out Audio 1 L out 6 Audio 1 L in 15 R or C out R or C in 4 GND 17 GND 7 B out B in 19 Video out or Y ...

Страница 139: ... 61 117 130 MP3 audio 7 9 36 135 MPEG audio 12 115 136 N NexTView 13 NICAM audio 33 113 NTSC 24 108 111 113 O One Touch Copy 22 24 71 72 73 128 One Touch Recording 62 One Button Record GUIDE Plus 41 On screen display OSD 37 115 Optimized recording 75 117 Original content 11 38 86 88 89 93 P PAL 108 111 113 PBC PlayBack Control for Video CD 36 51 136 PhotoViewer 100 101 Picture quality adjusting th...

Страница 140: ...INC 300 Allstate Parkway Markham Ontario L3R OP2 Canada TEL 1 877 283 5901 PIONEER EUROPE NV Haven 1087 Keetberglaan 1 B 9120 Melsele Belgium TEL 03 570 05 11 PIONEER ELECTRONICS ASIACENTRE PTE LTD 253 Alexandra Road 04 01 Singapore 159936 TEL 65 6472 7555 PIONEER ELECTRONICS AUSTRALIA PTY LTD 178 184 Boundary Road Braeside Victoria 3195 Australia TEL 03 9586 6300 PIONEER ELECTRONICS DE MEXICO S A...

Отзывы: