— 5 —
On-Screen Display
The following information (VCR operating status) appears on the TV screen. (
✈
P.26)
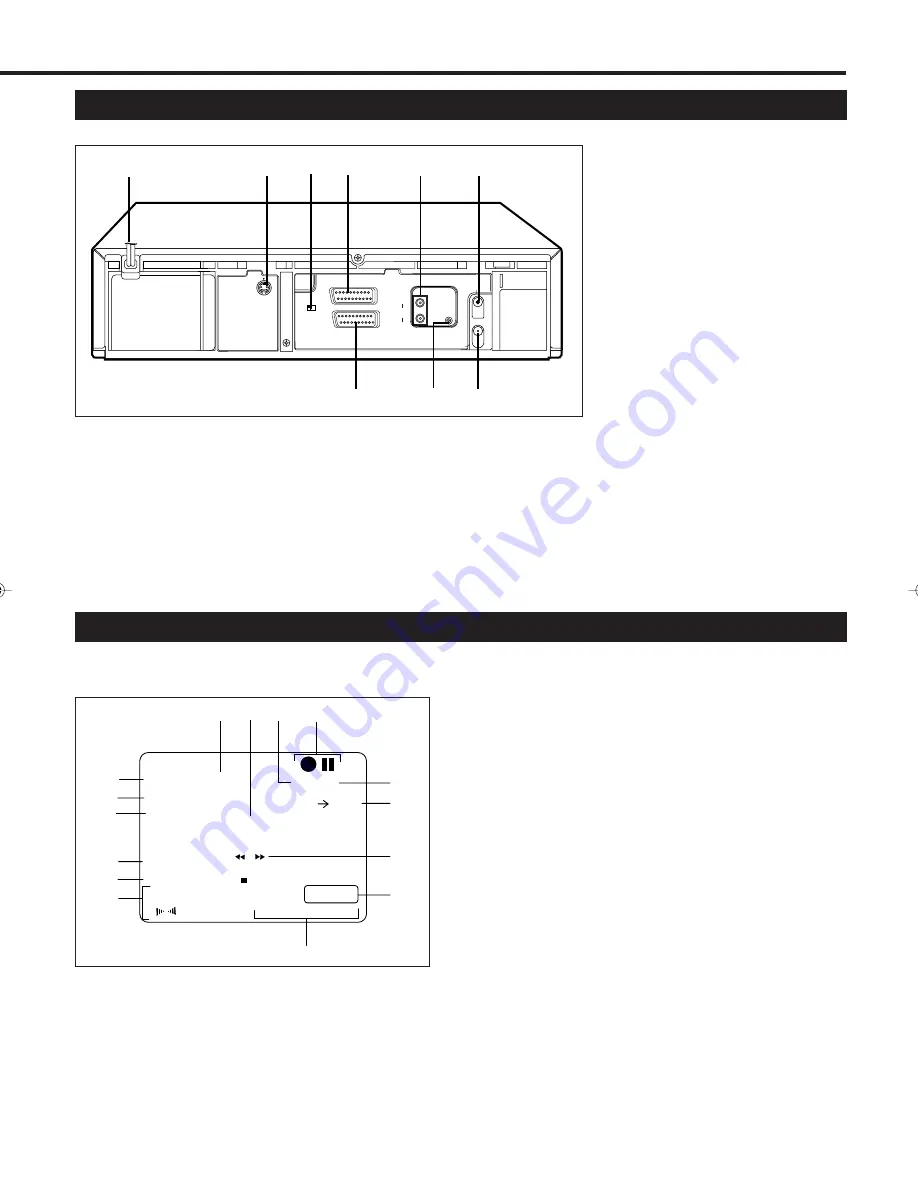
1 AC (alternating current)
power cord
Connect the AC power cord to an AC
outlet.
2 S-VIDEO out jack
For connecting to the S-Video input jack
on a TV or another VCR. (
✈
P.9, P.32)
Rear Panel
5 AUDIO OUT jacks
For connecting to the audio input jack
on a TV or another VCR. (
✈
P.9, P.32)
6 ANT. (antenna) IN (input)
terminal (from Antenna)
Connect your antenna or Cable to this
terminal. (
✈
P.9)
7 AV2 IN/DECODER Connector
For connecting to the AV terminal on
another VCR, satellite tuner or decoder.
(
✈
P.32, P.34, P.35)
8 Remote PAUSE Connector
Enables connection to second recorder
equipped with R.A. Edit connector.
9 RF OUT (output) terminal (to
TV)
Use the supplied RF coaxial cable to
connect this terminal to the UHF/VHF
input terminal on the TV. (
✈
P.9)
3 AV1 OUT switch
Selects the type of signal output via the
21 pin AV1 IN/OUT connector. (
✈
P.9)
4 AV1 IN/OUT Connector
(SCART)
For connecting to the AV terminal on
TV or another VCR. (
✈
P.9, P.32)
1. Operation mode
2. Cassette-In Indicator
3. SmartPicture setting or
Timer warning display
4. TV station name
5. Channel position
number
6. Current time
7. Current date
8. Received broadcast
9. Tape position indicator
10. Sound output mode
11. Tape speed
12. NTSC playback display
13. Tape direction
14. Counter display
15. Tape remaining time indicator
ANT. IN
AV1 IN/OUT
S OUT
AV2 IN/DECODER
L
AUDIO
OUT
R
RF OUT
PAUSE
AV1 OUT
COMP. Y/C
1
2
3
4
6
5
9
8
7
PR. 12 ABC
]
SP
23:59
31.12.99
AUTO
ST
0------------+---- -----+--------+-----+
HIFI
1:23:45
L R REMAIN 1:00
1
2
3
4
5
6
7
8
9
10
11
13
14
15
NTSC PAL
12
VR1000/07-New
99.7.8, 3:28 PM
5


