17
Wheel Forks
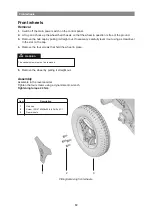
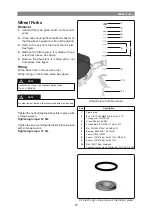
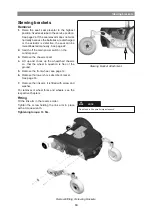
Wheel fork with friction brake.
Wheel Forks
Removal
1.
Switch off the main power switch on the control
panel.
2.
Lift up and chock up the wheelchair chassis so
that the wheel in question is free of the ground.
3.
Remove the cap from the top of the link arm.
See figure.
4.
Remove the friction plate. It is fitted with one
screw from above. See figure.
5.
Remove the wheel fork. It is fitted with a nut
from above. See figure.
Fitting
Fit the wheel fork in the reverse order.
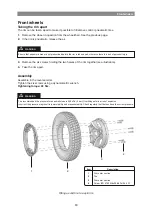
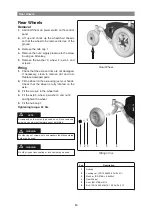
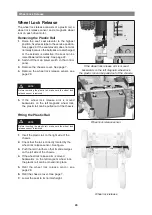
Fit the O-ring on the friction plate. See figure.
No other type of lubricant than that stated here may be used.
Fit the O-ring In the groove of the friction plate.
Tighten the nut holding the wheel fork in place with
a torque wrench.
Tightening torque: 33 nm.
Tighten the screw holding the friction plate in place
with a torque wrench.
Tightening torque: 15 nm.
Lubricate the O-ring with Lubricant friction brake,
Part. no: 1820405
m
nOTE
m
nOTE
1
Plastic plug
2
Bolt, ISO 10642 M8x20 10.9 Fe/Zn 5 C1/
Locking coat DIN 267-28
3
O-ring Ø24.2x3 EPDM
4
Friction plate ISO 2768-m Fe/Zn 12C1
5
Nut, DIN 934 M14x1.5 8Fe/Zn 8C1
6
Bearing, 6002-2RS1 (15x32x9)
7
Circlip, DIN 472 Ø32
8
Spacer, ISO 2768-m Fe/Zn 12C1 (Ø20 h9)
9
Spacer, ISO 2768-m Fe/Zn 12C1
10
Bolt, ISO 2768-m Stainless
Lubricant friction brake, Momentum, PRO AA 2/0,025
Pos.
Description
1
2
3
4
5
8
9
10
11
7 6
Содержание C300
Страница 1: ...SERVICE MANUAL Permobil K C300 Power wheelchair US ...
Страница 2: ......
Страница 62: ...62 Cabling overview A B C D E F 1 2 3 4 ...
Страница 63: ...63 Cabling overview Cabling overview R net A B C D E F 5 6 7 8 ...
Страница 64: ...64 Cabling overview A B C D E F 1 2 3 4 ...
Страница 65: ...65 Cabling overview Cabling overview VR2 A B C D E F 5 6 7 8 ...
Страница 67: ......
Страница 68: ...Order no 205221 US 0 ...

