PATON
ProTIG
DC TIG/MMA
- 42 -
-
“
Postflow
”
–
2 s;
-
“
Current type
”
–
DC.
To start welding, the torch should be brought to the product so that the tungsten
electrode does not touch the surface of the product and press the button on the torch.
Then, the welding process begins:
- a gas valve opens and preblowing with a shielding gas is performed within 1 second;
- an arc is ignited at a current of 100 A;
- an arc burns exactly as long as it is set - 0.1 seconds, after which it automatically
extincts;
- after extinction of the arc, a pause of 3 seconds occurs;
- after the pause the arc is ignited again and the process occurs again, in a circle.
During the welding process described above, the torch button remains in a pressed
position. When the button on the torch is released, the arc is extincted and postblowing
with gas occurs within 2 seconds. This means that the process is completed. To start the
process again, it is necessary to press the button on the torch again.
In this example DC welding was used. For AC welding, for example, when welding
aluminum, it is necessary to select a current type - AC, to set a current frequency - for
example, 120 Hz, and a current balance - 50%. After that, a similar welding process will be
performed, but on AC with a frequency of 120 Hz and 50% balance.
4.6 TIG MIX welding mode
This mode is mostly used for welding aluminum. The essence of the mode is to
combine AC and DC
–
AC is intended to destroy the oxide film of aluminum, and DC
–
for
effective heating of metal for larger penetration compared to conventional AC welding.
To set the mode, in addition to standard parameters of TIG AC mode, it is necessary to
adjust 2 special parameters:
3.
«
Balance
МІХ»
–
percentage ratio between AC and DC.
4.
«
Frequency
МІХ»
–
frequency of alternating AC and DC.
4.7 Operation of the machine with the use of pedal in TIG AC and TIG DC modes
In order to start operation with the pedal it is required to:
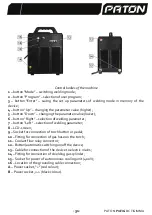
- connect pedal to socket
9
;
- connect torch to black socket of the source
«
-
» (
В
);
- connect gas socket of torch to fitting
10
;
- connect gas hose to fitting
14
;
- connect cable with terminal
«
mass
»
to red socket
«+» (
А
);
- connect clamping device of the mass to the product;
- connect network plug to power source;
- transfer network button/automatic
12
, to the position
«І»;
- Using the button
«Mode» (
1
), select TIG AC or TIG DC mode on the device;
- Using the parameter "BUTTON MODE" (button mode on torch), set "PED" value.
After setting up additional mode parameters, it is possible to start welding. The
minimum pressing on the pedal initiates the arc ignition on the starting current, which was
Содержание ProTIG-200
Страница 1: ......
Страница 2: ......
Страница 8: ...7 PATON ProTIG DC TIG MMA 1 2 3 4 5 6 7 LCD 1 Mode TIG AC TIG DC...
Страница 12: ...11 PATON ProTIG DC TIG MMA F 20 200 2 TIG C 2T TIG 2 2...
Страница 13: ...PATON ProTIG DC TIG MMA 12 4 TIG C 4T 4 2 TIG 2T pulse...
Страница 15: ...PATON ProTIG DC TIG MMA 14 zk zk F 2 TIG DC 2T TIG 2 2...
Страница 16: ...15 PATON ProTIG DC TIG MMA 4 TIG DC 4T 4 2 TIG D 2T pulse...
Страница 18: ...17 PATON ProTIG DC TIG MMA TIG Lift 4 4 Double Pulse TIG 4 5 SPOT SPOT TIG 2 1 0 1 3 2 DC 1 100 0 1 3 2...
Страница 20: ...19 PATON ProTIG DC TIG MMA REMOTE CONTROL ON BUTTON MODE PED TIG AC TIG DC S1 R1 10 5 MMA I Mode 1 Enter 5 1 F...
Страница 21: ...PATON ProTIG DC TIG MMA 20 pulse DC 1 100 2 50 3 50 4 50 5 ON 6 50 7 OFF 8 8 W 150 100 50 50 1 5 2...
Страница 25: ...PATON ProTIG DC TIG MMA 24...
Страница 26: ...25 PATON ProTIG DC TIG MMA 13 ProTIG 200 AC DC 2 ProTIG 315 400V AC DC 1 PATON...
Страница 27: ...PATON ProTIG DC TIG MMA 26...

