www.parweld.com
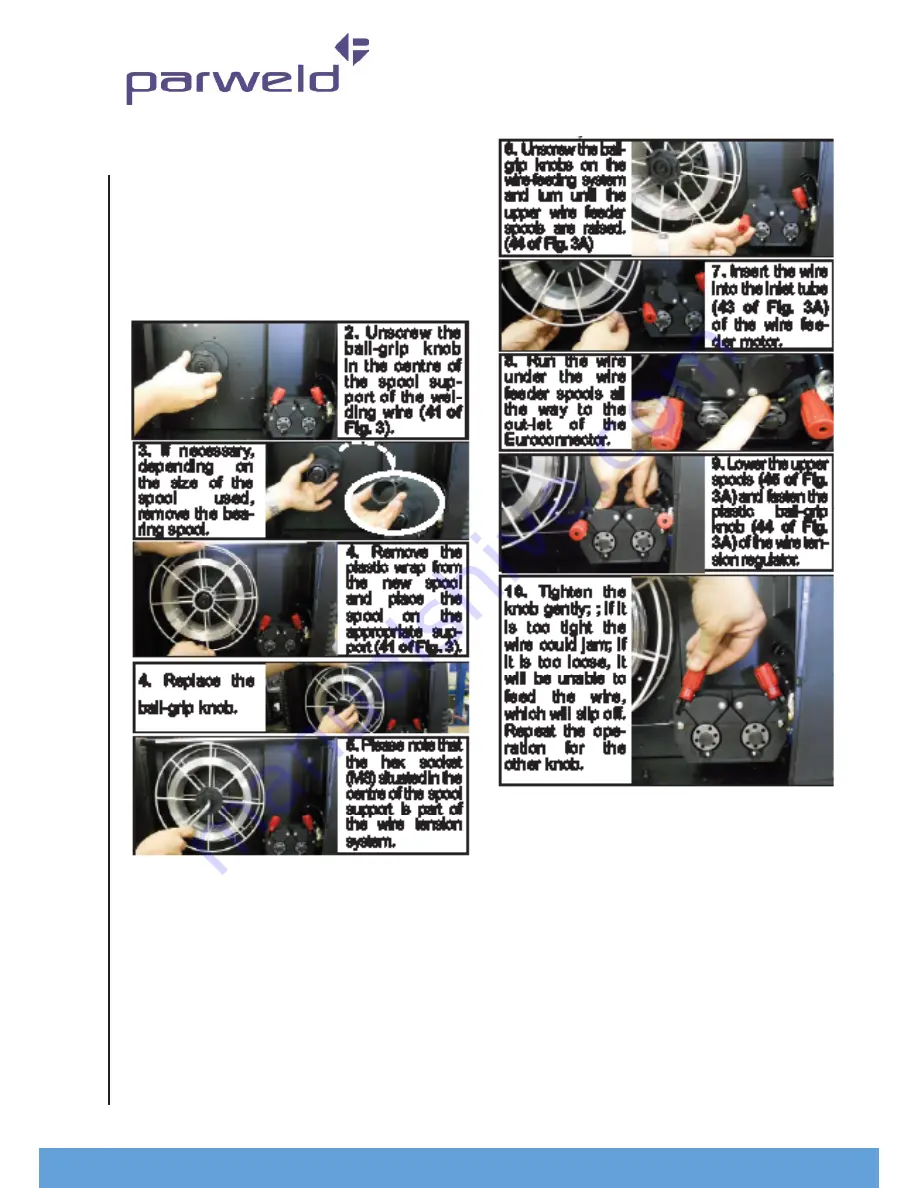
carefully, in the order described below.
Warning: before inserting the wire, always
remove the gas nozzle (Fig. 4A) and the wire
feeder tip (Fig. 4B) from the welding torch.
1. Disconnect the cable from the power supply
(32 of Fig. 2).
Tighten or loosen the hex socket to set the correct
tension: tightening too much can cause
excessive tension that could prevent the spool
from turning correctly. On the other hand, if the
tension is too loose, the welding wire could
accidentally unwind.
Caution: before proceeding with the next step, make sure
the torch cable (Fig. 4) is well extended and that the welding
wire does not have any bends or burrs. Failure to follow
these precautions could damage the wire-feeding tube
inside the torch. Once the wire has been threaded through
the torch, attach the wire-feeder tip and the gas nozzle.
N.B. When changing the diameter of the wire, make sure
that the correct cable of the wire-feeder spool is facing
towards the inside of the machine. To do so, ensure that
the diameter and type of wire is legible (facing towards the
outside of the machine) Remember that the spools with a
‘V’ cable are suitable for feeding iron and steel wire. The
spools with a ‘U’ are suitable for aluminium wire.
4. MIG/MAG WELDING To choose this welding
mode use switch 10, select MIG and press confirm.
9
Содержание DP323C
Страница 1: ...ISSUE 2 User Manual DP323C...
Страница 3: ...CONTENTS 2...
Страница 4: ...www parweld com 3...
Страница 5: ...www parweld com 4...
Страница 6: ...www parweld com 5...
Страница 9: ...www parweld com 8 3 LOADING THE WELDING WIRE To load the welding wire follow these instructions...
Страница 24: ...www parweld com 23...
Страница 26: ...www parweld com 25...
Страница 27: ...www parweld com 26 Spare Parts 26...


