background image

www.parweld.com

2. Move the torch with a continuous movement, 

using a push, not pull, motion. This will guarantee the 

gaseous shield of the arc. 
3. Avoid welding in high winds. If the wind is too strong 

it could carry the gas away from the welding pool, 

creating a porous (weak) weld. 
4. Keep the wire clean: never use rusty wire. 
5. Make sure the torch cable is free of dents or coils, 

which could compromise the correct movement of the 

wire. 
6. When changing the wire spool, always clean the 

wire feed tube with compressed air  

9. MMA WELDING

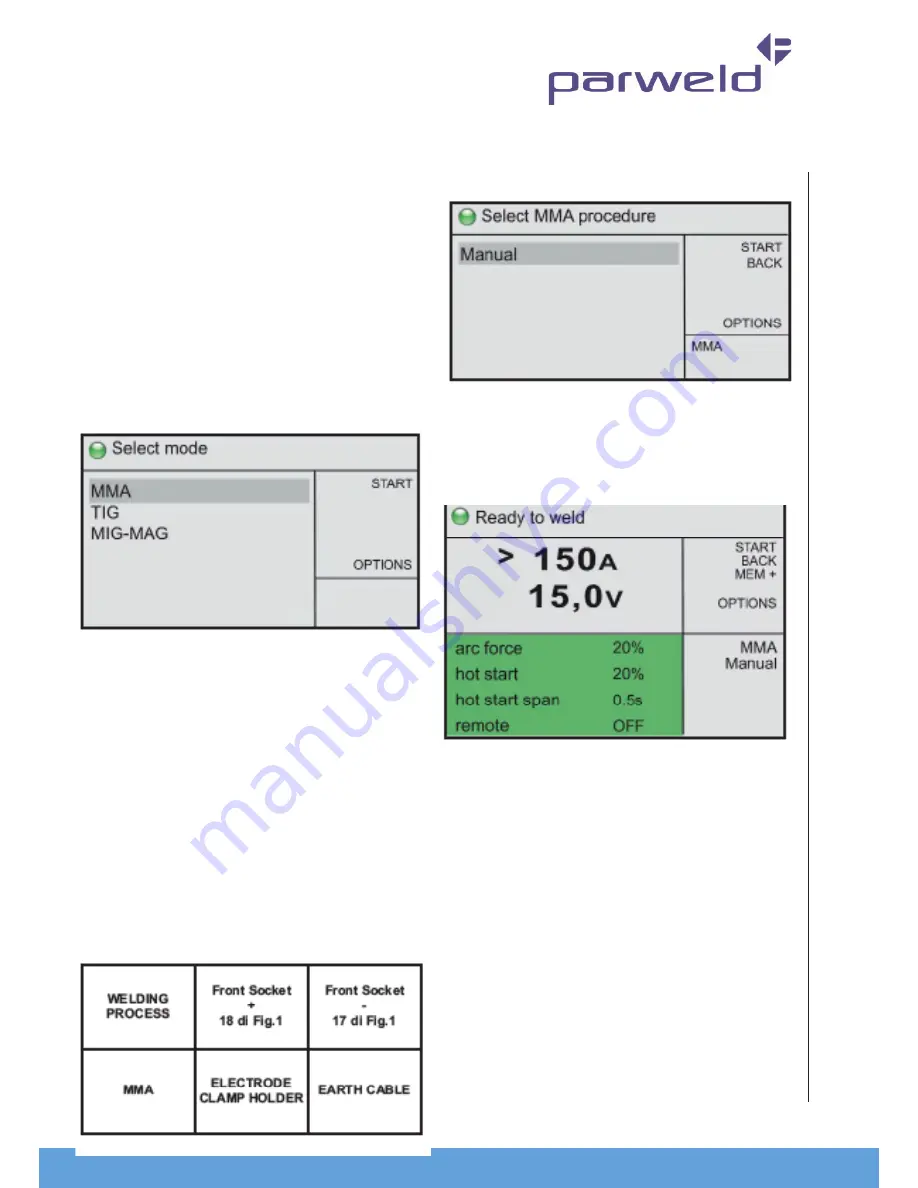
 To select this welding mode, use 

switch 10, select MMA and press confirm. 

Electric arc welding with a covered MMA (Metal 

Manual Arc) electrode or SMAW (Shielded Metal Arc 

Welding) is a manual welding procedure that takes 

advantage of the heat generated by the electric arc, 

which strikes between a covered earthed electrode 

and the workpiece. This procedure allows for the 

creation of joints in any position, in the workshop, 

outdoors, in confined areas or places that are difficult 

to access. 
With the DP403SW and DP503SW it is possible to 

weld any type of electrode and diameter. The spark 

of the arc occurs by placing the electrode close to the 

workpiece. 
The correct connection of the electrode clamp holder 

and the earth cable can be seen in the table below: 
Always make sure that the earth and the electrode 

clamp holder are kept far apart.

9.1 MMA WELDING Manual

 This mode can be 

accessed using switch 10. Selecting this option will 

take you to the welding screen: 

Switch 9 in fig. 1 adjusts the welding current (very thick 

workpieces require a higher current). 
Furthermore, switch 10 adjusts the parameters shown 

in the figure below: 

Arc Force: This sets the current increase ratio in 

relation to the welding current, that the welder can 

force, in order to keep the arc appropriately ignited in 

any position. 
Hot Start: This sets the current increase ratio in 

relation to the welding current, that the welder can 

force when the arc is ignited, to improve the quality of 

the same. 
Hot start span: This sets the time period when the jot 

start current is forced. 
Remote: This switches the remote control (which 

connects to socket 13 of fig.1) of the current intensity 

ON or OFF. 

16

Содержание DP323C

Страница 1: ...ISSUE 2 User Manual DP323C...

Страница 2: ...age 10 4 2 Synergic Short Arc MIG WELDING page 11 4 3 Pulse synergic MIG WELDING page 13 5 MIG WELDING CONECTOR page 14 5 2 CONNECTOR FOR MIG WELDING with a traditional torch page 15 5 3 CONNECTOR FOR...

Страница 3: ...CONTENTS 2...

Страница 4: ...www parweld com 3...

Страница 5: ...www parweld com 4...

Страница 6: ...www parweld com 5...

Страница 7: ...onalise all of the welding settings All of the main parameters of the machine are stored on a memory card SD Card keeping the equipment constantly up dated with the latest welding developments If the...

Страница 8: ...ch for adjusting the principal welding settings This switch is used to set the principal welding parameters MMA TIG Welding set the welding current 11 H O in to be used only with liquid cooling torche...

Страница 9: ...www parweld com 8 3 LOADING THE WELDING WIRE To load the welding wire follow these instructions...

Страница 10: ...cable Fig 4 is well extended and that the welding wire does not have any bends or burrs Failure to follow these precautions could damage the wire feeding tube inside the torch Once the wire has been...

Страница 11: ...or gas welding the centre of the wire contains a mineral product that improves the quality of the weld this must always be used with gas The correct method for connecting the torch and the earth cable...

Страница 12: ...cessive tacks Pre gas time This allows the user to set the time of the gas supply before feeding the welding current Post gas time This allows the user to set the time of the gas supply when the weldi...

Страница 13: ...than 1s will cause the set welding current to pass to second level and vice versa Prolonged pressure on the torch trigger will halt the welding process 2nd level This option is for setting the values...

Страница 14: ...ment the wire speed i e welding power can be adjusted with knob 9 shown in Fig 1 The other parameters are automatically adjusted to the set power depending on the type and diameter of the wire selecte...

Страница 15: ...r set by the current final In this mode 4t 4bi time is irrelevant and the final current is maintained as long as the trigger is held down Spot welding This sets the maximum welding duration when diffe...

Страница 16: ...The wire is continuously fed through a torch by a wire feeder to the weld pool A solid wire or flux cored wire can be used The transfer methods of the filler material define different arc types SHORT...

Страница 17: ...ifficult to access With the DP403SW and DP503SW it is possible to weld any type of electrode and diameter The spark of the arc occurs by placing the electrode close to the workpiece The correct connec...

Страница 18: ...tions of the electrodes used 11 CONNECTION FOR MMA WELDING The Dinse connector is inserted by lining up the key with the groove and turning the connector in a clockwise direction until it stops The el...

Страница 19: ...ifficult positions and on pipes which require full penetration The TIG procedure can be used on various types of metals such as ferrous materials alloys nickel copper titanium magnesium During welding...

Страница 20: ...e welding mode is active this sets the ratio between the time the welding current and the base current is applied water pump Where present this turns the water system ON or OFF remote This turns the r...

Страница 21: ...er 17 REMOTE CONNECTION Figure 8 shows the connections of the remote connector 20 of fig 1 Where Sw is the torch trigger P is the potentiometer for controlling the current 17 1 REMOTE CONTROL OF THE W...

Страница 22: ...meters for the welding mode required 3 Press the MEM button 4 of fig 1 4 Turn switch 10 fig 1 chose the first letter of the name with which you want to save the work point 5 Press switch 10 to confirm...

Страница 23: ...ld the need to modify the work stage arise activate the Unlock option by pressing the function button The unlock function will require the user to enter the password that was set and activated as desc...

Страница 24: ...www parweld com 23...

Страница 25: ...electrode in contact with the earth Arc off Poor contact between the earth clamp and the workpiece Tighten the clamp and check again Short circuit between the contact nozzle and the gas tube Clean and...

Страница 26: ...www parweld com 25...

Страница 27: ...www parweld com 26 Spare Parts 26...

Страница 28: ...d to ensure material contents as per the list below Cadmium 0 01 by weight Lead 0 1 by weight Mercury 0 1 by weight Hexavalent chromium 0 1 by weight Polybrominated biphenyl s pbbs 0 1 by weight Polyb...

Страница 29: ...h defects by suitable repair or replacement at Parweld s sole option of any components or parts of the product determined by Parweld to be defective Parweld makes no other warranty express or implied...

Страница 30: ...12 2TZ tel 44 1299 266800 fax 44 1299 266900 www parweld com info parweld co uk Parweld Limited Bewdley Business Park Long Bank Bewdley Worcestershire England DY12 2TZ tel 44 1299 266800 fax 44 1299 2...

Отзывы: