background image

90

Gemini GV Hardware Installation Guide

System Installation

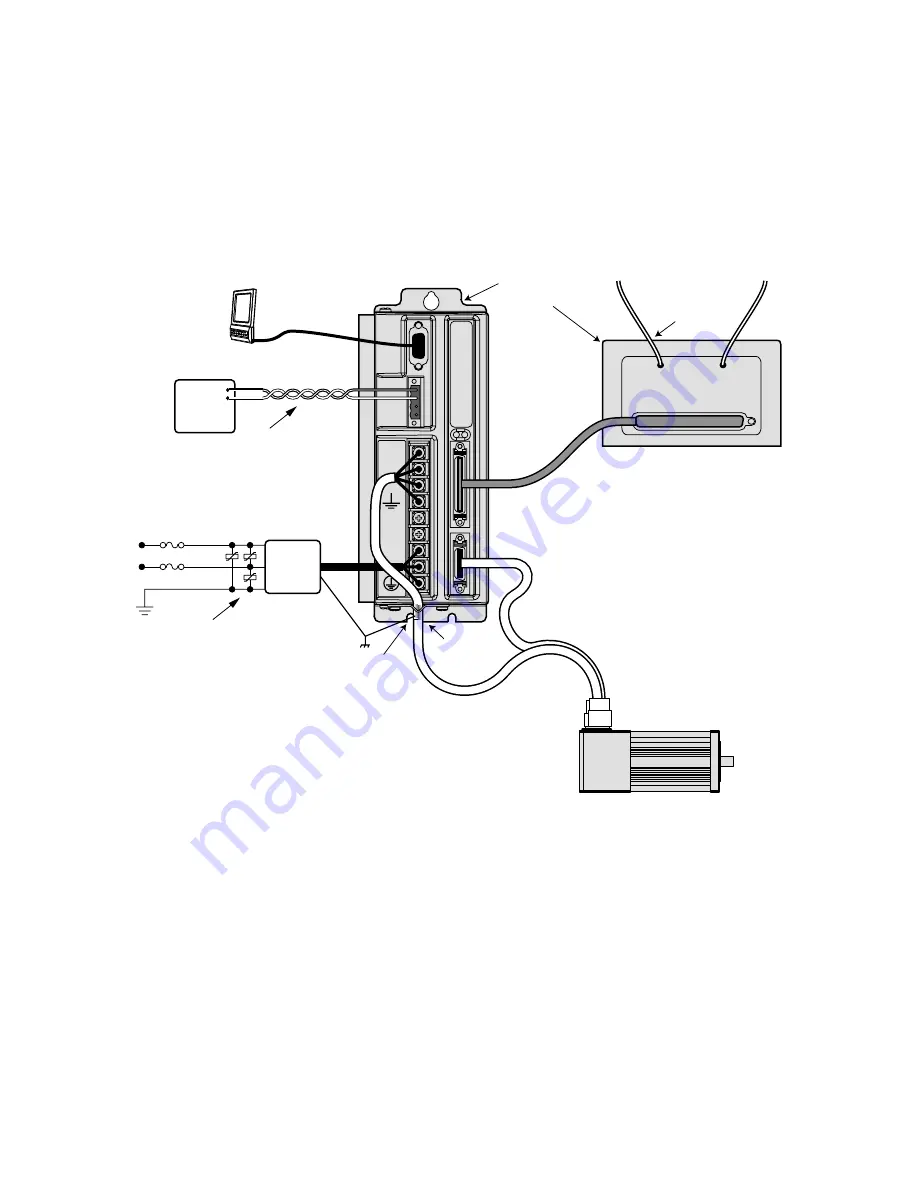
If you mount the Gemini drive in an enclosure, terminate cable braids (screens) at
the entrance of the enclosure. However, the motor braid must be returned to the
drive’s saddle clamp (GV-H20n/H40n: R-Clamp on front of drive), not any other
location.

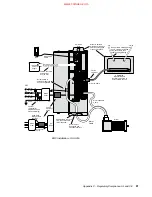
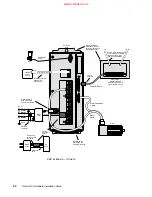
The next figures show typical EMC installations.

Twisted at 3 twists
minimum per 
inch (25 mm)

Saddle clamp
braid; make loop
as short as
possible

Varistor

(3 places)

GEM-VM50

Breakout Module

(enclosure mounted, or

not accessible to user)

RS-232/485
Cable

Drive I/O Cable

Motor Feedback
Cable

Motor
Cable

Gemini

Drive

HPC

Motor

N or L2/N

L1

Earth

VAC

VDC+

VDC–

+24VDC

Power

Supply

Mains

Filter

Bond braid to earthed panel.
Use R-clamp or bulkhead
clamshell clamp. (See 
360

°

 bonding drawing.)

I/O

Limits

Mount to earthed
metal panel. Remove 
paint from flange and 
mounting locations.

Remove paint 
from flange and
mounting locations.

EMC Installation – GV-L3n; GV-U3n/6n/12n

www.comoso.com

Содержание Gemini GV Series

Страница 1: ...oved 24V DC 24V RTN RELAY COM RELAY N O COMPUMOTOR DRIVE I O MOTOR FEEDBACK RS 232 485 DATA BUS OUT DATA BUS IN Servo 24V DC 24V RTN RELAY COM RELAY N O RS 232 485 U V W VBUS VBUS L2 N L1 COMPUMOTOR DRIVE I O MOTOR FEEDBACK GV U3 6 12 MOTOR WARNING Hazardous voltage may exist for up to 30 seconds after power is removed Effective December 1 2001 p n 88 017791 01 E Gemini GV Hardware Installation Gu...

Страница 2: ...ny purpose not expressly authorized by the owner thereof Since Parker Hannifin constantly strives to improve all of its products we reserve the right to change this user guide and software and hardware mentioned therein at any time without notice In no event will the provider of the equipment be liable for any incidental consequential or special damages of any kind or nature whatsoever including b...

Страница 3: ...RES 35 Relay Connections optional 36 24VDC Keep Alive Power Connections optional 36 Multiple Drive Installations optional 37 Regeneration Protection 38 Aligning the Resolver optional 42 RS 232 485 Communications 44 Establishing Communications 44 Configuring the Serial Port 44 RS 232 Communications 45 RS 232 Daisy Chaining 45 RS 485 Communications 47 RS 485 Multi Drop 47 Updating the Drive s Operat...

Страница 4: ... 336 EEC Electromagnetic Compatibility Directive as amended by Directive 92 31 EEC These products are intended for use in Commercial Light Industrial and Industrial Environments as defined in the relevant EMC standards These products are compliant with the Low Voltage Directive 73 23 EEC Low Voltage Directive 93 68 EEC CE Marking Directive Symbols Protective Earth Connection Earth Ground Terminal ...

Страница 5: ...d Sharing the Power Bus now shows TASX Bit 5 Resolver Failure page 52 CHANGE The TASX command s Bit 5 indicates resolver failure not encoder failure Soldercup Connectors Specified page 60 66 NEW Mating soldercup connectors and backshells are specified for the 50 pin DRIVE I O connector and the 26 pin MOTOR FEEDBACK connector Pulse Input Specifications page 61 CLARIFICATION Specifications are liste...

Страница 6: ...vision C November 1 1999 The following is a summary of the primary technical changes to this document when part number 88 017791 01C superseded 88 017791 01B Information for the Gemini GV H20n Servo Drive was added Information for the Gemini Power Dissipation Module GPDM was added Information about using resolver feedback was added GC 26 GC 50 GFB KIT were added Special Features Chapter was added ...

Страница 7: ...Chapter 1 Introduction 7 1 Introduction IN THIS CHAPTER Gemini Product Overview Compatible Compumotor Products C H A P T E R O N E www comoso com ...

Страница 8: ...ing and notch filters in the GV Gemini GT6 and GV6 The Gemini GT6 and GV6 are controller drives available with several different programming modes These drives have basic motion control and sequencing capabilities and can be used in distributed control applications By using optional plug in cards they can be equipped with interfaces for Profibus or DeviceNet The GT6 and GV6 are configured and prog...

Страница 9: ...continuous 7 5A peak at 170 340VDC U6 120 240VAC single phase 6A continuous 15A peak at 170 340VDC U12 120 240VAC single phase 12A continuous 30A peak at 170 340VDC H20 208 240VAC three phase 20A continuous 50A peak at 294 340VDC single phase 16A continuous 50A peak at 294 340VDC H40 208 240VAC three phase 40A continuous 100A peak at 294 340VDC Amperage values represent continuous current peak of ...

Страница 10: ...Architect or X Language software Cables Motors etc See list at beginning of Chapter 2 Installation in Appendix A Specifications and in the separate Gemini Motor Reference Manual User Guides The following items ship with the drive Gemini Quick Start Guide Gemini Hardware Installation Guide Gemini Programmer s Reference Gemini Motor Reference Manual Motion Planner CD ROM You can also order the drive...

Страница 11: ...Chapter 2 Installation 11 2 Installation IN THIS CHAPTER Checking Your Shipment Express Setup C H A P T E R T W O www comoso com ...

Страница 12: ...g manuals NK Cables various cables breakout modules etc are available See Appendix A Specifica tions for cable and accessory information Cable clamps EMC filters ferrites etc are available See Appendix C Regulatory Compliance for part numbers and more information Motors You may have ordered a motor from one of the following families of Compumotor motors SM Series BE Series J Series NeoMetric Serie...

Страница 13: ...n procedure DATA BUS OUT DATA BUS IN Servo 24V DC 24V RTN RELAY COM RELAY N O RS 232 485 U V W VBUS VBUS L2 N L1 COMPUMOTOR DRIVE I O MOTOR FEEDBACK GV U 3 6 12 MOTOR WARNING Hazardous voltage may exist for up to 30 seconds after power is removed RS 232 485 Relay Keep Alive Power Motor Power AC Power I O Connections Motor Feedback RS 232 485 24V DC 24V RTN RELAY COM RELAY N O COMPUMOTOR DRIVE I O ...

Страница 14: ... a Compumotor system 6K Controller RS 232 485 Cable RS 232 485 Cable Drive I O Cable Motor Feedback Cable Motor Cable Gemini Drive Motor AC Power Compumotor System If you use a Compumotor controller other than the 6K see Appendix A Specifica tions for wiring instructions Step 1 Connecting the Motor Compumotor s motor cable with the GS or GB option has an MS connector on one end The other end has t...

Страница 15: ...n H40n R Clamp on heatsink Make the loop of cable between saddle clamp and drive terminals as short as possible Connecting the Motor Feedback Cable Compumotor s motor feedback cable with the GS or GB option has an MS connector on one end and a 26 pin connector on the other end 1 Connect the MS connector on the motor cable to the mating connector on the motor 2 Connect the 26 pin connector on the m...

Страница 16: ...e a fuse in each of the AC input lines Recommended fuse types and sizes are Drive Type Fuse Style Rating Fuse Type GV L3n 120VAC 125VAC Time Delay 10 amp Type RK5 or better GV U3n 6n 12n 120VAC 125VAC Time Delay 30 amp Type RK5 or better GV U3n 6n 12n 240VAC 250VAC Time Delay 30 amp Type RK5 or better GV H20n 208 240VAC 1 3 250VAC Time Delay 30 amp Type RK5 or better GV H40n 208 240VAC 3 250VAC Ti...

Страница 17: ...er you make connections GV H20n Connecting Single Phase AC Power Connections are illustrated in the drawing above Single Phase 208 240VAC Operations 1 Connect power system s safety earth to drive s protective conductor terminal marked with the symbol Do not fuse the protective conductor terminal 2 Connect 208 240VAC 1 50 60 Hz power to drive s L1 and L2 terminals 3 Reinstall the clear plastic term...

Страница 18: ... assume you are using a Gemini drive and a 6K controller and that you have only one serial port on your PC The following procedures give instructions for moving the cable back and forth between the Gemini and 6K WARNING This procedure causes the motor shaft to move Do not connect a load to the shaft 1 Verify that a load is not connected to the motor and that the motor is clamped securely in place ...

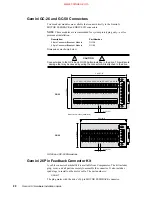
Страница 19: ...rameters command values are stored in the Gemini drive s EEPROM and are automatically recalled when you cycle power or reset the drive 8 Click the Terminal tab on the bottom of the screen to enter terminal mode 9 Issue a DMODE13 command This configures the drive for autorun mode in which the motor runs open loop in the clockwise direction at 1 rps The motor will not begin turning though because yo...

Страница 20: ... establish communications with the 6K Select File New Terminal Emulator OK Under Communications Settings select the 6K product and COM port you are using When you select a 6K product Motion Planner begins ASCII communications with that 6K product 4 From Motion Planner issue the following commands to the 6K DRIVE0 ensures the drive is disabled CMDDIR0 ensures clockwise is the positive direction SMP...

Страница 21: ...ct direction If your system does not perform properly find and correct the problem before proceeding If necessary see Chapter 4 Troubleshooting 5 From Motion Planner issue the following commands DRIVE0 disables the drive Reconfigure the SMPER setting to its previous value if necessary Factory default value is 4000 For the 6K to read and react to a GV fault enter the command DRFEN1 for each axis 6 ...

Страница 22: ...cial features you may wish to use see Chapter 4 Special Features for more information Relay and how to control a Motor Brake 24VDC Keep Alive Power Multiple Drive Installations Connecting drive power buses together Regeneration and the GPDM Power Dissipation Module Aligning the Resolver RS 232 Daisy Chain RS 485 Multi Drop 4 Connect the Load 5 Configure Your Drive After completing your hardware in...

Страница 23: ...Chapter 3 Configuration 23 3 Configuration IN THIS CHAPTER Configuration Tuning Procedures C H A P T E R T H R E E www comoso com ...

Страница 24: ...r on a PC These programs are also available on the Compumotor web site at http www compumotor com Information about installing and using each of these software tools can be found in the Gemini Programmer s Reference Overview of Configuration Commands Motion Planner and Pocket Motion Planner s configuration procedures present commands in groups organized by function The overview below is organized ...

Страница 25: ...input step resolution you enter a number position mode only ORES pseudo encoder you enter a number output resolution DMTLIM torque limit you enter a number DMTSCL torque scale you enter a number DMVLIM velocity limit you enter a number DMVSCL velocity scale you enter a number 1 Encoder tracking mode uses incoming quadrature encoder pulses to command motion 2 Autorun mode commands motion with no pu...

Страница 26: ...re position error velocity setpoint actual velocity torque force setpoint actual electrical torque velocity error phase A or U commanded current phase A or U actual current phase B or V commanded current phase B or V actual current d axis commanded current d axis actual current q axis commanded current q axis actual current DMONAS analog monitor A scaling1 you enter a percentage1 DMONBV analog mon...

Страница 27: ...ion loop bandwidth you enter a number SGIRAT current torque damping ratio you enter a number DNOTAF notch filter A frequency you enter a number DNOTAQ notch filter A quality factor you enter a number DNOTBF notch filter B frequency you enter a number DNOTBQ notch filter B quality factor you enter a number DNOTLD notch lead filter frequency you enter a number DNOTLG notch lag filter frequency you e...

Страница 28: ...ance of your system If you only know this value approximately you can adjust this value until you achieve the system performance you desire The total system inertia is given by the following formula Total system inertia motor rotor inertia 1 LJRAT If your system has significant mechanical damping you will also want to adjust the LDAMP setting which specifies system damping provided by the load If ...

Страница 29: ...s usually not helpful 8 After you achieve a satisfactory system response reconfigure the drive for torque mode DMODE2 This completes the primary tuning procedure If you are unable to achieve a satisfactory response proceed to the advanced tuning procedure below Advanced Tuning Procedure 1 Configure the drive for torque tuning mode DMODE15 and connect an oscillo scope as described in Steps 1 6 in t...

Страница 30: ... bandwidth using the DVBW command A sluggish response indicates that velocity loop bandwidth is too low To improve the response increase bandwidth by using the DVBW command NOTE Ringing oscillations or a sluggish response can also indicate inaccurate drive settings for LJRAT or LDAMP 4 After you achieve a satisfactory system response reconfigure the drive for velocity mode DMODE4 This completes th...

Страница 31: ...inaccurate drive settings for LJRAT or LDAMP 8 OPTIONAL Null the Input Offset First command zero volts by using either of two methods Method 1 connect your controller or command voltage source and command zero volts or Method 2 disconnect the controller or command voltage source and short CMD to CMD pin 23 to pin 24 Second Issue a DCMDZ command to null any offset at the command input 9 After you a...

Страница 32: ...leration and deceleration rates Be sure the maximum velocity of your move is well below the rated speed of your drive motor combination 3 Configure ANALOG MONITOR A to show position error DMONAV3 4 Connect one channel of your oscilloscope to the drive s ANALOG MONITOR A pin 21 Connect your oscilloscope s ground to the drive s ANALOG GROUND pin 25 5 Adjust your oscilloscope to display position erro...

Страница 33: ... shaft motion will not damage equipment or injure personnel Notch Filter Adjustment Procedure 1 Configure the analog monitor to show q axis current DMONAV19 2 Configure the drive for torque mode DMODE2 3 Configure DMTLIM to approximately 1 3 of the default value for your Compumotor motor 4 Connect one channel of your oscilloscope to the drive s ANALOG MONITOR A pin 21 Connect your oscilloscope s g...

Страница 34: ...ppropriate tuning mode torque velocity or position Observe the system s response to the tuning mode s step input 4 Choose a value for the lag filter DNOTLG that reduces low frequency resonance and provides satisfactory system performance 5 If you are done adjusting filters reconfigure DMTLIM to its default value Otherwise proceed to the Lead Lag Filter Adjustment procedure below Lead Lag Filter Ad...

Страница 35: ...IN THIS CHAPTER Relay 24VDC Keep Alive Power Connections Multiple Drive Installations V BUS Regeneration Protection and the GPDM Aligning the Resolver RS 232 485 Communications Updating the Drive s Operating System C H A P T E R F O U R www comoso com ...

Страница 36: ...peration Drive Condition Relay State Enabled Closed Faulted Open No AC power or not enabled Open 24VDC power does not affect the relay With 24VDC applied the relay will be open if AC power is not applied Relay Specifications Relay Type Dry contact mechanical relay Normally open Relay Rating 5 amps at 24VDC or 120VAC 24VDC Keep Alive Power Connections optional The following drawing shows how to con...

Страница 37: ... etc Software status bit see TASX command indicates keep alive is active 24VDC power only AC power is disconnected CAUTION Do not exceed 28 8VDC input voltage Multiple Drive Installations optional Safety Earth Connections For multiple drive installations we recommend a single point or star safety earth configuration as shown below Gemini Drive Gemini Drive Gemini Drive VAC N or L2 N L1 VAC N or L2...

Страница 38: ...Connect together only V BUS terminals of drives that share the same fused AC power source as shown below VBUS VBUS L2 N L1 VBUS VBUS L2 N L1 VBUS VBUS L2 N L1 VAC GV U3 U6 U12 H40 GV U3 U6 U12 H40 GV U3 U6 U12 H40 Use a single point safety earth Connect to GPDM if necessary Not shown 3 phase AC connections for GV H40 Fuses Sharing the Power Bus If excess regenerated energy causes an overvoltage or...

Страница 39: ... J from 340 410VDC 2240 µF If excess regenerated energy causes overvoltage faults you can connect the Gemini Power Dissipation Module GPDM to the V BUS terminals of these drives Regenerated energy from the drive will then be dissipated in the GPDM Gemini Power Dissipation Module GPDM The GPDM is designed for use with GV U3n U6n U12n drives NOTE If you use a GV H20n H40n drive and regeneration in y...

Страница 40: ...lor Code for GPDM Left Right Status Green Off ready Green Yellow active Red Off fault max temperature duty cycle or pulse exceeded Yellow LED may flash or be continuously illuminated until GPDM stops dissipating GPDM Connection Instructions WARNING Sheet metal and exhaust air at the top of the enclosure are hot Avoid contact WARNING V BUS and V BUS terminals are at hazardous voltages when power is...

Страница 41: ...V U3n 6n 12n GV U3n 6n 12n Use a single point safety earth 30A fuses VBUS VBUS Connect 2nd GPDM if necessary VBUS VBUS GPDM Connections The next figure shows GPDM dimensions 6 0 152 5 4 138 2 75 70 1 38 35 7 0 177 8 7 75 197 8 0 203 3x CLEARANCE FOR 8 OR M4 MOUNTING SCREWS 1 00 25 4 0 88 22 2 Dimensions GPDM Power Dissipation Module www comoso com ...

Страница 42: ...ed is loaded from the motor configuration file Resolver Alignment Procedures There are three methods to align the resolver Method 1 Enter a known resolver offset angle Method 2 Find an unknown resolver offset angle and store it in the drive s nonvolatile memory Method 3 Loosen the resolver cleats and rotate the housing while monitoring offset angle Secure the housing when the angle is zero degrees...

Страница 43: ...resolver to a specific offset angle usually zero degrees 1 Disconnect the load from the motor shaft The shaft should be free to rotate 2 Verify correct motor wiring See the Gemini Motor Reference Manual for wiring information for Compumotor motors 3 Configure the drive for your motor as described in Chapter 2 Installation If you use a non Compumotor motor create and download a motor configuration ...

Страница 44: ... 2 1 3 4 5 6 7 8 9 Rx RD A Tx TD A 6 7 8 9 2 1 3 4 5 Rx Tx Gnd Gnd Rx RD B Tx TD B Gemini Drive RS 232 Connections 1 RS 485 Rx RD B 2 RS 232 Receive 3 RS 232 Transmit 4 RS 485 Tx TD B 5 Ground 6 No connection 7 RS 485 Rx RD A 8 RS 485 Tx TD A 9 No connection Gemini Drive Pin Assignments Gemini Drive RS 485 Connections RS 232 485 Connections To communicate with the drive connect the drive s RS 232 ...

Страница 45: ...ications Pin Out for RS 232 Communication Pin Description 2 Rx receive Connect to Tx on your computer 3 Tx transmit Connect to Rx on your computer 5 GND logic ground Connect to GND on your computer Maximum RS 232 cable length is 50 feet 15 25 meters To establish unique addresses for daisy chained units use the ADDR command Unit 0 Unit 1 Unit 2 Tx Rx GND Daisy Chain to a Computer or Terminal 25 Pin...

Страница 46: ...Set error level to 4 for all units on the chain Unlike ASCII based products the binary prompts associated with the different error levels can pass through the daisy chain to the terminal controller without interfering with the other drives At that point they are translated into the text strings defined by the ERROK and ERRBAD commands Consequently error levels using prompts can be used in Gemini d...

Страница 47: ...e Reconnecting the cables with power applied may cause the drive to interpret intermittent connections as RS 232 hardware handshake signals this may result in shutdown of the RS 485 interface If this happens reset the drive to re enable the RS 485 interface Recommended cable Belden 9842 Refer to the diagram below for connection information RS 232 485 connector Long cable runs may require terminati...

Страница 48: ...ERRLVL2 Set error level to 2 for unit 1 2_ERRLVL2 Set error level to 2 for unit 2 3_ERRLVL2 Set error level to 2 for unit 3 In general to send a Gemini command from the master unit to a specific unit in the multi drop prefix the command with the unit address and an underscore e g 3_ERES4000 sets the encoder resolution to 4000 on unit 3 The master unit may receive data from a multi drop unit You sh...

Страница 49: ...Chapter 5 Troubleshooting 49 5 Troubleshooting IN THIS CHAPTER LED Status Software Commands for Troubleshooting RS 232 485 Troubleshooting System Problems C H A P T E R F I V E www comoso com ...

Страница 50: ...S reports codes for specific faults and warnings Look for non Drive problems problems with other parts of the system Detailed procedures for each of these topics are given in the rest of this chapter LEDs The drive has two LEDs The LED on the left can be red or green The LED on the right can be yellow or green LED illumination states and the conditions they indicate are tabulated below Left LED Ri...

Страница 51: ... note of the errors listed the first time you issue the command as this original information will be written over as subsequent errors occur You can use the CERRLG command to clear the contents of the error log This allows you to start the diagnostic process when the error log is in a known state TAS Transfer Axis Status The TAS command returns the status of all axes in the form of a 32 bit respon...

Страница 52: ...tion 21 Bad Hall state Bad state 111 or 000 was detected Check Hall wiring 22 Unrecognized hardware Consult factory 23 User fault Indicates input 3 was active 24 Keep Alive active Not a fault indicates 24VDC power at 24VDC input 25 Power dissipation fault Indicates excessive regeneration GV L3n GV H20n GV H40n only Check deceleration load inertia 28 Configuration warning Drive altered a user enter...

Страница 53: ...eck the PC COM port setting again Your PC may have multiple COM ports Try connecting to a different port Check to see if another application is busy using the COM port Close all other applications Try connecting to a different port Check AC power to the drive The drive s left LED should be illuminated either red or green If these steps do not solve your problem see Testing the Cable below Testing ...

Страница 54: ...ne end of your RS 232 cable to your PC palm PC or HPC Disconnect the other end of the cable from the drive 2 With no data being transmitted measure the voltage on the RS 232 cable s transmit pin should be pin 2 The voltage on the transmit pin should be in the range 3VDC to 12VDC 3 Measure the voltage on the RS 232 cable s receive pin should be pin 3 The voltage on the receive pin should be zero vo...

Страница 55: ... Connect the Motor power and feedback Connect AC Power Configure the Drive The final step in Configure the Drive is issuing a DMODE13 command which configures the drive for autorun 3 Enable the drive by connecting Pin 1 to Pin 2 on the drive s 50 pin DRIVE I O connector NOTE connecting pin 1 to pin 2 may require that you use a breakout module such as Compumotor s GEM VM50 4 Apply AC power 5 The mo...

Страница 56: ...ons Helical couplers are inadequate and are not recommended Mechanical Transmission Verify that your mechanical system functions properly and is not jammed Motion Problems If problems occur during motion check these possible causes Motor Sizing ensure that the motor has enough torque to perform the move Excessive Acceleration or Deceleration Excessive Velocity Electrical Noise Electrical noise on ...

Страница 57: ...Appendix A Specifications 57 A Specifications IN THIS CHAPTER Gemini Drive Specifications Input Output Specifications Dimensions Protective Circuits Cable Specifications A P P E N D I X A www comoso com ...

Страница 58: ...D Tightening torque 20 in lbs nom 24 in lbs max 20 in lbs nom 24 in lbs max Output Power Continuous Output Peak Output Current Power Current Power Drive amps peak watts max amps peak watts max GV L3n 3A 440W 7 5A 1 1 kW GV U3n 3A 880W 7 5A 2 2 kW GV U6n 6A at 8 kHz 1 75 kW 15A at 8 kHz 4 4 kW GV U12n 12A at 8 kHz 3 5 kW 30A at 8 kHz 8 8 kW GV H20n 20A 3 input 5 8 kW 50A 3 input 14 7 kW at 8 kHz at...

Страница 59: ... General requirements CE for EMC 89 336 EEC BS EN61800 3 1997 Adjustable speed electric power drive systems Part 3 EMC product standard including specific test methods IEC 61800 3 1996 Adjustable speed electric power drive systems Part 3 EMC product standard including specific test methods Interface Communication Connector Drive connector 9 pin D subminiature plug Mating connector 9 pin D subminia...

Страница 60: ... 49 48 47 46 45 44 43 42 41 40 39 38 37 36 35 34 33 32 31 30 29 28 27 26 22 21 19 14 13 4 3 2 CNTRL P VINref Inputs Outputs 46 45 43 31 29 28 27 26 Analog Out 2 Encoder Out Encoder In Reset 10V Cmd 10V Cmd Dir CCW BX Dir CCW BX Step CW AX Step CW AX Enable 25 24 23 11 10 9 8 2 1 Choose one Input mode Drive I O Connector Connector Specifications Mating Connector Gemini Drive not provided see note M...

Страница 61: ...pin 24 3 Connect your controller s analog ground reference to pin 25 4 If you use a Compumotor 6K Controller use the analog command cable not the step and direction command cable See Cable Specifications later in this appendix for part numbers If you use a pulse source to generate step direction CW CCW or encoder tracking signals note that the drive s pulse inputs use differential receivers withou...

Страница 62: ...anual disable Enable Input and Reset Input Reset Input optional The reset and enable inputs use the same circuit design as the drawing above indicates To reset the drive temporarily connect the reset input pin 3 to digital ground pin 2 Reset begins when pin 3 is grounded The drive will begin its power up sequence upon disconnection of pin 3 from ground VINref Voltage Input Reference optional Use V...

Страница 63: ...ternal 5 24VDC supply to the VINref terminal Inputs are sourcing at 24V unless you connect CNTRL P to ground then inputs will be sinking inputs Input voltage range 0 24VDC Switching Levels Low 1 3 VINref voltage High 2 3 VINref voltage 10 KΩ 10 KΩ Threshold Sense Pullup Down Sense Inputs You can use the INLVL and INDEB commands to configure the inputs as active high or active low and to set the de...

Страница 64: ...evolution post quadrature Clockwise Rotation Channel A leads Channel B Counterclockwise Rotation Channel B leads Channel A The encoder outputs operate in one of two modes Pseudo Encoder Mode Output Channels A and B are derived from position information from the load feedback device e g encoder or resolver The outputs are not based on calculated or commanded position Pseudo encoder mode is the defa...

Страница 65: ...e pin 25 as a ground reference for these monitors Analog Monitor Specifications Maximum Output 10V scalable Resolution 8 bits peak to peak for full scale signal Internal Connections 21 Analog Monitor A 22 Analog Monitor B 23 24 25 Analog Ground DRIVE I O Connector 221 Ω User configurable output variable Same circuit design as Analog Monitor A Analog Monitors You can configure the analog outputs to...

Страница 66: ...ions Mating Connector Gemini Drive not provided see note Manufacturer AMP AMP Connector Model CHAMP 050 Series II CHAMP 050 Series II AMP Part Number 2 178238 4 2 175677 4 Wire Gauge not applicable use 28 AWG 0 08 mm2 Note Mating connectors are not provided with Gemini drives Compumotor cables are available with mating connectors attached If you make your own cables you must use a jack screw style...

Страница 67: ...pins and connect two wires to the encoder ground pins We recommend that you splice each pair of wires to a larger diameter wire as shown in the next drawing Encoder Cable Encoder 5 Encoder 5 Encoder Ground Encoder Ground 1 2 3 4 To Encoder MOTOR FEEDBACK Connector Splice wire pair to thicker gauge wire Splicing Wires Together Splicing to a larger wire provides more wire for current conduction mini...

Страница 68: ...tor does not have a thermal switch short pins 12 and 13 together The drive will experience a motor fault if neither a thermal switch nor a jumper wire is attached to pins 12 and 13 Hall Effects Connect your motor s Hall effect wires to pins 14 18 on the MOTOR FEED BACK connector The Gemini GV drive is designed to be used with motors that have single ended open collector Hall outputs Internally the...

Страница 69: ...5 GV U3n 3 75 95 3 1 00 25 4 GV U6n 3 75 95 3 1 00 25 4 GV U12n OW 2 75 70 1 38 35 FH 7 0 177 8 7 75 196 9 8 0 203 2 1 00 25 4 0 88 22 2 Product OW Overall Width inches mm FH Fin Height inches mm 3x clearance for 8 or M4 mounting screws Dimensions in inches mm 0 58 14 7 0 16 4 1 Dimensions Shorter Enclosure www comoso com ...

Страница 70: ...on Guide 6 00 153 0 5 40 138 0 2 75 70 5 0 127 1 38 35 2 25 57 2 8 9 226 1 9 63 244 5 9 9 251 5 1 00 25 4 0 88 22 2 Dimensions in inches mm 3x clearance for 8 or M4 mounting screws 0 58 14 7 0 16 4 1 Dimensions GV H20n www comoso com ...

Страница 71: ...19 30 2 Back of flange masked from paint Back of flange masked from paint 3 82 97 1 4 88 124 2 44 62 3x clearance for 1 4 or M6 mounting screws Dimensions in inches mm Dimensions GV H40n Drive Mounting The Gemini drive is a vented product Mount it under an overhang to prevent material spilling into the drive www comoso com ...

Страница 72: ... 1 00 25 4 Minimum Clearance 0 50 12 7 Minimum Clearance 1 00 25 4 Minimum Clearance NOTE Provide proper spacing to maintain minimum clearance between drives NOTE Provide proper spacing to maintain minimum clearance between drives Panel Layout GV L3n GV U3n GV U6n GV U12n Panel Layout Dimensions GV L3n GV U3n 6n 12n www comoso com ...

Страница 73: ...pacing to maintain minimum clearance between drives NOTE Provide proper spacing to maintain minimum clearance between drives NOTE Vertical spacing between drives 8 in 200 mm for GV H40 operating at full power 6 in 150 mm for GV H20 operating at full power 4 in 100 mm otherwise Panel Layout GV H20n GV H40n shown below Dimensions in inches mm Panel Layout Dimensions GV H20n and GV6 H40n www comoso c...

Страница 74: ... yes GV H40n 20Ω yes The shorting relay removes the inrush current limiter after drive startup This allows maximum bus voltage during high acceleration peak torque maximum speed applications Inrush current is temperature dependent Ambient Temperature Inrush Current Limit 25 C 77 F less than 35 amps 50 C 122 F less than 70 amps Drive Overtemperature Protection The Gemini drive s overtemperature cir...

Страница 75: ...hreshold Voltage GV L3n 212VDC GV U3n 6n 12n H20n H40n 410VDC Results of Fault Power to motor is turned OFF LEDs Left illuminated RED Right off Fault output is activated Latched fault CAUTION Overvoltage protection monitors only the motor output terminals DC motor bus It does not protect against an overvoltage on the AC input terminals Current Foldback The GV drive s current foldback circuit helps...

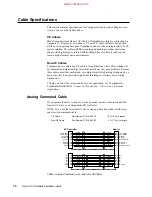
Страница 76: ...f electrical noise at high frequencies To help you select the correct cables for your application see Compumotor s Technical Bulletin TB269 Proper Cable Selection CE vs Non CE Gemini Applications Analog Command Cable If you operate the drive in torque or velocity mode use this cable to connect the Gemini GV drive to a Compumotor 6K controller NOTE If you use the Gemini GV drive in step and directi...

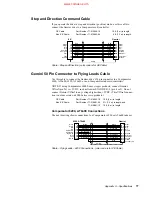
Страница 77: ...controllers NOTE If using Compumotor 6000 Series stepper products connect Gemini VINref pin 26 to 5VDC such as Gemini ENCODER 5 pin 4 or 5 Do not connect Gemini VINref to any voltage higher than 5VDC This VINref connec tion is not necessary on 6000 Series servo products CE Cable Part Number 71 016943 10 10 ft 3 m in length Non CE Cable Part Number 71 019861 04 4 ft 1 2 m in length and 71 019861 10...

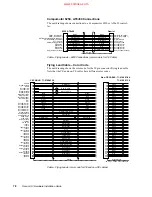
Страница 78: ...Yellow Brown Red 16 AWG Black 16 AWG Black White Black Red White Red Green White Green Orange White Orange Blue White Blue Yellow White Yellow Brown White Brown Black White Black Red White Red Green White Green Orange White Orange Blue White Blue Yellow White Yellow Brown White Brown 1 2 3 4 5 6 7 8 9 10 11 12 13 14 15 16 17 18 19 20 21 22 23 24 25 26 27 28 29 30 31 32 33 34 35 36 37 38 39 40 41 4...

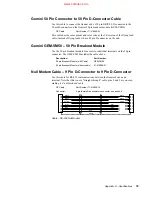
Страница 79: ...r The GEM VM50 includes the cable above Description Part Number 50 pin Breakout Module with Cable GEM VM50 50 pin Breakout Module without cable 01 016986 01 Null Modem Cable 9 Pin D Connector to 9 Pin D Connector Use this cable for RS 232 communications between the Gemini drive and a terminal Note that this is not a straight through cable pins 2 and 3 are crossed making it a null modem cable CE Ca...

Страница 80: ...iring the connector while attached to the drive Dimensions in inches millimeters GC 50 1 2 4 19 18 20 21 22 30 24 23 26 25 28 27 29 34 32 31 33 13 12 10 11 17 16 14 15 9 5 3 8 6 7 35 37 36 39 38 47 41 40 43 42 45 44 46 S 49 48 50 3 05 77 5 2 13 54 0 0 138 3 5 1 S 2 4 13 12 10 11 9 5 3 8 6 7 14 16 15 18 17 26 20 19 22 21 24 23 25 S 2 50 63 5 1 61 40 9 0 138 3 5 GC 26 GC 26 and GC 50 Dimensions Gemi...

Страница 81: ...Appendix B Non Compumotor Motors 81 B Using Non Compumotor Motors IN THIS CHAPTER Commands for Motor Configuration Motor Requirements A P P E N D I X B www comoso com ...

Страница 82: ...ant minutes DMTTCW motor winding thermal time constant minutes DPWM PWM switching frequency DMTMAX motor maximum temperature Use Motion Planner or Pocket Motion Planner to enter these command settings into the drive s memory See the Gemini Programmer s Reference for more information on commands Motor Requirements If you have questions about using a non Compumotor motor with a Gemini drive call Tec...

Страница 83: ...V drive 1 Randomly connect two motor wires and slowly apply a positive voltage with respect to the third See the next drawing WARNING This procedure could damage the motor Slowly increase the voltage until the motor moves Do not exceed the rated current 2 If THALL reports back a 1 2 or 4 change SHALL from either 0 to 1 or from 1 to 0 After you change SHALL reset the drive 3 Repeat step 1 until THA...

Страница 84: ...oes not report a value of 3 change Hall wires B and C If THALL reports a value of 3 the wires are connected correctly The following table summarizes phase voltages and their corresponding Hall states Starting with SHALL0 and the phase voltages as shown the THALL command should report the Hall states that match the Correct column If instead THALL reports Hall states that match the Use SHALL1 column...

Страница 85: ...ndix C Regulatory Compliance UL and CE 85 C Regulatory Compliance UL and CE IN THIS CHAPTER Installation Instructions Installation Guidelines System Installation Techniques A P P E N D I X C www comoso com ...

Страница 86: ...required to install Gemini drives into a CE compliant system Additional installation measures may be required at some locations The machine builder has ultimate responsibility for machine compli ance Low Voltage Directive LVD Installation Requirements Mains fuses Drive safety earth conductor Motor safety earth for motor voltages greater than 75 volts Drive must be installed such that the hazardous...

Страница 87: ...et the requirements of EN61000 4 5 Place a Littelfuse V275LA2Ø or equivalent varistor from line to line and from lines to earth before the mains filter as shown in the EMC Installation drawings later in this appendix Intersil General Electric and Littelfuse manufacture equivalent varistors Mains Filter You must install a mains filter The next table lists recommended filters Continuous GV L3 Filter...

Страница 88: ...y standards See the EMC Installation drawing at the end of this appendix Ferrite Absorbers Some installations may require that you take additional EMC measures To further increase product immunity and reduce product emissions you may add clip on ferrite absorbers to all cables Compumotor recommends a ferrite with at least 200 ohm impedance at 100 MHz such as Steward Ferrite part number 28A2024 Fai...

Страница 89: ...st be RF earth bonded as shown above Panel Mounting the Gemini Drive The mounting panel must be properly earthed and paint must be removed from drive mounting locations Gemini CE cables maintain proper RF bonding with the drive when you insert them in the correct location and tighten the headshell jackscrews You must fasten the motor shield braid to the bottom of the drive using the included saddl...

Страница 90: ...r inch 25 mm Saddle clamp braid make loop as short as possible Varistor 3 places GEM VM50 Breakout Module enclosure mounted or not accessible to user RS 232 485 Cable Drive I O Cable Motor Feedback Cable Motor Cable Gemini Drive HPC Motor N or L2 N L1 Earth VAC VDC VDC 24VDC Power Supply Mains Filter Bond braid to earthed panel Use R clamp or bulkhead clamshell clamp See 360 bonding drawing I O Li...

Страница 91: ...ower Supply Varistor 3 places for single phase see previous drawing Earth VAC Saddle clamp to bottom for mechanical strain relief if desired Mains Filter Mains Filter GV H20n L1 L2 L3 Bond braid to earthed panel Use R clamp or bulkhead clamshell clamp See 360 bonding drawing I O Limits Ferrite absorber detail Wrap wires through ferrite two times Protective earth Ferrite absorber Mount to earthed m...

Страница 92: ...2 L3 Twisted at 3 twists minimum per inch 25 mm VDC VDC 24VDC Power Supply RS 232 485 Cable HPC Bond braid to earthed panel Use R clamp or bulkhead clamshell clamp See 360 bonding drawing I O Limits Mains Filter GV H40n Wrap wires through ferrite two times Protective earth Mount to earthed metal panel Remove paint from flange and mounting locations Remove paint from flange and mounting locations F...

Страница 93: ...ital inputs 63 digital outputs 64 dimensions 69 download procedures 48 drive configuration 18 24 drive dimensions 69 Drive I O connector 60 drive settings 25 E electromagnetic compatibility 86 EMC 59 86 EMC installation 90 enable input 62 enclosure mounting 88 encoder 67 encoder outputs 64 environmental specifications 59 error log 51 express setup 12 F fault input 63 fault output 64 fault settings...

Страница 94: ... 38 75 regulatory agencies 86 relay 36 reset input 62 resolver aligning 42 connections 67 RS 232 daisy chain 45 54 RS 232 485 connector 44 troubleshooting 53 RS 485 communications 47 multi drop 47 S serial port 44 sharing power bus 38 ship kit 12 short circuit protection 74 software commands 51 specifications 58 standards 59 step and direction cable 77 inputs 61 system settings 25 T TAS 51 TASX 52...

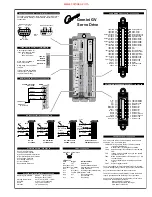
Страница 95: ...Encoder Z Encoder B Encoder B Encoder A Encoder A Encoder Ground Encoder Ground Encoder 5V Encoder 5V 13 12 11 10 9 8 7 6 5 4 3 2 1 26 22 21 20 19 18 17 16 15 14 Troubleshooting see page 49 Commonly used status commands binary status bits are numbered 1 to n from left to right TERRLG Error log reports the last 10 error conditions cleared with CERRLG TAS General report including fault conditions TA...

Отзывы: