


Chapter 1. Installation
9
Mounting the ZETA6xxx
Before you mount the ZETA6xxx
Check the list below to make sure you have performed all the necessary configuration tasks that require
accessing internal components (DIP switches, potentiometers, and jumpers). You may, however, be able to
adjust DIP switches and pots after mounting, if you allow access to the top of the ZETA6xxx chassis.
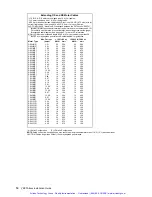
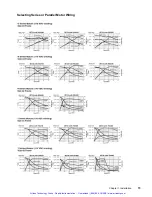
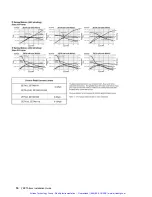
• Select motor current (DIP switches). Set your motor current appropriately. See page 7 for current level DIP switch
settings. If you ordered an O, R or T series motor, see pages 5 and 6 for the correct drive current rating for your
particular motor.
• Select device address (DIP switches). If you are not connecting multiple ZETA6xxx units in an RS-232C daisy chain
or an RS-485 multi-drop, use the factory setting. If you need to change this setting, refer to page 7 for instructions.
• Select serial communication method (jumpers & DIP switches). If you are using RS-232C to communicate with
the ZETA6xxx, use the factory settings. If you need to change these settings (i.e., for RS-485), refer to page 8 for
instructions.
• Be aware that if you exercise the motor matching procedures on page 30, you will need to access the potentiometers
at the top of the ZETA6xxx chassis. (The motor matching procedures are placed after the Electrical Connections
section of this manual because the process requires that you first understand how to connect the motor, serial
communication, and AC power.)
Artisan Technology Group - Quality Instrumentation ... Guaranteed | (888) 88-SOURCE | www.artisantg.com