


5
2. Installing the pump and connecting a separately sold operation panel
(accessory)
WARNING
z
Install the pump properly according to the prescribed procedure, and check that the pump is con-
nected and fixed to the mattress properly. Improper installation, connection, or fixing may cause
the body pressure to not be dispersed effectively. Also, the pump may fall, causing injury, and
there is a risk of an electric shock or fire due to a short circuit caused by damage or deformation.
z
When handling the pump, do not hold the operation panel cable, but hold the pump firmly
with both hands. There is a risk of electric shock and fire due to disconnection.
z
Take care when handling electrical parts such as the pump, operation panel (accessory), and
bed link cable, and do subject them to actions such as stepping on them, bumping or pulling
them, or spilling water on them. The product may malfunction, causing injury or failure. In
addition, there is a risk of an electric shock or fire due to a short circuit.
Pump
1
1
Detach
Detach
the cap.
the cap.
4
4
Detach
Detach
the cap.
the cap.
7
7
Detach
Detach
the cap.
the cap.
2
2
Orient the plug
Orient the plug
so that the
so that the
notch is facing
notch is facing
downward and
downward and
insert it.
insert it.
5
5
Orient the plug
Orient the plug
so that the
so that the
notch is facing
notch is facing
downward and
downward and
insert it.
insert it.
8
8
Orient the plug so
Orient the plug so
that the notch is
that the notch is
facing downward
facing downward
and insert it.
and insert it.
3
3
Turn the connector cap
Turn the connector cap
clockwise.
clockwise.
9
9
Turn the
Turn the
connector cap
connector cap
clockwise.
clockwise.
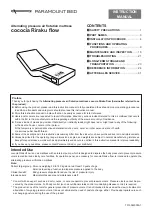
Warning label
1
Install the pump with its warning label facing up.
Note
!
z
Pay attention to the orientation of the top, bot-
tom, head end, and foot end.
z
Install the pump in the pump installation position cor-
rectly. Otherwise, vibration noise may be generated.
2
Connect the position sensor. (Steps
1
to
3
)
3
Connect the bed link cable. (Steps
4
to
6
)
4
When using a separately sold operation panel (accessory),
connect the operation panel. (Steps
7
to
9
)
5
When using a separately sold operation panel (accessory),
use the hook and cable clip to hang it on the top of the bed
footboard.
WARNING
Hang the operation panel on the designated part (top
of the bed footboard). Otherwise, a button may be ac-
cidentally pressed, and the product may behave unex-
pectedly, resulting in injury. Furthermore, a wire may
break due to the cable catching in a movable part of
the bed, a bed side-rail, etc., resulting in a malfunction
or failure.
2
Connect the position sensor.
3
Connect the bed link cable.
4
Connect the operation panel
(accessory).
Position sensor port
Operation panel port
Bed link cable port
Position sensor connector
Bed link cable connector
Operation panel connector
Cable
Hang the operation panel cable
Operation panel
Hook
Cable clip
Hook on a footboard, etc.
Cable
Footboard
6
6
Turn the
Turn the
connector
connector
cap clockwise.
cap clockwise.
3
INSTALLATION PROCEDURE


