2. Installation
2-12
November 2004
8820-A2-GN20-80
Front Power Access
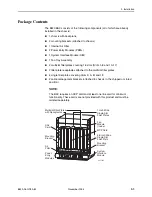
Front power access is made via two PEMs which are located in the front, lower left
side of the chassis. PEM A is located on the left, while PEM B is on the right.
NOTE:
Both PEMs must be powered, or else the management card alarm will
activate.
The DC power wiring requires the use of #8 AWG stranded wires. Use the
following procedure to connect power to the front.
WARNING:
!
— It is recommended that the following procedure be performed by a
qualified electrician.
— The DC power must be disconnected at its source before attempting
to connect wiring to the PEM. Wired PEMs should never be removed
without first disconnecting the power at its source.
Procedure
To connect power to the front of the chassis:
1. Apply the supplied compression-type ring tongue terminals to the #8 AWG
power wires. Use the Molex MagnaCrimp Hand Tool (Part No. MCT-8200).
2. Remove the PEM to be wired from the chassis by unfastening the two screws
from the PEM faceplate. Save these screws since they will be needed when
the wired PEM is reinstalled into the chassis (see
Step 7
).
3. Remove the two M4 Phillips-head screws installed in the power taps located
on the left and right side of the PEM wiring board. Also remove the two split
cable bushings from the PEM faceplate if they are installed.
48V R
TN
48V NEG
POWER ENTRY MODULE
LEFT UNIT: LINE A
RIGHT UNIT: LINE B
WARNING! POWER MUST BE DISCONNECTED AT THE SO
URCE
BEFORE REMOVING OR INSTALLING THIS PWR ENTRY MODU
LE
48V R
T
N
48V NEG
POWER ENTRY MODULE
LEFT UNIT: LINE A
RIGHT UNIT: LINE B
WARNING! POWER MUST BE DISCONNECTED AT THE SOU
RCE
BEFORE REMOVING OR INSTALLING THIS PWR ENTRY MOD
ULE
04-17548
PEM
Circuit
Breaker
48V R
TN
48V NEG
POWER ENTRY MODULE
LEFT UNIT: LINE A
RIGHT UNIT: LINE B
WARNING!
POWER MUST BE DISCONNECTED AT THE SOURCE
BEFORE REMOVING OR INSTALLING THIS PWR ENTRY MODULE
O
PEM
A
PEM
B
SCP
SERIAL
CLOCK
A
ALARM
OUT
CLOCK
B
MCP
SERIAL
ALARM
IN
HUB-2
LAN
MCP
LAN
TAP
OUT
SCP
LAN
HUB-1
LAN
TAP
IN
Содержание 8820
Страница 1: ...8820 Broadband Access Concentrator Installation Guide Document No 8820 A2 GN20 80 November 2004...
Страница 10: ...Contents iv November 2004 8820 A2 GN20 80...
Страница 14: ...About This Guide viii November 2004 8820 A2 GN20 80...
Страница 20: ...1 Introduction 1 6 November 2004 8820 A2 GN20 80...
Страница 48: ...2 Installation 2 28 November 2004 8820 A2 GN20 80...
Страница 54: ...3 Cabling Line Card Tip and Ring 3 6 November 2004 8820 A2 GN20 80...
Страница 78: ...A Pinouts A 8 November 2004 8820 A2 GN20 80...
Страница 82: ...B Technical Specifications B 4 November 2004 8820 A2 GN20 80...
Страница 86: ...Index IN 4 November 2004 8820 A2 GN20 80...

