background image

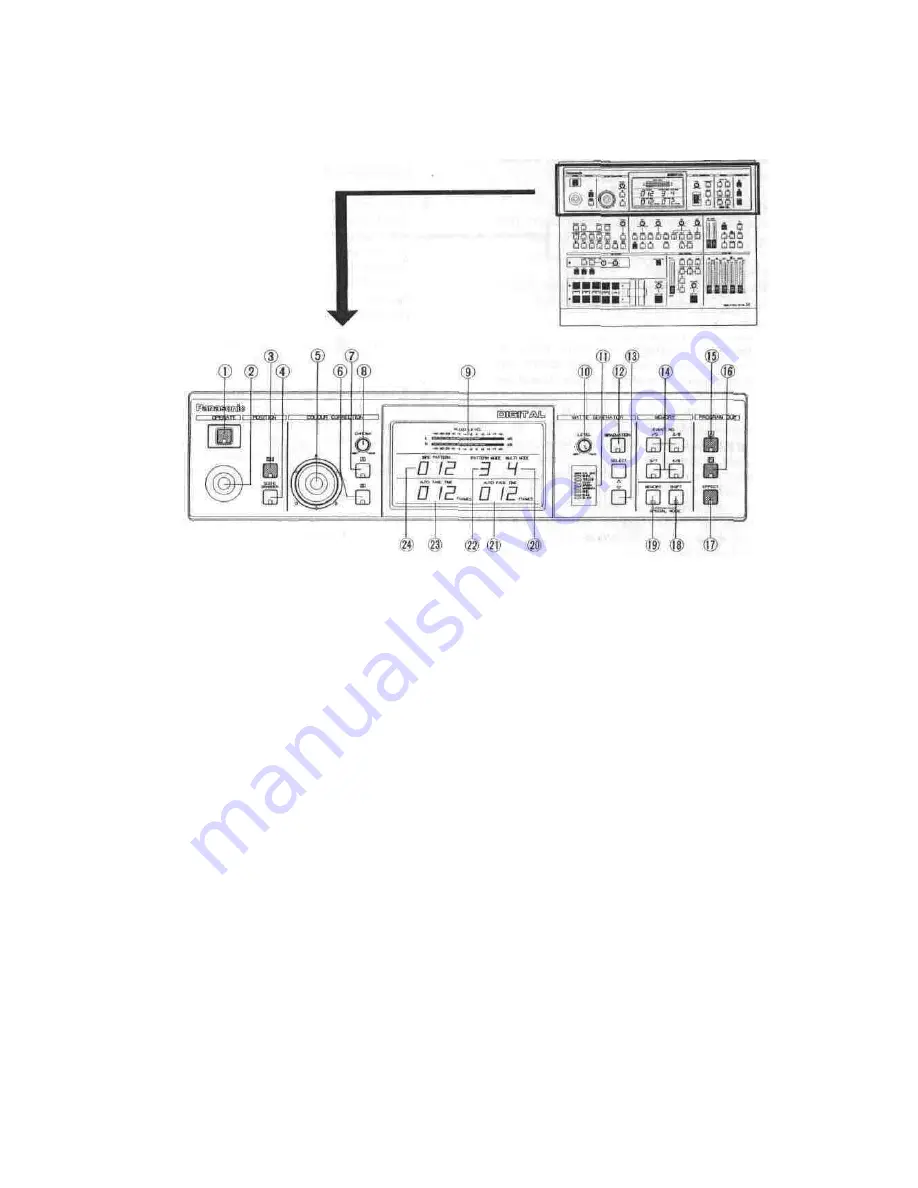
MAJOR  OPERATING  CONTROLS  AND  THEIR  FUNCTIONS

•TOP VIEW  1

1.  Power ON/OFF  Button (OPERATE)

Press  this  button  to  turn  on  the  power  of  the  unit.
The LED on this button lights and the following  LEDs
light  up  at  the  same  time.  C/L  BAR  on  the  Matte
Colour Indicator (11), Effect-Out Button (17), One-Way
Button (27), Straight Wipe Button (70), Effect ON/OFF
Button (59), Effect-A Button (58), Repeat Effect Button

(54), DSK-A Button (45), Matte Button (47), Wipe Select
Button (74), Source 1 on A-bus Button (102), Souce 2 on
B-Bus Button (101), Audio Follow ON/OFF Button (79)

and Black Fade Button (85).  These LED's light up only
when the  Reset  ON/OFF Switch (109) is turned on.

Notes :

1.  The Main Power Switch (in back) (131) must be on

before the Power ON/OFF Button (1) is pressed

2.  When the Editing Controller AG-A800 is used with

WJ-MX50,  the  power  of  AG-A800  should  be  off
first to turn off the power of WJ-MX50.  The power
of  WJ-MX50 can  not  be turned  off  by-itself.

3.  Read Note 3 on page  17.

2.  Positioner Joystick

The  position of  the wipe  pattern as selected  using  the
Square  Wipe  Button  (60)  can  be  freely  set  using  this

Joystick  control.

3.  Positioner ON/OFF  Button (ON)

This  button  must  be  pressed  to operate the  Positioner
Joystick (2).

4.  Scene  Grabber  ON/OFF  Button

(SCENE GRABBER)

The  scene wiped  by  the  Square  Wipe  Button  (60) will
be grabbed by pressing this button.  The position of this
area can  then be changed  by operating the  Positioner
Joystick (2).

5.  RGB Control

This Joystick Control permits you to balance or change
the  hue  from  the  images  of  the  Source  Video  Signal
(either  A  or  B)  by  moving  its  position 

When  this

Controller  is  positioned  at  centre,  it  generates  the
original colour of the Source Video Signal.

6.  Colour - B Button (B)

Colour correction can be made on the B  -  bus Source
Video Signal by pressing this button. When you press it
once, the I ED starts blinking, the chroma level can be
changed by using the Chroma Level Control (8).
When you press a second time, the LED is continuously
turned on, the hue can be changed  by using  the RGB
Control (5) in addition to the chroma level by using the
Chroma Level Control (8).

7.  Colour -

 A Button (A)

Colour correction can  be  made on the A  -  bus  Source
Video Signal by pressing this button. When you press it

once, the LED starts blinking, the chroma level can be
changed by using the Chroma Level Control (8).
When you press a second time, the LED is continuously
turned  on,  the  hue  can  be  changed  by  using  the  RGB
Control (5) in addition to the chroma level by using the
Chroma Level Control (8).

8.  Chroma Level Control (CHROMA)

This Control adjusts the colour level of the images from
the Source Video Signal  When this Control is set to the
centre position, it generates the original colour level of
the Source Video Signal.

Note:

The  noise  may  be  recorded  on  tape  when  this
control  is  adjusted  to  the  MAX  with  excessive
colour  input  signal.

- 4 -

Содержание WJMX50 - MIXER

Страница 1: ...Operating Instructions Production Mixer WJ MX50 Panasonic Before attempting to connect or operate this product please read these instructions completely ...

Страница 2: ...tive earthing of the power point consult a qualified electrician The lightning flash with arrowhead sym bol within an equilateral triangle is interned to alert the user to the presence of uninsulated dangerous voltage within the product s enclosure that may be of sufficient magnitude to constitute a risk of electric shock to persons The exclamation point within an equilat eral triangle is intended...

Страница 3: ...es With the WJ MX50 and your imagination there are many possible function combinations which are left to your creativity MAIN FEATURES 1 Built in Frame Synchronizers for A bus and B bus 2 Four audio video source inputs 3 Digital Effects such as Nega Mosaic Mono Paint Still Strobe Multi Trail and AV Synchro 4 Several combinations between the Chroma Key Luminance Key NAM Mix and Wipe 5 287 Wipe patt...

Страница 4: ...and also create a danger of electric shock Use the instrument under conditions where temperatures are within 0 C 40 C and humidity is below 90 IMPORTANT NOTICE FOR VIDEO INPUT SIGNAL 1 If the input video signal does not meet with the PAL colour standard this could cause a disturbance of synchronization The picture may jitter or tear 2 If the signal to noise ratio S N of the input signal is very lo...

Страница 5: ...ton The position of this area can then be changed by operating the Positioner Joystick 2 5 RGB Control This Joystick Control permits you to balance or change the hue from the images of the Source Video Signal either A or B by moving its position When this Controller is positioned at centre it generates the original colour of the Source Video Signal 6 Colour B Button B Colour correction can be made...

Страница 6: ... MATTE on the B bus is pressed the B bus button will begin blinking automatically to show you which button was selected before 17 Effect Out Button EFFECT When this button is pressed the final video signal whether it is effected or not will be provided at the Program Output connector 18 Shift Button SHIFT This button will be used when the Event Number Buttons 14 numbered 5 to 8 are required Howeve...

Страница 7: ...ected can be changed by adjusting this control To use this function the Aspect ON OFF Button 30 must be ON Note The black area will be shown along the image on the video monitor when the Compression function is used with it 30 Aspect ON OFF Button ON In case the Aspect unction is required this button must first be pressed 31 Negative Button NEGA The on screen image can be transposed to look like a...

Страница 8: ...d to activate the Downstream Key DSK effect 45 DSK A Button A When this button is pressed the Source Video Signal on the A Bus will be the Key Source Signal 46 Ext Camera Button EXT CAMERA When this button is pressed the external camera which is connected to the External Camera Input 121 or 122 can be used as the Key Source Signal 47 Matte Button MATTE When this button is pressed the Matte Colour ...

Страница 9: ...tton ON The selected Digital Effect function becomes operative by pressing this button 60 Square Wipe Button Four wipe patterns can be selected by pressing this button repeatedly circle oval square and diamond The Aspect Control 29 or the Positioner Joystick 2 can be used with these patterns 61 Mosaic Wipe Button The wiping becomes a mosaic like pattern by pressing this button Four kinds of patter...

Страница 10: ...on LUM KEY Ihe Luminance Key effect is obtained by pressing this button and the adjustment of the Slice Control 78 The B bus signal must be the key signal 76 Chroma Key Select Button CHROMA KEY The Chroma Key effect is obtained by pressing this button and the adjustment of the Hue Control 77 and Slice Control 78 The B bus signal must be the Key signal 77 Hue Control HUE This control is used to adj...

Страница 11: ...ade Transition Control 91 This button remains lit during Auto fading 93 A bus Fade Button A The video fade signal is faded out to the A bus video signal by pressing this button 94 B bus Fade Button B The video fade signal is faded out to the B bus video signal by pressing this button 95 Fade Control The fade in and fade out can be manually controlled by using this control 96 Fade LED IN OUT When t...

Страница 12: ... Aux 2 Audio Fader 87 is desired select either Mic or Aux 2 with this switch 106 Microphone Jack MIC Optional microphone can be connected to this jack 107 Title Input Connector TITLE This connector is used to connect the optional Character Generator WJ KB50 recommended The pin numbers are stated below 1 Character IN 2 Not used 3 Ground 4 Not used 5 Sync out 6 Not used 7 Ground 8 9VOUT 9 Ground 10 ...

Страница 13: ...ut has a priority to that of COMP Connector in the Source 3 If the S Video signal and the composite signal are both supplied to the Source 3 at the same time only the S Video signal is used as a Source 3 Video signal 117 Source 4 COMP Input Connector SOURCE4 COMP This connector accepts a 1 0 Vp p 75 ohms composite videosignal 118 Source 4 Y C Input Connector SOURCE3 Y C This connector accepts the ...

Страница 14: ...and L channel on the Program Outputi are provided via these XLR connectors 136 Auxiliary Audio Input 2 Jacks AUX AUDIO IN AUX2 The auxiliary audio input 2 signal can be inputted via these jacks When the audio is supplied to the L channel this audio is supplied to tlie R channel mono mode internally When the audio is also supplied to the R channel this audio is used for the R channel only 137 Auxil...

Страница 15: ...nasonic A B ROLL EDITING SYSTEM with 2 Playback VTRs 1 Recording VTR and 1 Editing Controller AG A800 For the details of operations setting up of controls and connections for the VTR s refer to the corresponding operating manuals Playback VTR 1 Playback VTR 2 14 ...

Страница 16: ...DV SYNC or BLACK BURST signal should be used The enough editing accuracy may not be obtained without this signal This signal is necessary for the Compression function and Trail function when it is recorded on the VTR 15 ...

Страница 17: ...e S Video Cables between the Source 1 Y C Input Connector 1 Hi Source 2 Y C Connector 113 Program Out 1 Y C Output Connector 124 on the WJ MX50 and the S VIDEO OUT S VIDEO IN connectors on the Playback VTR 1 Playback VTR 2 Recording VTR respectively 6 Connect the coaxial cable between the Black Burst Output Connector 128 on the WJ MX50 and the REF IN connector on the Interface Unit of AG A800 7 Co...

Страница 18: ...witch 109 was already in the ON position A 3 DEMO Switch 1 ON position The preprogrammed demonstration of the built in Effect functions of the WJ MX50 will be automatically displayed on an attached video monitor Note This feature is useful for demonstrating functions to a new user to help familiarize him herself with the unit 2 OFF position The unit reverts to standard operation mode This switch i...

Страница 19: ...se cases the Source Video Signal on the blinking source button instead of the Matte Colour will be displayed on the monitor automatically 1 LUM KEY 75 effect 2 CHROMA KEY 76 effect 3 DOWN STREAM KEY effect 4 FADE CONTROL effect The audio video signal to be sent out to the PROGRAM OUT 1 2 connectors 123 124 125 126 134 and 135 is selected by the appropriate PROGRAM OUT Buttons 15 16 17 In case the ...

Страница 20: ...ng In this case only the CHROMA Control 8 performs colour correction for the B bus signal If you press the B Button 6 a second time the LED is turned on The CHROMA Control 8 and the R G B Control 5 are then available to make colour correction tor the B bus signal To eliminate the colour correction press the B Button 6 a third time to turn off the LED If the CHROMA Control 8 is turned fully to the ...

Страница 21: ...t ratio by using the Aspect Control 29 and Aspect ON OFF Button 30 Press the ON Button 3 The wiped size becomes double Adjust the Mix Wipe Lever 99 to obtain the desired wipe size Operate the Positioner Joystick 2 The position of the wiped scene can be changed on the monitor screen 1 Negative Press the NEGA Button 31 The negative image like a film negative is obtained The Colour Correction can als...

Страница 22: ...ess the STILL Button 37 An instant or frozen image at any point in the selected video input will be obtained Live Still Notes 1 The Trail mode can be performed when the Still mode is under operation The LED on Still Button blinks during Trail mode 2 The Strobe mode Multi mode and Compression mode can not be used when the Still mode is under operation The Still mode becomes off automatically Note E...

Страница 23: ...elected the colour choice is available from the SELECT buttons 13 on the MATTE GENERATOR Notes 1 The trigger threshold can be adjusted by the LEVELControl 42 2 The A V Synchronization holds the desired effect s of Nega Mosaic Mono Paint and Still for certain period once triggered The holding time varies as shown below Operate the Mix Wipe Lever 99 from the A bus to B bus or vice versa to perform t...

Страница 24: ...nce a narrow border is added between the wiped images If it is pressed again the border becomes wide A third press of the button eliminators the border entirely Press one of the Matte Colour Selectors 13 to select then add the desired colour on the border The complementary colour of Matte Colour is applied Narrow Border with Matte Color Wide Border with Matte Color 1 Wiping Press the WIPE Button 7...

Страница 25: ...bus and B bus images are wiped in out on the monitor screen 2 Slide The following wipe pattern can be used with this mode 4 Pattern Modifier Modify Buttons should be used in combination with some of the Wipe Pattern Select Buttons If the prohibited combination is made the LED on the Modify Button goes off or the Straight Wipe Button 70 is automatically selected Note For the details of the combinat...

Страница 26: ...ns can be obtained by pressing this button repeatedly Press the BLINDS Button 63 The video scene is wiped in a blinds pattern The MULTI Button 67 can be used in combination with the PAIRING Button 65 4 Pairing The following wipe pattern can be used with this mode 5 Pattern Selection Select one of Wipe Pattern Select Buttons to obtain a desired wipe pattern This button can also be used in conjuncti...

Страница 27: ... Diagonal Wipe Button 66 The following patterns can be selected by pressing this button repeatedly 6 Mosaic Wipe Pattern Press the Mosaic Wipe Button 61 The following patterns can be selected by pressing this button repeatedly 4 Triangle Wipe Pattern Press the Triangle Wipe Button 64 The following patterns can be selected by pressing this button repeatedly 7 Square Wipe Pattern Press the Square Wi...

Страница 28: ... is displayed when the Reverse Button 28 is additionally pressed with the Straight Wipe Button The following functions and the Wipe Pattern Numbers can be accessed by the external Editing Controller Function Wipe Pattern Number Special Mode 1 55 Special Mode 2 56 Special Mode 3 57 Special Mode 4 58 Special Mode 5 59 Special Mode 2 Reverse 184 Special Mode 3 Reverse 185 Special Mode 4 Reverse 186 N...

Страница 29: ...o Modify Button Wipe Pattern Selection Buttons Modify Button PATTERN MODE COMPRESSION I Single Bus COMPRESSION II A B Bus SLIDE I Single Bus SLIDE II A B Bus PAIRING BLINDS MULTI MODE 1 MULTI MODE 2 MULTI MODE 3 MULTI MODE 4 ...

Страница 30: ... 29 ...

Страница 31: ...ULTI MODE 5 MULTI MODE 6 MULTI MODE 1 PAIRING MULTI MODE 2 8 PAIRING MULTI MODE 3 PAIRING MULTI MODE 4 PAIRING MULTI MODE 5 PAIRING MULTI MODE 6 PAIRING SPECIAL MODE No 1 055 No 2 056 184 No 3 057 185 No 4 058 186 No 5 059 NAM 060 LUM KEY 061 CHROMA KEY 062 3 0 ...

Страница 32: ...box number should be read as 001 Normal Wipe 129 Reverse Wipe 2 The box marked O can not be accessed by external controller However the wipe pattern can be available 3 No wipe pattern is available for the blank box 31 ...

Страница 33: ... and five kinds of edges are available by pressing this button repeatedly Turn the Mix wipe Lever 99 to the B bus position Select and press either the MATTE Button 47 or the WHITE Button 48 as a Key Fill signal The Key Fill signal will be filled on the key signal When the MATTE Button 47 is pressed the choice of desired colour is available from the MATTE GENERATOR Press the EXT CAMERA Button 46 as...

Страница 34: ... out to one of the following MATTE 81 WHITE 83 BLACK 85 A 93 or B 94 signal F 1 Video Fade Out In Set the Fade Control 95 to the IN OUT position Select the fade out scene from MATTE WHITE BLACK AorB Press the VIDEO Button 80 Slide the Fade Control 95 to the OUT IN position The IN OUT LED starts blinking as the fade progresses then the OUT IN LED begins banking after the fade is halfway done The OU...

Страница 35: ...r AUDIO can be selected for fading The LED in each button indicates which of the three are currently selected If none are selected the Fade Control Area is effectively disabled 2 The video signal can be Faded out to MATTE 81 The selected MATTE Colour WHITE 83 A White background BLACK 85 A Black background A Bus 93 Uneffected A video signal B Bus 94 Uneffected B video signal 3 A partial Fade which ...

Страница 36: ...ith GPI or RS422 4 Mode 4 Bounce Press No 4 button The compressed image drops bounce in from corner This can be executed by the Mix Wipe Lever 99 or by Auto Take Button 97 or by external controller equipped with GPI or RS422 5 Mode 5 Flip Press No 5 button The Vertical Split Compressed Wipe is obtained on the Matte Colour This can be executed by the Mix Wipe Lever 99 or by Auto Take Button 97 or b...

Страница 37: ...t Press and activate the PAINT Button 36 and STROBE Button 38 for the A bus version The Mix Wipe Lever 99 should be turned to A bus position at this moment Turn the Mix Wipe Lever 99 to the B bus position Press the B Button 57 on the DIGITAL EFFECT block Press the NEGA Button 31 Adjust the the TRANSITION Control 98 down to MIN position Then press the AUTO TAKE Button 97 repeatedly The 2 different ...

Страница 38: ...quired press the A V SYNCHRO Button 43 to synchronize this effect to the audio 4 Multi Live pictures mixing Reset the functions to the factory setup mode by turning off and on the power of the unit Select the same source input for both A bus and B bus Press the MULTI Button 40 Press the COMPRESSION Button 71 and Square Wipe Button 60 Adjust the Mix Wipe Lever 99 to change the size of square pictur...

Страница 39: ...ace 1 GPI General Purpose Interface The WJ MX50 accepts a GPI signal from an external remote controller The GPI signal can be used to activate the Auto Take function of the WJ MX50 Setting up the switch This switch has been set at right position OFF at factory The setting up may not necessary locally Turn off unit and disconnect power supply When handling unit take care not to damage the many cont...

Страница 40: ...8 kbps ON ON OFF 2 4 kbps OFF OFF ON Inhibited ON OFF ON Inhibited OFF ON ON Inhibited ON ON ON Inhibited 3 RS232C The optional remote controller which uses a MODEM can be used with the WJ MX50 for remote operation Setting up the switch Open the top panel by removing the 14 case screws Set the switch SW701 referring to the Note 2 and 3 below Close the top panel by fixing 14 case screws after setti...

Страница 41: ...ms BNC X 2 20 dBv 80 dBv 8 ohms unbalanced tip ring sleeve type phone jackx1 Nega Mosaic Mono Paint Still Strobe Multi Trail A V Synchro Frame Colour Bar White Yellow Cyan Green Magenta Red Blue Black 287 Patterns Positioner Colour Correction A bus B bus AUX 1 AUX 2 Mic Master Audio Follow Auto Take Auto Fade Memory Special Mode 4 1 1 Y 14 3 MHz 936 fH 8 bit component Sync 15 625 KHz 300 Hz SC 4 4...

Страница 42: ...75 176 177 178 PAIRING NOR 063 064 065 066 067 068 069 070 071 072 073 074 075 076 077 078 REV 191 192 193 194 195 196 197 198 199 200 201 202 203 204 205 206 BLINDS NOR REV 079 207 080i208 081 209 082 210 083 211 084 212 085i213 086 214 087 215 088i216 089 217 090 218 0911219 092 220 093 221 094 222 095 223 096 224 097 225 098 226 100 228 101 229 102 230 MULTI MULTI MODE NO NOR REV 103 4 104 5 10...

Отзывы: