background image

7

RQ

TX10

18

Getting S

tarted

Quick Start

 Gu

ide

Basic setup example

[\\\\\\\\\\\HDMI\AV\OUT\\\\\\\\\]

This connection provides the best picture quality.

Connect the HDMI cable (not included) from the HDMI AV OUT 
terminal on the main unit to the HDMI AV IN terminal on your TV.

Set “VIDEO PRIORITY” to “ON” (

B

17, HDMI menu).

Set “VIDEO FORMAT” in Menu 4 (HDMI) (

B

14).

VIERA Link “HDAVI Control”

If your Panasonic TV is VIERA Link compatible, you can operate your 
TV synchronising with home theater operations or vice versa 
(

B

14, Using the VIERA Link “HDAVI Control

TM

”).

Make the extra audio connection (

B

above) when you use VIERA Link 

“HDAVI Control” function.

[Note]

Non-HDMI-compliant cables cannot be utilized.

It is recommended that you use Panasonic’s HDMI cable. 
Recommended part number: 
RP-CDHG15 (1.5 m), RP-CDHG30 (3.0 m), RP-CDHG50 (5.0 m), etc.

[COMPONENT\VIDEO\OUT]

This connection provides a much purer picture than the VIDEO OUT 

terminal.

Connect the Component Video cable (not included) from the 
COMPONENT VIDEO OUT terminal on the main unit to the 
COMPONENT VIDEO IN terminal on your TV.

To enjoy progressive video

Connect to a progressive output compatible TV.
– Set “VIDEO OUT (I/P)” in VIDEO menu to “PROGRESSIVE” and 

then follow the instructions on the menu screen (

B

16).

Panasonic TVs with 576/50i·50p, 480/60i·60p input terminals are 
progressive compatible. Consult the manufacturer if you have another 
brand of TV.

Do not make the video connections through the VCR.

Due to copy guard protection, the picture may not be displayed 
properly.

Only one video connection is required. Choose one of the video 

connections above depending on your TV.

[\\\\\\OPTICAL\IN\\\\\\]

This is the preferred connection for best sound and true surround sound.

Connect the optical cable (not included) from the OPTICAL IN 
terminal on the main unit to the OPTICAL OUT terminal on your TV.

This unit can decode the surround signals received from your TV, cable 
or satellite STB. Refer to the operating instructions for the TV, cable or 
satellite STB for the settings necessary to output its audio from the 
digital audio output to your home theater system. Only Dolby Digital and 
PCM can be played with this connection.

After making this connection, make settings to suit the type of audio 
from your digital equipment (

B

9).

[Note]

If you have various sound sources (such as Blu-ray player, DVD 

recorder, VCR, etc.), connect them to the available inputs on the TV and 

the TV output should then be connected to the AUX or OPTICAL IN 

terminal (

[PT70]

: AUX/TV terminal) of the main unit.

Conserving power

The main unit consumes a small amount of power, even when it is in 
standby mode (approx. 0.48 W). To save power when the unit is not to 
be used for a long time, unplug it from the household mains socket.
You will need to reset some memory items after plugging in the main 

unit.

[Note]

The included AC mains lead is for use with the main unit only. 
Do not use it with other equipment. Also, do not use cords for other 
equipment with the main unit.

3

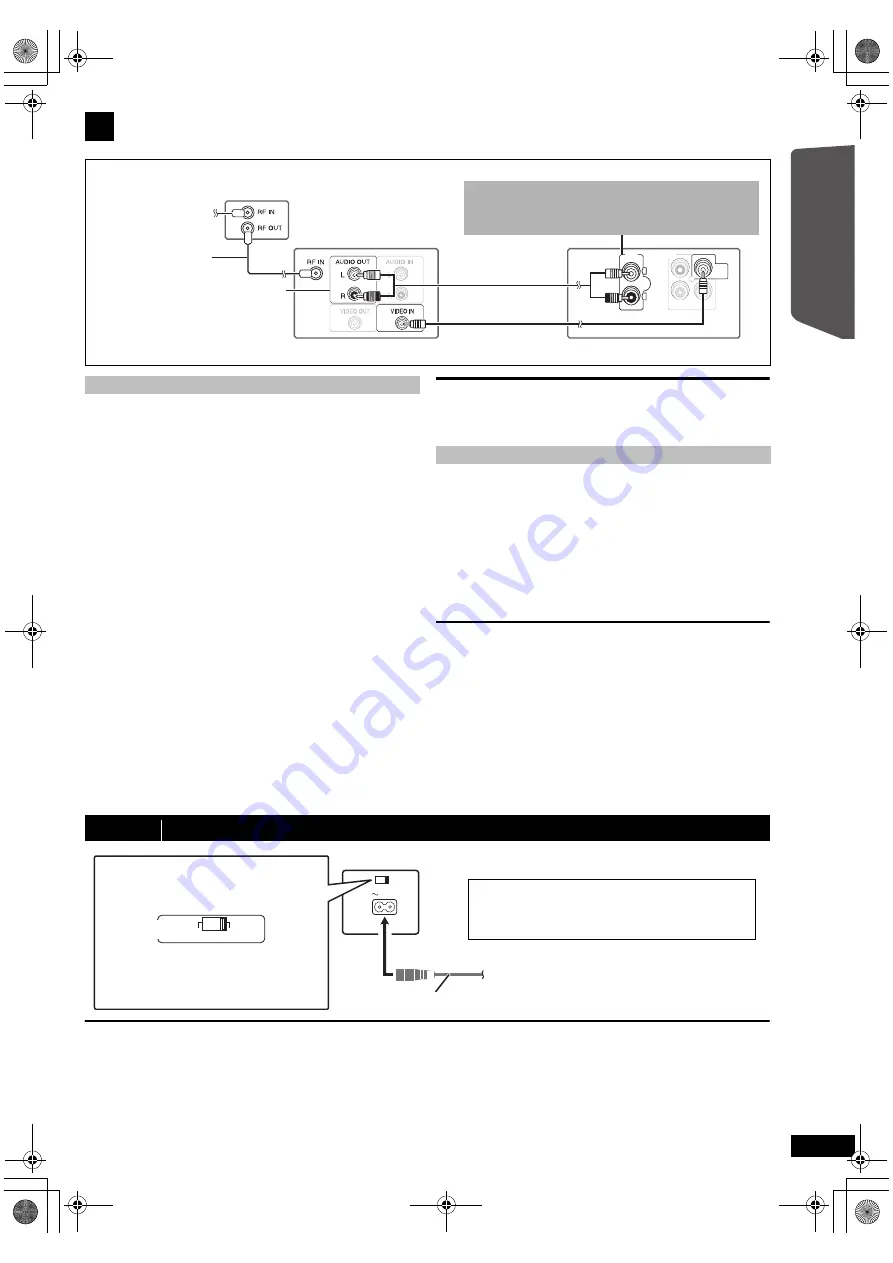
Audio and video connections

RF cable

(not included)

TV 

(not included)

Set top box (STB)
or VCR 

(not included)

Audio cable

(not included)

Main unit (rear)

To your cable TV

service or TV antenna

P

B

COMPONENT VIDEO OUT

P

R

VIDEO
OUT

Video cable 

(included)

Refer to the operating instructions for 
the TV, cable or satellite STB, or VCR 
for the settings necessary to output its 
audio from the AUDIO OUT terminal to 
your home theater system.

Y

AUX

L

R

Other video connections

Other audio connection 

[PT75]

step 3

AC mains lead connection

AC IN

To household mains socket

AC mains lead

 (included)

Main unit (rear)

VOLT

ADJ

110−127V

220−240V

 Except 

[Australia[and[N.Z.]

Before connecting the AC mains lead

Set the voltage.

Use a flat-head screwdriver to move the 
voltage selector to the appropriate position for 
the area in which this system is used.

[Saudi[Arabia[and[Kuwait]

BE SURE TO READ THE CAUTION FOR THE AC 
MAINS LEAD ON THE BACK COVER BEFORE 
CONNECTION.

You can enjoy the audio from your TV, cable or satellite STB, 
or your VCR through this home theater system by connecting 
to the AUX (

[PT70]

: AUX/TV) terminal. 

Select “AUX” (

[PT70]

: “AUX/TV”) as the source (

B

9).

SC-PT75-70G-RQTX1018-2B_eng.book  Page 7  Wednesday, September 30, 2009  5:44 PM

Содержание SC-PT75

Страница 1: ...manual for future reference The illustrations shown may differ from your unit Region number The player plays DVD Video marked with labels containing the region number or ALL Region Number The Middle East Saudi Arabia and Kuwait 2 Southeast Asia Hong Kong and Thailand 3 Australia and N Z 4 Example The Middle East Saudi Arabia and Kuwait 2 ALL 3 4 2 The illustration shows SC PT70 Obrázek představuje...

Страница 2: ... NO USER SERVICEABLE PARTS INSIDE REFER SERVICING TO QUALIFIED SERVICE PERSONNEL Australia and N Z THIS UNIT IS INTENDED FOR USE IN MODERATE CLIMATES Others THIS UNIT IS INTENDED FOR USE IN TROPICAL CLIMATES CAUTION DO NOT INSTALL OR PLACE THIS UNIT IN A BOOKCASE BUILT IN CABINET OR IN ANOTHER CONFINED SPACE ENSURE THE UNIT IS WELL VENTILATED TO PREVENT RISK OF ELECTRIC SHOCK OR FIRE HAZARD DUE TO...

Страница 3: ...CH SKIP SLOW SKIP PLAY PAUSE SEARCH OK DVD RADIO EXT IN MUTE F U N C T I O N S START T O P M E N U 10 SOUND SURROUND D I R E C T N A V I G A T O R PLAY LIST MENU SLEEP CHSELECT SETUP W SRD FLDISPLAY CANCEL REPEAT 7 8 10 11 12 18 9 20 21 23 13 15 19 1 4 5 17 2 22 14 16 3 6 POWER OPEN CLOSE VOL MUSIC PORT 1 2 4 5 6 8 7 9 3 SC PT75 70G RQTX1018 2B_eng book Page 3 Wednesday September 30 2009 5 44 PM ...

Страница 4: ...own on the main unit s display press SLEEP repeatedly SLEEP 30 SLEEP 60 SLEEP 90 SLEEP120 OFF Cancel To confirm the remaining time press and hold the button again Avoiding interference with other Panasonic equipment Main unit 1 Standby on switch Í I Press to switch the unit from on to standby mode or vice versa In standby mode the unit is still consuming a small amount of power B 11 2 Open Close t...

Страница 5: ...worldwide patents issued pending DTS and DTS Digital Surround are registered trademarks and the DTS logos and Symbol are trademarks of DTS Inc c 1996 2008 DTS Inc All Rights Reserved U S Patent Nos 6 836 549 6 381 747 7 050 698 6 516 132 and 5 583 936 This product incorporates copyright protection technology that is protected by U S patents and other intellectual property rights Use of this copyri...

Страница 6: ...rs can result in excessive bass Cover walls and windows with thick curtains For optional wall mount refer to page 17 Note Keep your speakers at least 10 mm away from the system for proper ventilation Setup example Recommended 5 1ch layout Place the front center and surround speakers at approximately the same distance from the seating position The angles in the diagram are approximate 1 Position wi...

Страница 7: ...ettings necessary to output its audio from the digital audio output to your home theater system Only Dolby Digital and PCM can be played with this connection After making this connection make settings to suit the type of audio from your digital equipment B 9 Note If you have various sound sources such as Blu ray player DVD recorder VCR etc connect them to the available inputs on the TV and the TV ...

Страница 8: ...o shown on the TV display step 4 Preparing the remote control Batteries CAUTION Danger of explosion if battery is incorrectly replaced Replace only with the same or equivalent type recommended by the manufacturer Dispose of used batteries according to the manufacturer s instructions R6 LR6 AA Insert so the poles and match those in the remote control Press in and lift up Replace the cover Use alkal...

Страница 9: ...adcast Press OK 9 2 While the frequency is flashing on the display Press the numbered buttons to select a channel To select a 2 digit number e g 12 S10 3 B 1 B 2 Alternatively press X W 6 and then press OK 9 Selecting the source from the START menu 1 Press START C to show the START menu This unit automatically turns on PT75 The TV also turns on when using VIERA Link HDAVI Control This works only w...

Страница 10: ...rom all speakers DOLBY PLII MOVIE DOLBY PLII MUSIC S SRD Selecting sound mode 1 Press SOUND B to select a sound mode Each time you press the button EQ Equalizer SUBW LVL Subwoofer Level C FOCUS Center Focus Only when 5 1ch layout mode is selected in Speakers position B 8 Easy setup settings 2 While the selected mode is displayed press 2 1 9 to make the settings Refer to the following for setting d...

Страница 11: ...te control only 1 PLAY 5 during standby mode The main unit automatically turns on and starts playing the disc in the tray Stop STOP 5 The position is memorised while RESUME STOP is on the screen Press 1 PLAY 5 to resume Press STOP 5 again to clear the position Pause PAUSE 5 Press 1 PLAY 5 to restart play Skip 9 SKIP 5 Search 6 5 5 during play Up to 5 steps Press 1 PLAY 5 to start normal play Slow ...

Страница 12: ...ges G 1 1 C 3 9 Group name Group and content number PG DATE LENGTH TITLE 1 0 1 6 0 2 1 0 1 1 LIVE CONCERT 0 2 1 5 2 0 3 8 2 5 1 2 0 5 AUTO ACTION 3 1 1 6 0 5 0 4 0 3 CINEMA 0 1 3 0 Playing a play list 1 While stopped press PLAY LIST e g To exit the screen press PLAY LIST 2 Press 3 4 9 to select the play list and press OK 9 Press 2 1 9 to skip page by page 1 Press FUNCTIONS D to show the on screen ...

Страница 13: ...turned off or another source is selected When playing PAL discs AUTO VIDEO FILM Automatically detects the film and video content and appropriately converts it Select when using AUTO and the content is distorted Select this if the edges of the film content appear jagged or rough when AUTO is selected However if the video content is distorted as shown in the illustration to the right then select AUT...

Страница 14: ...this unit is connected to a HDAVI Control 4 compatible TV with the Intelligent Auto Standby setting activated on the TV the main unit will be automatically turned to standby under the following conditions e g For details refer also to the operating instructions for your TV You can select whether audio is output from this unit s speakers or the TV speakers by using the TV menu settings For details ...

Страница 15: ...ng the player settings The settings remain intact even if you switch the unit to standby Underlined items are the factory settings in the following menus Continued on next page VIERA Link Control only with TV s remote control for HDAVI Control 2 or later 1 Select this unit s operation menu by using the TV menu settings For details refer to the operating instructions for your TV The START menu will...

Страница 16: ...4 select 0 ms AUTO Audio and video will automatically be set in sync NTSC DISC OUT Choose PAL 60 or NTSC output when playing NTSC discs B 18 Video systems NTSC When connected to an NTSC TV PAL60 When connected to a PAL TV Southeast Asia Hong Kong and Thailand NTSC is the factory preset STILL MODE Specify the type of picture shown when paused AUTO FIELD The picture is not blurred but picture qualit...

Страница 17: ... Consult a qualified building contractor when attaching the speakers to a wall Improper attachment may result in damage to the wall and speakers HDMI menu VIDEO PRIORITY ON When using the HDMI AV OUT terminal for video output The resolution of the video output from the HDMI AV OUT terminal is optimized according to the capability of the connected equipment e g TV OFF When not using the HDMI AV OUT...

Страница 18: ...vie and music discs DVD V Video CD Music discs with video Including SVCD Conforming to IEC62107 VCD CD Music discs CD Type of media Logo Formats Indicated as DVD R RW DVD Video Format Version 1 1 of the DVD Video Recording Format MP3 format JPEG format DivX format MPEG4 DVD V DVD VR MP3 JPEG DivX MPEG4 DVD R DL DVD Video Format Version 1 2 of the DVD Video Recording Format DivX format DVD V DVD VR...

Страница 19: ...lti cameras or DVD video recorders Conforming to SD VIDEO specifications ASF standard MPEG4 Simple Profile video system G 726 audio system Pick up Wavelength DVD CD 650 790 nm Laser power DVD CD CLASS 1M CLASS 1M Audio output Disc Number of channels 5 1 ch FL FR C SL SR SW VIDEO SECTION Video system PAL625 50 PAL525 60 NTSC Composite video output Output level Terminal 1 Vp p 75 Pin jack 1 system C...

Страница 20: ... B 8 The batteries are depleted Replace them with new ones B 8 Aim the remote control at the remote control signal sensor and operate B 4 Other products respond to the remote control Change the remote control operating mode B 4 No picture or sound Check the video or speaker connection B 6 7 Check the power or input setting of the connected equipment and the main unit Check that the disc has someth...

Страница 21: ...cture size does not fit the screen Change TV ASPECT in the VIDEO menu B 16 Use the TV to change the aspect Change the zoom setting ZOOM in Menu 2 B 13 Menu is not displayed correctly Restore the zoom ratio to NORMAL ZOOM in Menu 2 B 13 Auto zoom function does not work well Turn off TV s zoom function Zoom function may not work well especially in dark scenes and may not work depending on the type o...

Страница 22: ...ains plug for your safety and convenience A 5 ampere fuse is fitted in this plug Should the fuse need to be replaced please ensure that the replacement fuse has a rating of 5 ampere and that it is approved by ASTA or BSI to BS1362 Check for the ASTA mark Ï or the BSI mark Ì on the body of the fuse If the plug contains a removable fuse cover you must ensure that it is refitted when the fuse is repl...

Отзывы: