5
RQT7621
INT
R
O
If
[SHIFT]
appears the function will not work unless you use in combination with the [SHIFT] button. Make sure you first press and hold the [SHIFT] button.
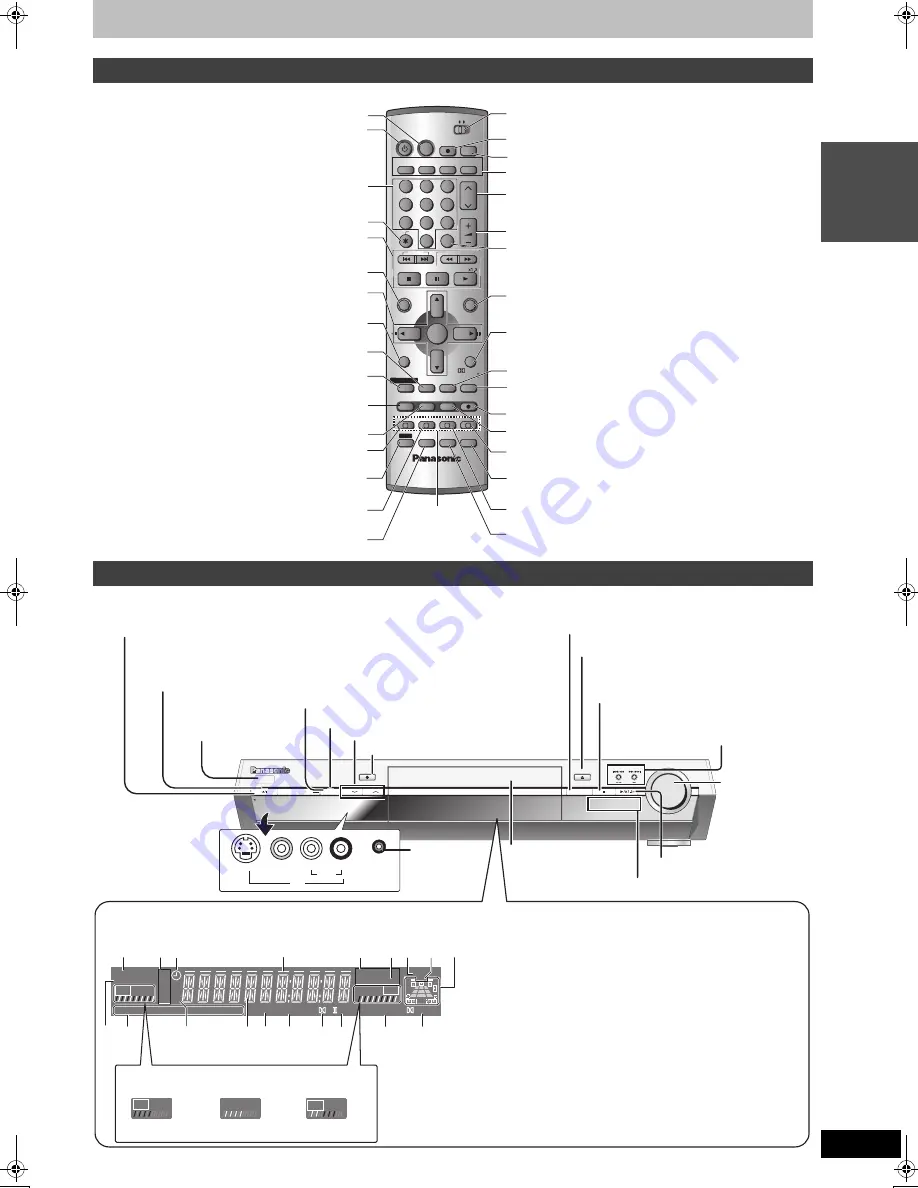
Remote control
CH
VOLUME
SKIP
STOP
PAUSE
PLAY/
SLOW/SEARCH
CANCEL
1
2
3
4
5
6
7
8
9
0
HOME THEATER
TV
EXT LINK
MULTI REAR
DUBBING
S.POSITION
CREATE CHAP
C.FOCUS
REC MODE
CH SELECT
RETURN
ERASE
TIMER
TIME SLIP
AV2/OPT
TOP MENU
ENTER
DIRECT NAVIGATOR
FUNCTIONS
MIX
2CH
REC
TEST
MANUAL SKIP
REPEAT
MUTING
AV
AUX
FM/AM
DVD
HDD
DISPLAY
PRO LOGIC
VIDEO Plus +
SHIFT
SHIFT
DIRECT TV REC
FM MODE
SUB MENU
STATUS
EQ/SFC
PROG/CHECK
PROG/CHECK
HDD/DVD INPUT
AUDIO
S W. LEVEL
-/--
F
A
B
C
D
Show on-screen menu (
➡
page 32)
Turn the unit on (
➡
page 15)
Select channels and title numbers etc./
Enter numbers
Cancel
Basic operations for recording and play
Show Top menu/Direct Navigator (
➡
page 28, 34)
Selection/Enter, Frame-by-frame (
➡
page 15, 29)
Change radio reception mode
[SHIFT]
(
➡
page 44)/
Show sub menu (
➡
page 34)
Down-mix signals to 2 channels
[SHIFT]
(
➡
page 46)/
Show status messages (
➡
page 33)
Select analog/optical AV2 input
[SHIFT]
(
➡
page 53)/
Show timer recording programme screen (
➡
page 26)
Skip the specified time/Display the television image as
a picture-in-picture/RDS (
➡
page 23, 29, 45)
Programme recording standby/release (
➡
page 25)
Linked timer recordings with external equipment
(
➡
page 27)
To use the functions labeled in orange, press the button
while pressing this button.
Virtual rear/multi rear surround
[SHIFT]
(
➡
page 47)/
One touch transfer (dubbing) (
➡
page 40)
Equalizer/Sound field control button (
➡
page 46)
Switch to “HOME THEATER” when operating the main unit,
or switch to “TV” when operating the television (
➡
page 19)
Direct TV recording (
➡
page 23)
Select television input mode (
➡
page 19)
Select the sources on the main unit (
➡
page 22, 28, 44, 53)
Channel select (
➡
page 22)
Adjust the volume (
➡
page 28, 45)
Input select (AV1, AV2, AV3, AV4 or TV channels)
(
➡
page 24)
Show FUNCTIONS window (
➡
page 42)
Return to previous screen/
Select speaker channels
[SHIFT]
(
➡
page 47)
Output test signals
[SHIFT]
(
➡
page 47)/
Skip 30 seconds forward (
➡
page 29)
Dolby Pro Logic
II
[SHIFT]
(
➡
page 46)/
Show VIDEO Plus
r
screen for timer recording (
➡
page 25)
Start recording (
➡
page 22)
Erase items (
➡
page 30)
Center focus
[SHIFT]
(
➡
page 47)/
Change recording mode (
➡
page 22)
Repeat items
[SHIFT]
(
➡
page 29)/
Muting (Volume is reduced to minimum.) (
➡
page 45)
Seat position
[SHIFT]
(
➡
page 47)/
Create chapters (
➡
page 30)
Select audio
[SHIFT]
(
➡
page 30, 53)/
Adjust the subwoofer level (
➡
page 47)
Input select for
the television
(
➡
page 19)
Main unit and display
AUX
HDD
DVD
FM/AM
OPEN/CLOSE
UP
DOWN
VOLUME
INPUT SELECTOR
REC
TIME SLIP
TUNE
CH
CH
PULL-OPEN
RDS
L/MONO
VIDEO IN
S-VIDEO IN
R
AUDIO IN
PHONES
AV3
HDD
XP
SP
CH
LP
EP
PLAY
DVD
VCD.MIX
R
-
AM
PLAY
TUNED
MONOMEMO
DTS MIX2CH
PL SFC
M.V.REAR
DVD
DIGITAL
CF
ST
REC
REC
RDS PTY PS
EXTLink
4
23
5 6
9
6 ?
>
=
1
@
A
7 8
: ;
<
B
EXT Link
REC
PLAY
EXT Link
PLAY
EXT Link
PLAY
DVD
D.MIX
R
-
AM
REC
REC
REC
Connection for
camcorder etc.
(
➡
page 24)
Standby/on switch (
Í
/I) (
➡
page 15)
Press to switch the unit from on to standby mode or vice versa. In
standby mode, the unit is still consuming a small amount of power.
Stop (
➡
page 22, 29)
Start play (
➡
page 28)
Time Slip indicator (
➡
page 23)
Input select (
➡
page 22, 28)
Remote control
signal sensor
Disc tray
(
➡
page 22, 28)
Start recording (
➡
page 22)
Open/close disc tray
(
➡
page 22, 28)
Volume dial for
recorder and
tuner
(
➡
page 28, 45)
Skip/Slow/Search (
➡
page 29),
Tuning (
➡
page 44)
Skip the specified time/Display the television image
as a picture-in-picture/RDS (
➡
page 23, 29, 45)
Input select indicator
Standby/on indicator [
Í
/I]
When the unit is connected to the AC mains supply,
this indicator lights up in standby mode and goes out
when the unit is turned on.
Recording
Playback
Recording/Playback
e.g.,
[HDD]
;
Radio broadcast display
TUNED: Receiving radio signal
ST:
Stereo
MONO: Monaural
MEMO: Channel preset memory
indicator
RDS:
Receiving RDS (Radio Data
System) signal
PTY:
Programme type indicator
PS:
Programme station indicator
<
Channel
=
Main display section
>
DTS indicator
?
Dolby Pro Logic
II
indicator
@
Equalizer/sound field control indicator
A
Virtual rear/multi rear surround
indicator
B
Dolby Digital indicator
Display
Channel select (
➡
page 22)
1
HDD indicator
2
Recording mode
3
Timer recording indicator
4
Transferring (dubbing)
in progress indicator
5
Disc type
6
Down-mix indicator
7
DVD indicator
8
Center Focus Indicator
9
Speaker channel, seat
position display
:
Linked timer recordings
with external equipment
indicator
Headphones
terminal
(
➡
page 45)
Control reference guide
HT1500_EB.book 5 ページ 2004年5月28日 金曜日 午後1時41分


