background image

158


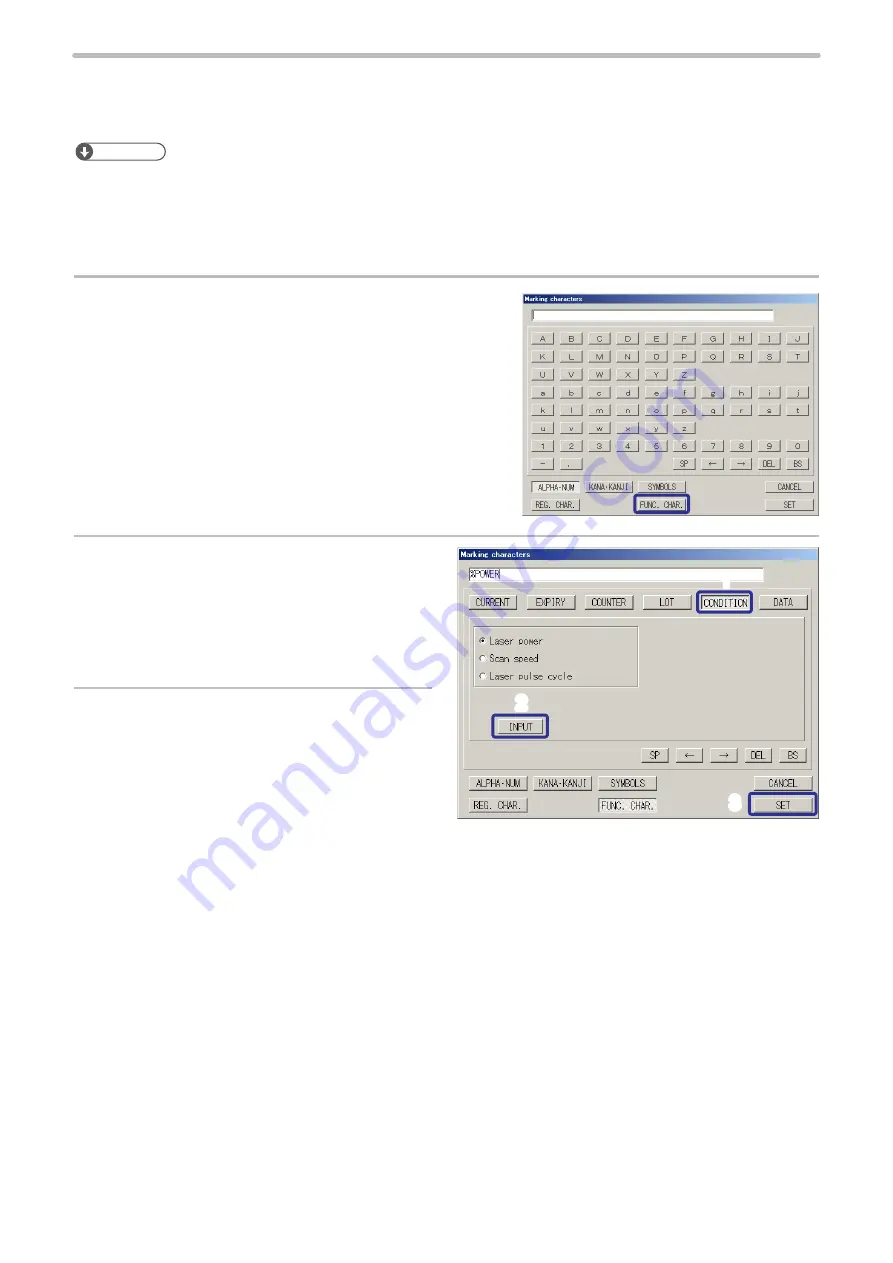
Marking Condition (Marking of Laser Settings)

With this function, the setting value of the laser settings such as laser power and scan speed is marked.
To check the marking quality with several laser settings, use this function.

Reference

•  The functional characters of the laser settings are displayed in 5 digits including decimal point with right-justified.
• 

When marking laser power, scan speed, and laser pulse cycle at the same time, perform function input for each item.

• 

It is not possible to set the functional characters of the laser settings to bar code and 2D code data.

Setting procedures

1. 

Press [FUNC. CHAR.] (FUNCTION CHARACTER).

2. 

Press [CONDITION].

Select the marking contents from the following 
parameters.

• 

Laser power

• 

Scan speed

• 

Laser pulse cycle (Only LP-V series) 

3. 

Press [INPUT] and then, press [SET].

Character strings to represent the functional characters of marking condition

%POWER:  Laser Power
%SPEED: 

Scan Speed

%PULSE: 

Laser pulse cycle (Only LP-V series)

2

3

1

ME-LP400V-OP-6

Содержание LP-400 Series

Страница 1: ...idsx global Laser Marker Operation Maintenance Manual LP 400 series LP V series LP W series ME LP400V OP 6 No 9000 0062 14V Please read these instructions carefully before using this product and save this manual for future use ...

Страница 2: ... 5 Please remind that we assume no liability for any results arising out of operations regardless of the above clauses Disclaimer The applications described in this document are all intended for examples only The purchase of our products described in this document shall not be regarded as granting of a license to use our products in the described applications We do NOT warrant that we have obtaine...

Страница 3: ...uctions to be observed This symbol is used to alert users to a specific operating procedure that must not be performed This symbols is used to alert users to a specific operating procedure that must be followed in order to operate the unit safely This symbols is used to alert users to a specific operating procedure that must be performed carefully DANGER Never look at laser beam directly through l...

Страница 4: ...ucts subject to the local laws and regulations of the country or region in which this laser product is used To protect the operators eyes make it mandatory to wear goggles against laser beam within the laser controlled area The protective goggles can momentarily protect the eyes against the scattered beam Never look at the direct beam or reflected beam even when you are wearing the protective gogg...

Страница 5: ...iring cable connecting and or maintenance work ensure that all the power switches are turned off Otherwise electrical shock may result The wiring and maintenance must be conducted by the electrical engineers or under their supervision Incorrect work may cause electrical shock Connect ground wire before using A failure or electrical leakage that occurs when the unit is not properly grounded may res...

Страница 6: ...aser beam is blocked by dust or gas it may cause decrease in laser marking or processing quality Installation and mounting Do not hold the cables and connectors at carrying this product Do not touch the laser emission port on the bottom of the head They may affect the laser marking quality badly For LP V LP W series do not grasp the fiber unit when carrying the head part Carry the head as shown in...

Страница 7: ...sed in the same raceway or connected in parallel to any device that generates high tension wires power lines large switching surge or the like There is a risk of malfunction caused by induction USB cable should not be connected in parallel with the controller power cable or the motor power cable Make the wiring as short as possible to prevent a malfunction by the noise Operation Do not turn off th...

Страница 8: ...SER AND ALL OTHER WARRANTIES EXPRESS OR IMPLIED INCLUDING WITHOUT LIMITATION THE WARRANTIES OF MERCHANTABILITY FITNESS FOR A PARTICULAR PURPOSE AND NON INFRINGEMENT OF PROPRIETARY RIGHTS ARE HEREBY EXPRESSLY DISCLAIMED IN NO EVENT SHALL PANASONIC INDUSTRIAL DEVICES SUNX AND ITS AFFILIATED ENTITIES BE LIABLE FOR DAMAGES IN EXCESS OF THE PURCHASE PRICE OF THE PRODUCTS OR FOR ANY INDIRECT INCIDENTAL ...

Страница 9: ... A1 2010 Industrial scientific and medical equipment Radio frequency disturbance characteristics Limits and methods of measurement EN61000 6 2 2005 Electromagnetic compatibility EMC Generic standards Immunity for industrial environments 2014 35 EU Low Voltage Directive EN60204 1 2006 A1 2009 Safety of machinery Electrical equipment of machines General requirements partially applied 2 EN61010 1 201...

Страница 10: ...ording to the laws and regulations of the country region or area applicable Attention for the laser marker disposal For disposal of this product segregate and dispose of it appropriately according to the laws and regulations of the country region or area applicable Batteries when disposed in the European Union must be separately collected in accordance with the EU Battery Directive 2006 66 EC EU B...

Страница 11: ...11 MEMO ME LP400V OP 6 ...

Страница 12: ...4xx T U A LP 410U C LP 410TU C LP 4xx T U C LP 410U CHN LP 410TU CHN LP 4xx T U CHN LP 435U LP 435TU LP 4xx T U LP 435 LP 4x5 LP 435U A LP 435TU A LP 4xx T U A LP 435U C LP 435TU C LP 4xx T U C LP 435U CHN LP 435TU CHN LP 4xx T U CHN LP 425S9U LP 425S9TU LP 4xxS9 T U LP 425 LP 425S9U A LP 425S9TU A LP 4xxS9 T U A LP 425S9U C LP 425S9TU C LP 4xxS9 T U C LP 425S9U CHN LP 425S9TU CHN LP 4xxS9 T U CHN...

Страница 13: ...ting method How to operate the laser marker and set the marking data using touch panel console or monitor and mouse Maintenance Troubleshooting External Control Manual This manual describes how to control this product externally using I O signals and serial communication RS 232C Ethernet commands Mainly the machine builder and system integrator shall be required for reading this manual I O control...

Страница 14: ...P 110 Mark Lot Mark Step Repeat P 98 Ѝ Ѝ Ѝ JAN FEB DEC January February December P 113 Mark Counter Mark to Flying Object P 101 0 0 0 1 0 0 0 2 0 0 0 3 0 0 0 4 P 117 Let s Try Contents The user can refer to the corresponding pages in which the contents of what user tries to do are described using this Let s Try Contents ME LP400V OP 6 ...

Страница 15: ...t External Control Manual A B C A B C Convert or Edit Graphic Data Create or Edit Making Font Logo Data Conversion Software Operation Manual Logo Data Editing Software Operation Manual Font Maker Operation Manual Install Laser Marker NAVI When in Trouble Laser Marker NAVI Operation Manual Troubleshooting P 291 ME LP400V OP 6 ...

Страница 16: ... LP V LP W Series 43 1 4 3 Cable 45 1 4 4 Console Option 46 1 5 Package 47 1 6 Name of Each Part 49 1 6 1 Head 49 1 6 2 Controller 53 1 6 3 DIP Switch 57 2 Installation and Connection 58 2 1 Installation 59 2 1 1 Installation Environment 59 2 1 2 Installation of LP 400 Series Head 61 2 1 3 Rotation of LP 400 Standard Head Scanner 64 2 1 4 Installation of LP V LP W Head 65 2 1 5 Installation of the...

Страница 17: ...k Counter 101 3 3 5 Mark Code Symbol 105 3 3 6 Mark Logo 110 3 3 7 Mark Step Repeat 113 3 3 8 Mark to Flying Object 117 4 Description of Operation Screen 121 4 1 Screen Composition 122 4 2 Functional Description 124 4 3 Operation Screen 126 4 3 1 Character Display 126 4 3 2 Image Display 127 4 3 3 Password to Open the Setting Screen 128 4 4 Operator Adjustment Screen 129 4 4 1 Operator Adjusting S...

Страница 18: ... Processing Condition 207 4 10 6 Point Radiation Condition 212 4 11 Laser Setting 214 4 11 1 Setting Parameters 214 4 11 2 Detail Adjustment Laser Setting 217 4 12 Trigger Setting 219 4 12 1 Marking to Static Work 219 4 12 2 Marking to Flying Object 220 4 13 Common Setting 232 4 13 1 Common Character Setting 233 4 13 2 Common Expiry Date 234 4 13 3 Common Counter 235 4 13 4 Common Lot 237 4 14 Ima...

Страница 19: ...nt of Laser Emission Port 276 Intake exhaust vent 278 Air filter 279 Air cooling fan 280 Laser oscillator 281 Galvano scanner 284 Internal shutter 285 Battery inside the controller 285 Replacement of fuse 286 Replacement of cable 286 Obtaining Backup Data 287 Serial No Checking Method 288 Disposal of Laser Marker 289 Cautions for separate disposal of head of LP 400 series 289 Disposal of old equip...

Страница 20: ... the maximum permissible exposure to eyes It is equal of NOHD at a maximum NHZ varies depending on the reflectance or surface condition of works Please calculate it based on the actual working environment Nominal hazard zone Model Name LP 420S9U LP 420S9TU LP 421S9U LP 421S9TU LP 425S9U LP 425S9TU Remarks Wavelength 9 3 μm Invisible beam Laser Medium CO2 Laser Max Output 1 75 W Mode of Operation C...

Страница 21: ... of Operation CW continuous wave Class 2 1 Sum of the guide laser and pointer values Radiation range of LP 400 Series Standard Head Model A C E G C E G B F D NOHD Unit mm Specified Point Model LP 430U LP 420S9U LP 410U LP 431U LP 421S9U LP 411U LP 435U LP 425S9U A Center Position of Laser Emission Port 28 B Center Position of Laser Emission Port 113 C Diameter of Laser Emission Port φ66 D Working ...

Страница 22: ...U LP 411TU LP 435TU LP 425S9TU A Center Position of Laser Emission Port 22 B Center Position of Laser Emission Port 170 5 C Diameter of Laser Emission Port φ66 D Working distance 185 111 262 E Laser Radiation Range at Working distance φ160 φ80 φ230 F NOHD 4900 2500 3000 1500 6900 G Laser Radiation Range at NOHD φ3500 φ1900 φ1600 φ800 φ5300 ME LP400V OP 6 ...

Страница 23: ...se calculate it based on the actual working environment Nominal hazard zone 1 The maximum output power means the maximum value of output that can be output from a laser oscillator itself Refer to 1 3 Specification P 36 for details of average output 2 The pulse width means the available output range from the laser oscillator itself 3 NOHD means the distance that the area where the amount of beam ir...

Страница 24: ... Center Position of Laser Emission Port 60 B Center Position of Laser Emission Port 91 C Diameter of Laser Emission Port φ87 φ106 φ87 D Working distance 190 350 127 E Laser Radiation Range at Working distance φ130 φ230 φ80 F NOHD 35800 65900 21000 G Laser Radiation Range at NOHD φ19200 φ37700 φ10000 ME LP400V OP 6 ...

Страница 25: ... the laser protective goggles or glasses which meet the following requirements For LP 400 series The goggles or glasses that have Optical Density OD of more than 6 at wavelength 9300 nm to 10600 nm 9 3 to 10 6 micrometers For LP V LP W series The goggles or glasses that have Optical Density OD of more than 6 at wavelength 1060 nm to 1070 nm 1 06 to 1 07 micrometers Through the goggles or glasses t...

Страница 26: ...e the specular object for the termination Path of laser beam The laser beam path should be set avoiding the eye level of workers at both sitting and standing time Illumination Make the area surrounding the laser marker well lighted as much as possible Because the pupils are contracted in the well lit place it reduces the risk to the eyes For LP V LP W series do not expose strong beam to the laser ...

Страница 27: ...n indicator are as follows Laser in non pumped state Lights out Laser pumping is in progress uncompleted and internal shutter closed Blue flashing Laser pumping is in progress uncompleted and internal shutter opened Purple flashing 1 Being in laser pumped state and internal shutter closed Blue lighted up Being in laser pumped state and internal shutter opened Purple lighted up Being in laser emitt...

Страница 28: ...ning Explanatory Aperture Label LP 430 T U A LP 431 T U A LP 435 T U A LP 430 T U C LP 431 T U C LP 435 T U C LP 420S9 T U A LP 421S9 T U A LP 425S9 T U A LP 420S9 T U C LP 421S9 T U C LP 425S9 T U C LP 410 T U A LP 411 T U A LP 410 T U C LP 411 T U C LP V10U A LP V15U A LP V10U C LP V15U C LP W052U A 4 Protective Housing Label 5 Certification and Identification Label for FDA compliant model LP 4x...

Страница 29: ...n alarm generates Release the cause of alarm and press this switch Alarm can be reset from the input output terminal console optional or monitor screen 5 Laser Stop Input Emergency Stop Input I O terminal The I O terminal equips Laser Stop input and Emergency Stop input Opening either of the signals or making its voltage level Low disables the laser emission Construct the safety system by connecti...

Страница 30: ... Stop in I O terminal CLOSE to OPEN Laser Pumping OFF Internal Shutter CLOSE Status Alarm E004 2 Close Emergency Stop and input alarm reset Push Emergency Stop Switch Laser Pumping OFF Internal Shutter CLOSE Status Alarm E002 2 Push emergency stop switch and input alarm reset 1 The operation behavior of Laser Stop varies depending on the laser emission ON OFF status Inputting Emergency Stop in I O...

Страница 31: ...er power when it is opened w Door for the maintenance e Safety switch r Laser protection shutter for marking object gateway Construct a control system which will separate cut off the laser beam or shut off the laser power when it is open t Depending on the system control specification use safety relay unit or safety PLC etc Connect the devices q to r and I O terminal of the laser marker Depending ...

Страница 32: ...32 1 Product Overview ME LP400V OP 6 ...

Страница 33: ...9U C LP 425S9U CHN 160 x 160 Standard LP 425S9TU LP 425S9TU A LP 425S9TU C LP 425S9TU CHN Tower Head LP 410U LP 410U A LP 410U C LP 410U CHN 10W 10 6μm 110 x 110 Standard LP 410TU LP 410TU A LP 410TU C LP 410TU CHN Tower Head LP 411U LP 411U A LP 411U C LP 411U CHN 55 x 55 Standard LP 411TU LP 411TU A LP 411TU C LP 411TU CHN Tower Head Model Name Description LP 4 3 0 U A q w e t y LP 4 2 5 S 9 TU ...

Страница 34: ...ame Description LP V 1 0 U CHN q we LP W 05 2 U A q w e r r q Series name of the product LP V series and LP W series are the fiber laser markers w Represents laser output power class as follows 1 Oscillator average output power 12W 05 Oscillator average output power 5W e Represents marking field class as follows 0 Marking field 90 mm x 90 mm 5 Marking field 160 mm x 160 mm 2 Marking field 55 mm x ...

Страница 35: ...t the touch panel console or monitor and mouse to the laser marker to set the marking data and other parameters This display can be used also as a monitor during the operation It is also possible to configure the marking data with PC by installing the attached software Laser Marker Driver Utility Optional items The following optional items sold separately are available for this product To purchase...

Страница 36: ...85 240 Marking data Character Capital and small letter of alphabet numeric Japanese Katakana Hiragana Kanji of JIS level 1 and JIS level 2 symbols user registration character up to 50 characters can be set Bar code CODE39 CODE128 ITF NW 7 EAN UPC GS1 DataBar GS1 DataBar Limited GS1 DataBar Stacked GS1 DataBar Expanded etc GS1 composite code GS1 DataBar Limited CC A GS1 DataBar Stacked CC A GS1 128...

Страница 37: ...ece Weight Approx 9 5 g 1 Average output power from the laser oscillator at delivery time with the laser power setting 100 2 Value of output 20 or larger and at 10 min passed after starting up 3 Work distance has an individual error of approx 2 mm per product 4 The descried values are available ranges for configuration The marking quality may vary depending on materials of marking objects and mark...

Страница 38: ...DE128 ITF NW 7 EAN UPC GS1 DataBar GS1 DataBar Limited GS1 DataBar Stacked GS1 DataBar Expanded etc GS1 composite code GS1 DataBar Limited CC A GS1 DataBar Stacked CC A GS1 128 CC A etc 2D code QR Code Micro QR Code SQRC Security QR Code 5 DataMatrix GS1 DataMatrix Logo data 6 VEC DXF HPGL BMP JPEG AI EPS Character height width mm 3 0 1 to 90 0 1 to 160 0 1 to 55 Number of setting files Max 2 048 ...

Страница 39: ...n individual error of approx 2 mm per product 3 The descried values are available ranges for configuration The marking quality may vary depending on materials of marking objects and marking conditions 4 Depending on the marking data the available scan speed might be limited in case the continuous marking more than 1 minute with high scan speed is set 5 For using SQRC an optional software is needed...

Страница 40: ... LP 431U LP 421S9U LP 411U 111mm LP 435U LP 425S9U 262mm w Center of marking field e Marking Field X Y LP 430U LP 420S9U LP 410U 110mm x 110mm LP 431U LP 421S9U LP 411U 55mm x 55mm LP 435U LP 425S9U 160mm x 160mm r Center of the scanner unit rotation t Screw hole for general purpose 2 holes in each surface of top and both sides M4 Screw Depth 10 y Laser pointer emission port Aperture diameter φ19m...

Страница 41: ...LP 420S9TU LP 410TU 110mm x 110mm LP 431TU LP 421S9TU LP 411TU 55mm x 55mm LP 435TU LP 425S9TU 160mm x 160mm r Laser pointer emission port Aperture diameter φ19mm t Head positioning pin hole of lens side surface φ4 0 06 0 02 Depth 6 5 y Head positioning pin hole of lens side surface φ4 0 06 0 02 x 5 Elongated hole Depth 6 5 u Head fixing screw hole of lens side surface 6 holes M6 Screw Depth 7 i H...

Страница 42: ... 390 54 20 120 40 310 q w q 164 Unit mm No Description q Rubber feet installation screw hole 4 holes on base and left side surface each M5 Depth 6 The rubber feet for controller can be installed on base or side surfaces w Screw for frame ground M4 Depth 10 ME LP400V OP 6 ...

Страница 43: ... mm LP W052U 55 mm x 55 mm r Laser pointer emission port φ27 mm Aperture diameter φ20 mm t Laser emission port LP V10U φ87 mm LP V15U φ106 mm LP W052U φ87 mm y Laser emission port height LP V10U 19 mm LP V15U 40 mm LP W052U 19 mm u Head positioning pin hole φ4 0 012 0 Depth 7 i Head positioning pin hole φ4 0 1 0 x 5 Elongated hole Depth 7 o Head fixing screw hole LP V10U LP W052U 10 holes LP V15U ...

Страница 44: ...lation screw hole 4 holes on base and left side surface each M5 Depth 6 The rubber feet for controller can be installed on base or side surfaces w Screw for frame ground M4 Depth 10 Notice Both the head and controller are connected with fiber cable and this cable cannot be detached from the device Forcibly detaching them might damage the product ME LP400V OP 6 ...

Страница 45: ...an Attached to LP 4xx T U LP 4xx T U A LP VxxU LP VxxU A LP W type wRating 250V VDE standards compatible cable Europe Attached to LP 4xx T U C LP VxxU C eRating 250V CCC standards compatible cable China Attached to LP 4xx T U CHN LP VxxU CHN type Unit mm Minimum bending radius 50mm q w e 3000 50 Head Power Cable Unit mm Minimum bending radius 100mm 50 ȭ26 ȭ11 5000 200 0 Head Control Cable Unit mm ...

Страница 46: ...ADP40 Unit mm 171 41 5 15 6 55 143 1 2 19 5 2900 70 80 0 8 w e q 60 253 197 128 No Description q Pen holder attaching nut M4 depth 6 both left and right sides w Fixing nut 4 positions M4 depth 6 e Controller Connecting Cable ME LP400V OP 6 ...

Страница 47: ...sportation For LP V LP W series both the head and controller are connected with fiber cable and this cable cannot be detached from the device Forcibly detaching them might damage the product LP 400 Standard Head model LP 400 Tower Head model LP V LP W Series Laser Marker 1 head unit and 1 controller unit Head Power Cable Head Control Cable Controller Power Cable 1 System Key qty 1 qty 1 qty 1 qty ...

Страница 48: ...lish LP 4xx T U CHN LP VxxU CHN Chinese 6 The following data are stored into this CD ROM Laser Marker Driver Utility Software for PC Setting of Laser Marker Laser Marker NAVI Font Maker Logo Data Conversion Software Export VEC Logo Data Editing Software PDF Manual LP 400 V W series Operation Maintenance Manual LP 400 V W series External Control Manual Laser Marker NAVI Operation Manual Logo Data C...

Страница 49: ...Series with the Standard Head LP 4xxU LP 4xxU A LP 4xxU C LP 4xxS9U LP 4xxS9U A LP 4xxS9U C 1 3 7 9 10 2 6 8 4 5 LP 400 Series with the Tower Head LP 4xxTU LP 4xxTU A LP 4xxTU C LP 4xxS9TU LP 4xxS9TU A LP 4xxS9TU C 1 2 3 6 8 7 5 4 ME LP400V OP 6 ...

Страница 50: ...This is the emission port of the laser beam 6 Focus Dial This is the dial to check the focus adjusting Refer to 2 1 8 Focus adjustment function P 70 for the detail 7 Focus Adjusting Control The control for adjusting the distance from the work Refer to 2 1 8 Focus adjustment function P 70 for the detail 8 Intake Vent for Air Cooling Air inlet for cooling the head In this vent the filter is installe...

Страница 51: ...e emission port of the red laser pointer radiated when using the dual pointer function To use the dual pointer function do not seal the laser pointer emission port at the installation For details refer to 2 1 7 Lasing position check P 69 5 Laser Emission Port This is the emission port of the laser beam 6 Focus Dial This is the dial to check the focus adjusting Refer to Refer to 2 1 8 Focus adjustm...

Страница 52: ...ad In this vent the filter is installed 9 Frame Ground Terminal F G This is the terminal for ground Be sure to connect it to earth permanently 10 Fiber Cable This is the cable for transmitting the laser This cable cannot be detached from the device ME LP400V OP 6 ...

Страница 53: ...val for 5 seconds or more from turning OFF the power to turning ON the power again Do not turn off the power supply while the system starts during the system start indicator is flashing 2 Controller display panel The indicator that shows the status of laser radiation and the laser marker No Display name Status Indication q FILE No ERROR CODE Normal state Displays selected file No Alarm or warning ...

Страница 54: ... Switch EMERGENCY STOP This switch is used to forcibly stop the laser pumping Push this switch at emergency or to stop the laser radiation Turn the switch to the direction of the arrow to release it 7 Console Connector CONSOLE This is the connector for console optional 8 USB Connector B PC This is the connector for connecting the attached USB cable Connect with PC in using Laser Marker NAVI 9 USB ...

Страница 55: ...Manual If Ethernet is not used for the external control connect nothing to the Ethernet port 4 VGA Connector VGA OUT This is the connector for connecting VGA OUT monitor When using a console optional item connect the attached return harness 5 USB Connector A 2 connectors This is the terminal for connecting the USB media or USB mouse For registering or saving data in the laser marker connect a comm...

Страница 56: ...0V to 264V AC including 10 voltage fluctuations 50Hz 60Hz The voltage and frequency switch automatically Be sure to connect the ground pin of the controller power cable to earth permanently 11 Frame Ground Terminal F G This is the terminal for ground Be sure to connect it to earth permanently 12 Fuse Holder FUSE Rotate and remove holder for replacing the fuse on fusing The rated ampere of the fuse...

Страница 57: ... does not sound buzzer when occurring error OFF This setting sounds buzzer when occurring error No 4 Selects valid invalid for password lock when shifting screen from operation to each setting one ON Sets invalid for password lock OFF Sets valid for password lock Refer to Password P 255 for the detail No 5 Selects shifting method for the remote mode ON Controls switching to the remote mode from th...

Страница 58: ...2 Installation and Connection ME LP400V OP 6 ...

Страница 59: ...oil contents and dust from entering into the laser marker e g using a storage box Installation environment for the stable operation For the stable operation install the laser marker with an appropriate protection measures as follows according to the usage environment Protection in a dusty place If the laser marker is installed at a dusty and or oil mist laden place it could cause malfunction of th...

Страница 60: ...an the laser emission port regularly B C D A B C D B C D Compressed Air Dust Collector Protection against electrical noise If there are devices that generate electrical noise such as a motor or the objects that generate static electricity around the laser marker the laser marker can be damaged by the noise Securely ground the frame ground terminal of the laser marker Depending on the grounding env...

Страница 61: ...to the outer dimension in 1 4 1 LP 400 Series P 40 Fix the head with the following conditions Head type Fixing position Fixing screw Inserting length of the screw Tightening torque Standard head Bottom face M6 screws at 6 positions 7 mm to 10 mm 3 0N m or below Tower head Rear face 7 mm to 10 mm Bottom face Laser emission port side 5 mm to 7 mm Laser marker Washer thickness stand thick Inserting l...

Страница 62: ...e mounted in the left right top and bottom direction When the lens side is mounting surface install the tower head always with the lens side down Notice Do not incorporate the laser marker in a unit where the laser head will be moved It may cause failure When install the head with the lens side up clean the laser emission port and remove the marking dust regularly When the lens side of the tower h...

Страница 63: ...sure the minimum bent radius of each cable Please install not to bar the flow of air cooling Installing near a heating element could be over ambient temperature and cause malfunction of the product When setting more than one laser marker install them so that a space of 300mm or more is given between the heads of each marker Not doing so may cause malfunction It might cause the malfunction with the...

Страница 64: ...e hexagon socket head cap screw M4 After rotating the scanner unit fix it tightly The tightening torque shall be 1 5N m or less Loosen Approx 200 degree Approx 150 degree M4 Hexagon Wrench WARNING Never use the laser marker with the setscrew for scanner angle loosened Failure to do so could rotate the head during the operation and cause laser emission to the dangerous direction Center of Rotation ...

Страница 65: ... with a thickness of 10 mm to 15 mm which is made of aluminum or other material with radiation performance equivalent to that of aluminum Tightening torque 3 0 N m or less The inserting length of the screw shall be 5 mm to 6 mm Laser marker Washer thickness stand thickness 5 to 6 mm M6 screw Lens cap For LP V LP W series the plastic lens cap is attached at shipping Be sure to remove it before use ...

Страница 66: ...ble Please install not to bar the flow of air cooling Installing near a heating element could be over ambient temperature and cause malfunction of the product When setting more than one laser marker install them so that a space of 300 mm or more is given between the heads of each marker Not doing so may cause malfunction It might cause the malfunction with the laser marker ME LP400V OP 6 ...

Страница 67: ...Tightening torque 2 0 N m or less The rubber feet can be mounted either on bottom or side face For the rubber feet installation use the attached M5 depth 15 mm screws M5 Screw M5 Screw Installation Space For the appropriate air cooling provide space around the device as shown in the following figure 150mm 50mm 50mm 200mm q w q Intake air w Exhaust Notice Ensure the minimum bent radius of each cabl...

Страница 68: ... Marking Field X Y mm 110 x 110 55 x 55 160 x 160 90 x 90 160 x 160 55 x 55 Notice Do not place anything in the area between the laser emission port and lasing object Use anti reflection material ex black paint for metal for an external shutter or a protective enclosure in a path of laser beam It may cause a failure of the components inside the head If any other devices such as a sensor or a camer...

Страница 69: ...e marking quality with the work distance indicated by the dual pointer and adjust it accurately as appropriate Refer to 4 6 1 Dual pointer P 136 for details Where the red point is closest to the center of the cross is the rough indication of the work distance LP 400 Series LP V LP W Series Guide Laser Function The marking contents and marking field can be traced with the red guide laser By using t...

Страница 70: ...is not closed Use the focus adjusting function when the product is installed Do not use this function for the daily use such as setup change Excessive use of this function may cause failure of the product q w q w Short Long Focus adjusting control Focus adjusting ruler w Turn in the right direction Long direction Makes the work distance focal length longer q Turn in the left direction Short direct...

Страница 71: ...is set to 0 at factory Adjusting focus changes the marking field and spot diameter In addition the amount of the spot diameter difference between the marking field center and the marking field end becomes large which may cause uneven marking quality The dual pointer is adjusted according to the distance from the work defined at the factory When the work distance is changed by the focus adjustment ...

Страница 72: ...e 5 m Min bending radius 100 mm Head Power Cable 5 m Min bending radius 100 mm Terminal Block Controller Head To SIGNAL To TERMINAL To SIGNAL To POWER To POWER LP V Series and LP W Series Fiber Cable 4 5 m Min bending radius 60 mm This cable can not be detached Head Power Cable 5 m Min bending radius 100 mm Terminal Block Controller Head To SIGNAL To TERMINAL To SIGNAL To POWER To POWER Head Contr...

Страница 73: ...ing and inserting the cable may cause a failure Reference Connect the terminal block wiring IN COM OUT COM LASER STOP and EMER with proper connection respectively The laser pumping and marking cannot start without connecting them Cable Wiring for LP 400 series Tower Head For LP 43xTU LP 42xS9TU LP 43xTU C LP 42xS9TU C LP 43xTU CHN LP 42xS9TU CHN model connect the cables using the banding band and ...

Страница 74: ...e it is used Set each connecting cable away from the device that generates high voltage power line and large switching surge as far as possible If any noise is occurred on the power source use the noise cut off transducer 90 V to 132 V AC or 180 V to 264 V AC 50 60 Hz Auto switching Controller Head Controller power cable Frame ground F G Earthing conductor Ground pin 125V cable AC power supply INL...

Страница 75: ...capacity 1GB or more Display resolution 1024 x 768 pixels or above Others Pointing device such as a mouse and character input device such as a keyboard 1 The CPU type memory capacity hard disk space and display function required to operate each OS should be provided in accordance with the recommendation of Microsoft 2 To install the software on a PC without a CD ROM drive copy all CD ROM data to t...

Страница 76: ...onnection status does not warrant all operations of VGA monitor and USB mouse Do not take out and put in a monitor and a mouse in being powered on When using monitor and mouse do not connect the return harness USB hub cannot be used for this product There is 1 port on the front of the controller and 2 ports on the back for USB connector A USB mouse can be connected in any of these ports The connec...

Страница 77: ...3 Basic Operation Procedure ME LP400V OP 6 ...

Страница 78: ... button According to the selected button the screen will change Reference If the touch panel responds out of the pointed position adjust the touch panel referring to 4 16 6 Adjustment of Touch Panel P 268 Selection of setting items Select the setting items with the following methods q Press pq or tu button to switch the items w Press the item to be set from the list The item displayed with is sele...

Страница 79: ...s SET q w e r t y u Function of the button on the entry field q CANCEL closes the entry field screen w SET fixes the input and close the entry field screen e Arrow key moves the input cursor position r DEL deletes a character or number behind of the cursor t BS removes a character or number in front of the cursor y The decimal point and minus symbols are displayed in the numeric input window u SP ...

Страница 80: ...Laser Marker 1 Setup and connect the laser marker 5 Save the marking data 1 Select the File No 2 Input the marking contents characters symbol code logos etc 3 Set the marking layout coordinates size etc 4 Set the laser condition 1 Confirm the radiation position by the guide laser 2 Radiate the laser for marking 3 Set the marking data 4 Radiate the laser ME LP400V OP 6 ...

Страница 81: ...formance install not to bar the flow of air 2 Connect the head and controller of the laser marker using these cables Head control cable Head power cable Fiber cable 1 3 Connect the following devices and cables to the controller Touch panel console and return harness or monitor and mouse or PC I O terminal 2 4 Connect the controller power cable 1 Only for LP V and LP W series The fiber cable cannot...

Страница 82: ... Flash in green i Light up in green Notice Since the ON OFF operation of the key switch puts load to laser marker do not turn off the power supply until completing the system start In case of turning ON the power supply after turning OFF leave the interval at least 5 seconds between ON and OFF 2 The operation screen is appeared after the system is started Reference To switch the display language r...

Страница 83: ...ata are stored in file format Select the file No at first to set the marking data 1 Press SETTING to switch the screen mode from operation to setting mode 2 Press FILE 3 Press CHANGE FILE No The Select File No window will appear 4 Select the file number and press EXECUTE ME LP400V OP 6 ...

Страница 84: ... input character data ABCD 1 Press CHARACTER The screen is changed into the character setting one 2 Place the cursor on the first line 01 and press EDIT Re adjusting the cursor to the first line 01 and then pressing double clicking the same cursor performs the same operation 3 Press ALPHA NUM 4 Input ABCD 5 Press SET ME LP400V OP 6 ...

Страница 85: ...haracter Interval 5 mm Character Width 4 mm Character Height 4 mm Starting Coordinate X 10 mm Y 5 mm 1 Press CONDITION Then press CHARACTER 2 Set 4 mm to Character Height Set 4 mm to Character Width Set 10 mm to X Position Set 5 mm to Y Position Set 5 mm to Char Interval Character Interval 3 Press IMAGE to check the marking layout ME LP400V OP 6 ...

Страница 86: ... Power The larger value the marking becomes darker or deeper To find the proper value set here from small value and adjust it to larger value according to the marking quality 3 Set 300 mm s to Scan Speed The larger value the marking becomes lighter and the marking time becomes shorter ME LP400V OP 6 ...

Страница 87: ...osition for each model For the appropriate work distance for each model refer to 1 3 Specification P 36 Reference The work distance can visually be confirmed using 4 6 1 Dual pointer P 136 2 Press IMAGE to check the marking layout 3 Press INDICATE 4 Select Marking Character and press START The marking content is displayed with the red guide laser Adjust the position of the marking object 5 The gui...

Страница 88: ...he switch is changed from flashing to lightning up the laser marker is ready for radiation Flashing time approx 20sec 2 Select TEST of the marking mode 3 The marking is started by pressing START WARNING The laser beam is emitted Be sure to use the protective goggle and enclosure while dealing with the laser Flashing to lightning ME LP400V OP 6 ...

Страница 89: ...ring of the Comments to set the file name 3 Input the comment and press SET Reference For the file name up to 20 characters can be input in case of inputting all single byte letter 4 Press SAVE The file content is saved Notice The file is not saved only by inputting file name For saving the file be sure to overwrite the file ME LP400V OP 6 ...

Страница 90: ... a laser safety manager Notice If turning off the power of the laser marker without overwriting the file under dealing the data is not saved Be sure to check the file saving before turning off the power Do not turn off the power during marking Turning off the power during marking might cause the failure of the laser marker If it needs to stop the laser radiation immediately press the emergency sto...

Страница 91: ...ter and laser applied for the current date function Notice The following items Date Lot and Expiry date are marked based on the internal clock of the laser marker The internal clock might be deviated caused by the error of the internal parts or degree of the battery drain Therefore be sure to check the time of the internal clock before the operation without fail Reference For details on the curren...

Страница 92: ...haracter 1 Press CHARACTER 2 Select the first line 01 and press EDIT Or double click the first line 01 3 Press FUNC CHAR FUNCTION CHARACTER and press CURRENT CURRENT DATE 4 Set 2 to Figure 5 Select Hour 24 6 Select Zero Indi ME LP400V OP 6 ...

Страница 93: ...t from 1 to 6 9 Select Minute 10 Select Zero Indi 11 Press INPUT and then press SET The 02 H0 02 m0 is input into the first line of the marking character string 12 Press IMAGE to check the marking layout The data to be marked current time is displayed 2 1 ME LP400V OP 6 ...

Страница 94: ...r Notice The following items Date Lot and Expiry date are marked based on the internal clock of the laser marker The internal clock might be deviated caused by the error of the internal parts or degree of the battery drain Therefore be sure to check the time of the internal clock before the operation without fail Reference For details on the expiry date function refer to 4 9 1 Expiry Date P 162 By...

Страница 95: ...ion is set to expiry No 1 Reference The expiration is settable up to 4 per file 1 to 4 Other than this setting the setting for common counter 5 to 8 that are common to all files are available Refer to 4 13 Common Setting P 232 2 Set 30 to Expi Expiry Date 3 Set Day to Unit 2 1 ME LP400V OP 6 ...

Страница 96: ...ct the first line 01 and press EDIT Or double click the first line 01 3 Press FUNC CHAR FUNCTION CHARACTER and then press EXPIRY Expiry Date 4 Enter 1 to the EXPIRY Expiry No field Set 2 to Figure The figure can be set from 1 to 6 5 Select Month 6 Select Zero Indi ME LP400V OP 6 ...

Страница 97: ...ontinuously 9 Select Zero Indi 10 Press INPUT and then press SET The 02 M1 02 D1 is input into the 1st line of the marking character string 11 Press IMAGE to check the marking layout The date to be marked is displayed ME LP400V OP 6 ...

Страница 98: ...s Date Lot and Expiry date are marked based on the internal clock of the laser marker The internal clock might be deviated caused by the error of the internal parts or degree of the battery drain Therefore be sure to check the time of the internal clock before the operation without fail Reference For details on the lot function refer to 4 9 3 Lot P 166 By using TIME HOLD IN signal of the I O conne...

Страница 99: ...The period of the lot is selectable among Expiry 1 to Expiry 8 Counter 0 to Common Counter 7 other than Current Date Refer to 4 9 Function Setting P 162 4 Set Month to Unit 5 Define Period and Marking Character Set the period and marking character as follows Period Marking Character 1 to 1 JAN 2 to 2 FEB 3 to 3 MAR 4 to 4 APR 5 to 5 MAY 6 to 6 JUN 7 to 7 JUL 8 to 8 AUG 9 to 9 SEP 10 to 10 OCT 11 t...

Страница 100: ...line 01 and press EDIT Or double click the first line 01 3 Press FUNC CHAR FUNCTION CHARACTER and press LOT 4 Set 0 to Lot Lot No 5 Press INPUT and then press SET The SFT 0 is input to first line of the marking character string 6 Press IMAGE to check the marking layout ME LP400V OP 6 ...

Страница 101: ...i Enable Type of base number Base 10 Decimal number system Set the counters shown above 2 Input the function character of the counter 1 Set the counter Refer to 3 Set the marking layout P 85 and 4 Set the laser condition P 86 in 3 2 3 Set the marking data P 83 3 Set the conditions of the function character of the counter and laser Reference For details on the counter function refer to 4 9 2 Counte...

Страница 102: ... to 4 per file 0 to 3 Other than this setting the setting for common counter 4 to 7 that are common to all files are available For details refer to 4 13 3 Common Counter P 235 2 Set 1 to Curr current value Set 1 to Init initial value Set 1000 to End end value Set 1 to Step Select TRIG TRIGGER for Source Count Source 1 2 ME LP400V OP 6 ...

Страница 103: ...EDIT Or double click the first line 01 3 Press FUNC CHAR FUNCTION CHARACTER and press COUNTER 4 Set 0 to Counter Counter Number Set 4 to Figure Set 0 to Offset Set the number to Decimal Number Select Zero Indi Zero indication The figure can be set from 1 to 6 The offset can be set from 0 to 9 The number can be set from 2 binary to 36 ME LP400V OP 6 ...

Страница 104: ...104 5 Press INPUT and then press SET The 04 C0 is input to 1st line of the marking character string 6 Press IMAGE to check the marking layout 0001 is displayed 2 1 ME LP400V OP 6 ...

Страница 105: ...to mark the above QR code at a center point with X coordinate 0 and Y coordinate 0 are described below 3 Set the pattern 2 Set the data to be converted into QR code Refer to 4 Set the laser condition P 86 in 3 2 3 Set the marking data P 83 4 Set the laser setting of QR code 1 Set QR code condition Reference For details on QR code marking refer to Setting for QR Code and DataMatrix Code P 198 ME LP...

Страница 106: ...Then press BAR CODE 2 Set 0 to Bar Code No The bar code numbers 0 to 7 can be selected per file 3 Set QR Code Model 2 to Bar Code Type Set the bar code type from the bar code pop up window after clicking Type column 4 Press CONDITION ME LP400V OP 6 ...

Страница 107: ...umeric to Mode Press Mode to switch display in the order of Alpha Binary Kanji and Numeric 7 Set H to Err Cor Error Correction Press Err Cor to switch display in the order of M Q H and L 8 Set 0 500 mm to Module H Module Height Set 0 500 mm to Module W Module Width 9 Set QR position Set 0 000 mm to X Pos Set 0 000 mm to Y Pos ME LP400V OP 6 ...

Страница 108: ...the data to be converted into QR code 1 Select the first line 01 of the QR Code Data and press EDIT Or double click the first line 01 2 Press ALPHA NUM and input ABCDEFGHIJKLMN12345 3 Press SET 2 1 ME LP400V OP 6 ...

Страница 109: ...Select a pattern and press SET Reference If a reading failure occurs with the standard pattern use the font maker provided to created the proper pattern Refer to Font Maker Operation Manual for details 2D code pattern can be also set using the character code Press JIS Code to open the ten key pad and then input the character code 4 Press IMAGE to check the marking layout 2 1 ME LP400V OP 6 ...

Страница 110: ...like shown above is described below 2 Set the condition for logo 1 Select logo data Refer to 4 Set the laser condition P 86 in 3 2 3 Set the marking data P 83 3 Set the conditions for the laser Reference For details on logo marking refer to 4 10 3 Logo Condition P 186 ME LP400V OP 6 ...

Страница 111: ...arker Refer to 4 15 USB Media P 241 and Logo Data Conversion Software Operation Manual As for the following file format data BMP DXF JPEG and HPGL and art work made by Adobe Illustrator convert these data into the appropriate file format data using logo data conversion software or ExportVec and then register the data into the laser marker DXF files are not required to be converted Refer to the Log...

Страница 112: ...Angle 3 Set 100 to Laser Power Cor Laser Power Correction Set 100 to Scan Speed Cor Scan Speed Correction Reference To adjust the laser power and or scan speed set in the laser setting screen only for the logo data input the correction ratio in this screen Refer to 4 10 3 Logo Condition P 186 4 Press IMAGE to check the marking layout ME LP400V OP 6 ...

Страница 113: ...al 4 mm Character Width 3 mm Row Step 10 mm Character Height 3 mm Mark ABC in 3 columns and 3 rows 3 Set the conditions for Step Repeat 2 Set the character condition 1 Set the marking character Refer to 4 Set the laser condition P 86 in 3 2 3 Set the marking data P 83 4 Set the laser condition Reference For details refer to Step Repeat P 175 ME LP400V OP 6 ...

Страница 114: ...114 1 Set the marking character 1 Press CHARACTER 2 Select the first line 01 and press EDIT Or double click the first line 01 3 Press ALPHA NUM 4 Input ABC and press SET ME LP400V OP 6 ...

Страница 115: ...ion 1 Press CONDITION Then press CHARACTER 2 Set 3 000 mm to Character Height Set 3 000 mm to Character Width Set 0 000 mm to X Position Set 0 000 mm to Y Position Set 4 000 mm to Char Interval Character Interval ME LP400V OP 6 ...

Страница 116: ...ess STEP and REP 2 Check Step and Repeat 3 Set 3 to Number of Row Set 3 to Number of Col Number of Column 4 Set 10 mm to Row Step Set 18 mm to Column Step 5 Set 20 000 mm to X Offset Set 20 000 mm to Y Offset 6 Press IMAGE to check the marking layout ME LP400V OP 6 ...

Страница 117: ...n the fly marking P 118 2 Set the conditions of the on the fly marking 1 Input character and set the marking conditions The detail is described in 2 Set the status of the laser marker into ready for receiving for trigger P 120 3 Set the status of the laser marker into ready for receiving trigger Reference For details on marking on moving object refer to 4 12 2 Marking to Flying Object P 220 ME LP4...

Страница 118: ... Direction The work is marked to the direction shown in the following figure RIGHT RIGHT RIGHT Notice Set the marker head in vertical against the work flow direction Reference Refer to 4 12 Trigger Setting P 219 for the work moving direction 3 Set Trigger Marking to Trigger ME LP400V OP 6 ...

Страница 119: ...rection Sensor Delay distance Work direction Notice Fine adjust the delay distance by executing the test marking actually Reference When the line speed fluctuates use Encoder signal In such case enter the number of encoder pulses When the encoder is not used marking on flying objects is executed by applying the calculation result based on the line speed already input For the encoder signal refer t...

Страница 120: ...sec 2 Set marking mode to RUN 3 Press START The marking is started by inputting trigger Reference Set the marking mode to RUN and press START Then the internal shutter is opened and the laser marker is ready for receiving the trigger For changing the status of the laser marker into ready for receiving trigger set the marking mode to REMOTE other than setting into RUN mode and control the laser mar...

Страница 121: ...4 Description of Operation Screen ME LP400V OP 6 ...

Страница 122: ...reens Operation Screen USB media and Environment Setting Maintenance P 133 Operator Adjusting Screen P 129 Operator Adjustable Items P 130 4 1 Screen Composition Operation Screen P 126 I O Check Monitor P 133 Error Log P 134 Selecting Marking Mode P 135 Setting Operator Adjustment Screen P 129 Dual pointer P 136 Guide laser P 137 Test Marking P 138 RUN Mode P 139 ME LP400V OP 6 ...

Страница 123: ...3 Image Display Screen P 239 Image Display P 239 Work Image Display P 240 USB Media P 241 Registration File P 241 Common File P 242 Logo File P 243 Font File P 244 Backup P 249 Environment Setting P 253 Display Setting Environment 1 P 253 System Setting Environment 2 P 258 Communication I O Setting Environment 3 P 261 Power check P 265 Output Simulation P 267 Adjustment of Touch Panel P 268 Langua...

Страница 124: ...s for Straight Line Circle or Arc and radiate the laser Arbitrary Point Irradiation Function Specify the coordinates for Point and exposure time and radiate the laser Flying Object marking function Marking following the moving target object is possible according to the specified line speed and encoder signal Step Repeat This allows marking of character string in matrix state by specifying the numb...

Страница 125: ...able to operators can be specified Laser power check 1 2 Measure the current value of laser power in comparison with the default value The value is displayed with Focus adjustment function 3 The focal length can be adjusted manually with the adjustment control in the head Adjustable width LP 430 T U LP 420S9 T U LP 410 T U Approx 3 mm LP 431 T U LP 421S9 T U LP 411 T U LP V10U Approx 2 mm LP 435 T...

Страница 126: ...rking character string to be marked 3 ADJUST Operator Adjustment Shifts to operator adjustment screen 4 SETTING Shifts to each setting screen 5 MAINTNC Maintenance Shifts to Maintenance screen 6 START STOP Starts or stops RUN mode Under RUN mode marking laser emission starts by setting ON the trigger input of the I O terminal Reference The actual marking characters of the functional characters for...

Страница 127: ...nt image is in the marking field 7 Shift Display Position Shifts image display position up and down left and right Pressing arrow shifts the image display position 8 ADJUST Operator Adjustment Shifts to operator adjustment screen 9 Area No Displayed when marking on the fly is set in Trigger setting It indicates the order of the marking field for the concatenated marking to flying object Press for ...

Страница 128: ...tion screen This is a protection not to change the marking conditions without permission Refer to 4 16 1 Display Setting Environment 1 P 253 1 Press SETTING The input window for password is appeared 2 Input the password and press OK The screen can be shifted to setting screen Reference If you forget the password refer to When password is forgotten P 256 ME LP400V OP 6 ...

Страница 129: ...nd out by 18 steps 4 Center of Image Display Set the origin center to image display position 5 Image Display Position Indicates where the current image is in the marking field 6 Shift Display Position Shifts image display position up and down left and right Pressing arrow shifts the image display position 7 Area No Displayed when marking on the fly is set in Trigger setting It indicates the order ...

Страница 130: ... 0 to 50 0 ms Line Speed Line Speed Fine Adjustment Sets the line speed for marking to flying object Displayed with the setting of the marking to flying object without encoder The fine adjustment of the line speed can be set after starting the marking in run mode Setting Range 0 060 to 240 000 m min LP 430 LP 420 LP 435 LP 425 LP V10 LP V15 0 060 to 170 000 m min LP 410 0 060 to 120 000 m min LP 4...

Страница 131: ...uring the laser power output with the commercially available laser power meter When the laser it needs to radiate the laser only to one point for the purpose of the laser marker being performed as the processing device use the arbitrary point radiation function Refer to 4 10 6 Point Radiation Condition P 212 In laser check function only the following settings are valid Laser power Laser pulse cycl...

Страница 132: ...ne adjustment of the line speed can be set after starting the marking in run mode when selecting marking for flying object not using encoder under trigger setting 4 12 Trigger Setting P 219 With this setting the fine adjustment of the line speed can be executed marking to flying object on the line in actual Description Line Speed Fine Adj Fine Adjustment Fine adjusts the line speed by pressing qp ...

Страница 133: ...I O connector 3 DIP Switch Monitor Monitors the ON OFF state of DIP switch Notice The signals represented by RESERVE are prepared for system reserved Do not connect anything The status is displayed with Reference The I O monitor updates the I O state every 20 ms Note that the I O monitor in remote status updates every 200 ms The name of each signal may vary depending on laser marker model Refer to...

Страница 134: ...ve the recorded error log into the USB media Insert the USB media into the controller select directly and press SAVE 2 CLEAR LOG Press CLEAR LOG to delete all error logs recorded Reference The oldest error logs is deleted sequentially to be replaced with the latest one after the log exceeds 64 records Some warning errors such as E800 E811 and alarm errors caused by system problem cannot be recorde...

Страница 135: ...r and dual pointer using 1 2 3 4 Description 1 MARKING MODE Selects mode from either RUN or TEST In Operation screen only RUN mode is available 2 START Starts marking in the selected mode at 1 3 STOP Stops marking 4 INDICATE Displays the operating status of dual pointer and guide laser In Operation screen Guide indication is not available ME LP400V OP 6 ...

Страница 136: ...ity with the work distance indicated by the dual pointer and adjust it accurately as appropriate Notice Use the dual pointer only as the guideline For obtaining the appropriate marking quality fine adjust the distance from the work after marking on an actual object and referring to its marking positions 1 Press INDICATE 2 Select Dual Pointer and press START 3 The dual pointer is disappeared by pre...

Страница 137: ...ide laser operates same as the static marking Guide laser is enabled when LASER STOP is input from the terminal block The setting of guide laser scan speed is common in all files 1 Press INDICATE 2 Select the indication mode and press START Marking area Marking character The scan speed tracing speed of guide laser can be changed by pressing the entry field of Scan Speed Marking character indicatio...

Страница 138: ...ted by pressing START The laser marker is performed the following procedure Press START for test marking Internal Shutter Open Marking Internal Shutter Close Reference The counter does not activate at test marking WARNING Once starting the test marking the laser radiation cannot be stopped till the marking is finished If the operator needs to stop the laser radiation immediately press the emergenc...

Страница 139: ...ed The laser marker is performed the following procedure Internal Shutter Open Ready for receiving external trigger Internal Shutter Open Ready for receiving external trigger Marking Mode RUN Press START Marking Mode RUN Press START Marking Marking Marking Marking Press STOP Press STOP Internal Shutter Close Internal Shutter Close Trigger Signal Trigger Marking to Still or Flying Object Equidistan...

Страница 140: ...name into the laser marker with the following procedure Each file can be registered the file name with the following procedure 1 Press the character string of the Comments 2 Input the comment and press SET Refer to 4 8 2 Character Input P 148 for setting method Reference Characters that can be used for input are as follows Capital and small letters of alphabet numerics Katakana Hiragana Kanji JIS ...

Страница 141: ...4 7 3 Save P 142 is appeared When selecting No the changed content is not saved When Selecting File From List 2 Pressing either No FILE or Modified Date and then pressing qp displays the list by selected item in ascending descending order Select the file and press EXECUTE When Selecting by Specifying File No 2 Press numeric column of Input File No 3 Input file No press SET Then press EXECUTE in Se...

Страница 142: ...le with the same file No When the power of the laser marker is turned OFF without overwriting the file the setting changing content is not saved 1 Press SAVE 2 When overwriting the file press Yes Yes Execute overwriting No Not execute overwriting Returns to the procedure 1 ME LP400V OP 6 ...

Страница 143: ...ing window for saving the file to different file No is appeared 2 Specify the file No to be saved using qp keys or inputting file No and press EXECUTE 3 When the file is already saved to a different file No the confirm window is appeared Yes Execute overwriting No Overwriting is not executed Screen returns to step 1 ME LP400V OP 6 ...

Страница 144: ... set with and each setting of its screen becomes initial one Reference In the case of overwriting the file at new creation with file No the file is registered to other No with the same operation of Save to Different No Also the comments is displayed with No Name ME LP400V OP 6 ...

Страница 145: ... the function character on this screen Characters that can be used for input are as follows Capital and small letters of alphabet numerics Katakana Hiragana Kanji JIS level 1 and JIS level 2 symbols user registration characters 4 8 1 Character Type Alphanumerical KANA KANJI Japanese character ME LP400V OP 6 ...

Страница 146: ...146 Symbol ME LP400V OP 6 ...

Страница 147: ...On the button of U1 to U50 in the user registration character input screen the registered character images are displayed together Max 30 characters can be input in one line as the marking character When the functional characters such as date lot or counter are in the strings both the input character digits including the functional character indicated with and actual marking digit should be less th...

Страница 148: ...ow 1 Display the line for input with the arrow on the right edge of the window 2 Press line for input The input window is appeared either by pressing EDIT at the cursor position or re pressing that line Input Method of Alphanumerical 1 Press ALPHA NUM 2 Press the character to be input directly for input The character is input by pressing SET ME LP400V OP 6 ...

Страница 149: ...m the table to enter it When the desired character is Hiragana press CONFIRM 3 When the desired character is Kanji press CONVER CONVERT until the desired Kanji is appeared and press CONFIRM The character is input by pressing SET Reference For marking kanji the setting of the JIS font is required Refer to 4 15 4 Font File P 244 There are some characters that are impossible to be converted into Kanj...

Страница 150: ... cursor Input Method of User Registration Character 1 Press REG CHAR REGISTRATION CHARACTER 2 Press the symbol No to be input directly for input The character is input by pressing SET Reference It needs to register the font created by the user into the user registration font and also register to laser marker Refer to 4 15 4 Font File P 244 The following characters are registered as the user regist...

Страница 151: ...nd press COPY 2 Move the cursor to the line to be pasted and press PASTE The character is pasted into the selected line Reference When copying to the character string already inputted the character the content is overwritten The pasting is repeatable for any number of times ME LP400V OP 6 ...

Страница 152: ...ne to be inserted 2 Press INSERT After inserting one line the line is shifted by one line Delete One Line 1 Place the cursor on the line to be deleted 2 Press DELETE When a line is deleted remaining lines are advanced by one position ME LP400V OP 6 ...

Страница 153: ...ernal clock might be deviated caused by the error of the internal parts or degree of the battery drain Therefore be sure to check the time of the internal clock before the operation without fail Reference For the internal clock refer to 4 16 2 System Setting Environment 2 P 258 For the setting procedures refer to 3 3 1 Mark Current Date Time P 91 and 3 3 2 Mark Expiry Date Time P 94 Set the expiry...

Страница 154: ...d Refer to Week Setting P 260 4 Zero Indication Setting Range Zero Indi Marks value in right justified and mark 0 to the left R Justified Marks value in right justified and blanks space left column L Justified Marks value in left justified and blanks space right column Justified Marks only value in left justified Character strings to represent the functional characters of date and time 0N Xn Date ...

Страница 155: ...r Counter No Select the No of the counter condition set in the function screen Setting Range Counter No 0 to 3 Common counter No 4 to 7 Notice The counters 0 to 3 are commonly set per 256 file For example the counters 0 to 3 with file No 0 are applied the same counter of that of 256 512 768 1024 1536 and 1792 files 2 Figure Sets the digit number to show the counter When the number of figures of th...

Страница 156: ...sent the functional characters of counter 0N CnY Z Counter with Zero Fill _N CnY Z Counter without Zero Fill right stop the underscore _ represents a space N_ CnY Z Counter without Zero Fill left stop the underscore _ represents a space N CnY Z Counter without Zero Fill stop Item Displayed characters Description N 1 to 6 Represents the number of digits n Represents the counter number 0 to 3 Counte...

Страница 157: ...eration without fail Reference By using TIME HOLD IN signal of the I O connector pin No 23 the functional characters such as date time and lot do not update and the laser marker marks the time and date at the point when the input was turned ON For the TIME HOLD IN function refer to the External control manual 1 Description 1 Lot Lot No Select the No of the lot condition set in the function screen ...

Страница 158: ...an speed and laser pulse cycle at the same time perform function input for each item It is not possible to set the functional characters of the laser settings to bar code and 2D code data Setting procedures 1 Press FUNC CHAR FUNCTION CHARACTER 2 Press CONDITION Select the marking contents from the following parameters Laser power Scan speed Laser pulse cycle Only LP V series 3 Press INPUT and then...

Страница 159: ... procedures 1 Press FUNC CHAR FUNCTION CHARACTER 2 Press DATA 3 Select the rank No and press INPUT 4 Set the character by pressing SET Description Rank No Select the No of the rank condition set in the function screen Setting Range When parallel input condition is 8 bit x 2 0 to 1 When parallel input condition is 4 bit x 4 0 to 3 Character strings to represent the functional characters of rank cha...

Страница 160: ...age display When it is set in the bar code or 2D code data the code symbol is generated with the specified digits of 0 on the image display Description Serial Data No Setting Range 0 to 15 Number of Display Figure Set the max number of the characters that will be input by the serial communication If the specified digit number and the character digits set by the communication command are different ...

Страница 161: ...bar code No and press INPUT Reference The bar code No is related to the bar code No set using the 4 10 4 Bar Code Condition P 188 3 Set the character by pressing SET Description Bar Code No Select the bar code No set in the barcode condition The check digit in the selected barcode is marked by this function Setting Range 0 to 7 Character strings to represent the functional characters of bar code c...

Страница 162: ...per file Reference The common expiry date common expiry No 5 to 8 are settable for all files in common Refer to 4 13 2 Common Expiry Date P 234 2 Expiry Value Expiry values to be used for conditions described in 3 When the expiry number is set to negative value it represents the past date Setting Range 999 to 999 3 Year Month Day Hour Min Sets unit of expiry 4 Today Included Enables to select Toda...

Страница 163: ...ber 30th September 30th October 30th October 29th October 1st November 1st October 31st October 31st December 1st November 30th November 1st December 1st November 30th November 30th December 30th December 29th December 1st January 1st December 31st December 31st January 31st January 30th The dates in parentheses are used in the case of leap years 2 In the case of setting the expiry date after 1 ye...

Страница 164: ...r of counter in the character setting screen Refer to Counter P 155 1 6 7 2 4 5 3 Description 1 Counter No Enables to set 4 types of lot conditions from 0 to 3 per file Notice The counters 0 to 3 are commonly set per 256 file For example the counters 0 to 3 with file No 0 are applied the same counter of that of 256 512 768 1024 1536 and 1792 files Reference The common counter common counters 4 to ...

Страница 165: ...ger input Counter 0 Counts up or counts down when counter 0 1 2 or 3 ends Counter 1 Counter 2 Counter 3 Counter 4 Counts up or counts down when common counter 4 5 6 or 7 ends Counter 5 Counter 6 Counter 7 6 Reset at Data Update With checking on this function the counter value is reset at the internal clock becomes 0 00 Reference When the date changes during the Time Hold function is effective the ...

Страница 166: ...t P 157 1 2 4 6 5 3 Description 1 Lot No Enables to set 4 types of lot conditions from 0 to 3 per file Setting Range 0 to 3 Reference The common lot common counters 4 to 7 are settable for all files common Refer to 4 13 4 Common Lot P 237 2 Period Target period of the lot function Setting Range Current Specifies as target date set with current date Expiry No 1 to 8 Specifies as target date set wit...

Страница 167: ...ctively at three times as following order Sunday is set as Holiday 1 Monday through Friday is set as Weekday 2 and Saturday is set as Holiday 3 5 Marking Character Set the character string to be marked Double click on the marking character string area or select the input line and press EDIT to open the character input window Setting Range Up to 9 characters Capital and small letters of alphabet nu...

Страница 168: ...ding 16 patterns from 0 to 15 2 Rank No Select rank No In the case that the Parallel Input is 8 bit 2 0 Marking character table corresponding to lower 8 bit D0 to D7 for number input 1 Marking character table corresponding to higher 8 bit D8 to D15 for number input In the case that the Parallel Input is 4 bit 4 0 Marking character table corresponding to 4 bit equal to 1 4 D0 to D3 for number input...

Страница 169: ... Rank No When Parallel Input is 8 bit 2 0 to 1 When Parallel Input is 4 bit 4 0 to 3 4 The character input window is appeared by selecting marking character corresponding to I O connector No and pressing EDIT Input the character and press SET When Parallel Input is 8 bit 2 0 to 255 When Parallel Input is 4 bit 4 0 to 15 2 1 ME LP400V OP 6 ...

Страница 170: ...table Low 4 bit Enables to set data for 16 offset values from 0 to 15 with the low 4 bit D0 to D3 as the one marking coordinate table 2 Parallel Value Parallel Input Value Enables to check offset image of the parallel input value input beforehand The coordinate with this parallel input value input here displays as the coordinate for check on the image display screen Setting Range In the case that ...

Страница 171: ... display image for checking the offset Before marking actually it becomes convenient marking by checking offset Setting procedure of External Offset function 1 Press OFFSET EXTERNAL OFFSET after pressing FUNCTION 2 Select the external offset condition between Low 8 bit and Low 4 bit 3 The ten key is appeared by pressing the input field of theta offset X offset or Y offset Input the value and press...

Страница 172: ...ecomes the reference position 2 Direction Define the preferred direction to number elements of a matrix 3 Number of Row Number of Columns Define the number of rows and columns of a matrix 4 Row Step Column Step Define the pitches along the row and column directions Setting Sample Base Pos X 0 mm Base Pos Y 0 mm Direction Col Number of Row 3 Number of Col 3 Row Step 3 mm Column Step 3 mm X Offset Y...

Страница 173: ...g objects in a file Common Condition Description 1 Mirror Flip Mirror Inversion Flip Inversion Inversion has two types Mirror vertical inversion and Flip horizontal inversion Mirror Mirror Inversion Y Axis Symmetry makes the character string symmetrical to Y axis Flip Flip Inversion X Axis Symmetry makes the character string symmetrical to X axis ABC ABC ABC ABC A B C ABC ABC c Mirror c Flip R Mir...

Страница 174: ...l The interval period at overwriting is set Setting Range 0 0 to 9 9 seconds or 0 to 60 seconds 5 Kerning Set the level of spacing between characters The lower the value is the smaller the spacing is This feature is enabled when the character spacing is set to proportional Level 1 Minimize the origin point of the character interval with this condition The letter spacing of the letter i and l small...

Страница 175: ...ction 2 Number of Row 3 Number of Column The number of rows columns where the pattern which has been set is to be marked Setting Range 1 to 100 Reference The pattern is the unit of data created in Step Repeat Max number of settable patterns is 1000 4 Row Step 5 Column Step The pitch between patterns in row column direction Setting Range 0 000 to 90 000 mm LP V10 0 000 to 110 000 mm LP 430 LP 420 L...

Страница 176: ...h step is not selected the all counter values are the same in one Step Repeat marking as shown in the figure below 1 1 1 1 1 1 1 1 1 2 2 2 2 2 2 2 2 2 3 3 3 3 3 3 3 3 3 4 4 4 4 4 4 4 4 4 8 Count Mark OFF When the Step Repeat counter is used and set the mark off in the specified pattern select here whether the counter value of the marking off part is counted or skipped Refer to Step Repeat Fine Adj...

Страница 177: ...tep 1 is the base position 1 4 7 2 5 8 3 6 9 3 6 9 2 5 8 1 4 7 1 2 3 4 5 6 7 8 9 7 8 9 4 5 6 1 2 3 Starting Position Upper L Starting Position Upper R Starting Position Upper L Starting Position Upper R Marking Direction horizontal Marking Direction horizontal Marking Direction vertical Marking Direction vertical Step Repeat setting sample Setting parameter Character ABC Number of Rows 4 Number of...

Страница 178: ...des adjustment to all marking positions for patterns included in the columns rows from that specified at Column or Row to the last 1 Col 1 Column 1 Row Provides adjustment to all marking positions for patterns included in the column row specified Reference The pattern to which Marking OFF is specified is not displayed on the operator adjustment screen and on the image display screen under the adju...

Страница 179: ...aser power adjustment 10 Total amount of the laser power 20 10 30 8 Step and Repeat Fine adjustment List of fine adjustment instruction for each pattern Setting Range 0 to 99 totally 100 instructions Reference With selecting the fine adjust setting in this list and open the image screen the selected pattern is indicated in green To show the settings of each pattern select the line of the list and ...

Страница 180: ...No The characters set at the common character setting correspond to the line numbers 51 to 60 If the character conditions set there are to be changed specify the setting line to any of them to set the character conditions 3 Marking Shape Select from Straight Line Proportional Justify Fan like form or Fan like form The setting varies by pressing this field 4 Alignment Select from Center Right or Le...

Страница 181: ...nal Font 4 may fail to mark the character in bold 7 Laser Power Correction Scan Speed Correction Laser Pulse Cycle Correction Only LP V series Correction of each character condition No for the laser power scan speed laser pulse cycle set at laser setting Setting Range of Laser Power Correction 0 to 200 Setting Range of Scan Speed Correction 5 to 500 Setting Range of Laser Pulse Cycle Correction 50...

Страница 182: ...mm LP 430 LP 420 LP 410 0 100 to 160 000 mm LP 435 LP 425 LP V15 0 100 to 55 000 mm LP 431 LP 421 LP 411 LP W052 Character Height Character Width 3 X Y Position Sets the X Y position of the origin point of the reference character Setting Range 45 000 to 45 000 mm LP V10 55 000 to 55 000 mm LP 430 LP 420 LP 410 80 000 to 80 000 mm LP 435 LP 425 LP V15 27 500 to 27 500 mm LP 431 LP 421 LP 411 LP W05...

Страница 183: ...e Character interval indicates the distance between origins of the characters Proportional Character interval indicates the distance between the character edge line When Proportional setting set Kerning in 4 10 1 General Condition P 173 to adjust the balance of the character interval Justify The characters are arranged in the specified string width equally 5 Line Interval Specifies the pitch betwe...

Страница 184: ...P V10 0 100 to 110 000 mm LP 430 LP 420 LP 410 0 100 to 160 000 mm LP 435 LP 425 LP V15 0 100 to 55 000 mm LP 431 LP 421 LP 411 LP W052 Character Height Character Width 3 Center Position X Y Sets the X Y position of the arc center Setting Range 300 000 to 300 000 mm 4 Radius Sets the radius of arc Setting Range 0 to 300 000 mm 1 2 3 4 5 6 7 ME LP400V OP 6 ...

Страница 185: ...first marking character on the first line Setting Range 180 00 to 180 00 degree 7 Character Interval Angle Angle between two adjacent characters Setting Range 180 00 to 180 00 degree Character Interval Angle Radius Center Position X Y Start Angle Line Interval Radius Character Interval Angle Radius Center Position X Y Start Angle Line Interval Radius Fan like Origin of character string for left ju...

Страница 186: ...s time to be in READY for marking will be longer In case of registering much logo data or shortening the time for file change convert the DXF data into the VEC data using the attached software Logo Data Conversion Software 4 DELETE Press DELETE to delete the setting of the logo file If there is no logo file setting the logo condition is not saved at file saving 5 Origin only for DXF file format Sp...

Страница 187: ...ge 0 010 to 2 000 mm 13 Marking Direction only for DXF file format Sets marking direction of the solid hatching drawing in DXF file data Both vertical and horizontal directions are settable 14 Laser Power Correction Scan Speed Correction Laser Pulse Cycle Correction Only LP V series Correction of each logo No for the laser power scan speed laser pulse cycle set at laser setting Setting Range of La...

Страница 188: ...tate of the marked code on the flying object sufficiently Common setting for bar code and 2D code 1 3 4 7 8 2 5 6 Description 1 Bar Code No Specifies up to 8 codes per one registered file Setting Range 0 to 7 2 Type Select the code type Press code name to display the Bar Code selecting screen For the selectable code type refer to Code Type and Code Data P 190 3 Center Position X Y or X Y Position ...

Страница 189: ... concatenated marking to flying object Setting Range 0 to 15 7 Whole width or Whole size Displays the entire size of the code including the quiet zone corresponding to the data specified For the 2D code the size with the margin or quiet zone is indicated in 8 Code Data Specifies the data to encode Press the target line and press EDIT to display the data input screen Set the data character specifie...

Страница 190: ...ntrol codes Kanji mode 2 byte character JIS level 1 and JIS level 2 within JIS code 2121 to 7426 HEX Max 255 characters DataMatrix ECC200 Binary mode Characters within ASCII Code 00 HEX to 7F HEX consisting of 0 to 9 A to Z a to z symbols and control codes Kanji mode JIS level 1 and JIS level 2 within JIS code 2121 to 7426 HEX GS1 DataMatrix 0 to 9 A to Z a to z symbols _ function character FNC1 R...

Страница 191: ...one to narrow element width Specifying the number other than 0 here makes it possible to view the image of the quiet zone if the inversion marking is not performed Setting Range 0 0 to 20 0 4 2X 4X Element Ratio only for CODE128 EAN UPC The ratio of double triple quadruple element to narrow element width Setting Range 2X 1 4 to 2 6 Setting Range 3X 2 1 to 3 9 Setting Range 4X 2 8 to 5 2 Reference ...

Страница 192: ...ter NW 7 only Specifies the start stop character Select from A B C or D 9 Human Readable Text only for CODE128 EAN UPC Sets Human Readable Text marking for EAN UPC CODE 128 and UCC EAN128 Check the box to enable the function Reference For the settings of the human readable text of CODE128 and UCC EAN 128 refer to Human Readable Text P 203 For EAN UPC code the human readable text is marked with the...

Страница 193: ...he larger value than Line Width set in laser setting screen Setting Range 0 050 to 1 000 mm 3 Bar Code Height 1 Lower Bar Code Height 2 One Bar Code Height 3 Specifies the height of bar code lower bar code respective tiers on a multi tiered bar code GS1 DataBar Standard Truncated GS1 DataBar Limited or GS1 DataBar Expanded only GS1 DataBar Stacked only GS1 DataBar Expanded Stacked or GS1 DataBar S...

Страница 194: ...ng the Module Width and Bar Code Data this function is available Pressing AUTO button displays the confirmation dialog box On this screen clicking Yes sets both the bar code condition and laser condition automatically and clicking No sets only the bar code condition automatically This AUTO setting becomes invalid by pressing Cancel Refer to Setting Value for AUTO Set P 324 for detail 9 Separator H...

Страница 195: ... code to be used alone Please refer to the corresponding of the bar code for details on bar code setting screen Please refer to the screen of CODE128 for UCC EAN128 GS1 128 1 2 3 Description 1 1D 2D Selection Selects the setting object 2D button become effective when any characters are input in the bar code data column 2 Bar Code Data Data to be encoded in bar code The data that can be input are t...

Страница 196: ...he width as close as that of linear bar code by the automatic operation in case of setting 0 Note that the maximum number of column rows is 928 Setting Range 0 to 30 4 Error Correction Level CC C only Specifies the error correction level There are 9 levels 0 to 8 for the error correction level When 9 is selected the recommended value specified in the specification is selected Setting Range 0 to 9 ...

Страница 197: ...o display the Human Readable Text Setting screen Refer to Human Readable Text P 203 for the detail Relationship between combination of 1D and 2D codes and the number of row Bar Code Type The Rows Number Available in CC A The Rows Number Available in CC B UPC E GS1 DataBar Stacked Omnidirectional 5 6 7 8 9 10 12 column 8 11 14 17 20 23 26 column EAN 8 GS1 DataBar Limited 4 5 6 7 8 column 6 8 10 12 ...

Страница 198: ...l When Auto is selected the size is specified to be the minimum Refer to Symbol Size and Data Capacity P 322 for detail Square 10 10 12 12 14 14 16 16 18 18 20 20 22 22 24 24 26 26 32 32 36 36 40 40 44 44 48 48 52 52 64 64 72 72 80 80 88 88 Rectangle 8 18 8 32 12 26 12 36 16 36 16 48 3 Mode Input mode for the code data Depending on the mode available characters vary Refer to Code Type and Code Dat...

Страница 199: ...he human readable text of the GS1 DataMatrix Reference This product supports Format 06 Macro 06 of ISO15434 for DataMatrix For GS1 DataMatrix the control code FNC1 is automatically inputted at the head of the code data When inputting AI 01 followed by 13 digit numerical character the check digit modulus10 weight 3 1 is inputted automatically at the next digit For DataMatrix group separator FNC1 or...

Страница 200: ...152 HEX is displayed Pressing pattern code displays the pattern code input screen On the patter code input screen the image of the pattern code can be selected In case of setting the pattern code using the character code press JIS CODE for displaying the ten key and then input the character code 2 Laser Power Correction Scan Speed Correction Laser Pulse Cycle Correction Only LP V series Correction...

Страница 201: ...x QR Code Micro QR Code q w r e t r e e No Name Remarks q Margin QR code More than 4 modules around Micro QR code More than 2 modules around w Finder Pattern e Timing Pattern r Black Dark module White Light module Data Area t Alignment Pattern DataMatrix code y u o i No Name Remarks y Quiet Zone More than 1 module around u Timing Module i Border o Black Mark module White Space module Data Area ME ...

Страница 202: ...pe Module Font image Character code 8137 HEX 8138 HEX 8139 HEX 813A HEX 813B HEX 813C HEX 813D HEX 813E HEX Pattern type Module Font image Character code 813F HEX 8140 HEX 8141 HEX 8142 HEX 8143 HEX 8144 HEX 8145 HEX 8146 HEX Pattern type Border pattern Font image Character code 8147 HEX 8148 HEX 8149 HEX 814A HEX 814B HEX 814C HEX Pattern type Border pattern Reference For 2D pattern font a total ...

Страница 203: ...Y Position Specifies relative coordinate of X Y position of Human Readable Text when the center of the code is defined as the origin point Setting Range 45 000 to 45 000 mm LP V10 55 000 to 55 000 mm LP 430 LP 420 LP 410 80 000 to 80 000 mm LP 435 LP 425 LP V15 27 500 to 27 500 mm LP 431 LP 421 LP 411 LP W052 2 Character Height Character Width Specifies the character height width of Human Readable...

Страница 204: ...er setting Setting Range of Laser Power Correction 0 to 200 Setting Range of Scan Speed Correction 5 to 500 Setting Range of Laser Pulse Cycle Correction 50 to 200 Reference If the value of Laser power correction laser power is equal to or larger than 100 the setting will be 100 Marking is not available when the laser power correction value is 0 If the corrected value exceeds the setting limit the...

Страница 205: ...1 4 5 National Healthcare Reimbursement No Germany 711 National Healthcare Reimbursement No France 712 National Healthcare Reimbursement No Spain 713 National Healthcare Reimbursement No Brasil 714 National Healthcare Reimbursement No Portugal 8004 max 30 digits alphanumeric symbols FNC1 4 5 Global Individual Asset Identifier GIAI 8008 8 to 12 digits numeric FNC1 4 5 Date and time of production 90...

Страница 206: ... is 01 12345678901231 GS1 DataBar Limited CC A on 2D side In case that the code setting data is 1720123130123456 F1 10123456 Human Readable Text is 17 201231 30 123456 10 123456 GS1 DataMatrix In case that the code setting data is 011234567890123 Human Readable Text is 01 12345678901231 Reference To set the code data in more than two lines using AI Application Identifier set AI at the head of the ...

Страница 207: ...W052 Blank of dashed line When dashed line is set input the length of the blank of the dashed line Setting Range 0 000 to 90 000 mm LP V10 0 000 to 110 000 mm LP 430 LP 420 LP 410 0 000 to 160 000 mm LP 435 LP 425 LP V15 0 000 to 55 000 mm LP 431 LP 421 LP 411 LP W052 Solid part of dashed line Blank of dashed line 3 Processing Element Indicates the processing condition set at the laser setting Up ...

Страница 208: ...f the straight line Setting Range 45 000 to 45 000 mm LP V10 55 000 to 55 000 mm LP 430 LP 420 LP 410 80 000 to 80 000 mm LP 435 LP 425 LP V15 27 500 to 27 500 mm LP 431 LP 421 LP 411 LP W052 Setting example of the straight line 5 15 X mm 0 3 10 Y mm X Y 15 10 X Y 5 3 End Point Start Point ME LP400V OP 6 ...

Страница 209: ...000 to 80 000 mm LP 435 LP 425 LP V15 27 500 to 27 500 mm LP 431 LP 421 LP 411 LP W052 2 Radius Specifies the radius of the circle Setting Range 0 010 to 45 000 mm LP V10 0 010 to 55 000 mm LP 430 LP 420 LP 410 0 010 to 80 000 mm LP 435 LP 425 LP V15 0 010 to 27 500 mm LP 431 LP 421 LP 411 LP W052 Setting example of the circle Y mm 5 0 X mm 5 X Y 5 5 Center Point Radius ME LP400V OP 6 ...

Страница 210: ...c Setting Range 0 010 to 300 000 mm 3 Direction For the arc in counterclockwise direction select CCW and in clockwise direction select CW 4 Open Ang Open Angle Select the open angle of the arc from under or over 180 degree Open Angle Counterclockwise Clockwise Open Angle Start Point X Y End Point X Y Radius Radius Radius Radius Open Angle Counterclockwise Clockwise Open Angle Start Point X Y End P...

Страница 211: ...180 00 degree 4 Laser Power Correction Scan Speed Correction Laser Pulse Cycle Correction Only LP V series Correction of the processing elements in the selected processing condition No for the laser power scan speed laser pulse cycle set at laser setting If the correction rate is set to 0 the marking image is displayed in gray and marking is not executed Setting Range of Laser Power Correction 0 t...

Страница 212: ...P 410 80 000 to 80 000 mm LP 435 LP 425 LP V15 27 500 to 27 500 mm LP 431 LP 421 LP 411 LP W052 3 Laser Power Correction 4 Laser Pulse Cycle Correction Only LP V series Correction of all radiation points in the selected condition No for the laser power laser pulse cycle set at laser setting If the correction rate is set to 0 the marking image is displayed in gray and marking is not executed Settin...

Страница 213: ...osition and time 9 DELETE Pressing DELETE button deletes the selected radiation position and time 10 ALL DEL Pressing ALL DEL button deletes all radiation position and time in the table 11 List of Point Radiation Conditions Displays the setting condition radiation position and time Up to 50 radiation points can be set in one condition list WARNING Since the arbitrary point radiation function carri...

Страница 214: ...31 LP 421 LP 411 LP W052 CAUTION If too high laser power is set or too slow scan speed is set it may flame up or burn depending on the material to be used for the marking At test marking radiate the laser by setting rather low laser power and rather fast scan speed check the marking quality and adjust the setting value gradually 3 Laser Pulse Cycle Only LP V LP W series LP V Series Adjusts the int...

Страница 215: ...h for bold character at character condition Refer to 4 10 2 Character Conditions P 180 The time for marking may be long if the setting value of the line width is smaller The initial value of the line width is set depending on the model as follows LP 430 LP 420 LP 410 0 18mm LP 431 LP 421 LP 411 0 11mm LP 435 LP 425 0 26mm LP V10 0 06mm LP V15 0 10mm LP W052 0 04mm 6 Marking Pitch This item sets th...

Страница 216: ...5 0 060 to 170 000 m min LP 410 0 060 to 120 000 m min LP 431 LP 421 LP W052 0 060 to 85 000 m min LP 411 9 Fly Obj Wait Flying Object Wait Used at measurement of marking period Waiting period for marking corresponding to the line speed for flying object marking It is indicated when the moving direction in the trigger setting is set to other than still Setting Range 0 00 to 500 00ms 10 Start Point...

Страница 217: ...Curve Adjustment The shape of curve line in the character to be marked is adjusted Though setting a small value here can shorten the marking time the curve line is distorted Setting large value makes the edge thick Setting Range 0 to 100 Initial Value 0 Curve Line Distorted Dark Deep Line Proper Small Large 3 Waiting Time Waiting Time Adjustment Adjusts the waiting time for starting radiation at t...

Страница 218: ...tart end points Setting larger value makes the marking time longer Setting Range 0 00 to 10 00 ms Initial Value 0 00 ms 6 Point Rad On Off Point Radiation ON OFF Adjustment Adjusts the on off timing of the radiation for 4 10 6 Point Radiation Condition P 212 On time specifies the waiting time for starting radiation Off time specifies the waiting time for moving to the next radiation points Setting...

Страница 219: ...ng after input of trigger signal 4 12 1 Marking to Static Work 1 2 Description 1 Moving Direction Selects STILL for the moving direction 2 Delay Time Sets the time difference from the input of trigger signal to marking start Setting Range 0 to 5000 ms Reference Set a delay time shorter than a input interval of trigger signal When the next trigger signal is inputted during delay warning E800 occurs...

Страница 220: ...arking bold character there might be the possibility that the marking quality is affected Therefore operate the laser marker after performing the marking test using the function of marking bold character Since the marking to the flying object is affected by vibration or line speed easily marking and reading 2D code or bar code to the flying object might become unstable Therefore when marking 2D co...

Страница 221: ...uring delay warning E800 occurs Only if Detect TRIG Warning during Marking in Environment Setting is valid 2 Line Speed Inputs the line speed Available when encoder setting is disabled Setting Range 0 060 to 240 000 m min LP 430 LP 420 LP 435 LP 425 LP V10 LP V15 0 060 to 170 000 m min LP 410 0 060 to 120 000 m min LP 431 LP 421 LP W052 0 060 to 85 000 m min LP 411 3 Encoder Signal Enable this fun...

Страница 222: ...ng Setting Range 0 00 to 500 00 ms Adjust the waiting time of the marking for flying object so that the width of the character string is as shorten as possible shown below when performing the test marking remaining the setting of the marking for flying object Too Narrow Proper Too Wide If the error occurs during the marking to flying object adjust the following settings ERROR CODE Description Sett...

Страница 223: ...Interval Marking Interval Inputs the moving distance of the line for marking start Setting Range 0 to 3000 0mm 2 Line Speed Inputs the line speed Available when encoder setting is disabled Setting Range 0 060 to 240 000 m min LP 430 LP 420 LP 435 LP 425 LP V10 LP V15 0 060 to 170 000 m min LP 410 0 060 to 120 000 m min LP 431 LP 421 LP W052 0 060 to 85 000 m min LP 411 3 Delay Distance Inputs the ...

Страница 224: ...lity might be deteriorate Depending on the marking condition the recommendation setting value for the encoder pulse is 25 00P mm or more 6 Fly Obj Wait Flying Object Wait Waiting period for marking corresponding to the line speed for flying object marking Setting Range 0 00 to 500 00ms Adjust the waiting time of the marking for flying object so that the width of the character string is as shorten ...

Страница 225: ...When the character is extended press p for increasing the setting speed When the character is shrunken press q for decreasing the setting speed Setting Range 0 060 to 240 000 m min LP 430 LP 420 LP 435 LP 425 LP V10 LP V15 0 060 to 170 000 m min LP 410 0 060 to 120 000 m min LP 431 LP 421 LP W052 0 060 to 85 000 m min LP 411 Fine Adj Encoder Fine Adjustment Performs fine adjustment when the encode...

Страница 226: ...condition Condition No 1 Area No 0 Set the marking condition of 1 to 6 Condition No 2 Area No 1 Set the marking condition of 7 to B Condition No 3 Area No 2 Set the marking condition of C to G Condition No 4 Area No 3 Set the marking condition of H to L Condition No 5 Area No 4 Set the marking condition of M and N Reference At the marking to flying object with an encoder the marking stops for each...

Страница 227: ... sure that the width of the character string should match with or go over the projection line on the marking image screen Calculate the start position of 6 which is the head character of Area No 1 on the X coordinate using the following formula Formula 45 character string width on the 1st line 90mm 2 3 In this sample the formula below is established because the character string width on the 1st li...

Страница 228: ... 1 on the X coordinate using the following formula Formula 55 character string width on the 1st line 110m 2 3 In this sample the formula below is established because the character string width on the 1st line is 75mm Starting position of the head character on the X coordinate 55 75 110 2 3 53 Character condition of 12345 on the 1st line Character condition of 67890 on the 2nd line Character condit...

Страница 229: ...2 3 In this sample the character string width on the 1st line is 42mm and therefore the calculation will be Starting position of the head character on the X coordinate 27 5 42 55 x 2 3 22 Moving direction LEFT Downstream Upstream Moving direction LEFT Downstream Upstream Character condition of 123 on the 1st line Character condition of 456 on the 2nd line Character condition No 1 Character Height ...

Страница 230: ...1st line 160mm x 2 3 In this sample the character string width on the 1st line is 112mm and therefore the calculation will be Starting position of the head character on the X coordinate 80 112 160 x 2 3 75 Moving direction LEFT Downstream Upstream Moving direction LEFT Downstream Upstream Character condition of 12345 on the 1st line Character condition of 67890 on the 2nd line Character condition ...

Страница 231: ...tween the characters is 100mm a 100 a a f f A B C Specify the marking condition of each line on the marking condition setting screen In this case the character string on the 1st line is specified as Condition No 1 Area No 0 and that on the 2nd line is specified as Condition No 2 Area No 1 and that on the 4th line is specified as Condition No 4 Area No 3 Set the X position of each condition number ...

Страница 232: ...file is saved on the file screen 1 2 Description 1 Registration name Input the common file name Only one common file can be registered in the laser marker As a file name both alphabet including capital and small letters and numeric can switch between single and double byte Up to 20 characters can be input in case of inputting all single byte letter Refer to 4 8 2 Character Input P 148 for the inpu...

Страница 233: ...ng copy paste line insertion line deletion and edit Input and edit methods are the same as that of the character setting screen Input a marking character with reference to 4 8 2 Character Input P 148 of a character Reference The conditions character size etc of the character set by common marking character setting are set on the character conditions of each file Since there are 51 to 60 common set...

Страница 234: ...iry Value Expiry values to be used for conditions described in 3 as unit When the expiry number is set to negative value it represents the past date Setting Range 999 to 999 3 Year Month Day Hour Min Sets unit of expiry Ex Mark the expiry date of 3 months Set 3 to Expi and select Month for Expiry unit 4 Today Included Enables to select Today Included or Today Not Included for expiry in the case of...

Страница 235: ... No 4 counter conditions can be set in 4 to 7 for all files 2 Curr Current Value Current counter value The current value is subsequently marked Set the current value within the initial value and end value Setting Range 0 to 999999 3 Init End Initial Value End Value The initial value and the end value of the counter When the counter value reaches to the end value the marking is started from initial...

Страница 236: ... Counter 2 Counter 3 Counter 4 Counts up or counts down when common counter 4 5 6 or 7 ends Counter 5 Counter 6 Counter 7 6 Reset at Data Update With checking on this function the counter value is reset at the internal clock becomes 0 00 Reference When the date changes during the Time Hold function is effective the counter value is reset at the timing of releasing Time Hold the time hold input is ...

Страница 237: ... After setting common lot condition here input the functional character of lot in the character setting screen Refer to Lot P 157 1 2 3 4 5 6 Description 1 Common Lot No 4 lot conditions can be set in 4 to 7 for all files Setting Range 4 to 7 2 Period Target period of the lot function Setting Range Current Specifies as target date set with current date Expiry No 1 to 8 Specifies as target date set...

Страница 238: ...in Function Setting menu For marking Monday through Friday as Weekday and Saturday and Sunday as Holiday you should set respectively at three times as following order Sunday is set as Holiday 1 Monday through Friday is set as Weekday 2 and Saturday is set as Holiday 3 5 Marking Character Set the character string to be marked Double click on the marking character string area or select the input lin...

Страница 239: ... 4 Center of Image Display Set the origin center to image display position 5 Image Display Position Indicates where the current image is in the marking field 6 Shift Display Position Shifts image display part up and down left and right Pressing arrow shifts the image display part 7 Area No 1 Displayed when marking on the fly is set in Trigger setting It indicates the order of the marking field for...

Страница 240: ...lay In case there are data which you will see on the image display but not be marked such as the outline data of the marking object or characters setting 0 to Laser Power Correction Then the data are showed with gray figure on the image display The marking data which are set to 0 for Laser Power Correction are not marked They do not affected the marking time etc as well Reference When Laser Power ...

Страница 241: ...an USB media and USB mouse to USB connector Performance of the laser marker might be failed Before using a USB media check it for compatibility with the laser marker We shall not be responsible for performance of all kinds of USB media USB media with security features cannot be used USB hub cannot be used for this product Use USB media directly connecting to the laser marker 4 15 1 Registration Fi...

Страница 242: ...3 Item Description 1 TO MEDIA Copies the selected common file stored in the laser marker to the USB media 2 FROM MEDIA Registers the selected common file stored in the USB media to the laser marker 3 DEL MEDIA Deletes the selected common file from the USB media Select the file to delete and click EXECUTE 4 Common file list Displays the common file stored in the laser marker ME LP400V OP 6 ...

Страница 243: ...marker Select the file to delete and click EXECUTE 4 DEL MEDIA Deletes the selected logo file from the USB media Select the file to delete and click EXECUTE 5 Logo file list Displays the all logo files stored in the laser marker Clicking the title line of the list the files are sorted in ascending or descending order by the following categories Logo File File Name Modified Date Reference Up to 204...

Страница 244: ...numeric and symbols called Original font in the laser marker 0 to 9 A to Z a to z and some symbols Character Font 2 LP 400 V series ORG4 LP W series ORG5 JIS Font JIS1 JIS Level 1 font Hiragana Katakana and Kanji characters for Japanese special characters for Grecian and Russian User Registration Font USER User Registration Character Font newly created character by user or JIS Level 2 font Kanji c...

Страница 245: ...arrange a proper balance of character line when Kanji and alphanumeric characters are used in the same character line JIS font Font file of Hiragana Katakana Grecian Russian and Kanji Refer to the Character Code Table of External Control Manual for the character kind and character code For Japanese Font For English Font JIS1 FON JIS1_E FON JIS2 FON JIS2_E FON User Registration Character Font The f...

Страница 246: ...es and logo files selecting the category title in the list and pressing displays the list by selected item in ascending descending order 2 Select the copy destination directory and press Copy For the registration file and common file input the file name to be saved on USB media Then press SET and COPY Input possible with 8 characters of English capital letters or numeric letters or 4 characters of...

Страница 247: ...nd font files select the file number to be registered and press EXECUTE Reference When copying the registration file in that a logo file is used register the logo file to the laser marker too In case of transferring the registered file in the new version controller to the old version controller settings of new functions of the new version controller are not available registered In case of transfer...

Страница 248: ... Check the file and press Yes Pressing No does not delete the file and returns to Step 1 3 The file is deleted from the laser marker Delete Media The file data saved in USB media is deleted 1 Select the file to be deleted from the file list after selecting directory and then press EXECUTE When pressing SLCT ALL the all files are selected Reference Selecting the category title in the list and press...

Страница 249: ... the controller Reference Use the formatted empty FD 1 44MB when using the USB compatible FDD floppy disk drive If it needs to back up the data to the FD more than two disks may be needed depending on the amount of data registered 2 Press OTHER and select BACKUP 3 Press BACKUP 4 Input the file name and press SET This file name is displayed when selecting the backup data for restoring 5 The backup ...

Страница 250: ...eps the original setting Present time of internal clock Environment setting Console setting Environment setting Current value of counter function Display language Error log System information If Ethernet is used check the IP address etc after the importing of the backup data When the backup data is imported to the laser marker communication parameter settings are overwritten with the backup data I...

Страница 251: ...that support USB 1 Set the cable of FDD that supports USB to the USB media connector on the controller and insert a FD 2 Press EXECUTE 3 Check the execution of formatting and then press OK Pressing Cancel does not format USB media and returns to Step 1 4 Formatting is executed ME LP400V OP 6 ...

Страница 252: ...to USB media and press SET and then press SAVE Input possible with 8 characters of English capital letters or numeric letters or 4 characters of Hiragana Katakana and Kanji 3 The file data will be output to USB media in the text format Reference The data output into text format can be opened and read with Notepad etc of Windows The following names have been already reserved by system and can not b...

Страница 253: ...age Display P 127 2 Update Function Character Select the updating on Yes off No in the operation screen for the function character such as date lot counter 3 Remote Screen Select the display of the operation screen under the remote control mode Operation Screen Refer to 4 3 Operation Screen P 126 I O Check Monitor Refer to 4 5 1 I O Check Monitor P 133 File No Reference When selecting Image for th...

Страница 254: ...an Speed Laser Pulse Cycle Only LP V series Change File No Overwriting Laser Check 2 Editable Lines Sets the number of line possible to be edited at the edition of character setting on the operator s adjustment screen Setting Range 0 to 50 lines Reference Setting of password is useful to avoid unintentional change of setting by operator Setting of parameters only the specified operators can change...

Страница 255: ...creen The password is required to change the screen from operation screen to the other setting screens Setting procedures 1 Press the password 2 Input the password and press SET A password consists of figures of maximum fifteen digits To disable the password protection delete all characters and press SET ME LP400V OP 6 ...

Страница 256: ... 5 The figures displayed on the setting of password indicate the currently registered password 6 Check the password and press CANCEL 7 Turn off the key switch on the controller and turn off DIP switch No 4 to make the password valid Reference The setting is not changed if the DIP switch is turned to ON while the key switch is in the ON position Turn the DIP switch to ON after turning off the power...

Страница 257: ...arker the rightmost space of the right guard pattern consists of six modules adding one extra module to that of the standard when it is set to ISO IEC 24724 2011 For GS1 DataBar Limited when 2006 or 2011 is set and Guard in Condition setting of GS1 DataBar P 193 is enabled the guard pattern is expanded with the certain width in addition to the specified width of ISO IEC 24724 2006 or 2011 When Cus...

Страница 258: ...rker The internal clock might be deviated caused by the error of the internal parts or degree of the battery drain Therefore be sure to check the time of the internal clock before the operation without fail Console The console connected to the laser marker is specified Item Description 1 Type Specifies the type of console connected to the laser marker LP ADP20 g LP ADP40 g 15 Monitor g 17 Monitor ...

Страница 259: ... laser setting is 100 or more 4 Rotation Offset Rotates the object to the rotation direction around the original point Setting Range 180 00 to 180 00 degree Y Y X X Rotation Rotation 5 X Y Offset Shifts the marking position to the X Y direction Setting Range 45 000 to 45 000 mm LP V10 55 000 to 55 000 mm LP 430 LP 420 LP 410 80 000 to 80 000 mm LP 435 LP 425 LP V15 27 500 to 27 500 mm LP 431 LP 42...

Страница 260: ...e December 31 is in the first week of the year and the date January 1 is in the last week of the year Example When January 1 is Sunday week setting is as follows Setting The first week Remarks Update Day Monday First week January 1 January 1 Sun only The second week is from January 2 Mon to January 8 Sun Update Day Monday First week First Thursday From January 2 Mon to January 8 Sun which includes...

Страница 261: ... marking to flying object when the setting of one shot time is longer than the period in which the line moves the distance specified at Interval 2 Detect TRIG Warning during Marking Enabling this setting the warning E800 to show that the trigger cannot be accepted is output in case the trigger is input while the shutter is opened If the invalid trigger is detected the warning E800 occurs for the s...

Страница 262: ...g entry 1bit 2bit Initial setting 1 bit 5 Delimit Sets the delimiter code to identify the end of telegraphic message Setting entry CR CR LF Initial setting CR 6 Check Sum Specify ON OFF of check sum error detection information Enable this function when using the check sum Check Sum indicates the lower 1 byte of adding result of value binary from the start code to the last data by converting it to ...

Страница 263: ...mmand GS FNC1 This setting is available only when the barcode GS1 DataMatrix is used To set the barcode character by using serial communication command BCS select either GS OFF or FNC1 ON as the separator of AI data with the variable length Setting Range ON the separator of variable length AI data is FNC1 OFF the separator of variable length AI data is GS Notice The communication control of the la...

Страница 264: ...mmunication environment setting Make sure that the IP address for the laser marker on the network is not overlapping the IP address for the PC PC Laser Marker A Laser Marker B Laser Marker C Laser Marker D IP Address 192 168 1 10 192 168 1 5 192 168 1 6 192 168 1 7 192 168 1 8 Subnet Mask 255 255 255 0 Default Gateway None Port 9094 9094 9094 9094 ME LP400V OP 6 ...

Страница 265: ...6 Power after Correction The laser power ratio after power correction is displayed Make correction so that the value is as close to 100 as possible 7 Correct Date It denotes the date and time when the power is corrected 8 Power Correct It shows power correction ratio Set the ratio so that the current power power correction ratio 100 9 Laser Rad Time Laser Radiation Time Displays the total time of ...

Страница 266: ... is radiated with the internal shutter closed Be sure to use the protective goggle and enclosure in case of laser leakage Also do not place any objects around the radiating area 1 Press POWER CHECK 2 The Confirm screen is displayed Press START The current laser marker power is measured 3 The Power Monitor screen is displayed For the auto correction Press Auto For the manual correction press Manual...

Страница 267: ...tput OFF and 1 indicates output ON During the output simulation the status display of the terminal changes to yellow 3 Output ON OFF Click the output terminal name to simulate then the output status of the laser marker changes 4 STOP OUTPUT Terminates the simulation mode and reset the ON OFF status of the output signals This button appears when output simulation is started During the output simula...

Страница 268: ...king you if you want to save the calibration result Notice Lightly touch the center of the cross with a pen whose tip radius is approx 0 5 An excessive force applied to the touch panel may damage the panel 3 Press OK Pressing Cancel or doing nothing for 10 seconds will cancel the calibration result Reference Out of synchronous on console is considered if the displacement of display position on the...

Страница 269: ...When the display language is changed the unregistered setting data under editing is cleared Save the file data before changing the language 1 Press ENVIRON and press LANGUAGE on the bottom edge of the screen Language selection screen will appear 2 Select the language and press SET 1 2 ME LP400V OP 6 ...

Страница 270: ...d the custom software name is displayed Serial No 2 Version information of the internal software Controller Logo data conversion Galvano Controller Galvano Controller IPL ROM 1 to ROM 3 CPU 1 to CPU 3 3 Running information Capacity of Flash Memory Free Space of Flash Memory Total Laser Radiation Time Total Laser Pumping Time Reference The contents shown in the system information may partly vary de...

Страница 271: ...271 MEMO ME LP400V OP 6 ...

Страница 272: ...Maintenance ME LP400V OP 6 ...

Страница 273: ...on Daily maintenance Replacement when degraded or defective q Laser emission port fθ lens Contamination Cleaning Replacement at our service department w Protection glass of the laser emission port 1 Contamination Cleaning Customer replaceable e Intake exhaust vent Contamination Cleaning r Air filter Contamination Cleaning Customer replaceable t Air cooling fan Contamination Replacement at our serv...

Страница 274: ...of the laser emission port is attached to the laser aperture It protects the fθ lens from dirt or damage AR anti reflection coating is applied to the glass surface Effect from deterioration Lens for LP V LP W series protection glass surface may become contaminated or receive dust generated during marking Using laser marker with the lens contaminated may cause the lens to get burned in This may als...

Страница 275: ...laser emission port with an air duster for optics and wipe it lightly with a soft cloth If a contamination is severe use a soft cloth immersed in ethanol to wipe it LP 400 Series LP V LP W Series Soft cloth Laser emission port Soft cloth Laser emission port Notice Do not wipe the laser emission port strongly or touch it with a sharp pointed object Laser marker might become faulty WARNING Never use...

Страница 276: ...LP ACV15 LP W Series LP ACV12 1 Remove the protection glass of the laser emission port Notice Do not touch the lens and the glass surface of the laser emission port and the protection glass at installing or removing If the cover is difficult to be loosened use a commercially available belt wrench In that case avoid scratching the glass surface of the laser emission port 2 Remove any dust and dirt ...

Страница 277: ...isting it 6 Install the protection glass to the laser emission port Tighten the protection glass turning in a following direction When the protection glass is LP ACV60 tighten it until a resistance is felt From that point tighten the 10 to 20 mm circumference Be sure to tighten the glass properly and without looseness Laser Marker Model Protection Glass Model Protection Glass Model LP V10U LP ACV6...

Страница 278: ...e controller and disconnect the controller power cable 2 Vacuum the intake exhaust vent and remove the dust LP 400 series Intake air Exhaust LP V LP W series Notice Do not blow air to the laser marker especially to the intake exhaust vent If the dust penetrates in the laser marker it may results in failure 3 Wipe the vent with a dried cloth If a contamination is severe use a cloth wrung out with n...

Страница 279: ...e filters For the controller 1 middle size filter and 1 small size filter LP V series LP W series LP AFT21 For the head 1 small size filter For the controller 1 large size filter and 1 middle size filter Steps for cleaning Daily maintenance and replacement of air filter Clean air filters regularly according to the usage environment 1 Turn OFF the key switch of the controller and disconnect the con...

Страница 280: ...ent any dust or oil adhered onto the fan may impair air flow rate of the fan or even stop the rotation of the fan When the cool performance decreases the temperature in the electric circuit or laser oscillator will go up which may cause an error or stoppage of laser radiation Also a temperature rise in the housing will foster deterioration in the internal parts which may cause the marking performa...

Страница 281: ...lator may become defective and unable to irradiate the laser Replacement interval Deterioration in quality of marking or processing density reduction incomplete marking or processing is observed Setting a large value for the laser power is not reflected in the quality of marking or processing The laser power measured with a commercial power meter has decreased by 20 compared to the delivery status...

Страница 282: ...e detector should be more than φ10mm A difference may arise under the high low temperature Measuring power with normal temperature 20 to 30 Celsius degree is recommended Before measuring the laser power make sure there is no contamination in the laser emission port If the laser emission port is contaminated or damaged an error may result in the measurement of the laser power 2 Install the power me...

Страница 283: ...operation screen 5 Press LSR CHK Press START in the laser radiation confirmation dialog to irradiate the laser Reference The power setting in the selected file is applied to the laser check radiation WARNING Be sure to wear protective goggles During the radiation the laser energy is concentrated to one point Use due caution with long period radiation it may cause a fire or damage to the object 6 P...

Страница 284: ...ta The galvano scanner scans the setting data by controlling the angle of galvano mirror mounted onto the axis of rotation of motor with two axes to create characters and graphics for marking and processing Effect from deterioration Uneven wear may occur on the bearing inside the galvano scanner depending upon marking frequency and conditions If uneven wear develops accurate reproducing may become...

Страница 285: ...ers such as the current date time expiry date time and lot date time are marked based on the time of this clock Effect from deterioration When the battery inside the controller runs out due to aging the date and time of the internal clock may be out of synchronization when the laser marker is turned OFF If you start the laser marker in such a condition warning E251 for the decrease in clock batter...

Страница 286: ... Fuse Rating 250V 6 3A 021506 3MXP made by Littelfuse B Type Brown Glass Fuse Rating 250V 15A FGBO 250V15APBF made by FUJI TERMINAL INDUSTRIES Co LTD Steps for replacement 1 Remove causes for fuse blowing 2 Turn OFF the key switch of the controller and disconnect the controller power cable 3 Turn the fuse holder on the back side and remove the fuse 4 Replace it with new one 5 Turn the fuse holder ...

Страница 287: ...kers for repairing and maintaining purposes Steps for obtaining backup data daily maintenance 1 Start up the laser marker and press SETTING USB Reference If the laser marker has a floppy disk drive instead of the USB port press FD 2 Press OTHER BACKUP 3 Insert USB memory device into the USB port on the controller 4 Press BACKUP 5 Specify the name and storage destination for a backup file Reference...

Страница 288: ...laser marker is written on the area marked by a circle in the figure below Head Standard Model Head Tower Model LP 400 Series LP V LP W Series Controller LP xxxxx SERIAL No xxxxxx LOT No xxxxxx WORK DISTANCE xxx mm Panasonic Industrial Devices SUNX Co Ltd Head Controller Check it on screen Start up the laser marker and press SYSTEM INFO on the Environment Setting screen The serial number is displa...

Страница 289: ...nternal parts to be concerned for disposal No Name Containing materials q CO2 laser oscillator ZnSe zinc selenide w Lens in beam expander e Laser emission port f θ lens WARNING When the lens is broken wear gloves a mask and protective goggles to prevent swallowing or inhaling broken pieces dust or the adherence to the skin Disposal of old equipment and batteries Only for European Union and countri...

Страница 290: ...is method is never described with the replacing method of the battery The customer should call our service representative to replace the battery 1 Remove the side cover of the controller Remove 6 screws of the side cover as shown in the figure below and then slide the cover backward After removing the cover the battery is installed in the position as shown in the right figure below surrounded with...

Страница 291: ...Troubleshooting ME LP400V OP 6 ...

Страница 292: ...ply or supply power from outside Emergency stop input on I O terminal is in OPEN status or safety equipment such as door and switch connected to the Emergency stop input on I O terminal is in OPEN status Check the connection of EMER and EMER for PNP type model OUT COM of I O terminal Restore the original condition of the safety equipment connected to the Emergency stop input Laser is not pumped in...

Страница 293: ...shows nothing Monitor is not turned on Check power to monitor Monitor cable is not connected Check that monitor cable is securely connected to connector VGA OUT on back of controller VGA compatible monitor is not connected Connect a VGA compatible monitor Mouse does not work When the controller is the PS 2 mouse supported type Mouse relay cable is not connected A mouse is plugged directly into mou...

Страница 294: ...utput power of laser marker Applicable marking object is as follows FAYb laser marker LP V LP W series Metal resin excluding transparent and translucent types CO2 laser marker LP 400 series Resin including transparent and translucent types and paper Marking cannot be done The laser radiation indicator does not change to the marking status When the marking mode is TEST The marking mode is RUN Selec...

Страница 295: ...ries only Contact our sales office Fumes occurring during marking hinder laser beam Install dust collector Check that dust collector works well Distance to object is not appropriate Adjust distance between bottom surface of laser maker and target surface of object Target surface of object is inclined Make adjustment so that bottom surface of laser marker head and target surface of object are paral...

Страница 296: ...re are continuous vibrations coming from surrounding equipment such as motor and press Perform vibration prevention measures There are irregular vibrations coming from surrounding equipment such as air cylinder and forklift Start and or stop timing of feeder does not match with marking operation Marking is disturbed at beginning end of marking When disturbed at the beginning of marking Marking tri...

Страница 297: ...tion of conveyor Secure objects to prevent misalignment Marking character pitch is unstable The line speed at the marking position is different from the speed at the installation site of the encoder Place the encoder as close as possible to the marking position Decrease the encoder resolution to block the effect of the line speed fluctuation Note that the minimum value of the encoder pulse should ...

Страница 298: ...RS 232C or Ethernet port They cannot be used at the same time or switched The port selected in the environment setting screen indicates the valid communication port RS 232C is selected at factory shipment Type of connection cable used is in appropriate For RS 232C use a commercially available cross cable A straight cable cannot be used Laser marker has three wire connection Only pins Nos 2 3 and 5...

Страница 299: ... not pumped Internal shutter is closed Open the internal shutter When controlling the shutter by I O signal turn off DIP switch No 2 and turn on terminal SHUTTER in terminal block When controlling the shutter by serial communication turn on DIP switch No 2 and send shutter command SHT To change the DIP setting the switch of the laser marker should be set at power OFF state The changing operation o...

Страница 300: ...or occurs All commands except the following are refused while alarm or error is active When alarm occurred Status Request STS Error code ECR When warning occurred Status Request STS Error code ECR Shutter control SHT for closing motion only Command Reception Permission MKM Only for reception mode ON and reception mode readout Two or more command data are transmitted at the same time After sending ...

Страница 301: ...DE Error details Measures E002 Emergency stop button of controller is pushed Release emergency stop button of controller by turning it in arrow direction E004 Emergency stop occurred on external terminal Check the connection of EMERGENCY STOP or LASER STOP terminal on the I O terminal Check the status of the safety equipment connected to the EMERGENCY STOP or LASER STOP terminals Confirm operation...

Страница 302: ...is an unnecessary short line segment in logo files Set scan speed smaller or 0 to Pre Scan time on Laser Setting E240 E241 The temperature of the laser has reached its limit Check that the ambient temperature is in the specified operating temperature Make sure cooling fan operates When not recovered contact our sales office E250 Detected a decrease in power supply voltage Check and correct the pow...

Страница 303: ... marker When not recovered contact to our sales office E450 to E456 Memory error E700 Unable to lase as laser pumping is turned OFF Confirm that the laser pumping remains on during lasing operation Check wiring and control procedure for the I O terminal block wiring to communication port and the procedure of the communication command Reference When other error not listed in this section was occurr...

Страница 304: ...ed on and then open the internal shutter ERROR CODE Error details Measures E251 Detected a decrease in clock battery voltage Reset present time Contact to our sales office While laser Marker power is on reset Present Time in Environment Setting When the power is off reset Present Time E500 There is not enough free space The file cannot be registered Delete registered file and logo file E501 Cannot...

Страница 305: ...f a start point and a end point of characters or logo data Separate the long segment into short data E620 E621 Flying object area over Can not follow line speed of flying object marking Shorten marking time with the following methods Speed up scan speed Narrow character interval Make characters smaller Reduce numbers of characters Change setting of curve edge Reduce numbers of character lines Disp...

Страница 306: ... is turned OFF Turn ON the laser pumping and after the laser pumping has completed start marking E701 1 Started laser power check in laser pumping OFF state Turn ON the laser pumping and after the laser pumping has completed start power check E800 no message Invalid input of marking trigger while Ready is OFF Change marking timing so that trigger input is performed after marking ready output is tu...

Страница 307: ...f the narrow element basic module larger than that of the line width of the laser E913 No quiet zone in bar code Set the proper value for Quiet Narrow Ratio With the inversion setting set always quiet zone E914 Too small separate pattern or composite row height Adjust the height of one step bar code Specify the proper value for Separation Ptrn H W so that the Separation Pattern Height becomes 0 or...

Страница 308: ...Appendix ME LP400V OP 6 ...

Страница 309: ... A bar or space on a bar code is called an element On CODE39 a character consists of nine elements five bars and four spaces thee wide elements and six narrow elements 4 Check Character Used to check if the read data is correct or not by putting the value calculated with the certain formula modulus 43 on just before the stop character for re calculation 5 Character Gap The space between two adjace...

Страница 310: ...s bars or spaces two elements have the wide width In case the number of data character is odd 0 is added at the head to make it even number 4 Bar Code Height Usually 5 mm or 15 of the symbol width excluding the quiet zone whichever is greater Check Character Used to check if the read data is correct or not by putting the value calculated with the certain formula modulus 10 weight 3 1 on just befor...

Страница 311: ...code set according to the input data 3 Data Character On CODE128 bar code a character consists of 11 modules minimum unit consisting of bars and spaces It has four types of element width from 1 to 4 modules 4 Function Character Entering FNC1 just before the data characters indicates that the code is UCC EAN128 GS1 128 5 Check Character Used to check if the read data is correct or not by putting th...

Страница 312: ...r both start and stop characters 3 Data Character On NW 7 bar code a character consists of seven Narrow and Wide elements four bars and three spaces 4 Check Character Used to check if the read data is correct or not by putting the value calculated with the certain formula modulus 16 on just before the stop character for re calculation 5 Character Gap The space between two adjacent characters In th...

Страница 313: ...width from 1 to 4 modules The data characters are displayed on either side of center bar 4 Check Character Used to check if the read data is correct or not by putting the value calculated with the certain formula modulus 10 weight 3 1 on just before the stop character for re calculation 5 Bar Code Height The nominal bar height is specified as follows EAN 13 UPC A and UPC E symbols 22 85 mm EAN 8 s...

Страница 314: ...In the standard case the minimum value of bar code height is 33 times as high as the module width For Truncated Stacked and Stacked Omnidirectional it is 13 13 and 69 times respectively GS1 DataBar symbols has the three type of version as shown below in addition standard GS1 DataBar Truncated GS1 DataBar Truncated lowers the bar code height of GS1 DataBar to meet the elongated marking field The mi...

Страница 315: ... code height is 69 times as high as the module width Content of code data On GS1 DataBar bar code one digit package indicator is added before the 13 digit common product code EAN The 14 digit product code is called as GTIN Global Trade Item Number It can indicate numerical characters 0 to 9 The data consists of application identifier 01 and 13 figure numerical characters The application identifier...

Страница 316: ...r Has the n k structure n indicates the number of modules and k indicates that of bars and spaces that make up the character This data character is composed with 7 bars and spaces consisting with 26 modules The element is arranged from left to right as shown in the figure above 4 Check Character This check character is composed with 7 bars and spaces consisting with 18 modules and it is set betwee...

Страница 317: ...y recognized It consists of five elements having 15 modules 4 Data Character Has the n k structure n indicates the number of modules and k indicates that of bars and spaces that make up the character As shown in the figure above the data character is arranged so as to facing to the adjacent finder pattern toward the arrow direction 5 Bar Code Height The minimum value of bar code height is 34 times...

Страница 318: ...de It has the size of 7 7 modules The ratio of module width is 1 1 3 1 1 see the figure below When a finder pattern in created with the Font Maker the entire character image is the finder pattern area of QR code 1 1 1 1 3 3 Alignment Pattern The pattern to correct the strain of symbol 4 Timing Pattern The pattern used to acquire the data density 5 Data Area The area where data are coded The black ...

Страница 319: ...vel Maximum data amount Numerical Alpha numerical Binary Kanji 1 21 x 21 L 40 24 17 10 M 33 20 14 8 Q 25 15 11 6 H 16 10 7 4 2 25 x 25 L 81 49 34 20 M 66 40 28 17 Q 52 31 22 13 H 33 20 14 8 3 29 x 29 L 131 79 55 33 M 100 60 42 25 Q 81 49 34 20 H 52 31 22 13 4 33 x 33 L 186 113 78 48 M 138 84 58 35 Q 114 69 48 29 H 76 46 32 19 5 37 x 37 L 253 154 106 65 M 191 116 80 49 Q 157 95 66 40 H 105 63 44 27...

Страница 320: ...35 143 98 60 10 57 x 57 L 255 255 255 167 M 213 131 Q 221 151 93 H 174 119 74 11 61 x 61 L 255 255 255 198 M 251 155 Q 177 109 H 200 137 85 Version Error Correct Level Maximum data amount Numerical Alpha numerical Binary Kanji 12 65 x 65 L 255 255 255 226 M 177 Q 203 125 H 227 155 96 13 69 x 69 L 255 255 255 255 M 204 Q 241 149 H 177 109 14 73 x 73 L 255 255 255 255 M 223 Q 159 H 194 120 15 77 x 7...

Страница 321: ...ttern with black and white modules It provides easy recognition of data modules 3 Border The orientation of DataMatrix can be detected by the alignment pattern with L shaped lines 4 Data Area The area where data are coded The black unit module the minimum unit of code is called as mark module and white as space module When creating mark space module patterns with the Font Maker the entire characte...

Страница 322: ...48 x 48 255 86 28 1 52 x 52 101 29 2 64 x 64 138 28 6 72 x 72 182 28 1 80 x 80 226 29 6 88 x 88 255 28 8 x 18 10 6 1 58 3 8 x 32 20 13 4 52 4 12 x 26 32 22 7 46 7 12 x 36 44 31 10 45 16 x 36 64 46 15 42 9 16 x 48 98 72 23 36 4 1 Though the codes indicated with 255 can contain more than 255 digits based on their standard in the laser marker 255 digits are the max amount of the code data to be input...

Страница 323: ... It is also necessary for the upper side in addition for CC C 2 Start Stop Pattern This pattern shows the start and end of the bar code 3 Data Pattern This pattern has the characters contained in bar code and data for error correction 4 Separator Pattern between a linear bar code and 2D code 5 Linear Bar Code Size of quiet zone and the number of characters to be encoded etc are the same in case of...

Страница 324: ...th LP V LP W series half of the line width initial value Marking Pitch LP 400 series half of the Module width LP V LP W series same value with the line width initial value Marking Quality Adjustment Wait Adjustment 10 This setting item is set automatically when selecting GS1 DataBar CC A CC B Setting Screen Setting Item GS1 DataBar Stacked GS1 DataBar Stacked Omnidirectional Bar Code Condition Bar...

Страница 325: ...it Adjustment 10 This setting item is set automatically when selecting GS1 DataBar Limited CC A CC B Setting Screen Setting Item GS1 DataBar Expanded GS1 DataBar Expanded Stacked Bar Code Condition Bar Code Height 34W Separator Pattern Height W Ratio 1 Quiet W Ratio 1 Inversion Inversion Symbol Character Quantity 4 Guard Available Human Readable Text Available Character Height 6W Character Width 5...

Страница 326: ...g Graphic Applied on AutoCADLT and Corresponding Table for Marking Object using Laser Marker DXF Version Entity Name Graphic Name Applica bility Remarks R12J 3DFACE 3D face N 3DLINE 3D line N ARC Arc Y Converted into segment and output ATTDEF Attribute definition N ATTRIB Attribute N CIRCLE Circle Y Converted into segment and output DIMENSION Dimension N INSERT Insert graphic Y Converted into each...

Страница 327: ...ent REGION Region N SPLINE Free curve Y Converted into segment and output TOLERANCE Geometric tolerance N XLINE Line straight line Y Output with segment R14 Used Express Tools ARCALIGNEDTEXT Character string on arc N RTEXT Reference character string N WIPEOUT Masking graphic N For the applicability of the function Y means applicable and N means not applicable for this laser marker Reference The DX...

Страница 328: ...Index ME LP400V OP 6 ...

Страница 329: ...onnector 54 Console Return Connector 55 Controller 53 Controller Power Cable 45 Copy and Paste 151 Counter 101 155 164 Current Date 91 Curve Adjustment 217 D Data Length 262 Delay Distance 221 Delay Time 219 Delete Media 248 Delete Registration 248 Delimit 262 DIP Switch 56 57 Disposal 289 Dual Pointer 69 136 DXF 326 E EAN UPC 191 Edge Adjustment 217 Emergency Stop Switch 30 54 Encoder 221 222 225...

Страница 330: ...ax Output 20 23 Model 33 Moving direction 220 N New Creation 144 NHZ 20 23 NOHD 20 23 NW 7 191 O Offset 174 Operation Screen 126 Operator Adjustment Screen 129 254 Optional items 35 Outer Dimensional Drawing 40 Output Simulation 267 Overwriting 174 P Package 47 Parity 262 Password 128 255 Point Radiation 212 218 Power Connector 50 51 56 Pre scan Time 218 Present time 258 Processing Condition 207 P...

Страница 331: ...ment 216 Trademark 2 Trigger Selection 221 Trigger Setting 219 Troubleshooting 292 U Update Function Character 253 USB Connector 54 USB Media 241 V VEC 186 VGA Connector 55 W Waiting Time Adjustment 217 Warning 304 Wavelength 20 23 Week Setting 260 Work Image Display 240 X X Y Position 182 ME LP400V OP 6 ...

Страница 332: ...software information to implement the features By using these features you explicitly authorize MS Microsoft Corporation and or their designated agent to use this information solely to improve their products or to provide customized services or technologies to you MS or Microsoft Corporation may disclose this information to others but not in a form that personally identifies you 12 Internet Based ...

Страница 333: ...No 9000 0062 14V ...

Страница 334: ... Panasonic Industrial Devices SUNX Co Ltd 2003 2018 July 2018 9000 0062 14V ...

Отзывы: