


78
screen prompt, alarm upload, email will not be activated again. After 10s, if system detects another
alarm signal, it can generate an alarm since the anti-dither time is out.
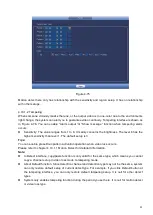
Period: Click setup button, you can see an interface is shown as in Figure 4-75. Here you can set
motion detect period. System only enables motion detect operation in the specified periods. It is not
for video loss or the tampering. There are two ways for you to set periods. Please note system only
supports 6 periods in one day.
Alarm Out: when an alarm occurs, system enables peripheral alarm devices.
Latch: when motion detection complete, system auto delays detecting for a specified time. The value
ranges from 1-300(Unit: second)
Show Message: System can pop up a message to alarm you in the local host screen if you enabled
this function.
Alarm Upload: System can upload the alarm signal to the network (including alarm centre) if you
enabled current function.
Send Email: System can send out email to alert you when an alarm occurs.
Record Channel: System auto activates motion detection channel(s) to record once an alarm occurs.
Please make sure you have set MD record in Schedule interface(Main
Menu->SETTING->SCHEDULE) and schedule record in manual record interface(Main
Menu->ADVANCED->MANUAL RECORD)
PTZ Activation: Here you can set PTZ movement when an alarm occurs. Such as go to preset, tour
&pattern when there is an alarm. Click
“
Setup
”
button, you can see an interface is shown as in
Record Delay: System can delay the record for specified time after alarm ended. The value ranges
from 10s to 300s.
Tour: Here you can enable tour function when alarm occurs. System one-window tour.
Snapshot: You can enable this function to snapshot image when a motion detect alarm occurs.
Buzzer: Highlight the icon to enable this function. The buzzer beeps when alarm occurs.
Please highlight icon
to select the corresponding function. After all the setups please click save
button, system goes back to the previous menu.
Note:
In motion detection mode, you cannot use copy/paste to set channel setup since the video in each
channel may not be the same.
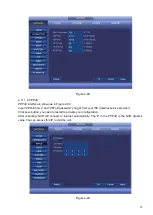
In Figure 4-72, you can left click mouse and then drag it to set a region for motion detection. Click FN to
switch between arm/withdraw motion detection. After setting, click ENTER button to exit.
Содержание k-nl304k
Страница 1: ...Network Disk Recorder User s Manual Model No K NL304K K NL308K K NL316K Version 1 0 5 ...
Страница 32: ...23 The following figure is based on our K NL316K product Figure 3 2 ...
Страница 50: ...41 Figure 4 25 ...
Страница 67: ...58 Figure 4 52 Figure 4 53 ...
Страница 88: ...79 Figure 4 71 Figure 4 72 ...
Страница 89: ...80 Figure 4 73 Figure 4 74 ...
Страница 94: ...85 Figure 4 78 Figure 4 79 ...
Страница 95: ...86 Figure 4 80 Figure 4 81 ...
Страница 96: ...87 Figure 4 82 Figure 4 83 ...
Страница 99: ...90 Figure 4 86 Figure 4 87 ...
Страница 114: ...105 send rate and receive rate at the top panel Figure 4 105 ...
Страница 116: ...107 Figure 4 107 In Figure 4 107 click one HDD item the S M A R T interface is shown as in Figure 4 108 Figure 4 108 ...
Страница 119: ...110 Figure 4 111 Figure 4 112 ...
Страница 129: ...120 Figure 4 125 Figure 4 126 ...
Страница 142: ...133 Figure 5 11 You can click this icon to display or hide the PTZ control platform 3D Intelligent Positioning Key ...
Страница 164: ...155 Figure 5 38 Figure 5 39 Figure 5 40 ...
Страница 172: ...163 Figure 5 51 Figure 5 52 Figure 5 53 Figure 5 54 ...