


94
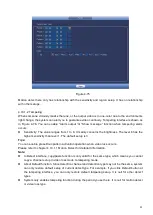
4.11.1.3 DDNS
DDNS setup interface is shown as in Figure 4-91.
You need a PC of fixed IP in the internet and there is the DDNS software running in this PC. In other
words, this PC is a DNS (domain name server).
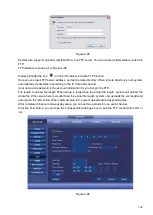
In network DDNS, please select DDNS type and highlight enable item. And them please input your
PPPoE name you get from you IPS and server IP (PC with DDNS). Click save button and then reboot
system.
Click save button, system prompts for rebooting to get all setup activated.
After rebooting, open IE and input as below:
http
:
//(DDNS server IP)/(virtual directory name)/webtest.htm
e.g.: http
:
//10.6.2.85/NVR _DDNS/webtest.htm.)
Now you can open DDNSServer web search page.
Figure 4-91
Please note DDNS type includes: CN99 DDNS, NO-IP DDNS, Quick DDNS, Dyndns DDNS and Private
DDNS. All the DDNS can be valid at the same time, you can select as your requirement.
Private DDNS function shall work with special DDNS server and special software.
Quick DDNS and Client-end Introduction
1) Background Introduction
Device IP is not fixed if you use ADSL to login the network. The DDNS function allows you to access the
NVR via the registered domain name. Besides the general DDNS,
the Quick DDNS works with the device
from the manufacturer so that it can add the extension function.
2) Function Introduction
The quick DDNS client has the same function as other DDNS client end. It realizes the bonding of the
domain name and the IP address. Right now, current DDNS server is for our own devices only. You need
to refresh the bonding relationship of the domain and the IP regularly. There is no user name, password
Содержание k-nl304k
Страница 1: ...Network Disk Recorder User s Manual Model No K NL304K K NL308K K NL316K Version 1 0 5 ...
Страница 32: ...23 The following figure is based on our K NL316K product Figure 3 2 ...
Страница 50: ...41 Figure 4 25 ...
Страница 67: ...58 Figure 4 52 Figure 4 53 ...
Страница 88: ...79 Figure 4 71 Figure 4 72 ...
Страница 89: ...80 Figure 4 73 Figure 4 74 ...
Страница 94: ...85 Figure 4 78 Figure 4 79 ...
Страница 95: ...86 Figure 4 80 Figure 4 81 ...
Страница 96: ...87 Figure 4 82 Figure 4 83 ...
Страница 99: ...90 Figure 4 86 Figure 4 87 ...
Страница 114: ...105 send rate and receive rate at the top panel Figure 4 105 ...
Страница 116: ...107 Figure 4 107 In Figure 4 107 click one HDD item the S M A R T interface is shown as in Figure 4 108 Figure 4 108 ...
Страница 119: ...110 Figure 4 111 Figure 4 112 ...
Страница 129: ...120 Figure 4 125 Figure 4 126 ...
Страница 142: ...133 Figure 5 11 You can click this icon to display or hide the PTZ control platform 3D Intelligent Positioning Key ...
Страница 164: ...155 Figure 5 38 Figure 5 39 Figure 5 40 ...
Страница 172: ...163 Figure 5 51 Figure 5 52 Figure 5 53 Figure 5 54 ...